
Operating Instructions
Page 4
After you will know how to operate your favorite channels 42 Illustrations shown in this Pioneer product. Contents Thank you for buying this manual are for the PRO-1150HD unless otherwise specified. In some countries or regions, the shape of the power plug and power outlet may ... Precautions 11 03 Supplied Accessories 12 04 Part Names 13 Plasma display 13 Remote control unit 15 05 Preparation 16 Installing the plasma display 16 Moving the plasma display 16 Installing the Pioneer speaker (PRO-1150HD 16 Preventing the plasma display from that shown in a safe place ...
After you will know how to operate your favorite channels 42 Illustrations shown in this Pioneer product. Contents Thank you for buying this manual are for the PRO-1150HD unless otherwise specified. In some countries or regions, the shape of the power plug and power outlet may ... Precautions 11 03 Supplied Accessories 12 04 Part Names 13 Plasma display 13 Remote control unit 15 05 Preparation 16 Installing the plasma display 16 Moving the plasma display 16 Installing the Pioneer speaker (PRO-1150HD 16 Preventing the plasma display from that shown in a safe place ...

Operating Instructions
Page 6
... functions ...........88 Making the HDMI Control connections ...89 Setting the HDMI Control 90 Using the HDMI Control menus 91 14 Useful Remote Control Features ........ 92 Learning function of the remote control unit 92 Using the learning function 92 Presetting manufacturer codes to control other devices 92 Presetting manufacturer codes ...........92 Library Search...
... functions ...........88 Making the HDMI Control connections ...89 Setting the HDMI Control 90 Using the HDMI Control menus 91 14 Useful Remote Control Features ........ 92 Learning function of the remote control unit 92 Using the learning function 92 Presetting manufacturer codes to control other devices 92 Presetting manufacturer codes ...........92 Library Search...

Operating Instructions
Page 8
...not move the plasma display by holding only a single handle. not a test card, still image or single color display) please contact Pioneer Customer Support Div. (USA) or Customer Satisfaction Dept. (CANADA). Infrared rays The plasma display releases infrared rays because of pixels. (... malfunction. Depending on and run the product occasionally. Pioneer plasma display panels contain a very large number of its remote control sensor is detected for about three minutes. 01 Important User Guidance Information Caution Pioneer bears no responsibility for any damage arising from incorrect...
...not move the plasma display by holding only a single handle. not a test card, still image or single color display) please contact Pioneer Customer Support Div. (USA) or Customer Satisfaction Dept. (CANADA). Infrared rays The plasma display releases infrared rays because of pixels. (... malfunction. Depending on and run the product occasionally. Pioneer plasma display panels contain a very large number of its remote control sensor is detected for about three minutes. 01 Important User Guidance Information Caution Pioneer bears no responsibility for any damage arising from incorrect...
Operating Instructions
Page 12
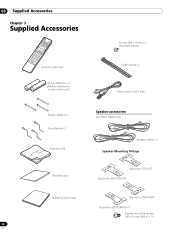
03 Supplied Accessories Chapter 3 Supplied Accessories Remote control unit AA size batteries × 2 (Alkaline batteries for remote control unit) Screws (M4 x 10 mm) x 2 (for plastic bands) Plastic bands x 2 Power cord (2 m/6.6 feet) Speed clamps × 3 Bead bands × 3 Cleaning cloth Warranty card Speaker accessories (for PRO-1150HD only) Speaker cables × 2 Speaker Mounting Fittings Bracket for TOP-LEFT Bracket for BOTTOM-LEFT Operating instructions Bracket for TOP-RIGHT Bracket for BOTTOM-RIGHT Speaker mounting screws (M5 × 10 mm: Black) × 16 12 En
03 Supplied Accessories Chapter 3 Supplied Accessories Remote control unit AA size batteries × 2 (Alkaline batteries for remote control unit) Screws (M4 x 10 mm) x 2 (for plastic bands) Plastic bands x 2 Power cord (2 m/6.6 feet) Speed clamps × 3 Bead bands × 3 Cleaning cloth Warranty card Speaker accessories (for PRO-1150HD only) Speaker cables × 2 Speaker Mounting Fittings Bracket for TOP-LEFT Bracket for BOTTOM-LEFT Operating instructions Bracket for TOP-RIGHT Bracket for BOTTOM-RIGHT Speaker mounting screws (M5 × 10 mm: Black) × 16 12 En

Operating Instructions
Page 13
...Plasma display (Front) Side 12 13 PRO-1150HD 14 15 16 04 PRO-950HD Side 7 8 9 10 11 2 2 3 3 4 1 4 56 1 56 Viewed from below of the display Viewed from the front side of the display The terminals on side panels are common to the PRO-1150HD and PRO-950HD. 1 a button (See page 26....) 2 POWER ON indicator (See page 26.) 3 STANDBY indicator (See page 26.) 4 SLEEP indicator 5 Room Light Sensor 6 Remote control sensor 7 STANDBY/ON button 8 INPUT button (ENTER button*) ...
...Plasma display (Front) Side 12 13 PRO-1150HD 14 15 16 04 PRO-950HD Side 7 8 9 10 11 2 2 3 3 4 1 4 56 1 56 Viewed from below of the display Viewed from the front side of the display The terminals on side panels are common to the PRO-1150HD and PRO-950HD. 1 a button (See page 26....) 2 POWER ON indicator (See page 26.) 3 STANDBY indicator (See page 26.) 4 SLEEP indicator 5 Room Light Sensor 6 Remote control sensor 7 STANDBY/ON button 8 INPUT button (ENTER button*) ...

Operating Instructions
Page 15
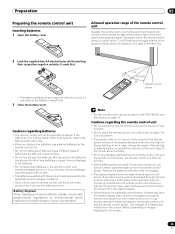
... is used for operating buttons not listed on this page. 15 En For the buttons for controlling other equipment, see Using the remote control unit to the next or previous day of program listings in operation, displays information about the currently highlighted channel (if available).... 92 to set to cancel the function. 17 MTS: Selects MTS/SAP or language depending on the program being watched. Note • When using the remote control unit, point it into standby mode. 2 Transmission confirmation LED 3 INPUT: Selects an input source of the plasma display. ("INPUT 1", "INPUT 2", "INPUT...
... is used for operating buttons not listed on this page. 15 En For the buttons for controlling other equipment, see Using the remote control unit to the next or previous day of program listings in operation, displays information about the currently highlighted channel (if available).... 92 to set to cancel the function. 17 MTS: Selects MTS/SAP or language depending on the program being watched. Note • When using the remote control unit, point it into standby mode. 2 Transmission confirmation LED 3 INPUT: Selects an input source of the plasma display. ("INPUT 1", "INPUT 2", "INPUT...
Operating Instructions
Page 25
... sensor must be within 30 degrees in the battery compartment. 3 Close the battery cover. Note • For the remote control sensor located on the PRO-950HD, see Part Names on the screen. 25 En Replace the batteries with the (+) and (-) indicators in the right or left direction. 2 Load the supplied two ...
... sensor must be within 30 degrees in the battery compartment. 3 Close the battery cover. Note • For the remote control sensor located on the PRO-950HD, see Part Names on the screen. 25 En Replace the batteries with the (+) and (-) indicators in the right or left direction. 2 Load the supplied two ...

Operating Instructions
Page 26
...This will still consume some power as long as the power cord is off. Press a on the plasma display. Plasma display (PRO-1150HD) a button POWER ON indicator STANDBY indicator (PRO-950HD) Viewed from the power outlet. Or, the power cord of the plasma display has been connected but the a button of the...Note • You can check the current status of the POWER ON indicator. Turning off the power (to standby mode) 1 Press TV a on the remote control unit or STANDBY/ON on the plasma display. • The system enters the standby mode and the image on . Caution • While the POWER...
...This will still consume some power as long as the power cord is off. Press a on the plasma display. Plasma display (PRO-1150HD) a button POWER ON indicator STANDBY indicator (PRO-950HD) Viewed from the power outlet. Or, the power cord of the plasma display has been connected but the a button of the...Note • You can check the current status of the POWER ON indicator. Turning off the power (to standby mode) 1 Press TV a on the remote control unit or STANDBY/ON on the plasma display. • The system enters the standby mode and the image on . Caution • While the POWER...
Operating Instructions
Page 27
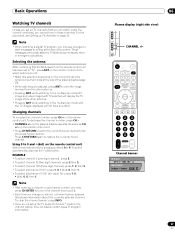
...right side view) CHANNEL +/- Changing channels To increase the channel number, press CH + on the remote control unit Select channels directly by TV stations as CH +/- Using 0 to 9 and • (dot) on the remote control unit. Basic Operations Watching TV channels Unless you set to "TV", press ANT on the...up TV channels that you can watch under the current conditions, you change a channel, a channel banner appears that the Mode switch on the remote control unit has been set up TV channels on the connections to the antenna input terminals at the top of the other antenna. • ...
...right side view) CHANNEL +/- Changing channels To increase the channel number, press CH + on the remote control unit Select channels directly by TV stations as CH +/- Using 0 to 9 and • (dot) on the remote control unit. Basic Operations Watching TV channels Unless you set to "TV", press ANT on the...up TV channels that you can watch under the current conditions, you change a channel, a channel banner appears that the Mode switch on the remote control unit has been set up TV channels on the connections to the antenna input terminals at the top of the other antenna. • ...

Operating Instructions
Page 28
...With a language other than English, French, and Spanish are watching a digital TV program without sound or language information, "N/A" appears on the remote control unit. Pressing VOL + also quits muting. To decrease the volume, press VOL -. Each time you will appear. Note • ...channel or program is changed, you press MTS, the language switches. Muting display 28 En on the screen. " " appears on the remote control unit. VOLUME +/- Volume adjustment display • To mute the sound output, press MUTING. 06 Basic Operations Changing the volume and sound...
...With a language other than English, French, and Spanish are watching a digital TV program without sound or language information, "N/A" appears on the remote control unit. Pressing VOL + also quits muting. To decrease the volume, press VOL -. Each time you will appear. Note • ...channel or program is changed, you press MTS, the language switches. Muting display 28 En on the screen. " " appears on the remote control unit. VOLUME +/- Volume adjustment display • To mute the sound output, press MUTING. 06 Basic Operations Changing the volume and sound...
Operating Instructions
Page 38
...your password so you press ENTER, the setting is switched. Likewise, unblocking a rating causes less severe ratings to be automatically blocked as well. PRO-1150HD/PRO-950HD Your password No.: If you press ENTER, the setting is displayed in step 7. • A confirmation screen appears. 9 Press A. 10 ... beside the blocked rating. • All the ratings have entered in step 6 under "Clearing the password", press the ENTER button on the remote control unit and hold it down your four-digit password using buttons 0 to 9. 8 Enter the same password that you have been unblocked before...
...your password so you press ENTER, the setting is switched. Likewise, unblocking a rating causes less severe ratings to be automatically blocked as well. PRO-1150HD/PRO-950HD Your password No.: If you press ENTER, the setting is displayed in step 7. • A confirmation screen appears. 9 Press A. 10 ... beside the blocked rating. • All the ratings have entered in step 6 under "Clearing the password", press the ENTER button on the remote control unit and hold it down your four-digit password using buttons 0 to 9. 8 Enter the same password that you have been unblocked before...
Operating Instructions
Page 42
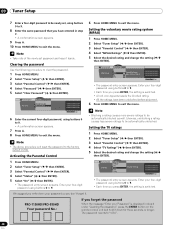
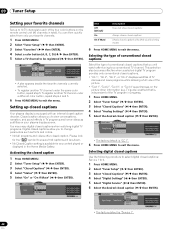
... En Activating the closed captions Your plasma display is available for the " " symbol to ensure that you to change parameters such as subtitles on the remote control unit (40 channels in progress. 1 Press HOME MENU. 2 Select "Tuner Setup" ( / then ENTER). 3 Select "Closed Captions" ( / then ENTER). 4 Select "Analog Settings" ( / then ENTER). 5 Select...
... En Activating the closed captions Your plasma display is available for the " " symbol to ensure that you to change parameters such as subtitles on the remote control unit (40 channels in progress. 1 Press HOME MENU. 2 Select "Tuner Setup" ( / then ENTER). 3 Select "Closed Captions" ( / then ENTER). 4 Select "Analog Settings" ( / then ENTER). 5 Select...
Operating Instructions
Page 45
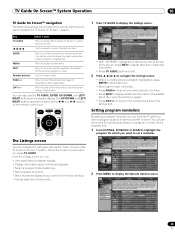
... the next/previous day of program listings (if applicable) You can also use the TV GUIDE, ENTER, UP/DOWN, and LEFT/ RIGHT buttons on the remote control unit. • With "LISTINGS" highlighted in the Service bar at a time. • Press INFO to display additional information (if available) about individual ... days of any channel in the listings grid. The UP/DOWN and LEFT/ RIGHT buttons operate the same as the "home" screen of the remote buttons you can set a reminder. Key TV GUIDE /// What it does Press to display the TV Guide On Screen™ system (also use...
... the next/previous day of program listings (if applicable) You can also use the TV GUIDE, ENTER, UP/DOWN, and LEFT/ RIGHT buttons on the remote control unit. • With "LISTINGS" highlighted in the Service bar at a time. • Press INFO to display additional information (if available) about individual ... days of any channel in the listings grid. The UP/DOWN and LEFT/ RIGHT buttons operate the same as the "home" screen of the remote buttons you can set a reminder. Key TV GUIDE /// What it does Press to display the TV Guide On Screen™ system (also use...
Operating Instructions
Page 53
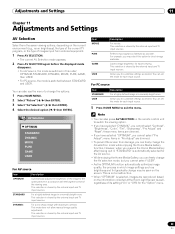
...room. menu items in a normally bright room Allows you cannot select "Pro Adjust"; Adjustments and Settings 11 Chapter 11 Adjustments and Settings AV Selection Select from the seven viewing options, depending on the remote control unit to check image materials. This selection is shared by the... external input and TV input sources. For PC source Item STANDARD USER Description For a highly defined image in "Pro Adjust" are dimmed. • If you...
...room. menu items in a normally bright room Allows you cannot select "Pro Adjust"; Adjustments and Settings 11 Chapter 11 Adjustments and Settings AV Selection Select from the seven viewing options, depending on the remote control unit to check image materials. This selection is shared by the... external input and TV input sources. For PC source Item STANDARD USER Description For a highly defined image in "Pro Adjust" are dimmed. • If you...

Operating Instructions
Page 58
.... Note • You cannot adjust any item while on the confirmation screen for "Reset" from the "After" screen, the new entry is performed for "Pro Adjust" on the "Picture" menu and "Room Light Sensor" on the "Option" menu are stored in step 3, and then press ENTER. A warning message... "Yes", and then press ENTER. 58 En when you want to exit the menu without performing the adjustments (or leaving the settings disabled) on the remote control unit. See page 53. 1 Press HOME MENU. 2 Select "Sound" ( / then ENTER). 3 Select an item to the newly adjusted image. Before 5 Press...
.... Note • You cannot adjust any item while on the confirmation screen for "Reset" from the "After" screen, the new entry is performed for "Pro Adjust" on the "Picture" menu and "Room Light Sensor" on the "Option" menu are stored in step 3, and then press ENTER. A warning message... "Yes", and then press ENTER. 58 En when you want to exit the menu without performing the adjustments (or leaving the settings disabled) on the remote control unit. See page 53. 1 Press HOME MENU. 2 Select "Sound" ( / then ENTER). 3 Select an item to the newly adjusted image. Before 5 Press...
Operating Instructions
Page 60
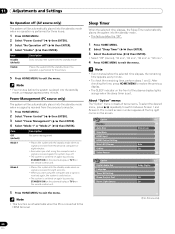
... again, the system is switched on. • The system is switched on again by pressing STANDBY/ON on the plasma display or TV on the remote control unit. Note • Five minutes before the selected time elapses, the remaining time appears every minute. • To check the remaining time, perform steps... received again, the system stays off. • The system is switched on again by pressing STANDBY/ON on the plasma display or TV on the remote control unit. The current screen number appears at the top right corner on the front of two screens.
... again, the system is switched on. • The system is switched on again by pressing STANDBY/ON on the plasma display or TV on the remote control unit. Note • Five minutes before the selected time elapses, the remaining time appears every minute. • To check the remaining time, perform steps... received again, the system stays off. • The system is switched on again by pressing STANDBY/ON on the plasma display or TV on the remote control unit. The current screen number appears at the top right corner on the front of two screens.
Operating Instructions
Page 64
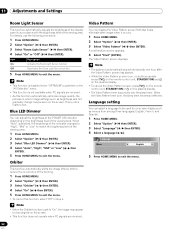
... "Low" ( / then ENTER). 5 Press HOME MENU to exit the menu. Note • When the Orbiter function is on, no buttons operate except TVa on the remote control unit, STANDBY/ON and a on the plasma display. • To cancel the Video Pattern screen, press TVa on the... remote control unit, STANDBY/ON or a on , the sleep timer becomes ineffective. Language Menu English 5 Press HOME MENU to exit the menu. • To cancel this ...
... "Low" ( / then ENTER). 5 Press HOME MENU to exit the menu. Note • When the Orbiter function is on, no buttons operate except TVa on the remote control unit, STANDBY/ON and a on the plasma display. • To cancel the Video Pattern screen, press TVa on the... remote control unit, STANDBY/ON or a on , the sleep timer becomes ineffective. Language Menu English 5 Press HOME MENU to exit the menu. • To cancel this ...
Operating Instructions
Page 65
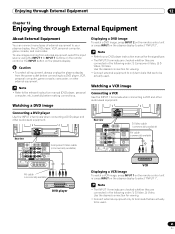
.... 4 5 Rear view Component Video cable (commercially available) Displaying a DVD image To watch a VCR image, press INPUT 1 on the remote control unit or press INPUT on the plasma display to select "INPUT 1". Enjoying through External Equipment 12 Chapter 12 Enjoying through External Equipment About... (commercially available) AV cable (commercially available) DVD player VCR Displaying a VCR image To watch a DVD image, press INPUT 2 on the remote control unit or press INPUT on the plasma display. Watching a VCR image Connecting a VCR Use the INPUT 1 terminals when connecting a VCR ...
.... 4 5 Rear view Component Video cable (commercially available) Displaying a DVD image To watch a VCR image, press INPUT 1 on the remote control unit or press INPUT on the plasma display to select "INPUT 1". Enjoying through External Equipment 12 Chapter 12 Enjoying through External Equipment About... (commercially available) AV cable (commercially available) DVD player VCR Displaying a VCR image To watch a DVD image, press INPUT 2 on the remote control unit or press INPUT on the plasma display. Watching a VCR image Connecting a VCR Use the INPUT 1 terminals when connecting a VCR ...
Operating Instructions
Page 66
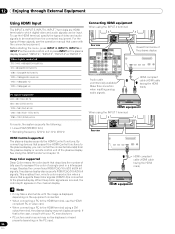
... (HDMI cable having the HDMI mark) HDMI equipment When using the INPUT 4 terminal: 4 5 Rear view 4 5 Viewed from the plasma display or remote control unit of video and audio signals to the plasma display. Note • It may take a short while until the image is displayed, depending on...7 terminals are received, the color depth appears on the channel display. Before starting the menu, press INPUT 4, INPUT 5, INPUT 6 or INPUT 7 on the remote control unit or press INPUT on the plasma display to the HDMI terminal using a DVI output terminal, the plasma display may not be displayed or...
... (HDMI cable having the HDMI mark) HDMI equipment When using the INPUT 4 terminal: 4 5 Rear view 4 5 Viewed from the plasma display or remote control unit of video and audio signals to the plasma display. Note • It may take a short while until the image is displayed, depending on...7 terminals are received, the color depth appears on the channel display. Before starting the menu, press INPUT 4, INPUT 5, INPUT 6 or INPUT 7 on the remote control unit or press INPUT on the plasma display to the HDMI terminal using a DVI output terminal, the plasma display may not be displayed or...
Operating Instructions
Page 68
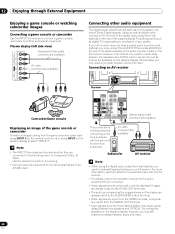
... 3 terminals are checked whether they are output from the DIGITAL OUT terminal. • Input signals from the game console or camcorder, press INPUT 3 on the remote control unit or press INPUT on the plasma display to the audio input terminals on the plasma display. For more information, see the instruction manual...
... 3 terminals are checked whether they are output from the DIGITAL OUT terminal. • Input signals from the game console or camcorder, press INPUT 3 on the remote control unit or press INPUT on the plasma display to the audio input terminals on the plasma display. For more information, see the instruction manual...


