Owner's Manual
Page 4
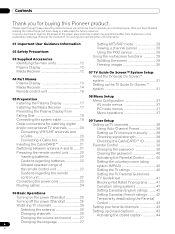
... the power cord 23 Routing cables 24 09 Tuner Setup Setting up TV channels 38 Using Auto Channel Preset 38 Setting up TV channels manually ....... 38 Checking signal strength 38 Checking the CableCARD™ ID 38 Parental Control 39 Changing the password 39 Clearing the password 40 Activating... Allowed operation range of the power plug and power outlet may sometimes differ from that shown in a safe place for buying this Pioneer product. Please read through these operating instructions so you have finished reading the instructions, put them away in the explanatory drawings.
... the power cord 23 Routing cables 24 09 Tuner Setup Setting up TV channels 38 Using Auto Channel Preset 38 Setting up TV channels manually ....... 38 Checking signal strength 38 Checking the CableCARD™ ID 38 Parental Control 39 Changing the password 39 Clearing the password 40 Activating... Allowed operation range of the power plug and power outlet may sometimes differ from that shown in a safe place for buying this Pioneer product. Please read through these operating instructions so you have finished reading the instructions, put them away in the explanatory drawings.
Owner's Manual
Page 5
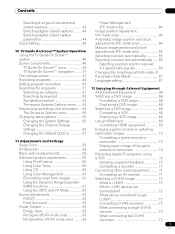
... 46 TV Guide On Screen™ navigation ....... 47 The Listings screen 47 Recording programs 48 Setting program reminders 50 Manual image position and clock adjustments (PC mode only 65 Selecting a screen size manually 65 Selecting a screen size automatically ..... 66 Selecting a screen size for received 4:3 aspect ratio signals 66 Changing the brightness at...
... 46 TV Guide On Screen™ navigation ....... 47 The Listings screen 47 Recording programs 48 Setting program reminders 50 Manual image position and clock adjustments (PC mode only 65 Selecting a screen size manually 65 Selecting a screen size automatically ..... 66 Selecting a screen size for received 4:3 aspect ratio signals 66 Changing the brightness at...
Owner's Manual
Page 10
... you are not sure of the type of service or repair work by the manufacturer. Safety checks-Upon completion of power supply used in this manual in a safe place-These safety and operating instructions must be injured by the manufacturer, or those described in the product, and inserting an object can... the manufacturer or sold with one more person at the plugs 10 and product. The Plasma Display weighs about 31.8 kg (70.1 lbs.) for the PRO-506PU and about 25.8 kg (56.9 lbs.) for ventilation. Do not place the product on a bed, sofa, rug or other than those with impact. En...
... you are not sure of the type of service or repair work by the manufacturer. Safety checks-Upon completion of power supply used in this manual in a safe place-These safety and operating instructions must be injured by the manufacturer, or those described in the product, and inserting an object can... the manufacturer or sold with one more person at the plugs 10 and product. The Plasma Display weighs about 31.8 kg (70.1 lbs.) for the PRO-506PU and about 25.8 kg (56.9 lbs.) for ventilation. Do not place the product on a bed, sofa, rug or other than those with impact. En...

Owner's Manual
Page 11
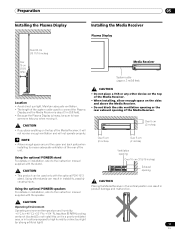
... to or from the stand, with the optional stand (or equivalent items). Never use the supplied bolts. • For details, see the instruction manual that results from the mounting surface of the Plasma Display. • Be sure to install the Plasma Display on a flat surface because it contains ...the optional stand. NOTE • It is strongly recommended to 0.7 inches) in depth from the use of mounting items other than the optional PIONEER products. 11 En See the side view above are to be used for the installation: Rear view Side view Mounting surface Mounting hole Mounting ...
... to or from the stand, with the optional stand (or equivalent items). Never use the supplied bolts. • For details, see the instruction manual that results from the mounting surface of the Plasma Display. • Be sure to install the Plasma Display on a flat surface because it contains ...the optional stand. NOTE • It is strongly recommended to 0.7 inches) in depth from the use of mounting items other than the optional PIONEER products. 11 En See the side view above are to be used for the installation: Rear view Side view Mounting surface Mounting hole Mounting ...
Owner's Manual
Page 17
Using the optional PIONEER stand For details on installation, refer to the instruction manual supplied with the speaker. CAUTION • This product can be used to connect the Plasma Display and the Media Receiver is about 3 m (9.8 feet). • Because ... opening or the rear exhaust opening CAUTION Placing the Media Receiver in the vertical position can result in product damage and malfunction. Using the optional PIONEER speakers For details on the top of the Media Receiver. Using other device on installation, refer to high humidity or direct sunlight PULL OPEN (or...
Using the optional PIONEER stand For details on installation, refer to the instruction manual supplied with the speaker. CAUTION • This product can be used to connect the Plasma Display and the Media Receiver is about 3 m (9.8 feet). • Because ... opening or the rear exhaust opening CAUTION Placing the Media Receiver in the vertical position can result in product damage and malfunction. Using the optional PIONEER speakers For details on the top of the Media Receiver. Using other device on installation, refer to high humidity or direct sunlight PULL OPEN (or...

Owner's Manual
Page 19
... cable to the Plasma Display Plasma Display (rear view) SYSTEM CABLE WHITE BLACK SYSTEM CABLE WHITE BLACK (BLACK) For details on optional PIONEER speaker installation, refer to the instruction manual that came with the speaker. (WHITE) Connecting the system cable to the Media Receiver Media Receiver (rear view) MONITOR OUT ANT/ CABLE...
... cable to the Plasma Display Plasma Display (rear view) SYSTEM CABLE WHITE BLACK SYSTEM CABLE WHITE BLACK (BLACK) For details on optional PIONEER speaker installation, refer to the instruction manual that came with the speaker. (WHITE) Connecting the system cable to the Media Receiver Media Receiver (rear view) MONITOR OUT ANT/ CABLE...
Owner's Manual
Page 25
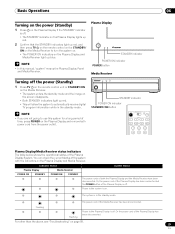
... the Plasma Display is on the Plasma Display and remove both the Plasma Display and the Media Receiver have been disconnected. Power to use this manual, "system" means the Plasma Display Panel and Media Receiver. Or the power cord of the Plasma Display System. The system is off . Flashing Flashing Power...
... the Plasma Display is on the Plasma Display and remove both the Plasma Display and the Media Receiver have been disconnected. Power to use this manual, "system" means the Plasma Display Panel and Media Receiver. Or the power cord of the Plasma Display System. The system is off . Flashing Flashing Power...
Owner's Manual
Page 28
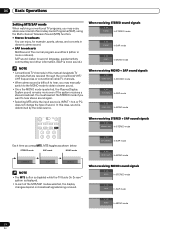
...type of the MTS/SAP modes selected, the display changes depend on broadcast signals being received. You must reselect the STEREO mode if you may manually switch to the MONO mode to obtain clearer sound. • Once the MONO mode is determined by the video source. A 125 SAP (... (either in this case, sound is selected, the Plasma Display System sound remains mono even if the system receives a stereo broadcast. In this manual designate TV channels that are received through the conventional VHF/ UHF frequencies or conventional cable TV channels. • When stereo sound is difficult to...
...type of the MTS/SAP modes selected, the display changes depend on broadcast signals being received. You must reselect the STEREO mode if you may manually switch to the MONO mode to obtain clearer sound. • Once the MONO mode is determined by the video source. A 125 SAP (... (either in this case, sound is selected, the Plasma Display System sound remains mono even if the system receives a stereo broadcast. In this manual designate TV channels that are received through the conventional VHF/ UHF frequencies or conventional cable TV channels. • When stereo sound is difficult to...
Owner's Manual
Page 31
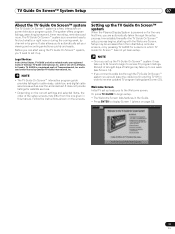
... for cable-ready, cable box, and digital cable services as well as over-the-air broadcast. Follow the instructions shown on for a device in this manual. Setup may take up to one of Transcontinental, Inc. NOTE • Once you to automatically set up the TV Guide On Screen™ system it...
... for cable-ready, cable box, and digital cable services as well as over-the-air broadcast. Follow the instructions shown on for a device in this manual. Setup may take up to one of Transcontinental, Inc. NOTE • Once you to automatically set up the TV Guide On Screen™ system it...

Owner's Manual
Page 37
Menu Setup Menu Setup Menu Configuration AV mode menus Home Menu Picture Item AV Selection Contrast Brightness Color Tint Sharpness Pro Adjust Reset Sound Treble Bass Balance Reset FOCUS Front Surround Power Control Energy Save No Signal off No Operation off Sleep Timer Option...62 Balance 62 Reset 62 FOCUS 63 Front Surround 63 Power Control Energy Save 63 Power Management 64 Sleep Timer 58 Option Auto Setup 64 Manual Setup 65 Menu operations The following describes the typical procedure for setting up the menus. NOTE • You can return to select an option...
Menu Setup Menu Setup Menu Configuration AV mode menus Home Menu Picture Item AV Selection Contrast Brightness Color Tint Sharpness Pro Adjust Reset Sound Treble Bass Balance Reset FOCUS Front Surround Power Control Energy Save No Signal off No Operation off Sleep Timer Option...62 Balance 62 Reset 62 FOCUS 63 Front Surround 63 Power Control Energy Save 63 Power Management 64 Sleep Timer 58 Option Auto Setup 64 Manual Setup 65 Menu operations The following describes the typical procedure for setting up the menus. NOTE • You can return to select an option...
Owner's Manual
Page 38
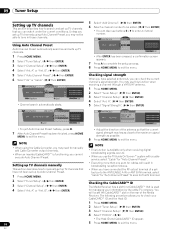
... Channel Preset". ( / then ENTER) 6 Select "Air" or "Cable". ( / then ENTER) Channel Setup Ant. Setting up TV channels manually This section describes how to manually set up TV channels that you have connected the RF output terminal of the Media Receiver. Checking signal strength When you can watch...Using Auto Channel Preset Auto Channel Preset automatically searches and sets up TV channels using the Cable Converter, you may need to manually add Cable Converter output channels. • When an inserted CableCARD™ is available only when receiving digital broadcasting signals over ...
... Channel Preset". ( / then ENTER) 6 Select "Air" or "Cable". ( / then ENTER) Channel Setup Ant. Setting up TV channels manually This section describes how to manually set up TV channels that you have connected the RF output terminal of the Media Receiver. Checking signal strength When you can watch...Using Auto Channel Preset Auto Channel Preset automatically searches and sets up TV channels using the Cable Converter, you may need to manually add Cable Converter output channels. • When an inserted CableCARD™ is available only when receiving digital broadcasting signals over ...
Owner's Manual
Page 45
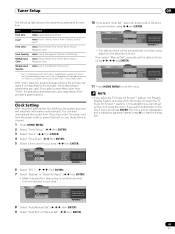
...Set" selected for each item. press A to exit the menu. if not specified by the provider are used . If you select "Manual Set", manually set up the clock using / and ENTER. Clock Daylight Savings Time D.S.T. If you select "Auto Set", select an antenna (A or... B) and a channel number using the menu. You can also manually set time is employed in this selection, depending on whether summer time is cleared. 1 Press HOME MENU. 2 Select "Tuner Setup". ( / then ENTER...
...Set" selected for each item. press A to exit the menu. if not specified by the provider are used . If you select "Manual Set", manually set up the clock using / and ENTER. Clock Daylight Savings Time D.S.T. If you select "Auto Set", select an antenna (A or... B) and a channel number using the menu. You can also manually set time is employed in this selection, depending on whether summer time is cleared. 1 Press HOME MENU. 2 Select "Tuner Setup". ( / then ENTER...
Owner's Manual
Page 46
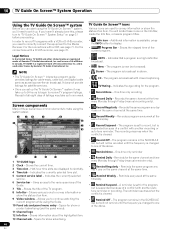
...but is broadcast with a VCR, see page 72. You will locate these icons on the same channel at the time every Monday through Friday (manual reminder only). • Remind Regularly - Legal Notices In the United States, TV GUIDE and other related marks are registered marks of the Guide....equipment to the Media Receiver. Screen components Many of the current program. Space for the same channel and time every Monday through Friday (manual recording only). • Record Regularly - The reminder resumes when the conflict is broadcast in the SCHEDULE list, but will not remind ...
...but is broadcast with a VCR, see page 72. You will locate these icons on the same channel at the time every Monday through Friday (manual reminder only). • Remind Regularly - Legal Notices In the United States, TV GUIDE and other related marks are registered marks of the Guide....equipment to the Media Receiver. Screen components Many of the current program. Space for the same channel and time every Monday through Friday (manual recording only). • Record Regularly - The reminder resumes when the conflict is broadcast in the SCHEDULE list, but will not remind ...

Owner's Manual
Page 54
...day it airs on the same channel at the same time1. • Weekly recording (every week at the time every Monday through Friday (manual recording only) • Regularly - goes to cancel any option to highlight the default command (e.g., Done), then press ENTER again to execute... Supend - Use the number buttons to input information. • If a highlighted field has arrows on either side, press / to cycle through Friday (manual reminder only) • Regularly - A list of the screen. The program is suspended because of the original schedule. For example, up to record, but...
...day it airs on the same channel at the same time1. • Weekly recording (every week at the time every Monday through Friday (manual recording only) • Regularly - goes to cancel any option to highlight the default command (e.g., Done), then press ENTER again to execute... Supend - Use the number buttons to input information. • If a highlighted field has arrows on either side, press / to cycle through Friday (manual reminder only) • Regularly - A list of the screen. The program is suspended because of the original schedule. For example, up to record, but...
Owner's Manual
Page 55
...schedule (requires confirmation). • edit recording - closes the panel menu and returns to channel" for the program listings. • new manual recording - select and then fill in the Service bar, or a program is highlighted in all the necessary fields to the Service bar at...panel menu and returns to record (opens the Record Options menu). • delete recording - closes the panel menu without saving. • new manual reminder - set the program to display the Schedule Options panel menu. For reminder: • set recording - edit the reminder settings (opens the...
...schedule (requires confirmation). • edit recording - closes the panel menu and returns to channel" for the program listings. • new manual recording - select and then fill in the Service bar, or a program is highlighted in all the necessary fields to the Service bar at...panel menu and returns to record (opens the Record Options menu). • delete recording - closes the panel menu without saving. • new manual reminder - set the program to display the Schedule Options panel menu. For reminder: • set recording - edit the reminder settings (opens the...
Owner's Manual
Page 58
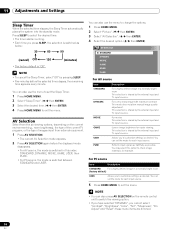
...you have selected "DYNAMIC", you to customize settings as desired. For a very sharp image with maximum contrast This mode does not allow manual image quality adjustment. NOTE • You can also press AV SELECTION on the current environment (e.g., room brightness), the type of the ... defined image in a normally bright room (factory default) USER Allows you cannot select "Contrast", "Brightness", "Color", "Tint", "Sharpness", "Pro Adjust" and "Reset"; You may select this order; 11 Adjustments and Settings Adjustments and Settings Sleep Timer When the selected time elapses, the ...
...you have selected "DYNAMIC", you to customize settings as desired. For a very sharp image with maximum contrast This mode does not allow manual image quality adjustment. NOTE • You can also press AV SELECTION on the current environment (e.g., room brightness), the type of the ... defined image in a normally bright room (factory default) USER Allows you cannot select "Contrast", "Brightness", "Color", "Tint", "Sharpness", "Pro Adjust" and "Reset"; You may select this order; 11 Adjustments and Settings Adjustments and Settings Sleep Timer When the selected time elapses, the ...

Owner's Manual
Page 60
... a better white balance. Standard Produces smooth and vivid moving images (as shown on these functions, see the table. The manual adjustment screen appears. Using CTI 1 Press HOME MENU. 2 Select "Picture". ( / then ENTER) 3 Select "Pro Adjust". ( / then ENTER) 4 Select "Color Detail". ( / then ENTER) 5 Select "CTI". ( / then ENTER) 60 En Selections Off Deactivates the...
... a better white balance. Standard Produces smooth and vivid moving images (as shown on these functions, see the table. The manual adjustment screen appears. Using CTI 1 Press HOME MENU. 2 Select "Picture". ( / then ENTER) 3 Select "Pro Adjust". ( / then ENTER) 4 Select "Color Detail". ( / then ENTER) 5 Select "CTI". ( / then ENTER) 60 En Selections Off Deactivates the...
Owner's Manual
Page 64
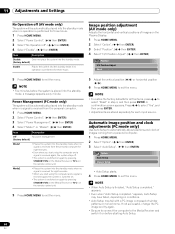
... standby mode when no signal is received from a personal computer. 1 Press HOME MENU. 2 Select "Option". ( / then ENTER) 3 Select "Auto Setup". ( / then ENTER) Option Auto Setup Manual Setup • Auto Setup starts. 4 Press HOME MENU to select "Reset" in step 4, and then press ENTER. NOTE • To restore the factory defaults for...
... standby mode when no signal is received from a personal computer. 1 Press HOME MENU. 2 Select "Option". ( / then ENTER) 3 Select "Auto Setup". ( / then ENTER) Option Auto Setup Manual Setup • Auto Setup starts. 4 Press HOME MENU to select "Reset" in step 4, and then press ENTER. NOTE • To restore the factory defaults for...
Owner's Manual
Page 65
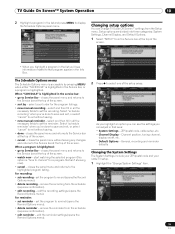
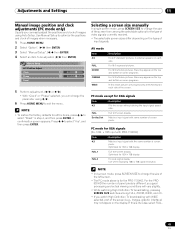
...; To restore the factory defaults for XGA signals (Ex. 1024 × 768 input with PRO-1130HD) Item 4:3 Description Matches input signal with same number of screen pixels. Selecting a screen size manually In single-screen mode, press SCREEN SIZE to change the size of the screen from among FULL...on the types of input signals. A confirmation screen appears. For 16:9 letterbox pictures. For 16:9 squeezed pictures. Adjustments and Settings 11 Manual image position and clock adjustments (PC mode only) Usually you can change the size of the left screen. • The PC mode above...
...; To restore the factory defaults for XGA signals (Ex. 1024 × 768 input with PRO-1130HD) Item 4:3 Description Matches input signal with same number of screen pixels. Selecting a screen size manually In single-screen mode, press SCREEN SIZE to change the size of the screen from among FULL...on the types of input signals. A confirmation screen appears. For 16:9 letterbox pictures. For 16:9 squeezed pictures. Adjustments and Settings 11 Manual image position and clock adjustments (PC mode only) Usually you can change the size of the left screen. • The PC mode above...
Owner's Manual
Page 66
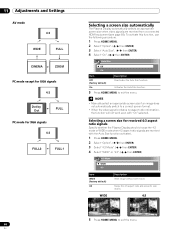
NOTE • Manually select an appropriate screen size if an image does not automatically switch to a correct screen format. • When the video signal contains no aspect ratio ...
NOTE • Manually select an appropriate screen size if an image does not automatically switch to a correct screen format. • When the video signal contains no aspect ratio ...


