

Owner's Manual
Page 4
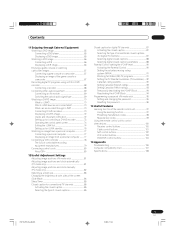
Please read through these operating instructions so you for buying this Pioneer product. In some countries or regions, the shape of the power plug and power outlet may sometimes differ from that shown in a safe place for ... the EPG 59 Using auto channel select 59 Recording TV programs using a D-VHS recorder ...... 60 Recording TV programs via a VCR controller 61 Setting the timer manually 62 Priority rules for overlapped presettings 63 Changing/ canceling TV program presettings 64 Using the EPG 64 Using the menu 64 Changing the volume and...
Please read through these operating instructions so you for buying this Pioneer product. In some countries or regions, the shape of the power plug and power outlet may sometimes differ from that shown in a safe place for ... the EPG 59 Using auto channel select 59 Recording TV programs using a D-VHS recorder ...... 60 Recording TV programs via a VCR controller 61 Setting the timer manually 62 Priority rules for overlapped presettings 63 Changing/ canceling TV program presettings 64 Using the EPG 64 Using the menu 64 Changing the volume and...
Owner's Manual
Page 5
... Useful Adjustment Settings Adjusting image positions (AV mode only 81 Adjusting image positions and clock automatically (PC mode only 81 Adjusting image positions and clock manually (PC mode only 82 Selecting a screen size 83 Changing the brightness at both sides of the screen (Side Mask 84 Sleep Timer 85 Closed caption...
... Useful Adjustment Settings Adjusting image positions (AV mode only 81 Adjusting image positions and clock automatically (PC mode only 81 Adjusting image positions and clock manually (PC mode only 82 Selecting a screen size 83 Changing the brightness at both sides of the screen (Side Mask 84 Sleep Timer 85 Closed caption...

Owner's Manual
Page 8
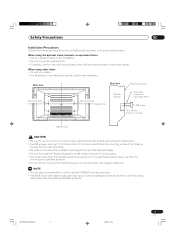
...since they can result in fire or personal injury. cause overheating and/or shorten the life of the front protection panel changes, resulting in this manual in fire, electric shock and/or other than those with impact. Never expose the screen of time. broken, resulting in accidents. 7. Check...perform many useful functions, but it can ing products (including amplifiers). 22. The Plasma Display weighs about 38 kg (83.8 lbs.) for the PRO-504PU and about 30.5 kg (67.3 lbs.) for built-in case the plasma Display breaks. 14. Keep this product is made of unauthorized parts...
...since they can result in fire or personal injury. cause overheating and/or shorten the life of the front protection panel changes, resulting in this manual in fire, electric shock and/or other than those with impact. Never expose the screen of time. broken, resulting in accidents. 7. Check...perform many useful functions, but it can ing products (including amplifiers). 22. The Plasma Display weighs about 38 kg (83.8 lbs.) for the PRO-504PU and about 30.5 kg (67.3 lbs.) for built-in case the plasma Display breaks. 14. Keep this product is made of unauthorized parts...
Owner's Manual
Page 9
... lines. • Use M8 screws, which go 12 to 18 mm (0.5 to use the supplied bolts. • For details, see the instruction manual that results from the use of mounting items other items • Consult your dealer to perform the installation. • Be sure to 0.7 inches) ... • Be sure to install the Plasma Displayed on a flat surface because it contains glass. • The screw holes other than the optional PIONEER products. When using the optional stand, brackets, or equivalent items • Ask your dealer. • The following precautions when installing with the optional ...
... lines. • Use M8 screws, which go 12 to 18 mm (0.5 to use the supplied bolts. • For details, see the instruction manual that results from the use of mounting items other items • Consult your dealer to perform the installation. • Be sure to 0.7 inches) ... • Be sure to install the Plasma Displayed on a flat surface because it contains glass. • The screw holes other than the optional PIONEER products. When using the optional stand, brackets, or equivalent items • Ask your dealer. • The following precautions when installing with the optional ...
Owner's Manual
Page 17
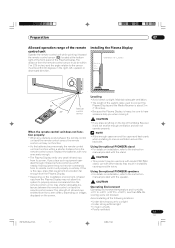
...func- Replace the batteries with other stands may not receive commands from its remote control unit properly or entirely. Using the optional PIONEER stand • For details on the top of the system cable used only with model PDK-TS04 stand, use with new ... (276 inches) Remote 30º control sensor Locating • Avoid direct sunlight. If you place anything on installation, refer to the instruction manual provided with the stand. • The Plasma Display emits very weak infrared rays from its screen. The strength of the Plasma Display. Using the...
...func- Replace the batteries with other stands may not receive commands from its remote control unit properly or entirely. Using the optional PIONEER stand • For details on the top of the system cable used only with model PDK-TS04 stand, use with new ... (276 inches) Remote 30º control sensor Locating • Avoid direct sunlight. If you place anything on installation, refer to the instruction manual provided with the stand. • The Plasma Display emits very weak infrared rays from its screen. The strength of the Plasma Display. Using the...

Owner's Manual
Page 20
System cable Connecting the system cable to the speaker instruction manual provided. TO PREVENT THE RISK OF ELECTRIC SHOCK, DO NOT TOUCH UNINSULATED PARTS BEFORE DISCONNECTING THE POWER CORD. 20 En PDP-ELITE-Eng (17-27) ..., 11:44 07 Preparation Setting the system Connecting the system cable to the Plasma Display Plasma Display (rear view) (WHITE) (BLACK) For details on optional PIONEER speaker installation, refer to the Media Receiver Media Receiver (rear view) SERVICE ONLY IN OUT CONTROL VCR CONTROL IN OUT IN OUT S-VIDEO DIGITAL OUT...
System cable Connecting the system cable to the speaker instruction manual provided. TO PREVENT THE RISK OF ELECTRIC SHOCK, DO NOT TOUCH UNINSULATED PARTS BEFORE DISCONNECTING THE POWER CORD. 20 En PDP-ELITE-Eng (17-27) ..., 11:44 07 Preparation Setting the system Connecting the system cable to the Plasma Display Plasma Display (rear view) (WHITE) (BLACK) For details on optional PIONEER speaker installation, refer to the Media Receiver Media Receiver (rear view) SERVICE ONLY IN OUT CONTROL VCR CONTROL IN OUT IN OUT S-VIDEO DIGITAL OUT...

Owner's Manual
Page 28
Media Receiver STANDBY indicator POWER ON indicator POWER button • In this manual, "system" means the Plasma Display Panel and Media Receiver. • You can also reverse steps 1 and 2. 28 En PDP-ELITE-Eng (28-37) 28 9/9/03, ...
Media Receiver STANDBY indicator POWER ON indicator POWER button • In this manual, "system" means the Plasma Display Panel and Media Receiver. • You can also reverse steps 1 and 2. 28 En PDP-ELITE-Eng (28-37) 28 9/9/03, ...

Owner's Manual
Page 30
... Media Receiver (pages 24 to 26). on the remote control unit Select channels directly by 5. • After entering a channel number, you cannot tune in this manual designate TV channels that the Mode switch on the remote control unit has been set up conventional TV channels" on the remote control unit Press...
... Media Receiver (pages 24 to 26). on the remote control unit Select channels directly by 5. • After entering a channel number, you cannot tune in this manual designate TV channels that the Mode switch on the remote control unit has been set up conventional TV channels" on the remote control unit Press...

Owner's Manual
Page 32
The SAP feature allows a TV station to hear stereo sound again. • Selecting MTS while the input source is determined by manually switching to 4 or PC does not change the type of sound. STEREO mode SAP mode MONO mode STEREO SAP MONO • In each of the ...
The SAP feature allows a TV station to hear stereo sound again. • Selecting MTS while the input source is determined by manually switching to 4 or PC does not change the type of sound. STEREO mode SAP mode MONO mode STEREO SAP MONO • In each of the ...
Owner's Manual
Page 38
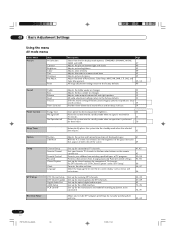
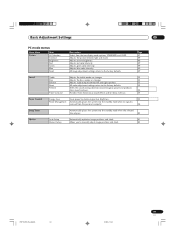
... Provides three-dimensional sound effects and/or deep, rich bass. 54 Power Control Energy Save No Signal off No Operation off Saves power by manually specifying date and time. 62-64 38 En PDP-ELITE-Eng (38-39) 38 9/9/03, 11:44 Adjusts picture sharpness. Page 47 49...more natural tone. 09 Basic Adjustment Settings Using the menu AV mode menus Home Menu Picture Item AV Selection Contrast Brightness Color Tint Sharpness Pro Adjust Reset Description Select from changing especially Parental Control settings. Adjusts the levels of recording equipment to be connected. 44-45 87-89 ...
... Provides three-dimensional sound effects and/or deep, rich bass. 54 Power Control Energy Save No Signal off No Operation off Saves power by manually specifying date and time. 62-64 38 En PDP-ELITE-Eng (38-39) 38 9/9/03, 11:44 Adjusts picture sharpness. Page 47 49...more natural tone. 09 Basic Adjustment Settings Using the menu AV mode menus Home Menu Picture Item AV Selection Contrast Brightness Color Tint Sharpness Pro Adjust Reset Description Select from changing especially Parental Control settings. Adjusts the levels of recording equipment to be connected. 44-45 87-89 ...
Owner's Manual
Page 39
... Management Automatically places the system into the standby mode when the selected time elapses. 85 Option Auto Setup Automatically optimizes image positions and clock. 81 Manual Setup Allows you to the factory defaults. Adjusts red color intensity. Page 47 49 49 49 49 49 49 Sound Treble Bass Balance Reset FOCUS... Automatically places the system into the standby mode when no signal is received from the two display mode options; All image adjustment settings return to manually adjust image positions and clock. 82 PDP-ELITE-Eng (38-39) 39 39 En 9/9/03, 11:44
... Management Automatically places the system into the standby mode when the selected time elapses. 85 Option Auto Setup Automatically optimizes image positions and clock. 81 Manual Setup Allows you to the factory defaults. Adjusts red color intensity. Page 47 49 49 49 49 49 49 Sound Treble Bass Balance Reset FOCUS... Automatically places the system into the standby mode when no signal is received from the two display mode options; All image adjustment settings return to manually adjust image positions and clock. 82 PDP-ELITE-Eng (38-39) 39 39 En 9/9/03, 11:44

Owner's Manual
Page 41
...Channel search automatically starts. Auto Channel Preset Antenna A Air/Cable Air Preset • Conventional TV channels in those channels. 7 Press / to manually add Cable Converter output channels. Auto Channel Preset Antenna A Air/Cable Air Preset • When using Auto channel Preset, you may not ...be able to tune in this manual designate TV channels that you can watch under the current conditions. Start 6 Press / to select "Air/Cable", and then press / ...
...Channel search automatically starts. Auto Channel Preset Antenna A Air/Cable Air Preset • Conventional TV channels in those channels. 7 Press / to manually add Cable Converter output channels. Auto Channel Preset Antenna A Air/Cable Air Preset • When using Auto channel Preset, you may not ...be able to tune in this manual designate TV channels that you can watch under the current conditions. Start 6 Press / to select "Air/Cable", and then press / ...

Owner's Manual
Page 42
...; To restore skipped channels, use the above procedure except that you select "Add" in step 7. • When using Auto Channel Preset, you may need to manually add Cable Converter output channels. 6 Press / to select "Channel", and then press / to select a channel to be skipped when CH +/- Channel ADD/DEL Antenna A Channel...
...; To restore skipped channels, use the above procedure except that you select "Add" in step 7. • When using Auto Channel Preset, you may need to manually add Cable Converter output channels. 6 Press / to select "Channel", and then press / to select a channel to be skipped when CH +/- Channel ADD/DEL Antenna A Channel...

Owner's Manual
Page 46
... a time zone for Clock Setting, time information is then acquired and set time is cleared. If you then need to select "Auto" or "Manual". Clock setting Use the following procedure to set the correct time again. 1 Press HOME MENU. 2 Press / to select "Setup", and then press... ENTER. 3 Press / to select "Clock", and then press ENTER. 4 Press / to select "Clock Setting", and then press / to manually set the time correctly. With "Manual" selected, you disconnect the power cord from among three languages; English, French, and Spanish. 1 Press HOME MENU. 2 Press / to select...
... a time zone for Clock Setting, time information is then acquired and set time is cleared. If you then need to select "Auto" or "Manual". Clock setting Use the following procedure to set the correct time again. 1 Press HOME MENU. 2 Press / to select "Setup", and then press... ENTER. 3 Press / to select "Clock", and then press ENTER. 4 Press / to select "Clock Setting", and then press / to manually set the time correctly. With "Manual" selected, you disconnect the power cord from among three languages; English, French, and Spanish. 1 Press HOME MENU. 2 Press / to select...

Owner's Manual
Page 48
... defined image in a normally bright room DYNAMIC For a very sharp image with the maximum contrast This mode does not allow manual image quality adjustment. AV Selection STANDARD DYNAMIC MOVIE GAME USER Picture adjustments Adjust the picture to your preference for easier viewing.... Picture AV Selection Contrast Brightness Color Tint Sharpness Pro Adjust Reset STANDARD 40 0 0 0 0 For AV source Item STANDARD Description For a highly defined image in a normally bright ...
... defined image in a normally bright room DYNAMIC For a very sharp image with the maximum contrast This mode does not allow manual image quality adjustment. AV Selection STANDARD DYNAMIC MOVIE GAME USER Picture adjustments Adjust the picture to your preference for easier viewing.... Picture AV Selection Contrast Brightness Color Tint Sharpness Pro Adjust Reset STANDARD 40 0 0 0 0 For AV source Item STANDARD Description For a highly defined image in a normally bright ...

Owner's Manual
Page 50
... green For weaker blue For stronger red For stronger green For stronger blue • To perform adjustment for more than three seconds to display the manual adjustment screen. 2 Press / to select an item to be adjusted. 4 Press HOME MENU to exit the menu. 6 Press HOME MENU to select the... Adjust the color temperature to give a better white balance. 1 Press HOME MENU. 2 Press / to select "Picture", and then press ENTER. 3 Press / to select "Pro Adjust", and then press ENTER. 4 Press / to select "Color Temp", and then press ENTER. 5 Press / to select the desired level, and then press ENTER.
... green For weaker blue For stronger red For stronger green For stronger blue • To perform adjustment for more than three seconds to display the manual adjustment screen. 2 Press / to select an item to be adjusted. 4 Press HOME MENU to exit the menu. 6 Press HOME MENU to select the... Adjust the color temperature to give a better white balance. 1 Press HOME MENU. 2 Press / to select "Picture", and then press ENTER. 3 Press / to select "Pro Adjust", and then press ENTER. 4 Press / to select "Color Temp", and then press ENTER. 5 Press / to select the desired level, and then press ENTER.

Owner's Manual
Page 62
... been connected to the signal input terminals on the recording equipment at least 30 seconds before the start of the preset program; Setting the timer manually Using the menu, you switch off the power. Start Stop 1/4 Total:0 Overlap Channel Target Information ---.--- -------- ---.--- -------- ---.--- -------- ---.--- -------- ---.--- -------- ---.--- -------- ---.--- -------- 3 Press / to select a list number, then press . • You can...
... been connected to the signal input terminals on the recording equipment at least 30 seconds before the start of the preset program; Setting the timer manually Using the menu, you switch off the power. Start Stop 1/4 Total:0 Overlap Channel Target Information ---.--- -------- ---.--- -------- ---.--- -------- ---.--- -------- ---.--- -------- ---.--- -------- ---.--- -------- 3 Press / to select a list number, then press . • You can...
Owner's Manual
Page 65
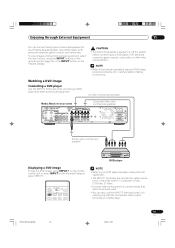
...VCR, personal computer, game console, and camcorder. Enjoying through External Equipment 11 You can connect many types of external equipment to your DVD player operation manual for the signal type. • The INPUT 1 terminals are checked for cable connections in the order where; 1) Component Video, 2) S-Video,... Connecting a DVD player Use the INPUT 1 terminals when connecting a DVD player and other external equipment. • Refer to the relevant operation manual (DVD player, personal computer, etc.) carefully before making connections. PDP-ELITE-Eng (65-80) 65 65 En 9/9/03, 11:46 To ...
...VCR, personal computer, game console, and camcorder. Enjoying through External Equipment 11 You can connect many types of external equipment to your DVD player operation manual for the signal type. • The INPUT 1 terminals are checked for cable connections in the order where; 1) Component Video, 2) S-Video,... Connecting a DVD player Use the INPUT 1 terminals when connecting a DVD player and other external equipment. • Refer to the relevant operation manual (DVD player, personal computer, etc.) carefully before making connections. PDP-ELITE-Eng (65-80) 65 65 En 9/9/03, 11:46 To ...
Owner's Manual
Page 69
... receiver. This allows audio such as digital TV broadcasting to select "Dolby Digital" or "PCM", and then press ENTER. For more information, see the user's manual for the DIGITAL AUDIO output terminal (OPTICAL), depending on your AV receiver. 1 Press HOME MENU. 2 Press / to select "DTV Setup", and then press ENTER. 3 Press...
... receiver. This allows audio such as digital TV broadcasting to select "Dolby Digital" or "PCM", and then press ENTER. For more information, see the user's manual for the DIGITAL AUDIO output terminal (OPTICAL), depending on your AV receiver. 1 Press HOME MENU. 2 Press / to select "DTV Setup", and then press ENTER. 3 Press...
Owner's Manual
Page 72
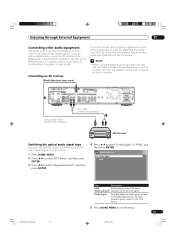
... i.LINK cannot relay data when their power is the case, connect the analog output terminals on the D-VHS recorder to select i.LINK. Check the user's manual for data relay in use D-VHS tape. See "Setting up to play back digital TV programs recorded using connected D-VHS recorders, use ) or do not...
... i.LINK cannot relay data when their power is the case, connect the analog output terminals on the D-VHS recorder to select i.LINK. Check the user's manual for data relay in use D-VHS tape. See "Setting up to play back digital TV programs recorded using connected D-VHS recorders, use ) or do not...


