Owner's Manual
Page 5
...to Use This Manual 2 Checking Supplied Accessories 3 Part Names and Functions 4 Main Unit 4 Remote Control Unit 5 Connection Panel 6 Installation and Connections 8 Installation of Terms 39 1 PRO-1000HD / PRO-800HD You will know how to Route Cables 17 Setting Up the System 18 Setup after Connection 18... Plasma Display, please carefully read the "Safety Precautions" and these "Operating Instructions" so you very much for purchasing this PIONEER product. Before Proceeding Notes on this Unit 9 Connection to INPUT1 and INPUT2 9 Connection to INPUT3 13 Connection to INPUT4 ...
...to Use This Manual 2 Checking Supplied Accessories 3 Part Names and Functions 4 Main Unit 4 Remote Control Unit 5 Connection Panel 6 Installation and Connections 8 Installation of Terms 39 1 PRO-1000HD / PRO-800HD You will know how to Route Cables 17 Setting Up the System 18 Setup after Connection 18... Plasma Display, please carefully read the "Safety Precautions" and these "Operating Instructions" so you very much for purchasing this PIONEER product. Before Proceeding Notes on this Unit 9 Connection to INPUT1 and INPUT2 9 Connection to INPUT3 13 Connection to INPUT4 ...
Owner's Manual
Page 6
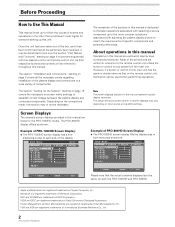
... actual contents displayed are the same for someone setting up this manual Operations in both the PRO-1000HD and PRO-800HD. About operations in this unit. The remainder of components. The PRO-800HD display differs as that on the remote control unit, that button can be beneficial to look over the section "Part Names and Functions...
... actual contents displayed are the same for someone setting up this manual Operations in both the PRO-1000HD and PRO-800HD. About operations in this unit. The remainder of components. The PRO-800HD display differs as that on the remote control unit, that button can be beneficial to look over the section "Part Names and Functions...

Owner's Manual
Page 7
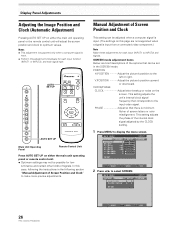
... :0 :0 SET UP INPUT1 OPTION RE S ET SELECT SET ENTER MENU EXIT 2 Press 3 to adjust the value. ÷ Operating Instructions ÷ Warranty 3 PRO-1000HD / PRO-800HD POS I T I ON : CL OCK / PHASE : SET UP 0/ 0 0/ 0 INPUT1 OPTION RE S ET SELECT SET ENTER MENU EXIT 4 Press SET... to display the menu screen. R. Before Proceeding Before Proceeding The following accessories were supplied. 1 Power cord 2 Remote control unit 3 AA (...
... :0 :0 SET UP INPUT1 OPTION RE S ET SELECT SET ENTER MENU EXIT 2 Press 3 to adjust the value. ÷ Operating Instructions ÷ Warranty 3 PRO-1000HD / PRO-800HD POS I T I ON : CL OCK / PHASE : SET UP 0/ 0 0/ 0 INPUT1 OPTION RE S ET SELECT SET ENTER MENU EXIT 4 Press SET... to display the menu screen. R. Before Proceeding Before Proceeding The following accessories were supplied. 1 Power cord 2 Remote control unit 3 AA (...
Owner's Manual
Page 8
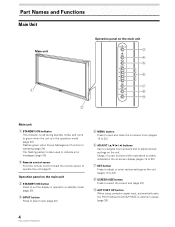
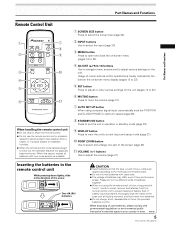
... input, automatically sets the POSITION and CLOCK/PHASE to optimum values (page 26). 4 PRO-1000HD / PRO-800HD Flashes green when Power-Management function is also used to indicate error messages (page 35). 2 Remote control sensor Point the remote control toward the remote sensor to put the display in the operation mode (page 20). Operation panel on...
... input, automatically sets the POSITION and CLOCK/PHASE to optimum values (page 26). 4 PRO-1000HD / PRO-800HD Flashes green when Power-Management function is also used to indicate error messages (page 35). 2 Remote control sensor Point the remote control toward the remote sensor to put the display in the operation mode (page 20). Operation panel on...
Owner's Manual
Page 9
..., the operable distance will gradually become shorter. When disposing of the arrow. H048 En 5 PRO-1000HD / PRO-800HD Inserting the batteries in the remote control unit While pressing down lightly, slide in a place subject to excessive humidity. ¶ When the remote control unit's batteries begin to mute the volume (page 21). 7 AUTO SET UP button...
..., the operable distance will gradually become shorter. When disposing of the arrow. H048 En 5 PRO-1000HD / PRO-800HD Inserting the batteries in the remote control unit While pressing down lightly, slide in a place subject to excessive humidity. ¶ When the remote control unit's batteries begin to mute the volume (page 21). 7 AUTO SET UP button...
Owner's Manual
Page 10
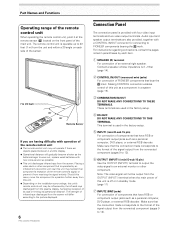
...at the remote sensor (Î) located on each item. 1 SPEAKER (R) terminal For connection of an external right speaker. Placing a video deck or other component. The strength of infrared rays discharged from the screen will differ according to the picture displayed. 6 PRO-1000HD / PRO-800HD Connection ...this unit is 8 -16 Ω (page 14). 2 CONTROL IN/OUT (monaural mini jacks) For connection of PIONEER components that component's reception of the remote control's signal, or prevent it from receiving the signal entirely. Note: The video signal will not be influenced by each...
...at the remote sensor (Î) located on each item. 1 SPEAKER (R) terminal For connection of an external right speaker. Placing a video deck or other component. The strength of infrared rays discharged from the screen will differ according to the picture displayed. 6 PRO-1000HD / PRO-800HD Connection ...this unit is 8 -16 Ω (page 14). 2 CONTROL IN/OUT (monaural mini jacks) For connection of PIONEER components that component's reception of the remote control's signal, or prevent it from receiving the signal entirely. Note: The video signal will not be influenced by each...
Owner's Manual
Page 19
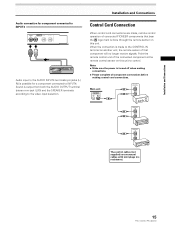
... sensor on this unit to the CONTROL IN terminal on another unit, the remote sensor of connected PIONEER components that component will no resistance). 15 PRO-1000HD / PRO-800HD Installation and Connections Audio connection for component connected to INPUT4 AUDIO R INPUT4 VIDEO L OUTPUT Audio input to the ...the SPEAKER terminals according to INPUT4. Notes ÷ Make sure the power is made , remote control operation of that bear the Î logo mark is done through the remote sensor on this unit. When the connection is turned off when making connections. ÷ Please...
... sensor on this unit to the CONTROL IN terminal on another unit, the remote sensor of connected PIONEER components that component will no resistance). 15 PRO-1000HD / PRO-800HD Installation and Connections Audio connection for component connected to INPUT4 AUDIO R INPUT4 VIDEO L OUTPUT Audio input to the ...the SPEAKER terminals according to INPUT4. Notes ÷ Make sure the power is made , remote control operation of that bear the Î logo mark is done through the remote sensor on this unit. When the connection is turned off when making connections. ÷ Please...

Owner's Manual
Page 24
... Before you begin, make sure you have: • Made connections between this unit. The STANDBY/ON indicator turns green. 20 PRO-1000HD / PRO-800HD FULL 4 Use VOLUME +/- CAUTION Please do not leave the same picture displayed on the screen for a short while even after ...H : 77. 1 kH z f V : 85. 0 Hz 115 2X864 2,5 3 S-VIDEO VIDEO 2,5 3 FULL I NPUT1 CAUT I O N OUT OF R ANG E f H : 75. 7 kH z f V :120. 0 Hz ---- 4 Main Unit Operating Panel Remote Control Unit 1 Switch the main power switch on the main unit to the on position to adjust the volume. This is blinking (red). 6 Switch MAIN...
... Before you begin, make sure you have: • Made connections between this unit. The STANDBY/ON indicator turns green. 20 PRO-1000HD / PRO-800HD FULL 4 Use VOLUME +/- CAUTION Please do not leave the same picture displayed on the screen for a short while even after ...H : 77. 1 kH z f V : 85. 0 Hz 115 2X864 2,5 3 S-VIDEO VIDEO 2,5 3 FULL I NPUT1 CAUT I O N OUT OF R ANG E f H : 75. 7 kH z f V :120. 0 Hz ---- 4 Main Unit Operating Panel Remote Control Unit 1 Switch the main power switch on the main unit to the on position to adjust the volume. This is blinking (red). 6 Switch MAIN...

Owner's Manual
Page 25
... refresh rates will be slightly different from the actual values. Press MUTING again to adjust the volume at a desired level. 21 PRO-1000HD / PRO-800HD to restore the sound. S-VIDEO VIDEO DISPLAY Operations Press VOLUME on the remote control unit. to the minimum level. V OLU ME :5 To mute the sound Press DISPLAY on the...
... refresh rates will be slightly different from the actual values. Press MUTING again to adjust the volume at a desired level. 21 PRO-1000HD / PRO-800HD to restore the sound. S-VIDEO VIDEO DISPLAY Operations Press VOLUME on the remote control unit. to the minimum level. V OLU ME :5 To mute the sound Press DISPLAY on the...
Owner's Manual
Page 27
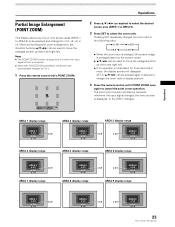
...FULL. 1 Press the remote control unit's POINT ZOOM. AREA 1 display range AREA 1 x 4.0 x 2.0 x 1.5 x 3.0 AREA 2 display range AREA 2 x 4.0 x 2.0 x 1.5 AREA 3 display range x 3.0 x 3.0 AREA 3 x 4.0 x 2.0 x 1.5 AREA 4 display range AREA 5 display range AREA 6 display range AREA 4 x 4.0 x 2.0 x 1.5 x 3.0 AREA 7 display range AREA 5 x 4.0 x 2.0 x 1.5 AREA 8 display range x 3.0 x 3.0 AREA 6 x 4.0 x 2.0 x 1.5 AREA 9 display range AREA 7 x 4.0 x 2.0 x 1.5 x 3.0 AREA 8 x 4.0 x 2.0 x 1.5 x 3.0 x 3.0 AREA 9 x 4.0 x 2.0 x 1.5 23 PRO-1000HD / PRO-800HD SET or 5/∞/2/3 can...
...FULL. 1 Press the remote control unit's POINT ZOOM. AREA 1 display range AREA 1 x 4.0 x 2.0 x 1.5 x 3.0 AREA 2 display range AREA 2 x 4.0 x 2.0 x 1.5 AREA 3 display range x 3.0 x 3.0 AREA 3 x 4.0 x 2.0 x 1.5 AREA 4 display range AREA 5 display range AREA 6 display range AREA 4 x 4.0 x 2.0 x 1.5 x 3.0 AREA 7 display range AREA 5 x 4.0 x 2.0 x 1.5 AREA 8 display range x 3.0 x 3.0 AREA 6 x 4.0 x 2.0 x 1.5 AREA 9 display range AREA 7 x 4.0 x 2.0 x 1.5 x 3.0 AREA 8 x 4.0 x 2.0 x 1.5 x 3.0 x 3.0 AREA 9 x 4.0 x 2.0 x 1.5 23 PRO-1000HD / PRO-800HD SET or 5/∞/2/3 can...

Owner's Manual
Page 28
L E V E L B. E NHANCE V. Except when input signal is G on the main unit operating panel or remote control unit. If a sync signal (*2) is input again later, the plasma display automatically returns to exit the menu screen. R. Operations Automatic Power OFF ...: OF F CL AMP P OS I T I ON : AU T O SETT I NG : VGA SELECT SET ENTER MENU EXIT 24 PRO-1000HD / PRO-800HD 3 Press 5/∞ to select either operate the computer, or press INPUT on the main unit operating panel or remote control unit. ÷ To return to normal operation from AUTO POWER OFF mode: Press STANDBY/ON...
L E V E L B. E NHANCE V. Except when input signal is G on the main unit operating panel or remote control unit. If a sync signal (*2) is input again later, the plasma display automatically returns to exit the menu screen. R. Operations Automatic Power OFF ...: OF F CL AMP P OS I T I ON : AU T O SETT I NG : VGA SELECT SET ENTER MENU EXIT 24 PRO-1000HD / PRO-800HD 3 Press 5/∞ to select either operate the computer, or press INPUT on the main unit operating panel or remote control unit. ÷ To return to normal operation from AUTO POWER OFF mode: Press STANDBY/ON...
Owner's Manual
Page 30
... operating panel or the remote control unit will adjust the screen position and clock to make more precise adjustments. MAIN MENU PICTURE SCREEN CONT RAST BR I ON : CL OCK / PHASE : SET UP 0/ 0 0/ 0 RE S ET INPUT1 OPTION 26 PRO-1000HD / PRO-800HD SELECT SET ENTER MENU ...values. Display Panel Adjustments Adjusting the Image Position and Clock (Automatic Adjustment) Pressing AUTO SET UP on either the main unit operating panel or remote control unit. ÷ Optimum settings may not be possible for low- L EVEL H. L EVEL G. Notes ÷ This adjustment is ...
... operating panel or the remote control unit will adjust the screen position and clock to make more precise adjustments. MAIN MENU PICTURE SCREEN CONT RAST BR I ON : CL OCK / PHASE : SET UP 0/ 0 0/ 0 RE S ET INPUT1 OPTION 26 PRO-1000HD / PRO-800HD SELECT SET ENTER MENU ...values. Display Panel Adjustments Adjusting the Image Position and Clock (Automatic Adjustment) Pressing AUTO SET UP on either the main unit operating panel or remote control unit. ÷ Optimum settings may not be possible for low- L EVEL H. L EVEL G. Notes ÷ This adjustment is ...
Owner's Manual
Page 36
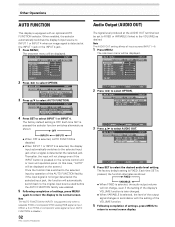
... UD I O OUT : F I GHT . The onscreen menu will be displayed on SYNC or component video signal is input, AUTO FUNCTION is disable.) 32 PRO-1000HD / PRO-800HD Audio Output (AUDIO OUT) The signal level produced at the selected jack. Each time SET is pressed the selector function switches alternately as desired. Note... all input sources (INPUT1- 4). 1 Press MENU; The onscreen menu will not change even if the INPUT button is pressed on the remote control unit or main unit operation panel. (In this case, "AUTO" will automatically switch back to the original input source used before ...
... UD I O OUT : F I GHT . The onscreen menu will be displayed on SYNC or component video signal is input, AUTO FUNCTION is disable.) 32 PRO-1000HD / PRO-800HD Audio Output (AUDIO OUT) The signal level produced at the selected jack. Each time SET is pressed the selector function switches alternately as desired. Note... all input sources (INPUT1- 4). 1 Press MENU; The onscreen menu will not change even if the INPUT button is pressed on the remote control unit or main unit operation panel. (In this case, "AUTO" will automatically switch back to the original input source used before ...
Owner's Manual
Page 37
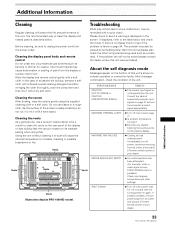
...it with a quick check. If problem persists, remove power plug from its outlet, and consult a Pioneer service center or your dealer. 33 PRO-1000HD / PRO-800HD Additional Information Cleaning the display panel body and remote control Do not under any objects blocking the cooling vents on again. Do not use a vacuum ...The recommended way to see if a warning is described below and check the mode. If displayed, refer to its outlet and consult a Pioneer service center or your dealer. If there is no display check to clean the display and related parts is displayed on page 34. Vents ...
...it with a quick check. If problem persists, remove power plug from its outlet, and consult a Pioneer service center or your dealer. 33 PRO-1000HD / PRO-800HD Additional Information Cleaning the display panel body and remote control Do not under any objects blocking the cooling vents on again. Do not use a vacuum ...The recommended way to see if a warning is described below and check the mode. If displayed, refer to its outlet and consult a Pioneer service center or your dealer. If there is no display check to clean the display and related parts is displayed on page 34. Vents ...
Owner's Manual
Page 38
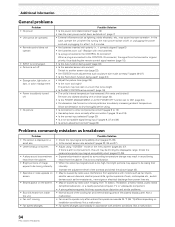
...radios (simplified radios) etc., or a nearby personal computer, TV, or video/audio component. • A strong electromagnetic field may be operated. • Remote control does not operate. • INPUT is not changed. • Picture is cut off. • Strange color, light color, or dark, or...used ? (page 23) • Adjust the picture tone (page 25). • Is the room too bright? Not a malfunction. 34 PRO-1000HD / PRO-800HD Not a malfunction. • Fan speed changes automatically in accordance with motors such as hair dryers, electric vacuum cleaners, electric power drills, ...
...radios (simplified radios) etc., or a nearby personal computer, TV, or video/audio component. • A strong electromagnetic field may be operated. • Remote control does not operate. • INPUT is not changed. • Picture is cut off. • Strange color, light color, or dark, or...used ? (page 23) • Adjust the picture tone (page 25). • Is the room too bright? Not a malfunction. 34 PRO-1000HD / PRO-800HD Not a malfunction. • Fan speed changes automatically in accordance with motors such as hair dryers, electric vacuum cleaners, electric power drills, ...
Owner's Manual
Page 40
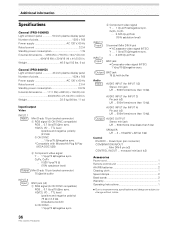
...TTL level /positive and negative polarity/ 75 Ω or 2.2 kΩ (impedance switch) G ON SYNC ... 1 Vp-p/75 Ω/negative sync. 36 PRO-1000HD / PRO-800HD 2 Component video signal Y ... 1 Vp-p/75 Ω/negative sync. CB/PB, CR/PR ... 0.525 Vp-p/75 Ω (75% satulation level) INPUT...& Play (VESA DDC1/2B) 2 Component video signal Y ... 1 Vp-p/75 Ω/negative sync. monaural mini jack (x2) Accessories Power cord 1 Remote control unit 1 AA (R6) batteries 2 Cleaning cloth 1 Speed clamps 2 Bead bands 2 Warranty 1 Operating Instructions 1 ÷ Due to improvements, ...
...TTL level /positive and negative polarity/ 75 Ω or 2.2 kΩ (impedance switch) G ON SYNC ... 1 Vp-p/75 Ω/negative sync. 36 PRO-1000HD / PRO-800HD 2 Component video signal Y ... 1 Vp-p/75 Ω/negative sync. CB/PB, CR/PR ... 0.525 Vp-p/75 Ω (75% satulation level) INPUT...& Play (VESA DDC1/2B) 2 Component video signal Y ... 1 Vp-p/75 Ω/negative sync. monaural mini jack (x2) Accessories Power cord 1 Remote control unit 1 AA (R6) batteries 2 Cleaning cloth 1 Speed clamps 2 Bead bands 2 Warranty 1 Operating Instructions 1 ÷ Due to improvements, ...
Other Manual
Page 4
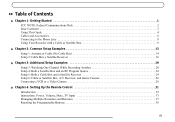
... Box and a Satellite Receiver 24 Setup 6: Cable or Satellite Box, A/V Receiver, and Game Console 26 Connecting a VCR or a Video Camera 29 Chapter 4: Setting Up the Remote Control 31 Introduction 32 Instructions: Power, Volume, Mute, TV Input 33 Managing Multiple Recorders and...
... Box and a Satellite Receiver 24 Setup 6: Cable or Satellite Box, A/V Receiver, and Game Console 26 Connecting a VCR or a Video Camera 29 Chapter 4: Setting Up the Remote Control 31 Introduction 32 Instructions: Power, Volume, Mute, TV Input 33 Managing Multiple Recorders and...
Other Manual
Page 11
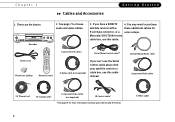
... DVD op Men Live TV Guide Info Menu Select Window Vol Mute Chan Page Record Return Play V CR Plus + Slow Clear 1 Stop Enter 2 3 4 5 6 7 8 9 V Pow T 0 V Inpu t Remote Control Composite A/V cables Serial (Data) Control cable* S-Video cable (not supplied) If you have a DIRECTV 4. You may want to choose audio and video cables: 3. If...
... DVD op Men Live TV Guide Info Menu Select Window Vol Mute Chan Page Record Return Play V CR Plus + Slow Clear 1 Stop Enter 2 3 4 5 6 7 8 9 V Pow T 0 V Inpu t Remote Control Composite A/V cables Serial (Data) Control cable* S-Video cable (not supplied) If you have a DIRECTV 4. You may want to choose audio and video cables: 3. If...
Other Manual
Page 14
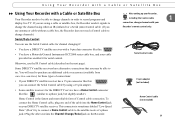
... has a 15-pin connector like this : (similar to the satellite receiver's phone jack.) Plug the other end into the Home Control jack on your Recorder's remote control only.
... has a 15-pin connector like this : (similar to the satellite receiver's phone jack.) Plug the other end into the Home Control jack on your Recorder's remote control only.
Other Manual
Page 15
... Control connection (to change unreliably or inconsistently, try optimizing the IR Control connection (see the User's Guide for troubleshooting help if changing channels with the remote control. Choosing an IR code in Chapters 2 and 3). During Guided Setup, you may help . If channels change at all. Try changing channels several times with...
... Control connection (to change unreliably or inconsistently, try optimizing the IR Control connection (see the User's Guide for troubleshooting help if changing channels with the remote control. Choosing an IR code in Chapters 2 and 3). During Guided Setup, you may help . If channels change at all. Try changing channels several times with...


