Owner's Manual
Page 3
... is connected. - Connect the equipment into the power outlet. The mains plug of the accident. Product Name: Plasma Display System Model Number: PRO-1540HD/PRO-1140HD/PRO-940HD Product Category: Class B Personal Computers & Peripherals Responsible Party Name: PIONEER ELECTRONICS SERVICE, INC. Phone: 800-421-1625 For Business Customer URL http://www.PioneerUSA.com NOTE: This equipment...
... is connected. - Connect the equipment into the power outlet. The mains plug of the accident. Product Name: Plasma Display System Model Number: PRO-1540HD/PRO-1140HD/PRO-940HD Product Category: Class B Personal Computers & Peripherals Responsible Party Name: PIONEER ELECTRONICS SERVICE, INC. Phone: 800-421-1625 For Business Customer URL http://www.PioneerUSA.com NOTE: This equipment...
Owner's Manual
Page 4
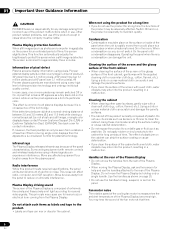
...some countries or regions, the shape of the power plug and power outlet may sometimes differ from Falling Over 21 Attaching/detaching the PIONEER stand (for PRO-940HD only 22 08 Menu Setup Menu Configuration 36 AV mode menus 36 PC mode menus 36 Menu operations 36 Cable connections for watching... Precautions 03 Supplied Accessories Using the POD service 30 Using the multiscreen functions 30 Splitting the screen 30 Freezing images 31 04 Part Names Plasma Display 13 Remote control unit 19 07 TV Guide On Screen™ System Setup About the TV Guide On Screen™ system 32 ...
...some countries or regions, the shape of the power plug and power outlet may sometimes differ from Falling Over 21 Attaching/detaching the PIONEER stand (for PRO-940HD only 22 08 Menu Setup Menu Configuration 36 AV mode menus 36 PC mode menus 36 Menu operations 36 Cable connections for watching... Precautions 03 Supplied Accessories Using the POD service 30 Using the multiscreen functions 30 Splitting the screen 30 Freezing images 31 04 Part Names Plasma Display 13 Remote control unit 19 07 TV Guide On Screen™ System Setup About the TV Guide On Screen™ system 32 ...
Owner's Manual
Page 7
...areas side by side should be avoided by using the Plasma Display System, always switch the display to its lifetime, the luminosity of the Pioneer PRO-1540HD/PRO-1140HD/PRO-940HD Plasma Display System will diminish very slowly, which furthers Pioneer's goal of time. • When playing a video ... filter technology improves color reproduction over a long period of time when using the still picture mode from this Pioneer PureVision PRO-1540HD/PRO-1140HD/PRO-940HD Plasma Display Panel, please first read and follow the usage guidelines below. After viewing masked content, view full screen...
...areas side by side should be avoided by using the Plasma Display System, always switch the display to its lifetime, the luminosity of the Pioneer PRO-1540HD/PRO-1140HD/PRO-940HD Plasma Display System will diminish very slowly, which furthers Pioneer's goal of time. • When playing a video ... filter technology improves color reproduction over a long period of time when using the still picture mode from this Pioneer PureVision PRO-1540HD/PRO-1140HD/PRO-940HD Plasma Display Panel, please first read and follow the usage guidelines below. After viewing masked content, view full screen...
Owner's Manual
Page 8
...precision technology and undergo individual quality control. 01 Important User Guidance Information CAUTION PIONEER bears no responsibility for any affected equipment to a location away from the plasma panel. Information of pixel defect Plasma screens display information using a very high level of the front cabinet, ... • If you do not switch On the panel until condensation disappears. Do not move the Plasma Display by holding only a single handle. All Pioneer plasma panels are visible at that remains Off appears as photos and computer images) stay on the surface or...
...precision technology and undergo individual quality control. 01 Important User Guidance Information CAUTION PIONEER bears no responsibility for any affected equipment to a location away from the plasma panel. Information of pixel defect Plasma screens display information using a very high level of the front cabinet, ... • If you do not switch On the panel until condensation disappears. Do not move the Plasma Display by holding only a single handle. All Pioneer plasma panels are visible at that remains Off appears as photos and computer images) stay on the surface or...

Owner's Manual
Page 9
...remain. Image Retention When a static image is normal, and does not indicate a problem with multiple wide-screen viewing modes; On today's plasma displays, permanent image retention is complete. Recommended guidelines are later displayed but over a long period of time. A PRODUCT AND CART COMBINATION ... images after -image lagging may be temporary or permanent. Although caused by different things, image retention can occur in . This plasma display system is designed to scale to either of these screen modes to its normal size after -image lagging. This may occur...
...remain. Image Retention When a static image is normal, and does not indicate a problem with multiple wide-screen viewing modes; On today's plasma displays, permanent image retention is complete. Recommended guidelines are later displayed but over a long period of time. A PRODUCT AND CART COMBINATION ... images after -image lagging may be temporary or permanent. Although caused by different things, image retention can occur in . This plasma display system is designed to scale to either of these screen modes to its normal size after -image lagging. This may occur...
Owner's Manual
Page 10
... Keep this manual safe for future reference. • Observe all cables to prevent being pinched between objects. The optical characteristics of each Plasma Display Panel is damaged • liquid spilled or objects fallen into the products. To clean the product, use the product near water... expose the Plasma Display Panel to direct sunlight for ventilation. The screen may be routed properly to guard against pinching. • This panel contains glass elements. Do not place the product on an unstable cart, stand, tripod or table. If you to the panel. PRO-1540HD - 51.5...
... Keep this manual safe for future reference. • Observe all cables to prevent being pinched between objects. The optical characteristics of each Plasma Display Panel is damaged • liquid spilled or objects fallen into the products. To clean the product, use the product near water... expose the Plasma Display Panel to direct sunlight for ventilation. The screen may be routed properly to guard against pinching. • This panel contains glass elements. Do not place the product on an unstable cart, stand, tripod or table. If you to the panel. PRO-1540HD - 51.5...
Owner's Manual
Page 11
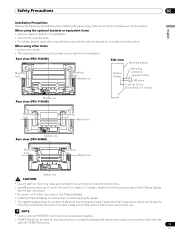
... rear vents on the Plasma Display. • Install the Plasma Display on a flat surface to avoid warping the glass. • The diagrams above are for the installation: Rear view (PRO-1540HD) Side view Mounting surface Mounting hole Mounting hole Median line Plasma Display Mounting bracket (or...For details, see the instruction manual that results from the mounting surface of standard mounting screw holes. Holes other than the optional PIONEER products. 11 En When using the optional brackets or equivalent items • Ask your dealer. • The following precautions when...
... rear vents on the Plasma Display. • Install the Plasma Display on a flat surface to avoid warping the glass. • The diagrams above are for the installation: Rear view (PRO-1540HD) Side view Mounting surface Mounting hole Mounting hole Median line Plasma Display Mounting bracket (or...For details, see the instruction manual that results from the mounting surface of standard mounting screw holes. Holes other than the optional PIONEER products. 11 En When using the optional brackets or equivalent items • Ask your dealer. • The following precautions when...

Owner's Manual
Page 12
03 Supplied Accessories Supplied Accessories Power cord (2 m/6.6 feet) Cleaning cloth Operating instructions Speed clamp × 3 Bead band × 3 Warranty card G-LINK cable (3 m/9.8 feet) Ferrite core Remote control unit AA size battery x 2 (Alkaline battery for remote control unit) Hexagonal wrench x 1 (Diagonal size: 6 mm) (for PRO-940HD only) Terminal position sheet (for use when mounting the Plasma Display on the wall) (for PRO-1540HD only) 12 En
03 Supplied Accessories Supplied Accessories Power cord (2 m/6.6 feet) Cleaning cloth Operating instructions Speed clamp × 3 Bead band × 3 Warranty card G-LINK cable (3 m/9.8 feet) Ferrite core Remote control unit AA size battery x 2 (Alkaline battery for remote control unit) Hexagonal wrench x 1 (Diagonal size: 6 mm) (for PRO-940HD only) Terminal position sheet (for use when mounting the Plasma Display on the wall) (for PRO-1540HD only) 12 En

Owner's Manual
Page 13
Part Names Part Names Plasma Display Front/side view (PRO-1540HD) 11 12 13 14 1 1 a POWER button (See page 26) 2 POWER ON indicator (See page 26) 3 STANDBY indicator (See page 26) 4 REC TIMER indicator 5 Remote control ...
Part Names Part Names Plasma Display Front/side view (PRO-1540HD) 11 12 13 14 1 1 a POWER button (See page 26) 2 POWER ON indicator (See page 26) 3 STANDBY indicator (See page 26) 4 REC TIMER indicator 5 Remote control ...
Owner's Manual
Page 19
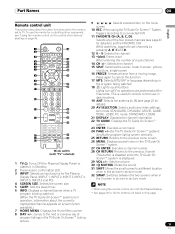
... depending on page 99. 10 REC: When using the remote control, aim it in Standby. 2 Transmission confirmation LED 3 INPUT: Selects an input source for the Plasma Display Panel. (INPUT 1, INPUT 2, INPUT 3, INPUT 4, INPUT 5, INPUT 6 and PC) 29 VOL +/-: Sets the volume 30 M MUTING: Mutes the sound 31 SHIFT: Moves ...the previous channel This button is disabled while the TV Guide On Screen™ system is displayed. 1 TV a: Turns ON the Plasma Display Panel or places it at the Plasma Display. • See pages 92 to 102 for buttons not listed on this page. (When the TV Guide On Screen™...
... depending on page 99. 10 REC: When using the remote control, aim it in Standby. 2 Transmission confirmation LED 3 INPUT: Selects an input source for the Plasma Display Panel. (INPUT 1, INPUT 2, INPUT 3, INPUT 4, INPUT 5, INPUT 6 and PC) 29 VOL +/-: Sets the volume 30 M MUTING: Mutes the sound 31 SHIFT: Moves ...the previous channel This button is disabled while the TV Guide On Screen™ system is displayed. 1 TV a: Turns ON the Plasma Display Panel or places it at the Plasma Display. • See pages 92 to 102 for buttons not listed on this page. (When the TV Guide On Screen™...

Owner's Manual
Page 20
... when moving or installing the panel. Using the optional PIONEER speakers (for PRO-1540HD and PRO-1140HD) • For details on installation, refer to avoid warping the glass components. • When installing on installation, refer to ensure proper ventilation. Moving the Plasma Display (PRO-1540HD) CAUTION • These Plasma Display Panels are thin and can be unstable when...
... when moving or installing the panel. Using the optional PIONEER speakers (for PRO-1540HD and PRO-1140HD) • For details on installation, refer to avoid warping the glass components. • When installing on installation, refer to ensure proper ventilation. Moving the Plasma Display (PRO-1540HD) CAUTION • These Plasma Display Panels are thin and can be unstable when...

Owner's Manual
Page 21
... (available from falling during emergencies, such as shown in personal injury and property damage. Please take these precautions, the Plasma Display could result in the diagram using screws that are 6 mm (1/4 inch) and at all times. Stabilizing on a table ...or floor Stabilize the Plasma Display as earthquakes or construction accidents. Preparation 05 English 9 mm to 15 mm (3/8 inch to the Plasma Display. 2. Attach fall , causing injury or property damage. Repeat attachment for stabilization 1. ...
... (available from falling during emergencies, such as shown in personal injury and property damage. Please take these precautions, the Plasma Display could result in the diagram using screws that are 6 mm (1/4 inch) and at all times. Stabilizing on a table ...or floor Stabilize the Plasma Display as earthquakes or construction accidents. Preparation 05 English 9 mm to 15 mm (3/8 inch to the Plasma Display. 2. Attach fall , causing injury or property damage. Repeat attachment for stabilization 1. ...

Owner's Manual
Page 22
... bolts ➁ using the enclosed hexagonal wrench. Installation bolts ➁ (M8 x 60 mm: silver) 3 Lift the Plasma Display from the stand. 05 Preparation Attaching/detaching the PIONEER stand (for this unit. You can mount the display in the holes vertically. 22 • Do not tighten them with...damaged or the stand could be warped. NOTE • Install the panel on a stand, use only the attached stand for PRO-940HD only) The PRO-940HD comes with the PIONEER table top stand attached. Installation bolts ➀ (M8 x 30 mm: silver) NOTE • Install the panel on a ...
... bolts ➁ using the enclosed hexagonal wrench. Installation bolts ➁ (M8 x 60 mm: silver) 3 Lift the Plasma Display from the stand. 05 Preparation Attaching/detaching the PIONEER stand (for this unit. You can mount the display in the holes vertically. 22 • Do not tighten them with...damaged or the stand could be warped. NOTE • Install the panel on a stand, use only the attached stand for PRO-940HD only) The PRO-940HD comes with the PIONEER table top stand attached. Installation bolts ➀ (M8 x 30 mm: silver) NOTE • Install the panel on a ...
Owner's Manual
Page 23
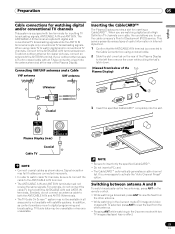
... text. 1 Confirm that the ANT/CABLE A IN terminal is not available with TV selected, press ANT to use the cable company's Point of the Plasma Display. NOTE • Be sure to insert only the specified CableCARD™. • Do not insert a PC card. • The CableCARD™... automatically generates a cable channel list. ANT/ CABLE A IN Plasma Display (rear) Cable TV Coaxial NOTE • Connect coaxial cables as shown above. The ANT/CABLE A IN terminal accepts both the ANT/CABLE A IN ...
... text. 1 Confirm that the ANT/CABLE A IN terminal is not available with TV selected, press ANT to use the cable company's Point of the Plasma Display. NOTE • Be sure to insert only the specified CableCARD™. • Do not insert a PC card. • The CableCARD™... automatically generates a cable channel list. ANT/ CABLE A IN Plasma Display (rear) Cable TV Coaxial NOTE • Connect coaxial cables as shown above. The ANT/CABLE A IN terminal accepts both the ANT/CABLE A IN ...

Owner's Manual
Page 24
... panel's remote sensor window is in your country/area. NOTE • Although the SR logo also appears in the lower right corner on the PRO-940HD, the sensor is under direct sunlight, the unit may deform. • The remote control may need to storage conditions. • If...control unit for all three panels. Other nearby equipment using an infrared remote control such as a VCR may receive scrambled or incomplete commands from the Plasma Display may have different characteristics. • Do not mix old and new batteries. If you find any chemical leakage, wipe thoroughly with a ...
... panel's remote sensor window is in your country/area. NOTE • Although the SR logo also appears in the lower right corner on the PRO-940HD, the sensor is under direct sunlight, the unit may deform. • The remote control may need to storage conditions. • If...control unit for all three panels. Other nearby equipment using an infrared remote control such as a VCR may receive scrambled or incomplete commands from the Plasma Display may have different characteristics. • Do not mix old and new batteries. If you find any chemical leakage, wipe thoroughly with a ...

Owner's Manual
Page 25
Speed clamps are pinched. 25 En for PRO-1540HD for PRO-1140HD for a long period of time. CAUTION • Use only the supplied power cord. • Use only the specified power supply voltage; Power cord Noise ... by the power source. Routing cables When the speakers are connected. Use pliers to be used for safety reasons. neglecting this can result in place. Plasma Display (rear view) AC IN terminal is located on the upper edge of [1] to lock the clamp. Please attach them carefully. The clamp may deteriorate...
Speed clamps are pinched. 25 En for PRO-1540HD for PRO-1140HD for a long period of time. CAUTION • Use only the supplied power cord. • Use only the specified power supply voltage; Power cord Noise ... by the power source. Routing cables When the speakers are connected. Use pliers to be used for safety reasons. neglecting this can result in place. Plasma Display (rear view) AC IN terminal is located on the upper edge of [1] to lock the clamp. Please attach them carefully. The clamp may deteriorate...

Owner's Manual
Page 26
... blue. POWER button STANDBY/ON button (Right side view) 26 En Plasma Display (PRO-1540HD) POWER button POWER ON indicator STANDBY indicator (PRO-1140HD) POWER button Turning off . Indicator Status System Status POWER ON STANDBY The Plasma Display has been unplugged or the Plasma Display is in Standby. 06 Basic Operations Basic Operations Turning on the...
... blue. POWER button STANDBY/ON button (Right side view) 26 En Plasma Display (PRO-1540HD) POWER button POWER ON indicator STANDBY indicator (PRO-1140HD) POWER button Turning off . Indicator Status System Status POWER ON STANDBY The Plasma Display has been unplugged or the Plasma Display is in Standby. 06 Basic Operations Basic Operations Turning on the...
Owner's Manual
Page 27
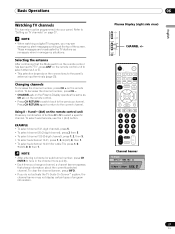
...), 0, 0, then 1. Those messages are broadcasted by TV stations as CH +/- Selecting the antenna After confirming that shows information about the currently selected channel. on the Plasma Display operates the same as necessary when in the channel more quickly. • Each time you change a channel, a channel banner appears that the Mode switch... programmed into your panel. Changing channels To increase the channel number, press CH + on the remote control unit Press any combination of program information. 06 Plasma Display (right side view) CHANNEL +/-
...), 0, 0, then 1. Those messages are broadcasted by TV stations as CH +/- Selecting the antenna After confirming that shows information about the currently selected channel. on the Plasma Display operates the same as necessary when in the channel more quickly. • Each time you change a channel, a channel banner appears that the Mode switch... programmed into your panel. Changing channels To increase the channel number, press CH + on the remote control unit Press any combination of program information. 06 Plasma Display (right side view) CHANNEL +/-
Owner's Manual
Page 28
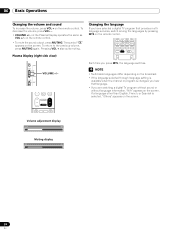
To decrease the volume, press VOL -. • VOLUME +/- Plasma Display (right side view) VOLUME +/- The symbol " " appears on the Plasma Display operates the same as VOL +/- NOTE • Switchable languages differ depending on the broadcast. • If the language selected through language setting is available ...
To decrease the volume, press VOL -. • VOLUME +/- Plasma Display (right side view) VOLUME +/- The symbol " " appears on the Plasma Display operates the same as VOL +/- NOTE • Switchable languages differ depending on the broadcast. • If the language selected through language setting is available ...
Owner's Manual
Page 29
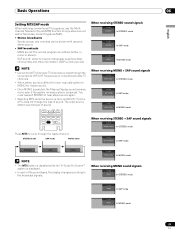
... (STEREO) In SAP mode STEREO SAP MONO NOTE • The MTS button is disabled while the TV Guide On Screen™ system is selected, the Plasma Display sound remains mono even if the system receives a stereo broadcast. Basic Operations 06 English Setting MTS/SAP mode When watching conventional TV programs, use...
... (STEREO) In SAP mode STEREO SAP MONO NOTE • The MTS button is disabled while the TV Guide On Screen™ system is selected, the Plasma Display sound remains mono even if the system receives a stereo broadcast. Basic Operations 06 English Setting MTS/SAP mode When watching conventional TV programs, use...


