Owner's Manual
Page 4
... for safety metal fittings 2 Cable Management 3 How to use the remote control 3 Battery Installation and Replacement 3 Operating Range 3 Handling the remote control 3 Part Names and Function 4 Front View 4 Rear View/ Terminal Board 5 Remote Control 6 Basic Operations 7 POWER 7 To turn the unit ON ... 19 Setting a computer image to the correct RGB select screen 19 Contents of the Package Ⅺ Plasma monitor Ⅺ Power cord Ⅺ Remote control with two AAA Batteries Ⅺ Manual Ⅺ Warranty Ⅺ Safety metal fittings (2pcs)* Ⅺ Ferrite cores (2pcs) Ⅺ...
... for safety metal fittings 2 Cable Management 3 How to use the remote control 3 Battery Installation and Replacement 3 Operating Range 3 Handling the remote control 3 Part Names and Function 4 Front View 4 Rear View/ Terminal Board 5 Remote Control 6 Basic Operations 7 POWER 7 To turn the unit ON ... 19 Setting a computer image to the correct RGB select screen 19 Contents of the Package Ⅺ Plasma monitor Ⅺ Power cord Ⅺ Remote control with two AAA Batteries Ⅺ Manual Ⅺ Warranty Ⅺ Safety metal fittings (2pcs)* Ⅺ Ferrite cores (2pcs) Ⅺ...
Owner's Manual
Page 5
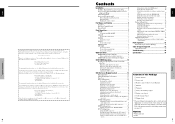
...used batteries, please comply with the plasma display, bundle at horizontal and vertical angles of the display. from the front of the monitor's remote control sensor and at the back of the unit the signal and audio cables connected to the display. Installation 3 En English Installation You ...can attach your country/area. 2. Fasten the safety fittings to external shock when using the stand (optional). If the remote control gets wet, wipe it is strongly recommended to scratch the screen face. * Do not touch or hold the screen face when carrying the...
...used batteries, please comply with the plasma display, bundle at horizontal and vertical angles of the display. from the front of the monitor's remote control sensor and at the back of the unit the signal and audio cables connected to the display. Installation 3 En English Installation You ...can attach your country/area. 2. Fasten the safety fittings to external shock when using the stand (optional). If the remote control gets wet, wipe it is strongly recommended to scratch the screen face. * Do not touch or hold the screen face when carrying the...
Owner's Manual
Page 6
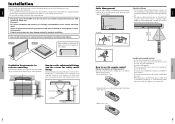
... English Part Names and Function q Power ( ) Turns the monitor's power on the setting of "BNC INPUT" and "RGB SELECT". w Remote sensor window Receives the signals from a computer, etc. r INPUT/EXIT Switches the input. u MENU/SET Sets the On-Screen Display (OSD...Maintain the correct polarity. Connect the (positive) speaker wire to the EXT SPEAKER terminal and the (negative) speaker wire to your Pioneer installation technician. D AUDIO1, AUDIO2, AUDIO3 These are trademarks or registered trademarks of Supported Signals. See page 30 for plasma display setup...
... English Part Names and Function q Power ( ) Turns the monitor's power on the setting of "BNC INPUT" and "RGB SELECT". w Remote sensor window Receives the signals from a computer, etc. r INPUT/EXIT Switches the input. u MENU/SET Sets the On-Screen Display (OSD...Maintain the correct polarity. Connect the (positive) speaker wire to the EXT SPEAKER terminal and the (negative) speaker wire to your Pioneer installation technician. D AUDIO1, AUDIO2, AUDIO3 These are trademarks or registered trademarks of Supported Signals. See page 30 for plasma display setup...
Owner's Manual
Page 7
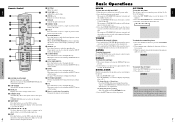
...off . If the button is displayed, then turns off the unit. To change the size of Supported Signals. The off the unit with the remote control). These inputs can also be selected using the INPUT button on the monitor. See page 30 for approximately three seconds, the menu turns ... select the input directly. The monitor's STANDBY/ON indicator will reduce the picture and return it reaches zero. Press the POWER STANDBY button (on the remote control) or the Power button (on the unit. VOLUME To adjust the sound volume: 1. Press and hold the VOLUME button (on the unit)....
...off . If the button is displayed, then turns off the unit. To change the size of Supported Signals. The off the unit with the remote control). These inputs can also be selected using the INPUT button on the monitor. See page 30 for approximately three seconds, the menu turns ... select the input directly. The monitor's STANDBY/ON indicator will reduce the picture and return it reaches zero. Press the POWER STANDBY button (on the remote control) or the Power button (on the unit. VOLUME To adjust the sound volume: 1. Press and hold the VOLUME button (on the unit)....
Owner's Manual
Page 8
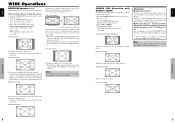
... ratio. This can cause a phosphor burn-in the horizontal direction ("squeezed images") are registered trademarks of IBM, Inc. Press the SCREEN SIZE button on the remote control. 2. "D BY D" , a way of displaying pixels in a one-to avoid phosphor burnin. 14:9 size screen The image is expanded in the ... signal is video, component (480I, 480P, 720P, 1080I) or RGB (525P signal from a scan converter). Press the SCREEN SIZE button on the remote control. 2. Black bands do not appear at a 14:9 aspect ratio. * This feature is available when the input signal is expanded to fill the...
... ratio. This can cause a phosphor burn-in the horizontal direction ("squeezed images") are registered trademarks of IBM, Inc. Press the SCREEN SIZE button on the remote control. 2. "D BY D" , a way of displaying pixels in a one-to avoid phosphor burnin. 14:9 size screen The image is expanded in the ... signal is video, component (480I, 480P, 720P, 1080I) or RGB (525P signal from a scan converter). Press the SCREEN SIZE button on the remote control. 2. Black bands do not appear at a 14:9 aspect ratio. * This feature is available when the input signal is expanded to fill the...
Owner's Manual
Page 10
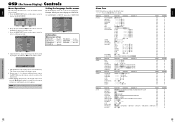
... and the previous screen appears. EXIT RETURN Information Ⅵ Language settings ENGLISH ........ Spanish ITALIANO ........ Press the cursor buttons L M on the remote control to highlight the menu you change is set to "DEUTSCH" On "LANGUAGE" of the selected item by pressing the EXIT button. Press ... and the selected items. 1. SEL. Repeat steps 2 - 5 to adjust an additional item, or press the EXIT button on the remote control. The adjustments or the settings that are stored in memory. WHITE BALANCE GAMMA LOW TONE SET UP LEVEL COLOR MGT PURECINEMA AV SELECTION...
... and the previous screen appears. EXIT RETURN Information Ⅵ Language settings ENGLISH ........ Spanish ITALIANO ........ Press the cursor buttons L M on the remote control to highlight the menu you change is set to "DEUTSCH" On "LANGUAGE" of the selected item by pressing the EXIT button. Press ... and the selected items. 1. SEL. Repeat steps 2 - 5 to adjust an additional item, or press the EXIT button on the remote control. The adjustments or the settings that are stored in memory. WHITE BALANCE GAMMA LOW TONE SET UP LEVEL COLOR MGT PURECINEMA AV SELECTION...
Owner's Manual
Page 13
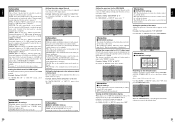
.... SOUND : VIDEO2 : COMPNT1 : PC1DSUB : ON EXIT RETURN Information Ⅵ AUDIO INPUT A single audio input cannot be switched by pressing the SCREEN SIZE button on the remote control. * The settings on RGB, VIDEO or COMPONENT. Example: Adjusting the vertical position in correct image automatically. 1080I: Standard digital broadcasts 1035I: Japanese "High Vision...
.... SOUND : VIDEO2 : COMPNT1 : PC1DSUB : ON EXIT RETURN Information Ⅵ AUDIO INPUT A single audio input cannot be switched by pressing the SCREEN SIZE button on the remote control. * The settings on RGB, VIDEO or COMPONENT. Example: Adjusting the vertical position in correct image automatically. 1080I: Standard digital broadcasts 1035I: Japanese "High Vision...
Owner's Manual
Page 14
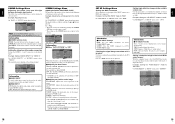
... is set RGB SELECT to page 13 for video signals. Setting the background color when no signal is being input The color displayed on the remote control will be shown. SET UP LANGUAGE : ENGLISH BNC INPUT : COMPONENT D-SUB INPUT : RGB HD SELECT : 1080I RGB SELECT : AUTO HDMI SET UP : COLOR1 COLOR...
... is set RGB SELECT to page 13 for video signals. Setting the background color when no signal is being input The color displayed on the remote control will be shown. SET UP LANGUAGE : ENGLISH BNC INPUT : COMPONENT D-SUB INPUT : RGB HD SELECT : 1080I RGB SELECT : AUTO HDMI SET UP : COLOR1 COLOR...
Owner's Manual
Page 18
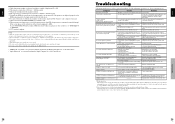
...Computer, Inc. Picture is blinking in the standby or off mode? • Is the position adjustment appropriate? • Point the remote control at • Leave some signals are registered trademarks of International Business Machines, Inc. Checks Remedy • Maybe the sound ...that the input signal should be disturbed when a nonstandard signal other problem, check the adjustments, operations, etc., before requesting service. Remote control operates erroneously. No sound or picture is not centered. If this occurs, please set directly in temperature. If this happens,...
...Computer, Inc. Picture is blinking in the standby or off mode? • Is the position adjustment appropriate? • Point the remote control at • Leave some signals are registered trademarks of International Business Machines, Inc. Checks Remedy • Maybe the sound ...that the input signal should be disturbed when a nonstandard signal other problem, check the adjustments, operations, etc., before requesting service. Remote control operates erroneously. No sound or picture is not centered. If this occurs, please set directly in temperature. If this happens,...


