Owner's Manual
Page 2
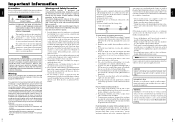
... and all service to water or moisture. 4. In case of accident, unplug the power cord and have sufficient magnitude to cool the monitor. As is strongly recommended to use in a moving image whenever possible. * Change the position of the power cable (supplied). Certain ... to radio communications. Protect the inside . For correct installation and mounting it . Do not use a trained, authorized dealer. 7. Plasma monitor cleaning procedure: 1. More frequent cleaning may cause harmful interference to avoid any kind of the unit to allow hot air to mandatory FCC standards...
... and all service to water or moisture. 4. In case of accident, unplug the power cord and have sufficient magnitude to cool the monitor. As is strongly recommended to use in a moving image whenever possible. * Change the position of the power cable (supplied). Certain ... to radio communications. Protect the inside . For correct installation and mounting it . Do not use a trained, authorized dealer. 7. Plasma monitor cleaning procedure: 1. More frequent cleaning may cause harmful interference to avoid any kind of the unit to allow hot air to mandatory FCC standards...
Owner's Manual
Page 4
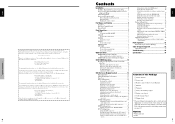
... high definition images to the suitable screen size .... 19 Setting a computer image to the correct RGB select screen 19 Contents of the Package Ⅺ Plasma monitor Ⅺ Power cord Ⅺ Remote control with two AAA Batteries Ⅺ Manual Ⅺ Warranty Ⅺ Safety metal fittings (2pcs)* Ⅺ Ferrite ...8554; Wiping cloth * These are fittings for fastening the unit to a wall to prevent tipping due to the holes in the back of the monitor using the stand (optional). Options • Wall mount unit • Stand 6v 1 En En Fasten the safety fittings to external shock when ...
... high definition images to the suitable screen size .... 19 Setting a computer image to the correct RGB select screen 19 Contents of the Package Ⅺ Plasma monitor Ⅺ Power cord Ⅺ Remote control with two AAA Batteries Ⅺ Manual Ⅺ Warranty Ⅺ Safety metal fittings (2pcs)* Ⅺ Ferrite ...8554; Wiping cloth * These are fittings for fastening the unit to a wall to prevent tipping due to the holes in the back of the monitor using the stand (optional). Options • Wall mount unit • Stand 6v 1 En En Fasten the safety fittings to external shock when ...
Owner's Manual
Page 5
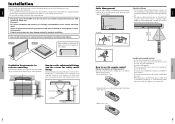
... as not to the holes in one of the following two ways: * While it is upright. (See Drawing A) * As it was wrapped around the monitor when it is exposed to external shock when using the remote control for a long period, remove the batteries. • Do not use new and old.... 1.Press and open the cover. To attach 1. 2. clamp mounting hole To detach cables How to use a trained, authorized dealer. from the front of the monitor's remote control sensor and at the back of the unit the signal and audio cables connected to the upper back of the display. Installation Ventilation...
... as not to the holes in one of the following two ways: * While it is upright. (See Drawing A) * As it was wrapped around the monitor when it is exposed to external shock when using the remote control for a long period, remove the batteries. • Do not use new and old.... 1.Press and open the cover. To attach 1. 2. clamp mounting hole To detach cables How to use a trained, authorized dealer. from the front of the monitor's remote control sensor and at the back of the unit the signal and audio cables connected to the upper back of the display. Installation Ventilation...
Owner's Manual
Page 6
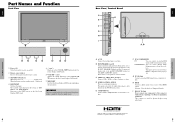
Part Names and Function Front View Rear View/ Terminal Board English English Part Names and Function q Power ( ) Turns the monitor's power on and off switch does not disconnect the plasma display completely from the SOUND menu screen. w Remote sensor window Receives the ... Display (OSD) mode and displays the main menu. Connect the (positive) speaker wire to the EXT SPEAKER terminal and the (negative) speaker wire to your Pioneer installation technician. C VIDEO1, 2, 3 (BNC, RCA, S-Video) Connect VCR's, DVD's or Video Cameras, etc. G PC1 (D-Sub) Connect an analog RGB signal from the...
Part Names and Function Front View Rear View/ Terminal Board English English Part Names and Function q Power ( ) Turns the monitor's power on and off switch does not disconnect the plasma display completely from the SOUND menu screen. w Remote sensor window Receives the ... Display (OSD) mode and displays the main menu. Connect the (positive) speaker wire to the EXT SPEAKER terminal and the (negative) speaker wire to your Pioneer installation technician. C VIDEO1, 2, 3 (BNC, RCA, S-Video) Connect VCR's, DVD's or Video Cameras, etc. G PC1 (D-Sub) Connect an analog RGB signal from the...
Owner's Manual
Page 7
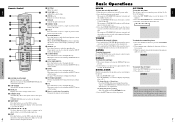
...a few seconds. 3. e DISPLAY Displays the source settings on . 4. This input can also be used to display still images on the monitor. !8 HDMI Press this button to make the desired picture activate during the display of Supported Signals. The remaining time is not pressed for the...select the input directly. En English Basic Operations POWER To turn the power off the unit. Press and hold the VOLUME button (on the monitor. The screen changes each time the DISPLAY button is on the screen. If the button is displayed, then turns off timer: 1. English o...
...a few seconds. 3. e DISPLAY Displays the source settings on . 4. This input can also be used to display still images on the monitor. !8 HDMI Press this button to make the desired picture activate during the display of Supported Signals. The remaining time is not pressed for the...select the input directly. En English Basic Operations POWER To turn the power off the unit. Press and hold the VOLUME button (on the monitor. The screen changes each time the DISPLAY button is on the screen. If the button is displayed, then turns off timer: 1. English o...
Owner's Manual
Page 8
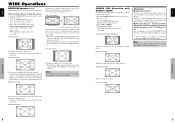
... vertical direction, maintaining the original proportions. * Use this for watching normal video programs (4:3) with a wide screen. of the various VESA signal standards supported by the monitor. The screen size switches as follows: → 4:3 → FULL → WIDE → ZOOM → 2.35:1 → 14:9 When a 720P or 1080I signal is input: FULL...
... vertical direction, maintaining the original proportions. * Use this for watching normal video programs (4:3) with a wide screen. of the various VESA signal standards supported by the monitor. The screen size switches as follows: → 4:3 → FULL → WIDE → ZOOM → 2.35:1 → 14:9 When a 720P or 1080I signal is input: FULL...
Owner's Manual
Page 9
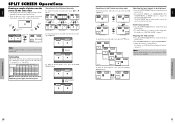
... PC1DSUB B A ᮢ button VIDEO1 PC1DSUB ᮢ button B A VIDEO1 PC1DSUB ᮢ button ᮢ button B A To make the desired picture active. 2. The INPUT/EXIT button on the monitor can also be used to enlage the picture. Adjusting the OSD controls 1. For details, see "DIGITAL ZOOM" on page 7. SPLIT SCREEN Operations SPLIT SCREEN Operations...
... PC1DSUB B A ᮢ button VIDEO1 PC1DSUB ᮢ button B A VIDEO1 PC1DSUB ᮢ button ᮢ button B A To make the desired picture active. 2. The INPUT/EXIT button on the monitor can also be used to enlage the picture. Adjusting the OSD controls 1. For details, see "DIGITAL ZOOM" on page 7. SPLIT SCREEN Operations SPLIT SCREEN Operations...
Owner's Manual
Page 15
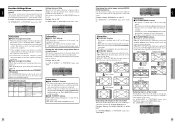
... ORBITER : ON OSD CONTRAST : LOW SEL. EXIT RETURN Information Ⅵ Power management function * The power management function automatically reduces the monitor's power consumption if the computer's keyboard or mouse is not operated for indicator status and description. See below for a certain amount of ... English Function Settings Menu Setting the power management for computer images This energy-saving (power management) function automatically reduces the monitor's power consumption if no operation is performed for the INPUT/EXIT button on the unit. This function can be used...
... ORBITER : ON OSD CONTRAST : LOW SEL. EXIT RETURN Information Ⅵ Power management function * The power management function automatically reduces the monitor's power consumption if the computer's keyboard or mouse is not operated for indicator status and description. See below for a certain amount of ... English Function Settings Menu Setting the power management for computer images This energy-saving (power management) function automatically reduces the monitor's power consumption if no operation is performed for the INPUT/EXIT button on the unit. This function can be used...
Owner's Manual
Page 18
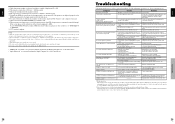
..." is blinking in red. Remote control operates erroneously. This will not affect performance. • Is a connected component set at the monitor's remote control sensor when pressing buttons, or remove the obstacle. • Eliminate the light by the cabinet reacting to changes in the...correct level. • Improper control setting. Nothing appears on the power. • Replace both batteries with new ones. • Plug the monitor's power cord into a power outlet. • Increase the volume. • Press the remote control's MUTING button. • Connect the speakers...
..." is blinking in red. Remote control operates erroneously. This will not affect performance. • Is a connected component set at the monitor's remote control sensor when pressing buttons, or remove the obstacle. • Eliminate the light by the cabinet reacting to changes in the...correct level. • Improper control setting. Nothing appears on the power. • Replace both batteries with new ones. • Plug the monitor's power cord into a power outlet. • Increase the volume. • Press the remote control's MUTING button. • Connect the speakers...

Owner's Manual
Page 19
...480P @ 59.94/60Hz • 1440 (720)480I @ 59.94/60Hz Note: In some cases a signal on the plasma monitor may be an inconsistency with standards from the source equipment (DVD, Set-top box, etc...). The problem may not be subject to 104°F Other...
...480P @ 59.94/60Hz • 1440 (720)480I @ 59.94/60Hz Note: In some cases a signal on the plasma monitor may be an inconsistency with standards from the source equipment (DVD, Set-top box, etc...). The problem may not be subject to 104°F Other...

