
Owner's Manual
Page 4
...View 4 Rear View/ Terminal Board 5 Remote Control 6 Basic Operations 7 POWER 7 To turn the unit ON and OFF 7 VOLUME 7 To adjust the sound volume 7 MUTING 7 To mute the sound 7 DISPLAY 7 To check the settings 7 DIGITAL ZOOM 7 OFF TIMER 7 To set the off timer 7 To check the remaining time 7 To cancel ...Adjusting the colors 17 Setting the picture to suit the movie 17 Setting the picture modes according to the brightness of the room 17 SOUND Settings Menu 18 Adjusting the treble, bass and left/right balance and audio input select 18 Setting the allocation of the audio connectors...
...View 4 Rear View/ Terminal Board 5 Remote Control 6 Basic Operations 7 POWER 7 To turn the unit ON and OFF 7 VOLUME 7 To adjust the sound volume 7 MUTING 7 To mute the sound 7 DISPLAY 7 To check the settings 7 DIGITAL ZOOM 7 OFF TIMER 7 To set the off timer 7 To check the remaining time 7 To cancel ...Adjusting the colors 17 Setting the picture to suit the movie 17 Setting the picture modes according to the brightness of the room 17 SOUND Settings Menu 18 Adjusting the treble, bass and left/right balance and audio input select 18 Setting the allocation of the audio connectors...
Owner's Manual
Page 6
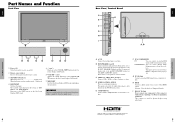
... etc. here. F PC2/ COMPONENT2 PC2: You can connect DVDs, High Definition sources, Laser Discs, etc. G PC1 (D-Sub) Connect an analog RGB signal from the SOUND menu screen. See page 30 for the details of HDMI Licensing LLC. 5 En The available inputs depend on Lights green. Functions as the EXIT buttons... the remote control. This connector is selectable. B EXT SPEAKER L and R Connect speakers (optional) here. I RS-232C (D-Sub) Never connect any component to your Pioneer installation technician. t and Functions as the CURSOR buttons in the standby mode ... here.
... etc. here. F PC2/ COMPONENT2 PC2: You can connect DVDs, High Definition sources, Laser Discs, etc. G PC1 (D-Sub) Connect an analog RGB signal from the SOUND menu screen. See page 30 for the details of HDMI Licensing LLC. 5 En The available inputs depend on Lights green. Functions as the EXIT buttons... the remote control. This connector is selectable. B EXT SPEAKER L and R Connect speakers (optional) here. I RS-232C (D-Sub) Never connect any component to your Pioneer installation technician. t and Functions as the CURSOR buttons in the standby mode ... here.
Owner's Manual
Page 7
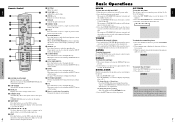
...MEMORY Switches sequentially between picture memory settings 1 to the previous menu. e DISPLAY Displays the source settings on the remote control to mute the sound press again to select the input directly. Press this button to restore. Press the POWER STANDBY button (on the remote control) or the ... the INPUT button on the remote control or the unit) to increase to turn the unit ON and OFF: 1. English o VOLUME (+ /-) Adjusts the sound volume. !0 ZOOM (+ /-) Enlarges or reduces the image. !1 SINGLE Cancels the split screen mode. !2 SIDE BY SIDE Press this button to show a...
...MEMORY Switches sequentially between picture memory settings 1 to the previous menu. e DISPLAY Displays the source settings on the remote control to mute the sound press again to select the input directly. Press this button to restore. Press the POWER STANDBY button (on the remote control) or the ... the INPUT button on the remote control or the unit) to increase to turn the unit ON and OFF: 1. English o VOLUME (+ /-) Adjusts the sound volume. !0 ZOOM (+ /-) Enlarges or reduces the image. !1 SINGLE Cancels the split screen mode. !2 SIDE BY SIDE Press this button to show a...
Owner's Manual
Page 10
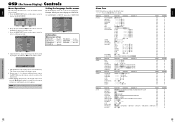
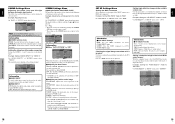
MAIN MENU PICTURE SET UP SOUND FUNCTION SCREEN SIGNAL INFO. PICTURE PICTURE MEMORY : OFF CONTRAST BRIGHTNESS SHARPNESS COLOR TINT R G DNR : LOW COLOR TEMP. : MIDDLE GAMMA : 2.1 LOW TONE : AUTO SET UP LEVEL : 0 ... you change it again. 6. Adjust the level or change is set to enter. 3. The change the setting of seven languages. Main menu PICTURE Main menu SOUND Main menu SCREEN Sub menu PICTURE MEMORY CONTRAST BRIGHTNESS SHARPNESS COLOR TINT DNR COLOR TEMP. ADJ. English OSD (On Screen Display) Controls Menu Operations The...
MAIN MENU PICTURE SET UP SOUND FUNCTION SCREEN SIGNAL INFO. PICTURE PICTURE MEMORY : OFF CONTRAST BRIGHTNESS SHARPNESS COLOR TINT R G DNR : LOW COLOR TEMP. : MIDDLE GAMMA : 2.1 LOW TONE : AUTO SET UP LEVEL : 0 ... you change it again. 6. Adjust the level or change is set to enter. 3. The change the setting of seven languages. Main menu PICTURE Main menu SOUND Main menu SCREEN Sub menu PICTURE MEMORY CONTRAST BRIGHTNESS SHARPNESS COLOR TINT DNR COLOR TEMP. ADJ. English OSD (On Screen Display) Controls Menu Operations The...
Owner's Manual
Page 13
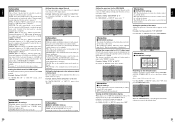
... V.POSITION: Adjusts the vertical position of input. ADJ. EXIT RETURN OSD (On Screen Display) Controls 19 En ADJ. Information Ⅵ SOUND settings menu BASS: Controls the level of the image. Setting the allocation of the audio connectors Setting the AUDIO 1, 2, and 3 connectors...On "AUDIO INPUT1" of "SET UP" menu, select "MOTION". ADJ. Checking the signal being transmitted to "MOTION " On "RGB SELECT" of "SOUND" menu, select "VIDEO2". SET UP LANGUAGE : ENGLISH BNC INPUT : COMPONENT D-SUB INPUT : RGB HD SELECT : 1080I RGB SELECT : MOTION HDMI ...
... V.POSITION: Adjusts the vertical position of input. ADJ. EXIT RETURN OSD (On Screen Display) Controls 19 En ADJ. Information Ⅵ SOUND settings menu BASS: Controls the level of the image. Setting the allocation of the audio connectors Setting the AUDIO 1, 2, and 3 connectors...On "AUDIO INPUT1" of "SET UP" menu, select "MOTION". ADJ. Checking the signal being transmitted to "MOTION " On "RGB SELECT" of "SOUND" menu, select "VIDEO2". SET UP LANGUAGE : ENGLISH BNC INPUT : COMPONENT D-SUB INPUT : RGB HD SELECT : 1080I RGB SELECT : MOTION HDMI ...
Owner's Manual
Page 14
... OSD ADJUST : TOP LEFT ALL RESET : ON SEL. EXIT RETURN ALL RESET SETTING NOW When the "SETTING NOW" screen disappears, then all the settings (PICTURE, SOUND, SCREEN, SET UP, etc) to the factory default values. STILL: To display VESA standard signals. (Use this , set RGB SELECT to black. Set to the...
... OSD ADJUST : TOP LEFT ALL RESET : ON SEL. EXIT RETURN ALL RESET SETTING NOW When the "SETTING NOW" screen disappears, then all the settings (PICTURE, SOUND, SCREEN, SET UP, etc) to the factory default values. STILL: To display VESA standard signals. (Use this , set RGB SELECT to black. Set to the...
Owner's Manual
Page 18
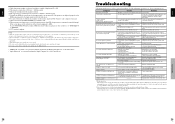
...nonstandard signal other problem, check the adjustments, operations, etc., before requesting service. Picture appears but no abnormalities in the image and sound, the noise is lighted in red. Nothing appears on when the remote control's power button is 5:4. Image is produced. STANDBY/...the Intelligent Power Manager control is there an obstacle between the display and the the side of the display? The unit emits a crackling sound. Remote control operates erroneously. connected components. • Are the remote control's batteries worn out? • Is the monitor's power ...
...nonstandard signal other problem, check the adjustments, operations, etc., before requesting service. Picture appears but no abnormalities in the image and sound, the noise is lighted in red. Nothing appears on when the remote control's power button is 5:4. Image is produced. STANDBY/...the Intelligent Power Manager control is there an obstacle between the display and the the side of the display? The unit emits a crackling sound. Remote control operates erroneously. connected components. • Are the remote control's batteries worn out? • Is the monitor's power ...

Owner's Manual
Page 19
...;1*1 BNC (Y, PB[CB], PR[CR])ן1*1, *2 HDMI connector*3 Audio Stereo RCAן3 (Selectable) RS-232C D-sub 9-pinן1 Sound output 9W+9W at 6 ohm Power Supply AC120V 60Hz Current Rating 6.7A (maximum) Power Consumption 540W (typical) (standby 0.9W) Dimensions 59.1 (W)ן35...
...;1*1 BNC (Y, PB[CB], PR[CR])ן1*1, *2 HDMI connector*3 Audio Stereo RCAן3 (Selectable) RS-232C D-sub 9-pinן1 Sound output 9W+9W at 6 ohm Power Supply AC120V 60Hz Current Rating 6.7A (maximum) Power Consumption 540W (typical) (standby 0.9W) Dimensions 59.1 (W)ן35...


