Owner's Manual
Page 3
...TABLE OF CONTENTS 1 Introduction to the ELITE Series Flat Panel TVs 6 1.1 Flat Panel TV Shipment Checklist ...6 1.2 Control Options: Get to Know Your Flat Panel TV ...8 1.2.1 Control Buttons and More on the Flat Panel TV ...8 1.2.2 Operating the Remote Control ...10 1.2.3 Buttons on your purchase of the best ...50 3 En We are felt and sounds can be tasted. A place where the senses evolve, colors are proud to incorporate this owner's guide and manual to learn about the many features and benefits that changes not only the way you look at the world. KURO is the future of Pioneer...
...TABLE OF CONTENTS 1 Introduction to the ELITE Series Flat Panel TVs 6 1.1 Flat Panel TV Shipment Checklist ...6 1.2 Control Options: Get to Know Your Flat Panel TV ...8 1.2.1 Control Buttons and More on the Flat Panel TV ...8 1.2.2 Operating the Remote Control ...10 1.2.3 Buttons on your purchase of the best ...50 3 En We are felt and sounds can be tasted. A place where the senses evolve, colors are proud to incorporate this owner's guide and manual to learn about the many features and benefits that changes not only the way you look at the world. KURO is the future of Pioneer...
Owner's Manual
Page 4
...Panel TV 78 5.1 Program the Remote Control to Operate Other Equipment 78 5.1.1 Use the Learning Feature...78 5.1.2 Assign a Manufacturing Code to the Remote Control 79 5.1.3 Issue a Library Search for a Manufacturer Code 79 5.1.4 Clear Added Manufacturer Codes from the Remote Control 80 5.1.5 Control a Pioneer Receiver ......84 5.2.2 Specify a Digital HDMI Signal Type ...85 5.2.3 Specify an Audio HDMI Signal Type ...85 5.3 Control Equipment with the Panel's Remote Through HDMI 86 5.3.1 Control an AV System...88 5.3.2 Control a Recorder ...89 5.3.3 Control a Player...89 5.3.4 Add an AV Amp ...
...Panel TV 78 5.1 Program the Remote Control to Operate Other Equipment 78 5.1.1 Use the Learning Feature...78 5.1.2 Assign a Manufacturing Code to the Remote Control 79 5.1.3 Issue a Library Search for a Manufacturer Code 79 5.1.4 Clear Added Manufacturer Codes from the Remote Control 80 5.1.5 Control a Pioneer Receiver ......84 5.2.2 Specify a Digital HDMI Signal Type ...85 5.2.3 Specify an Audio HDMI Signal Type ...85 5.3 Control Equipment with the Panel's Remote Through HDMI 86 5.3.1 Control an AV System...88 5.3.2 Control a Recorder ...89 5.3.3 Control a Player...89 5.3.4 Add an AV Amp ...
Owner's Manual
Page 5
French Ratings (age-based)...137 8.2 Manufacturer Codes to Program into the Remote Control 138 8.2.1 Cable...138 8.2.2 Satellite...138 8.2.3 VCR (Brands A - O)...140 8.2.5 VCR (Brands P - TV Parental Guideline Ratings (age/category-based 136 8.1.3 MPAA Movie Ratings (age-based) ...136 8.1.4 Canadian - N) ...143 8.2.11 DVD (Brands O - Z)......the Home Media Gallery...98 5.8.1 Show Your Movie Files on the Flat Panel TV ...101 5.8.2 Play Your Music Files on the Flat Panel TV ...103 5.8.3 Show Your Photo File on the Flat Panel TV ...104 5.9 Use the TOOLS Menu ...106 5.10 HMG Setup ...118 5.11...
French Ratings (age-based)...137 8.2 Manufacturer Codes to Program into the Remote Control 138 8.2.1 Cable...138 8.2.2 Satellite...138 8.2.3 VCR (Brands A - O)...140 8.2.5 VCR (Brands P - TV Parental Guideline Ratings (age/category-based 136 8.1.3 MPAA Movie Ratings (age-based) ...136 8.1.4 Canadian - N) ...143 8.2.11 DVD (Brands O - Z)......the Home Media Gallery...98 5.8.1 Show Your Movie Files on the Flat Panel TV ...101 5.8.2 Play Your Music Files on the Flat Panel TV ...103 5.8.3 Show Your Photo File on the Flat Panel TV ...104 5.9 Use the TOOLS Menu ...106 5.10 HMG Setup ...118 5.11...
Owner's Manual
Page 6
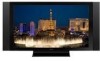
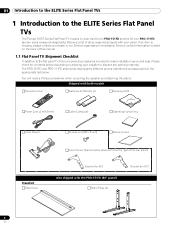
... models Remote Control Batteries for Remote (2) Cleaning Cloth Power Cord (2 m/6.6 feet) Cable Clamps (4) Operating Instructions Color Sensor Screws (x 2) (M5 x 8 mm) Warranty Card Stand kit Base Cover Color Sensor Bracket (when attached to the ELITE Series Flat Panel TVs The Pioneer ELITE Series Flat Panel TV models include the 60-inch PRO-151FD and the 50-inch PRO-111FD (screen...
... models Remote Control Batteries for Remote (2) Cleaning Cloth Power Cord (2 m/6.6 feet) Cable Clamps (4) Operating Instructions Color Sensor Screws (x 2) (M5 x 8 mm) Warranty Card Stand kit Base Cover Color Sensor Bracket (when attached to the ELITE Series Flat Panel TVs The Pioneer ELITE Series Flat Panel TV models include the 60-inch PRO-151FD and the 50-inch PRO-111FD (screen...

Owner's Manual
Page 8
... compartment to the drawings below for the panel and the remote control. 1.2.1 Control Buttons and More on the Flat Panel TV Your flat panel TV has buttons, indicators, and sensors on the panel sides. Power ON indicator 2 - SLEEP indicator Command Side of Panel 6 (PRO-111FD) 1 23 1 - ELITE Series Models: Face of the Panel (left side...
... compartment to the drawings below for the panel and the remote control. 1.2.1 Control Buttons and More on the Flat Panel TV Your flat panel TV has buttons, indicators, and sensors on the panel sides. Power ON indicator 2 - SLEEP indicator Command Side of Panel 6 (PRO-111FD) 1 23 1 - ELITE Series Models: Face of the Panel (left side...
Owner's Manual
Page 10
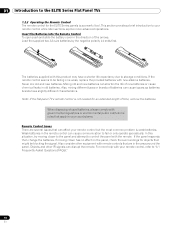
...this situation, try moving closer has no effect on the panel, check the surroundings for objects that can disrupt the remote. Note: If the flat panel TV's remote control is not needed for an extended length of batteries can cause issues as batteries brands have a shorter life expectancy... equipment with new alkaline batteries. Insert the Batteries into the Remote Control To open push and slide the battery cover in old batteries. 01 Introduction to the ELITE Series Flat Panel TVs 1.2.2 Operating the Remote Control The remote control for the ELITE Series panels is weak batteries. When ...
...this situation, try moving closer has no effect on the panel, check the surroundings for objects that can disrupt the remote. Note: If the flat panel TV's remote control is not needed for an extended length of batteries can cause issues as batteries brands have a shorter life expectancy... equipment with new alkaline batteries. Insert the Batteries into the Remote Control To open push and slide the battery cover in old batteries. 01 Introduction to the ELITE Series Flat Panel TVs 1.2.2 Operating the Remote Control The remote control for the ELITE Series panels is weak batteries. When ...
Owner's Manual
Page 11
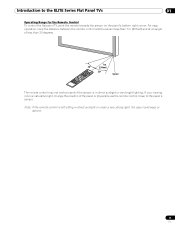
...very bright lighting. For easy operation, keep the distance between the remote control and the sensor less than 7 m (23 feet) and at an angle of less than 30 degrees. 7 m 30º (23 feet) 30º Sensor The remote control may not work properly if the sensor is naturally bright,... change the position of the panel or physically use the remote control closer to the ELITE Series Flat Panel TVs 01 Operating Range for the Remote Control To control the flat panel TV, point the remote towards the sensor on the panel's bottom right corner. Introduction to the panel...
...very bright lighting. For easy operation, keep the distance between the remote control and the sensor less than 7 m (23 feet) and at an angle of less than 30 degrees. 7 m 30º (23 feet) 30º Sensor The remote control may not work properly if the sensor is naturally bright,... change the position of the panel or physically use the remote control closer to the ELITE Series Flat Panel TVs 01 Operating Range for the Remote Control To control the flat panel TV, point the remote towards the sensor on the panel's bottom right corner. Introduction to the panel...

Owner's Manual
Page 12
... a few options, commands available through the buttons on the flat panel TV are duplicated on the remote control. This section identifies and describes the buttons on the remote control. The remote control can be programmed to control other equipment such as an input source...-channel VOL +/-: 9 Set the volume EXIT: 10 Exit the menu to return to the ELITE Series Flat Panel TVs 1.2.3 Buttons on the Remote Control Except for TV/RCV, CBL/SAT, VCR, or DVD/DVR TV 1 INPUT 1 2 3 4 2 TV/DTV 5 6 7 AV SCREEN SELECTION DISPLAY SIZE 3PC 4 FREEZE 5SPLIT 6 SWAP SHIFT 1 2 3 4 75 ...
... a few options, commands available through the buttons on the flat panel TV are duplicated on the remote control. This section identifies and describes the buttons on the remote control. The remote control can be programmed to control other equipment such as an input source...-channel VOL +/-: 9 Set the volume EXIT: 10 Exit the menu to return to the ELITE Series Flat Panel TVs 1.2.3 Buttons on the Remote Control Except for TV/RCV, CBL/SAT, VCR, or DVD/DVR TV 1 INPUT 1 2 3 4 2 TV/DTV 5 6 7 AV SCREEN SELECTION DISPLAY SIZE 3PC 4 FREEZE 5SPLIT 6 SWAP SHIFT 1 2 3 4 75 ...
Owner's Manual
Page 13
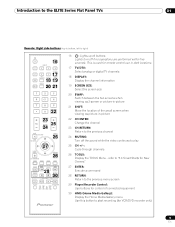
...(Home Media Gallery): Display the Home Media Gallery menu Use this button to start recording (for remote control use in dark locations. 17 TV/DTV: Select analog or digital TV channels 18 DISPLAY: Display the channel information 19 SCREEN SIZE: Select the screen size 20 SWAP... 24 MUTING: Turn off if no operations are performed within five seconds. Introduction to the ELITE Series Flat Panel TVs 01 Remote: Right side buttons (top to bottom, left to right) TV 16 INPUT 1 2 3 4 TV/DTV 17 5 6 7 AV SCREEN SELECTION DISPLAY SIZE PC 18 19 FREEZE SPLIT 20 21 SWAP SHIFT 1 2 3 4 5...
...(Home Media Gallery): Display the Home Media Gallery menu Use this button to start recording (for remote control use in dark locations. 17 TV/DTV: Select analog or digital TV channels 18 DISPLAY: Display the channel information 19 SCREEN SIZE: Select the screen size 20 SWAP... 24 MUTING: Turn off if no operations are performed within five seconds. Introduction to the ELITE Series Flat Panel TVs 01 Remote: Right side buttons (top to bottom, left to right) TV 16 INPUT 1 2 3 4 TV/DTV 17 5 6 7 AV SCREEN SELECTION DISPLAY SIZE PC 18 19 FREEZE SPLIT 20 21 SWAP SHIFT 1 2 3 4 5...
Owner's Manual
Page 29
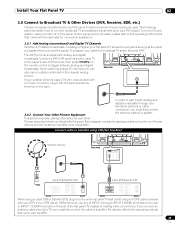
... the STB cable provided with the device(s) for connection assistance. 2.6.1 Add Analog (conventional) and Digital TV Channels Whether a TV station broadcasts in Analog or Digital, your other Pioneer equipment when combined with the STB. 29 En If your equipment is not listed, please refer to ... TV, select terminal ANT. If you connect an antenna cable directly to TV, you must first connect 2.6.2 Connect Your Other Pioneer Equipment the antenna cable to a splitter. Connect a VHF/UHF antenna and/or cable TV to the panel's rear ANT terminal, then press TV/DTV on the remote ...
... the STB cable provided with the device(s) for connection assistance. 2.6.1 Add Analog (conventional) and Digital TV Channels Whether a TV station broadcasts in Analog or Digital, your other Pioneer equipment when combined with the STB. 29 En If your equipment is not listed, please refer to ... TV, select terminal ANT. If you connect an antenna cable directly to TV, you must first connect 2.6.2 Connect Your Other Pioneer Equipment the antenna cable to a splitter. Connect a VHF/UHF antenna and/or cable TV to the panel's rear ANT terminal, then press TV/DTV on the remote ...
Owner's Manual
Page 34
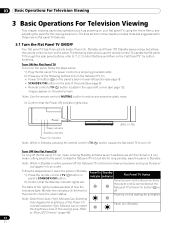
... Sleep indicator (PRO-111FD) Standby indicator Power On indicator Note: While in Standby, pressing the remote control's TV (a) button causes the flat panel TV to match Panel is in Standby the brightness level of the viewing area. Selecting Auto toggles the brightness of how the flat panel TV's Power On ... sit idle for long periods, leave the panel in the upper left section (see page 8) • Remote control's TV (a) button located in Standby. Unless the flat panel TV is to the right provides samples of the Power On indicator between High, Mid and Low to turn On...
... Sleep indicator (PRO-111FD) Standby indicator Power On indicator Note: While in Standby, pressing the remote control's TV (a) button causes the flat panel TV to match Panel is in Standby the brightness level of the viewing area. Selecting Auto toggles the brightness of how the flat panel TV's Power On ... sit idle for long periods, leave the panel in the upper left section (see page 8) • Remote control's TV (a) button located in Standby. Unless the flat panel TV is to the right provides samples of the Power On indicator between High, Mid and Low to turn On...
Owner's Manual
Page 35
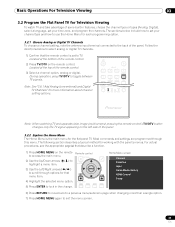
... to a previous menu/submenu page when changing more information about channel setting options. Located at the bottom of the remote control. 2) Press TV/DTV on the remote control. Remote control SAT GUIDE DVD TOP MENU ENTER HOME MENU 4) Highlight the selected menu option. RETURN Home Menu screen Channel ... Home Media Gallery HDMI Control Setup 6) Press RETURN to move back to select analog or digital TV channels. 1) Confirm that the remote control is the main menu for the flat panel TV. Follow the directions below include how to exit the menu screen. 35 En Note: See "2.6.1...
... to a previous menu/submenu page when changing more information about channel setting options. Located at the bottom of the remote control. 2) Press TV/DTV on the remote control. Remote control SAT GUIDE DVD TOP MENU ENTER HOME MENU 4) Highlight the selected menu option. RETURN Home Menu screen Channel ... Home Media Gallery HDMI Control Setup 6) Press RETURN to move back to select analog or digital TV channels. 1) Confirm that the remote control is the main menu for the flat panel TV. Follow the directions below include how to exit the menu screen. 35 En Note: See "2.6.1...
Owner's Manual
Page 38
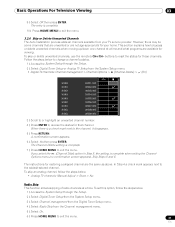
...a power outage, the time must be reset. to activate/deactivate Daylight Saving Time. 7 ) Select the proper option for your area. Using the remote control, follow the steps below to set the clock. 1 ) Access the System Setup through the Setup. 2 ) Select Auto Installation from the ... HOME MENU to close the menu and exit. 3.2.5 Create the List of Channels This section describes how to search for and adds TV channels to your selected TV provider. Time Zone D.S.T. : Atlantic : On 6 ) Select the menu option D.S.T. 03 Basic Operations For Television Viewing 3.2.4 Set the...
...a power outage, the time must be reset. to activate/deactivate Daylight Saving Time. 7 ) Select the proper option for your area. Using the remote control, follow the steps below to set the clock. 1 ) Access the System Setup through the Setup. 2 ) Select Auto Installation from the ... HOME MENU to close the menu and exit. 3.2.5 Create the List of Channels This section describes how to search for and adds TV channels to your selected TV provider. Time Zone D.S.T. : Atlantic : On 6 ) Select the menu option D.S.T. 03 Basic Operations For Television Viewing 3.2.4 Set the...
Owner's Manual
Page 41
... (no confirmation screen appears). When there is complete. 7 ) Press HOME MENU to reset the status for restoring a skipped channel are available for your TV service provider. Skip Steps 5 and 6. To skip an analog channel, follow the steps below. 1 ) Access the System Setup through the Setup. 2...status for that are unwanted or are not age-appropriate for viewing. The instructions for those channels. To skip or delete unwanted channels, use the remote's CH+/CH- In Step 4 a check mark appears next to exit the menu. 41 En A confirmation screen appears. 6 ) Select Yes ...
... (no confirmation screen appears). When there is complete. 7 ) Press HOME MENU to reset the status for restoring a skipped channel are available for your TV service provider. Skip Steps 5 and 6. To skip an analog channel, follow the steps below. 1 ) Access the System Setup through the Setup. 2...status for that are unwanted or are not age-appropriate for viewing. The instructions for those channels. To skip or delete unwanted channels, use the remote's CH+/CH- In Step 4 a check mark appears next to exit the menu. 41 En A confirmation screen appears. 6 ) Select Yes ...
Owner's Manual
Page 43
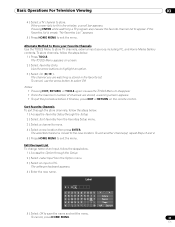
... an Input, follow the steps below . 1 ) Press TOOLS. The selected channel is empty, "No Favorites List." Pressing ENTER while watching a TV program also causes the favorite channel list to store. To cancel, use the arrow button to save the name and exit the menu. Label K ...watching is stored in the window, a scroll bar appears. appears. 5 ) Press HOME MENU to store TV channels, external input sources including PC, and Home Media Gallery contents. The TOOLS Menu appears on the remote control. To sort another channel(s), repeat Steps 3 and 4. 5 ) Press HOME MENU to highlight an...
... an Input, follow the steps below . 1 ) Press TOOLS. The selected channel is empty, "No Favorites List." Pressing ENTER while watching a TV program also causes the favorite channel list to store. To cancel, use the arrow button to save the name and exit the menu. Label K ...watching is stored in the window, a scroll bar appears. appears. 5 ) Press HOME MENU to store TV channels, external input sources including PC, and Home Media Gallery contents. The TOOLS Menu appears on the remote control. To sort another channel(s), repeat Steps 3 and 4. 5 ) Press HOME MENU to highlight an...

Owner's Manual
Page 44
...3.3.3 Turn On the Sleep Timer To save energy and to maximize the life of your flat panel TV can do. 3.3.1 Change the Channel/Sub-Channel With the remote control pointed at the panel's remote sensor, press the CH + button to sequentially change sequentially from station to increase the sound volume ...gradually. The CH - Simply press the number buttons in the order needed for that your flat panel TV, try using the ...
...3.3.3 Turn On the Sleep Timer To save energy and to maximize the life of your flat panel TV can do. 3.3.1 Change the Channel/Sub-Channel With the remote control pointed at the panel's remote sensor, press the CH + button to sequentially change sequentially from station to increase the sound volume ...gradually. The CH - Simply press the number buttons in the order needed for that your flat panel TV, try using the ...
Owner's Manual
Page 48
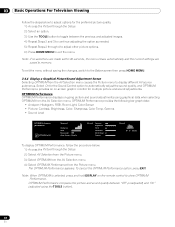
...) and "On" (adjusted using graphical data when selecting OPTIMUM from the AV Selection menu. Note: When OPTIMUM is selected, press and hold DISPLAY on the remote control to memory. OPTIMUM Performance provides the following bar graph data: • Analyzer: Histogram, RGB, Room Light, Color Sensor • Picture: Contrast, Brightness, Color, Sharpness...
...) and "On" (adjusted using graphical data when selecting OPTIMUM from the AV Selection menu. Note: When OPTIMUM is selected, press and hold DISPLAY on the remote control to memory. OPTIMUM Performance provides the following bar graph data: • Analyzer: Histogram, RGB, Room Light, Color Sensor • Picture: Contrast, Brightness, Color, Sharpness...
Owner's Manual
Page 55
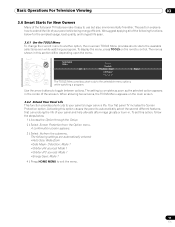
...watching a program. Use the arrow buttons to your panel's longer service life. Your flat panel TV includes the Screen Protection option. When showing two screens, the TOOLS Menu appears on the remote control. Basic Operations For Television Viewing 03 3.6 Smart Starts for the simplest usage, best quality... function provides short-cuts to toggle between options. Activating this option causes the panel to extend the life of the flat panel TV features make it easy to the selectable menu options while watching a program. This section explains how to automatically select the several ...
...watching a program. Use the arrow buttons to your panel's longer service life. Your flat panel TV includes the Screen Protection option. When showing two screens, the TOOLS Menu appears on the remote control. Basic Operations For Television Viewing 03 3.6 Smart Starts for the simplest usage, best quality... function provides short-cuts to toggle between options. Activating this option causes the panel to extend the life of the flat panel TV features make it easy to the selectable menu options while watching a program. This section explains how to automatically select the several ...

Owner's Manual
Page 56
...The farthest edges of your panel while keeping power usage at times as the picture position shifts. To cancel the Video Pattern screen, press the remote's TV (a) or the panel's STANDBY/ON. A confirmation screen appears. 3 ) Select Start from the submenu. The recommended setting, Energy Save Mode 1, ...extends the life of an image may appear to drop slightly on screen. While the Video Pattern screen is on, only the remote's TV (a) button and the panel's STANDBY/ON button is on the screen. 3.6.4 Trigger the Screen-Saving Video Pattern Periodically The Video Pattern ...
...The farthest edges of your panel while keeping power usage at times as the picture position shifts. To cancel the Video Pattern screen, press the remote's TV (a) or the panel's STANDBY/ON. A confirmation screen appears. 3 ) Select Start from the submenu. The recommended setting, Energy Save Mode 1, ...extends the life of an image may appear to drop slightly on screen. While the Video Pattern screen is on, only the remote's TV (a) button and the panel's STANDBY/ON button is on the screen. 3.6.4 Trigger the Screen-Saving Video Pattern Periodically The Video Pattern ...
Owner's Manual
Page 57
... Choose a PC Source." The current AV selection appears. 2 ) Press AV SELECTION again before the displayed mode disappears. Images can be from either the remote control or the Home Menu to select the AV source. Use either an AV Source or from an external AV Source. When the screen disappears...menu items while the remaining sections provide sound and power management options. Apply as many or as few of all that your flat panel TV offers, browse this chapter for features and functions that enhance your viewing experience. Choose from among the seven AV Selections for an external ...
... Choose a PC Source." The current AV selection appears. 2 ) Press AV SELECTION again before the displayed mode disappears. Images can be from either the remote control or the Home Menu to select the AV source. Use either an AV Source or from an external AV Source. When the screen disappears...menu items while the remaining sections provide sound and power management options. Apply as many or as few of all that your flat panel TV offers, browse this chapter for features and functions that enhance your viewing experience. Choose from among the seven AV Selections for an external ...


