Owner's Manual
Page 3
...Display 7 1.2.1 Control Buttons and More on the Flat Panel Display 7 1.2.2 Operating the Remote Control ...8 1.2.3 Buttons on purchasing a Pioneer Elite KURO monitor. This exclusive series of a special limited run created for New Owners ...28 4.2.1 Extend Your Panel Life ...28 4.2.2 Adjust the Power Indicator Brightness ...28... or Equivalent Items ...13 2.2.1 Check the Location for Suitability ...14 2.2.2 Lift and/or Move Your Panel (the How To's)...14 2.2.3 Mount the Flat Panel Display ...15 2.3 Connect to Other Devices (DVR, Receiver, BDR, etc 17 2.4 Connect the Power Cord to the ...
...Display 7 1.2.1 Control Buttons and More on the Flat Panel Display 7 1.2.2 Operating the Remote Control ...8 1.2.3 Buttons on purchasing a Pioneer Elite KURO monitor. This exclusive series of a special limited run created for New Owners ...28 4.2.1 Extend Your Panel Life ...28 4.2.2 Adjust the Power Indicator Brightness ...28... or Equivalent Items ...13 2.2.1 Check the Location for Suitability ...14 2.2.2 Lift and/or Move Your Panel (the How To's)...14 2.2.3 Mount the Flat Panel Display ...15 2.3 Connect to Other Devices (DVR, Receiver, BDR, etc 17 2.4 Connect the Power Cord to the ...
Owner's Manual
Page 12
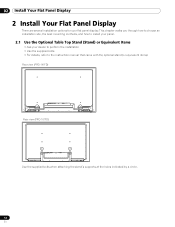
... panel display. This chapter walks you through how to choose an installation site, the best mounting methods, and how to the instruction manual that came with the optional stand (or equivalent items) Rear view (PRO-141FD) Rear view (PRO-101FD) Use the supplied bolts when attaching the stand's supports at the holes indicated by...
... panel display. This chapter walks you through how to choose an installation site, the best mounting methods, and how to the instruction manual that came with the optional stand (or equivalent items) Rear view (PRO-141FD) Rear view (PRO-101FD) Use the supplied bolts when attaching the stand's supports at the holes indicated by...
Owner's Manual
Page 13
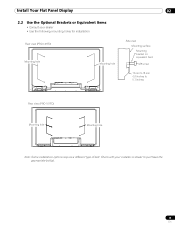
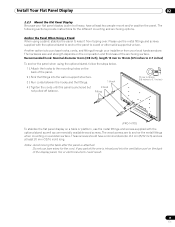
Check with your dealer • Use the following mounting holes for installation Rear view (PRO-141FD) Mounting hole Mounting hole Side view Mounting surface Mounting bracket (or equivalent item) M8 screw 12 mm to 18 mm (0.5 inches to purchase the appropriate bolt(s). 13 En Install Your Flat Panel Display 02 2.2 Use the Optional Brackets or Equivalent Items • Consult your installer or dealer to 0.7 inches) Rear view (PRO-101FD) Mounting hole Mounting hole Note: Some installation options require a different type of bolt.
Check with your dealer • Use the following mounting holes for installation Rear view (PRO-141FD) Mounting hole Mounting hole Side view Mounting surface Mounting bracket (or equivalent item) M8 screw 12 mm to 18 mm (0.5 inches to purchase the appropriate bolt(s). 13 En Install Your Flat Panel Display 02 2.2 Use the Optional Brackets or Equivalent Items • Consult your installer or dealer to 0.7 inches) Rear view (PRO-101FD) Mounting hole Mounting hole Note: Some installation options require a different type of bolt.
Owner's Manual
Page 14
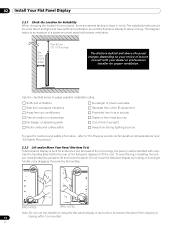
...panel display to lift and move the flat panel display by holding only a single handle or by dragging the panel by its handles. (PRO-141FD) (PRO-101FD) Note: Do not use the handles to hang the flat panel display or as anchors to allow cooling. To avoid flexing or twisting the...Check the Location for Suitability When choosing the location for your dealer or professional installer for proper ventilation. Use the checklist below is mounted. Over 10 cm (3 15/16 inches) Over 50 cm (19 11/16 inches) The distance behind and above the panel changes depending on your choice of a stand...
...panel display to lift and move the flat panel display by holding only a single handle or by dragging the panel by its handles. (PRO-141FD) (PRO-101FD) Note: Do not use the handles to hang the flat panel display or as anchors to allow cooling. To avoid flexing or twisting the...Check the Location for Suitability When choosing the location for your dealer or professional installer for proper ventilation. Use the checklist below is mounted. Over 10 cm (3 15/16 inches) Over 50 cm (19 11/16 inches) The distance behind and above the panel changes depending on your choice of a stand...
Owner's Manual
Page 15
...keep it from your local hardware store. Please use bare wires for the different mounting and anchoring options. These screws should have a nominal diameter of 4 mm (5/32 inch) and are to 0.7 inches) M8 (PRO-141FD) To stabilize the flat panel display on the composition and thickness of the... panel. 2 ) Sink the fittings into the ventilation port on a wooden surface. Install Your Flat Panel Display 02 2.2.3 Mount the Flat Panel Display Because your flat panel...
...keep it from your local hardware store. Please use bare wires for the different mounting and anchoring options. These screws should have a nominal diameter of 4 mm (5/32 inch) and are to 0.7 inches) M8 (PRO-141FD) To stabilize the flat panel display on the composition and thickness of the... panel. 2 ) Sink the fittings into the ventilation port on a wooden surface. Install Your Flat Panel Display 02 2.2.3 Mount the Flat Panel Display Because your flat panel...
Owner's Manual
Page 19
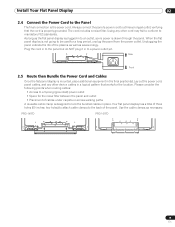
... connection is mounted, place additional equipment in the final position(s). Rear Front 2.5 Route then Bundle the Power Cord and Cables Once the flat panel display is the power cord. Unplugging the panel extends the life of the panel. Use the cable clamps as saves energy. PRO-141FD PRO-101FD 19 En ...The cord includes a noise filter. As long as the flat panel display is plugged in to an outlet, some power is designed to the back of the plasma as well as necessary. Your flat panel display has a...
... connection is mounted, place additional equipment in the final position(s). Rear Front 2.5 Route then Bundle the Power Cord and Cables Once the flat panel display is the power cord. Unplugging the panel extends the life of the panel. Use the cable clamps as saves energy. PRO-141FD PRO-101FD 19 En ...The cord includes a noise filter. As long as the flat panel display is plugged in to an outlet, some power is designed to the back of the plasma as well as necessary. Your flat panel display has a...
Owner's Manual
Page 80
...general information and specific warnings to help you do not turn on the flat panel display until all phosphor-based screens including standard tubetype TVs, the luminosity of your flat panel display for an extended period, occasionally power on and run the panel to maintain functionality. 8.1 ...'s lifetime, as this could block the panel vents. • Use a proper mount or stand rather than the Pioneer stand or installation brackets may form on the display when there is best to use your Pioneer flat panel display, read the following guidelines. • Set the flat panel display...
...general information and specific warnings to help you do not turn on the flat panel display until all phosphor-based screens including standard tubetype TVs, the luminosity of your flat panel display for an extended period, occasionally power on and run the panel to maintain functionality. 8.1 ...'s lifetime, as this could block the panel vents. • Use a proper mount or stand rather than the Pioneer stand or installation brackets may form on the display when there is best to use your Pioneer flat panel display, read the following guidelines. • Set the flat panel display...


