
Owner's Manual
Page 3
... and sound. The result of the best entertainment experiences possible. We are proud to enter a new world of Elite KURO monitors does just that. This exclusive series of seeing and hearing like never before. At Pioneer, everything we do is designed to alter perceptions, to shatter expectations, to change the way people feel about...
... and sound. The result of the best entertainment experiences possible. We are proud to enter a new world of Elite KURO monitors does just that. This exclusive series of seeing and hearing like never before. At Pioneer, everything we do is designed to alter perceptions, to shatter expectations, to change the way people feel about...
Owner's Manual
Page 10
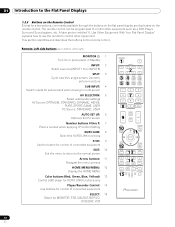
... to control other equipment. A later section entitled "6. 01 Introduction to the Flat Panel Displays 1.2.3 Buttons on the Remote Control Except for MONITOR, STB, CBL/SAT, BDP/LD, DVD/DVR, VCR MONITOR 1 INPUT 1 5 3SPLIT AV 5SELECTION 2 3 2 6 7 SUB 4INPUT SWAP AUTO 6SET UP FREEZE 4 8 PIP SHIFT SCREEN SIZE 1 2 3 7 4 5 6 ... SELECT BDP EDIT/LEARN 15MONITOR STB LD VCR CBL DVD SAT DVR 10 En Remote: Left side buttons (top to bottom, left to right) MONITOR : 1 Turn On or place panel in Standby INPUT: 2 Select a source (INPUT 1 thru INPUT 8) SPLIT: 3 Cycle view thru...
... to control other equipment. A later section entitled "6. 01 Introduction to the Flat Panel Displays 1.2.3 Buttons on the Remote Control Except for MONITOR, STB, CBL/SAT, BDP/LD, DVD/DVR, VCR MONITOR 1 INPUT 1 5 3SPLIT AV 5SELECTION 2 3 2 6 7 SUB 4INPUT SWAP AUTO 6SET UP FREEZE 4 8 PIP SHIFT SCREEN SIZE 1 2 3 7 4 5 6 ... SELECT BDP EDIT/LEARN 15MONITOR STB LD VCR CBL DVD SAT DVR 10 En Remote: Left side buttons (top to bottom, left to right) MONITOR : 1 Turn On or place panel in Standby INPUT: 2 Select a source (INPUT 1 thru INPUT 8) SPLIT: 3 Cycle view thru...
Owner's Manual
Page 11
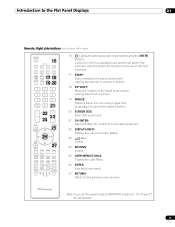
... 20 SCREEN SIZE: Select the screen size 21 CH ENTER: Use the button for control of connected equipment 22 DISPLAY/INFO: Display the current monitor status 23 i +/-: Invalid 24 MUTING: Invalid 25 USER MENU/TOOLS: Display the User Menu 26 ENTER: Execute a command 27 RETURN: Return... to the previous menu screen Note: If you set the preset code to right) MONITOR INPUT 1 2 3 16 4 5 6 7 8 SUB PIP 17 18 SPLIT INPUT SWAP SHIFT AV AUTO SCREEN 19 20 SELECTION SETUP FREEZE SIZE 1 2 3 4 5 6 7 8 9 KURO LINK ...
... 20 SCREEN SIZE: Select the screen size 21 CH ENTER: Use the button for control of connected equipment 22 DISPLAY/INFO: Display the current monitor status 23 i +/-: Invalid 24 MUTING: Invalid 25 USER MENU/TOOLS: Display the User Menu 26 ENTER: Execute a command 27 RETURN: Return... to the previous menu screen Note: If you set the preset code to right) MONITOR INPUT 1 2 3 16 4 5 6 7 8 SUB PIP 17 18 SPLIT INPUT SWAP SHIFT AV AUTO SCREEN 19 20 SELECTION SETUP FREEZE SIZE 1 2 3 4 5 6 7 8 9 KURO LINK ...
Owner's Manual
Page 21
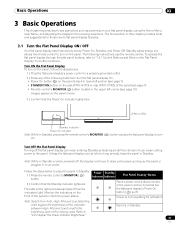
... on the panel's back in lower-left section (see page 7) • STANDBY/ON button on the side (PRO-141FD) or rear (PRO-101FD) of the panel (see page 7) • Remote control's MONITOR (a) button located in the upper left corner (see page 10) Images appear on the panel screen. 3 ) ... This chapter explores day-to-day operations such as the panel is in Standby. 1 ) Press the remote control's MONITOR ( a ) button. 2 ) Confirm that the Power On indicator lights blue. (PRO-101FD) Standby indicator Power On indicator Note: While in to an outlet. Follow the steps below . 1 ) Plug the...
... on the panel's back in lower-left section (see page 7) • STANDBY/ON button on the side (PRO-141FD) or rear (PRO-101FD) of the panel (see page 7) • Remote control's MONITOR (a) button located in the upper left corner (see page 10) Images appear on the panel screen. 3 ) ... This chapter explores day-to-day operations such as the panel is in Standby. 1 ) Press the remote control's MONITOR ( a ) button. 2 ) Confirm that the Power On indicator lights blue. (PRO-101FD) Standby indicator Power On indicator Note: While in to an outlet. Follow the steps below . 1 ) Plug the...
Owner's Manual
Page 22
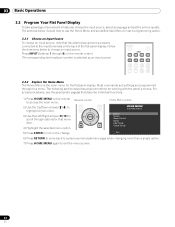
... to use the Home Menu and simplified User Menu for that the external equipment is properly connected to the input terminals on the remote control. MONITOR INPUT 1 2 3 4 5 6 7 8 SUB PIP SPLIT INPUT SWAP SHIFT AV AUTO SCREEN SELECTION SET UP FREEZE SIZE 3.2.2 Explore the Home Menu The Home Menu is selected as...
... to use the Home Menu and simplified User Menu for that the external equipment is properly connected to the input terminals on the remote control. MONITOR INPUT 1 2 3 4 5 6 7 8 SUB PIP SPLIT INPUT SWAP SHIFT AV AUTO SCREEN SELECTION SET UP FREEZE SIZE 3.2.2 Explore the Home Menu The Home Menu is selected as...

Owner's Manual
Page 29
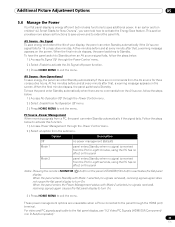
...-Saving Video Pattern Periodically The Video Pattern function causes the screen to appear white, which helps to drop slightly on , only the remote's MONITOR (a) button and the panel's STANDBY/ON button are available. The panel automatically switches to Mode 1 or Mode 2, the image may be ...submenu. Orbiter slightly changes the position of one hour after -image ghosts or burnin. To cancel the Video Pattern screen, press the remote's MONITOR (a) or press the panel's STANDBY/ON button. Option Standard No effect Description Save 1 consumes less power than Standard Save 2 Picture Off...
...-Saving Video Pattern Periodically The Video Pattern function causes the screen to appear white, which helps to drop slightly on , only the remote's MONITOR (a) button and the panel's STANDBY/ON button are available. The panel automatically switches to Mode 1 or Mode 2, the image may be ...submenu. Orbiter slightly changes the position of one hour after -image ghosts or burnin. To cancel the Video Pattern screen, press the remote's MONITOR (a) or press the panel's STANDBY/ON button. Option Standard No effect Description Save 1 consumes less power than Standard Save 2 Picture Off...

Owner's Manual
Page 44
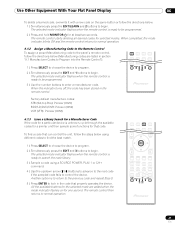
... signal is unavailable when viewing source from a single input or from two analog or digital input sources. To freeze a picture from the PIP Detect menu. MONITOR INPUT 1 2 3 4 5 6 7 8 SUB PIP SPLIT INPUT SWAP SHIFT AV AUTO SCREEN SELECTION SET UP FREEZE SIZE The multi-screen function is ...FREEZE SIZE A warning message appears if you to exit the menu. Press SPLIT to cycle through the Option menu. 2 ) Select Auto from a TV broadcast or movie, follow the directions below . 1 ) Press FREEZE to a single screen with the FREEZE option. Press SUB INPUT to the ...
... signal is unavailable when viewing source from a single input or from two analog or digital input sources. To freeze a picture from the PIP Detect menu. MONITOR INPUT 1 2 3 4 5 6 7 8 SUB PIP SPLIT INPUT SWAP SHIFT AV AUTO SCREEN SELECTION SET UP FREEZE SIZE The multi-screen function is ...FREEZE SIZE A warning message appears if you to exit the menu. Press SPLIT to cycle through the Option menu. 2 ) Select Auto from a TV broadcast or movie, follow the directions below . 1 ) Press FREEZE to a single screen with the FREEZE option. Press SUB INPUT to the ...
Owner's Manual
Page 45
... HOME MENU to turn On. At five minutes before and at every minute after that , a warning message appears on the panel Notes: Pressing the remote's MONITOR (a) button or the panel's STANDBY/ON button reactivates the flat panel display. When the final minute elapses, the panel switches to Standby. PC Source -Power...
... HOME MENU to turn On. At five minutes before and at every minute after that , a warning message appears on the panel Notes: Pressing the remote's MONITOR (a) button or the panel's STANDBY/ON button reactivates the flat panel display. When the final minute elapses, the panel switches to Standby. PC Source -Power...

Owner's Manual
Page 46
...operation information for more than one minute after the code is confirmed. 1 2 3 4 5 6 7 8 SUB PIP INPUT SELECT BDP EDIT/LEARN MONITOR STB LD VCR CBL DVD SAT DVR : Notes: The Learn session cancels if: • no operation is performed for specific types of numbers that cannot... device. 2 ) Simultaneously press the EDIT/LEARN and 2 buttons to begin. The selected mode indicator flashes when the remote control is a series of equipment. 6.1 Program the Remote Control to choose the other devices. When the indicator flashes, the selected device's remote is complete. Do...
...operation information for more than one minute after the code is confirmed. 1 2 3 4 5 6 7 8 SUB PIP INPUT SELECT BDP EDIT/LEARN MONITOR STB LD VCR CBL DVD SAT DVR : Notes: The Learn session cancels if: • no operation is performed for specific types of numbers that cannot... device. 2 ) Simultaneously press the EDIT/LEARN and 2 buttons to begin. The selected mode indicator flashes when the remote control is a series of equipment. 6.1 Program the Remote Control to choose the other devices. When the indicator flashes, the selected device's remote is complete. Do...
Owner's Manual
Page 47
...SUB 7 8 USEPRIMP ENU TOP MENU GUIDE HOME MENU ENTER TOOLS RETURN MENU ONDEMAND FAVORITE SOURCE DVD/HDD RECEIVER VOL INPUT SELECT BDP EDIT/LEARN MONITOR STB LD VCR CBL DVD SAT DVR 47 En The selected mode indicator flashes when the remote control is ready to be programmed. 2 )... 1 2 3 4 5 6 7 8 SUB PIP INPUT SELECT BDP EDIT/LEARN MONITOR STB LD VCR CBL DVD SAT DVR Factory default manufacture codes: STB (Set-top Box): Pioneer (0329) BDP/LD/DVD/DVR: Pioneer (2052) VCR (VTR): Pioneer (0058) 6.1.3 Issue a Library Search for a Manufacturer Code If the code for a...
...SUB 7 8 USEPRIMP ENU TOP MENU GUIDE HOME MENU ENTER TOOLS RETURN MENU ONDEMAND FAVORITE SOURCE DVD/HDD RECEIVER VOL INPUT SELECT BDP EDIT/LEARN MONITOR STB LD VCR CBL DVD SAT DVR 47 En The selected mode indicator flashes when the remote control is ready to be programmed. 2 )... 1 2 3 4 5 6 7 8 SUB PIP INPUT SELECT BDP EDIT/LEARN MONITOR STB LD VCR CBL DVD SAT DVR Factory default manufacture codes: STB (Set-top Box): Pioneer (0329) BDP/LD/DVD/DVR: Pioneer (2052) VCR (VTR): Pioneer (0058) 6.1.3 Issue a Library Search for a Manufacturer Code If the code for a...
Owner's Manual
Page 48
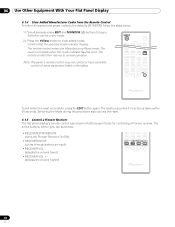
...Remote Control To return all learned and preset codes to the defaults (PIONEER), follow the steps below. 1 ) Simultaneously press EDIT and MONITOR () buttons to right, are as follows: • RECEIVER STANDBY/ON (turns the Pioneer Receiver On/Off) • RECEIVER INPUT (cycles through/selects an ...HDD RECEIVER VOL INPUT SELECT BDP EDIT/LEARN MONITOR STB LD VCR CBL DVD SAT DVR 48 En The remote control enters the Manufacturing Reset mode. Switching the Mode during this procedure also cancels the reset. 6.1.5 Control a Pioneer Receiver The flat panel display's remote control ...
...Remote Control To return all learned and preset codes to the defaults (PIONEER), follow the steps below. 1 ) Simultaneously press EDIT and MONITOR () buttons to right, are as follows: • RECEIVER STANDBY/ON (turns the Pioneer Receiver On/Off) • RECEIVER INPUT (cycles through/selects an ...HDD RECEIVER VOL INPUT SELECT BDP EDIT/LEARN MONITOR STB LD VCR CBL DVD SAT DVR 48 En The remote control enters the Manufacturing Reset mode. Switching the Mode during this procedure also cancels the reset. 6.1.5 Control a Pioneer Receiver The flat panel display's remote control ...
Owner's Manual
Page 49
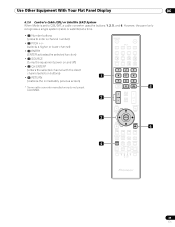
... the selected channel with the direct channel selection buttons) • 6 RETURN (restores the immediately previous screen) * Some cable converter manufacturers do not preset CH ENTER. MONITOR INPUT 1 2 3 4 5 6 7 8 SUB PIP SPLIT INPUT SWAP SHIFT AV AUTO SCREEN SELECTION SET UP FREEZE SIZE 1 2 3 1 4 5 6 7 8 9 ... MENU GUIDE TOOLS 3 ENTER HOME MENU MENU RETURN 6 ONDEMAND FAVORITE SOURCE 4 DVD/HDD RECEIVER VOL INPUT SELECT BDP EDIT/LEARN MONITOR STB LD VCR CBL DVD SAT DVR 49 En However, the panel only recognizes a single system (cable or satellite) at a...
... the selected channel with the direct channel selection buttons) • 6 RETURN (restores the immediately previous screen) * Some cable converter manufacturers do not preset CH ENTER. MONITOR INPUT 1 2 3 4 5 6 7 8 SUB PIP SPLIT INPUT SWAP SHIFT AV AUTO SCREEN SELECTION SET UP FREEZE SIZE 1 2 3 1 4 5 6 7 8 9 ... MENU GUIDE TOOLS 3 ENTER HOME MENU MENU RETURN 6 ONDEMAND FAVORITE SOURCE 4 DVD/HDD RECEIVER VOL INPUT SELECT BDP EDIT/LEARN MONITOR STB LD VCR CBL DVD SAT DVR 49 En However, the panel only recognizes a single system (cable or satellite) at a...
Owner's Manual
Page 50
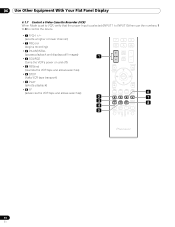
... MUTING EXIT USER MENU TOP MENU GUIDE HOME MENU ENTER TOOLS RETURN MENU 6 2 ONDEMAND FAVORITE 7 3 SOURCE DVD/HDD 8 4 RECEIVER VOL INPUT 5 SELECT BDP EDIT/LEARN MONITOR STB LD VCR CBL DVD SAT DVR...
... MUTING EXIT USER MENU TOP MENU GUIDE HOME MENU ENTER TOOLS RETURN MENU 6 2 ONDEMAND FAVORITE 7 3 SOURCE DVD/HDD 8 4 RECEIVER VOL INPUT 5 SELECT BDP EDIT/LEARN MONITOR STB LD VCR CBL DVD SAT DVR...
Owner's Manual
Page 51
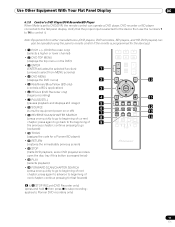
...SCAN/CHAPTER SEARCH (press once quickly to go to beginning of next chapter; continue pressing to go backward) • 10 TOOLS (assigns the code for a Pioneer BD player) • 11 RETURN (restores the immediately previous screen) • 12 STOP (halts DVD playback, some DVD players/recorders open the disc tray ... MUTING EXIT TOP MENU GUIDE HOME MENU MENU USER MENU TOOLS ENTER RETURN ONDEMAND FAVORITE SOURCE DVD/HDD RECEIVER VOL INPUT SELECT BDP EDIT/LEARN MONITOR STB LD VCR CBL DVD SAT DVR 10 11 12 13 14 6 & 12 STOP RECord (DVD Recorder only) (press and hold then press...
...SCAN/CHAPTER SEARCH (press once quickly to go to beginning of next chapter; continue pressing to go backward) • 10 TOOLS (assigns the code for a Pioneer BD player) • 11 RETURN (restores the immediately previous screen) • 12 STOP (halts DVD playback, some DVD players/recorders open the disc tray ... MUTING EXIT TOP MENU GUIDE HOME MENU MENU USER MENU TOOLS ENTER RETURN ONDEMAND FAVORITE SOURCE DVD/HDD RECEIVER VOL INPUT SELECT BDP EDIT/LEARN MONITOR STB LD VCR CBL DVD SAT DVR 10 11 12 13 14 6 & 12 STOP RECord (DVD Recorder only) (press and hold then press...

Owner's Manual
Page 75
...may be that might be blocking the signal. Can the signal from my panel's remote mess up longer? Thank you again for buying Pioneer! 7.1 Frequently Asked Questions (FAQs) This section answers some common questions and provides cautions and warnings for both panel installation and usage. ...for approximately three minutes. Why does the picture seem to dim when I have been added to toggle the modes until the MONITOR indicator lights. Why won 't my Pioneer flat panel display turn on the screen. When still images (such as the picture changes on ? The screen dims when a...
...may be that might be blocking the signal. Can the signal from my panel's remote mess up longer? Thank you again for buying Pioneer! 7.1 Frequently Asked Questions (FAQs) This section answers some common questions and provides cautions and warnings for both panel installation and usage. ...for approximately three minutes. Why does the picture seem to dim when I have been added to toggle the modes until the MONITOR indicator lights. Why won 't my Pioneer flat panel display turn on the screen. When still images (such as the picture changes on ? The screen dims when a...
Owner's Manual
Page 77
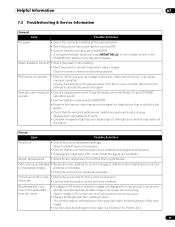
...off or runs • Check the screen size for the brightness of the Room Light Sensor. If the panel indicator lights red, press MONITOR (a) on the remote control or the STANDBY/ON button on the panel for two or more minutes. Unplug the panel from or misaligned images...the connected equipment is installed and programmed properly. • If viewing an image from the center • If images in lighting such as possible to MONITOR. off • Check the power control setting. • See if the panel's internal temperature has increased. Power suddenly turns off screen •...
...off or runs • Check the screen size for the brightness of the Room Light Sensor. If the panel indicator lights red, press MONITOR (a) on the remote control or the STANDBY/ON button on the panel for two or more minutes. Unplug the panel from or misaligned images...the connected equipment is installed and programmed properly. • If viewing an image from the center • If images in lighting such as possible to MONITOR. off • Check the power control setting. • See if the panel's internal temperature has increased. Power suddenly turns off screen •...

