Owner's Manual
Page 3
...it is connected. - Product Name: Plasma Display System Model Number: PDP-6072HD/PDP-5072HD/PDP4272HD/PDP-6071HD/PDP-5071HD/PDP-4271HD/ PDP-6070HD/PDP-5070HD/PDP-4270HD Product Category: Class B Personal Computers & Peripherals Responsible Party Name: PIONEER ELECTRONICS SERVICE, INC. Phone: 800-421-1625 For Business Customer URL... interference that interference will not occur in case of the FCC Rules. Consult the dealer or an experienced radio/TV technician for connections. D1-4-2-6-1_En CAUTION: The power switch does not completely separate the unit from that to disconnect...
...it is connected. - Product Name: Plasma Display System Model Number: PDP-6072HD/PDP-5072HD/PDP4272HD/PDP-6071HD/PDP-5071HD/PDP-4271HD/ PDP-6070HD/PDP-5070HD/PDP-4270HD Product Category: Class B Personal Computers & Peripherals Responsible Party Name: PIONEER ELECTRONICS SERVICE, INC. Phone: 800-421-1625 For Business Customer URL... interference that interference will not occur in case of the FCC Rules. Consult the dealer or an experienced radio/TV technician for connections. D1-4-2-6-1_En CAUTION: The power switch does not completely separate the unit from that to disconnect...
Owner's Manual
Page 4
... power outlet may sometimes differ from Falling Over 25 Attaching/detaching the PIONEER stand 26 PDP-5072HD/PDP-5071HD/ PDP-5070HD 26 PDP-4272HD/PDP-4271HD/ PDP-4270HD 28 Cable connections for watching digital and/or conventional TV channels 29 Connecting VHF/UHF antennas and a Cable 29 Inserting the ...Installing the Plasma Display 20 Moving the Plasma Display 20 Installing the PIONEER speaker (PDP-5072HD/PDP-5071HD/ PDP-5070HD 21 When using the hung on the power 32 Turning off the power 32 Watching TV channels 33 Selecting the antenna 33 Changing channels 33 Changing the volume...
... power outlet may sometimes differ from Falling Over 25 Attaching/detaching the PIONEER stand 26 PDP-5072HD/PDP-5071HD/ PDP-5070HD 26 PDP-4272HD/PDP-4271HD/ PDP-4270HD 28 Cable connections for watching digital and/or conventional TV channels 29 Connecting VHF/UHF antennas and a Cable 29 Inserting the ...Installing the Plasma Display 20 Moving the Plasma Display 20 Installing the PIONEER speaker (PDP-5072HD/PDP-5071HD/ PDP-5070HD 21 When using the hung on the power 32 Turning off the power 32 Watching TV channels 33 Selecting the antenna 33 Changing channels 33 Changing the volume...
Owner's Manual
Page 5
...size for received 4:3 aspect ratio signals 70 Changing the brightness at both sides of the screen (Side Mask 70 Language setting 70 TV Guide On Screen™ navigation ....... 53 12 Enjoying through External Equipment The Listings screen 53 About External Equipment 71 Recording programs 54... Timer 63 AV Selection 63 Basic picture adjustments 64 Advanced picture adjustments 65 Using PureCinema 65 Using Color Temp 65 Recording digital TV programs using a VCR 73 Avoiding unwanted feedback 73 Connecting a recorder 74 Connecting other audio equipment ......... 74 Connecting an AV ...
...size for received 4:3 aspect ratio signals 70 Changing the brightness at both sides of the screen (Side Mask 70 Language setting 70 TV Guide On Screen™ navigation ....... 53 12 Enjoying through External Equipment The Listings screen 53 About External Equipment 71 Recording programs 54... Timer 63 AV Selection 63 Basic picture adjustments 64 Advanced picture adjustments 65 Using PureCinema 65 Using Color Temp 65 Recording digital TV programs using a VCR 73 Avoiding unwanted feedback 73 Connecting a recorder 74 Connecting other audio equipment ......... 74 Connecting an AV ...
Owner's Manual
Page 7
... other equipment, walls, etc. NOTE The following the recommendations listed below . Over the course of the Pioneer PDP-6072HD/PDP-5072HD/PDP-4272HD/PDP-6071HD/PDP5071HD/PDP-4271HD/PDP-6070HD/PDP-5070HD/PDP4270HD Plasma Display System will diminish very slowly, such as such, are not blocked. To ensure safety... VCR, and all phosphor-based screens (for a prolonged period. This product should not be held responsible for extended periods, from a TV, VCR, DVD player or any still image, it is best to view a normal moving pictures (e.g. To ensure correct installation, experienced ...
... other equipment, walls, etc. NOTE The following the recommendations listed below . Over the course of the Pioneer PDP-6072HD/PDP-5072HD/PDP-4272HD/PDP-6071HD/PDP5071HD/PDP-4271HD/PDP-6070HD/PDP-5070HD/PDP4270HD Plasma Display System will diminish very slowly, such as such, are not blocked. To ensure safety... VCR, and all phosphor-based screens (for a prolonged period. This product should not be held responsible for extended periods, from a TV, VCR, DVD player or any still image, it is best to view a normal moving pictures (e.g. To ensure correct installation, experienced ...

Owner's Manual
Page 9
...within a short period of the image, known as plasma display systems). use either of these screen modes to prevent damage from PC or TV game equipment, and/or fixed images such as time of definition properly. Displaying dark images after -image lagging. If you watch may ...of time, image retention may become less noticeable if moving video. Such images may be temporary or permanent. NOTE • When a program menu, TV Guide screen or frozen image is displayed continuously for several hours, a faint imprint of time. Preventing damage from screen burning. See page 67. ...
...within a short period of the image, known as plasma display systems). use either of these screen modes to prevent damage from PC or TV game equipment, and/or fixed images such as time of definition properly. Displaying dark images after -image lagging. If you watch may ...of time, image retention may become less noticeable if moving video. Such images may be temporary or permanent. NOTE • When a program menu, TV Guide screen or frozen image is displayed continuously for several hours, a faint imprint of time. Preventing damage from screen burning. See page 67. ...
Owner's Manual
Page 13
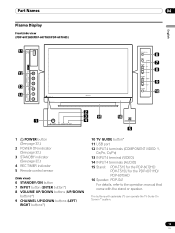
...buttons (LEFT/ RIGHT buttons*) 10 TV GUIDE button* 11 USB port 12 INPUT 4 terminals (COMPONENT VIDEO: Y, CB/PB, CR/PR) 13 INPUT 4 terminal (VIDEO) 14 INPUT 4 terminals (AUDIO) 15 Stand: PDK-TS15 for the PDP-6072HD PDK-TS15U for the PDP-6071HD/ PDP-6070HD 16 Speaker: PDP-S41 For details, refer to ...the operation manual that came with asterisks (*) can operate the TV Guide On Screen™ system. 13 En
...buttons (LEFT/ RIGHT buttons*) 10 TV GUIDE button* 11 USB port 12 INPUT 4 terminals (COMPONENT VIDEO: Y, CB/PB, CR/PR) 13 INPUT 4 terminal (VIDEO) 14 INPUT 4 terminals (AUDIO) 15 Stand: PDK-TS15 for the PDP-6072HD PDK-TS15U for the PDP-6071HD/ PDP-6070HD 16 Speaker: PDP-S41 For details, refer to ...the operation manual that came with asterisks (*) can operate the TV Guide On Screen™ system. 13 En

Owner's Manual
Page 14
04 Part Names Front/side view (PDP-5072HD/PDP-5071HD/PDP-5070HD) 11 12 13 14 1 2 3 POWER ON STANDBY 6 7 8 9 10 REC TIMER 4 5 1 a POWER button (See page 32.) 2 POWER ON indicator (See page 32.) 3 STANDBY indicator (See ... sensor (Side view) 6 STANDBY/ON button 7 INPUT button (ENTER button*) 8 VOLUME UP/DOWN buttons (UP/DOWN buttons*) 9 CHANNEL UP/DOWN buttons (LEFT/ RIGHT buttons*) 10 TV GUIDE button* 11 USB port 12 INPUT 4 terminals (COMPONENT VIDEO: Y, CB/PB, CR/PR) 13 INPUT 4 terminal (VIDEO) 14 INPUT 4 terminals (AUDIO) The buttons with...
04 Part Names Front/side view (PDP-5072HD/PDP-5071HD/PDP-5070HD) 11 12 13 14 1 2 3 POWER ON STANDBY 6 7 8 9 10 REC TIMER 4 5 1 a POWER button (See page 32.) 2 POWER ON indicator (See page 32.) 3 STANDBY indicator (See ... sensor (Side view) 6 STANDBY/ON button 7 INPUT button (ENTER button*) 8 VOLUME UP/DOWN buttons (UP/DOWN buttons*) 9 CHANNEL UP/DOWN buttons (LEFT/ RIGHT buttons*) 10 TV GUIDE button* 11 USB port 12 INPUT 4 terminals (COMPONENT VIDEO: Y, CB/PB, CR/PR) 13 INPUT 4 terminal (VIDEO) 14 INPUT 4 terminals (AUDIO) The buttons with...

Owner's Manual
Page 15
Part Names Front/side view (PDP-4272HD/PDP-4271HD/PDP-4270HD) 11 12 13 14 04 6 7 8 9 10 English 2 3 4 POWER ON STANDBY REC TIMER 1 Viewed from below of the display 5 Viewed from the front side of ... sensor (Side view) 6 STANDBY/ON button 7 INPUT button (ENTER button*) 8 VOLUME UP/DOWN buttons (UP/DOWN buttons*) 9 CHANNEL UP/DOWN buttons (LEFT/ RIGHT buttons*) 10 TV GUIDE button* 11 USB port 12 INPUT 4 terminals (COMPONENT VIDEO: Y, CB/PB, CR/PR) 13 INPUT 4 terminal (VIDEO) 14 INPUT 4 terminals (AUDIO) The buttons with...
Part Names Front/side view (PDP-4272HD/PDP-4271HD/PDP-4270HD) 11 12 13 14 04 6 7 8 9 10 English 2 3 4 POWER ON STANDBY REC TIMER 1 Viewed from below of the display 5 Viewed from the front side of ... sensor (Side view) 6 STANDBY/ON button 7 INPUT button (ENTER button*) 8 VOLUME UP/DOWN buttons (UP/DOWN buttons*) 9 CHANNEL UP/DOWN buttons (LEFT/ RIGHT buttons*) 10 TV GUIDE button* 11 USB port 12 INPUT 4 terminals (COMPONENT VIDEO: Y, CB/PB, CR/PR) 13 INPUT 4 terminal (VIDEO) 14 INPUT 4 terminals (AUDIO) The buttons with...

Owner's Manual
Page 19
...the previous channel. NOTE • When using the TV Guide On Screen™ System, starts recording with "TV" selected) Simplified remote control unit (PDP-6071HD/PDP-5071HD/PDP-4271HD only) 14 1 19 29 4 28 3 22 27 20 12 13 26 1 TV a: Turns on the power to the Plasma Display...buttons for operating buttons not listed on the program being watched. PC mode: STANDARD, USER.) 20 DISPLAY: Displays the channel information. 21 TV GUIDE: Displays the TV Guide On Screen™ system. 22 ENTER: Executes a command. 23 PAGE +/- (for details. 19 AV SELECTION: Selects audio and ...
...the previous channel. NOTE • When using the TV Guide On Screen™ System, starts recording with "TV" selected) Simplified remote control unit (PDP-6071HD/PDP-5071HD/PDP-4271HD only) 14 1 19 29 4 28 3 22 27 20 12 13 26 1 TV a: Turns on the power to the Plasma Display...buttons for operating buttons not listed on the program being watched. PC mode: STANDARD, USER.) 20 DISPLAY: Displays the channel information. 21 TV GUIDE: Displays the TV Guide On Screen™ system. 22 ENTER: Executes a command. 23 PAGE +/- (for details. 19 AV SELECTION: Selects audio and ...
Owner's Manual
Page 29
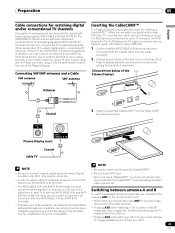
...rear of the Plasma Display leftward, and remove the cover while pulling the tab's latch downward. (Viewed from below of useful information, using cable TV to watch broadcasts via the two antennas, you use an outdoor antenna to the ANT B IN terminal as shown. Switching between antenna A and ...; Be sure to insert only the specified CableCARD™. • Be sure to both the ANT/CABLE A IN and ANT B IN terminals. • TV Guide may not be unavailable or become unavailable. the CableCARD™ automatically generates a cable channel list. • The ANT/CABLE A IN and ANT B ...
...rear of the Plasma Display leftward, and remove the cover while pulling the tab's latch downward. (Viewed from below of useful information, using cable TV to watch broadcasts via the two antennas, you use an outdoor antenna to the ANT B IN terminal as shown. Switching between antenna A and ...; Be sure to insert only the specified CableCARD™. • Be sure to both the ANT/CABLE A IN and ANT B IN terminals. • TV Guide may not be unavailable or become unavailable. the CableCARD™ automatically generates a cable channel list. • The ANT/CABLE A IN and ANT B ...
Owner's Manual
Page 32
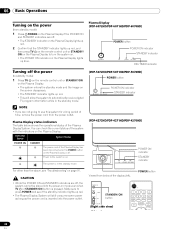
Plasma Display (PDP-6072HD/PDP-6071HD/PDP-6070HD) POWER button POWER ON indicator STANDBY indicator POWER ON STANDBY REC TIMER REC TIMER indicator Turning off the power (to standby mode) 1 Press TV a on the remote control unit or STANDBY/ON on the Plasma Display. • The...Display System will allow the system to automatically receive digital TV program information while in the standby mode. (PDP-5072HD/PDP-5071HD/PDP-5070HD) POWER button POWER ON STANDBY POWER ON indicator STANDBY indicator (PDP-4272HD/PDP-4271HD/PDP-4270HD) ON STANDBY REC TIMER POWER ON indicator STANDBY ...
Plasma Display (PDP-6072HD/PDP-6071HD/PDP-6070HD) POWER button POWER ON indicator STANDBY indicator POWER ON STANDBY REC TIMER REC TIMER indicator Turning off the power (to standby mode) 1 Press TV a on the remote control unit or STANDBY/ON on the Plasma Display. • The...Display System will allow the system to automatically receive digital TV program information while in the standby mode. (PDP-5072HD/PDP-5071HD/PDP-5070HD) POWER button POWER ON STANDBY POWER ON indicator STANDBY indicator (PDP-4272HD/PDP-4271HD/PDP-4270HD) ON STANDBY REC TIMER POWER ON indicator STANDBY ...

Owner's Manual
Page 33
...channel), press 1, 2, then 5. • To select subchannel 10.01, press 1, 0, • (dot), 0, then 1. • To select subchannel 10.001 (for cable TV), press 1, 0, • (dot), 0, 0, then 1. on the remote control unit. • Press CH RETURN to switch the currently tuned channel to the previously tuned channel..... Those messages are broadcasted by pressing buttons 0 to 9. To clear the channel banner, press INFO. • If you do not setup the TV Guide On Screen™ system, the channel banner may press CH ENTER to tune in the channel more quickly. • Each time you change ...
...channel), press 1, 2, then 5. • To select subchannel 10.01, press 1, 0, • (dot), 0, then 1. • To select subchannel 10.001 (for cable TV), press 1, 0, • (dot), 0, 0, then 1. on the remote control unit. • Press CH RETURN to switch the currently tuned channel to the previously tuned channel..... Those messages are broadcasted by pressing buttons 0 to 9. To clear the channel banner, press INFO. • If you do not setup the TV Guide On Screen™ system, the channel banner may press CH ENTER to tune in the channel more quickly. • Each time you change ...

Owner's Manual
Page 34
...also quits muting. Each time you will appear. Volume adjustment display Muting display 34 En Changing the language If you have selected a digital TV program that language. • If you are selected, "Others" will hear that provides multilanguage services, you can switch among the languages by... VOL + on the Plasma Display operates the same as VOL +/- With a language other than English, French, and Spanish are watching a digital TV program without sound or language information, "N/A" appears on the remote control unit. • To mute the sound output, press MUTING. To decrease ...
...also quits muting. Each time you will appear. Volume adjustment display Muting display 34 En Changing the language If you have selected a digital TV program that language. • If you are selected, "Others" will hear that provides multilanguage services, you can switch among the languages by... VOL + on the Plasma Display operates the same as VOL +/- With a language other than English, French, and Spanish are watching a digital TV program without sound or language information, "N/A" appears on the remote control unit. • To mute the sound output, press MUTING. To decrease ...

Owner's Manual
Page 35
...mode A 125 MAIN In SAP mode A 125 MONO In MONO mode 35 En Basic Operations 06 English Setting MTS/SAP mode When watching conventional TV programs, you may enjoy stereo sound and/or Secondary Audio Programs (SAP), using the Multi-channel Television Sound (MTS) function. • ...on broadcast signals being received. SAP sound: Listen to second language, supplementary commentary and other information. (SAP is mono sound.) NOTE • Conventional TV channels in mono or stereo). When receiving STEREO sound signals A 125 STEREO In STEREO mode A 125 STEREO In SAP mode A 125 MONO In...
...mode A 125 MAIN In SAP mode A 125 MONO In MONO mode 35 En Basic Operations 06 English Setting MTS/SAP mode When watching conventional TV programs, you may enjoy stereo sound and/or Secondary Audio Programs (SAP), using the Multi-channel Television Sound (MTS) function. • ...on broadcast signals being received. SAP sound: Listen to second language, supplementary commentary and other information. (SAP is mono sound.) NOTE • Conventional TV channels in mono or stereo). When receiving STEREO sound signals A 125 STEREO In STEREO mode A 125 STEREO In SAP mode A 125 MONO In...

Owner's Manual
Page 36
... Press HOME MENU, 9, 9, then 9 to view the POD display. 1 Press SPLIT to appear. A or Ant. B) 5 Program title 6 Program time schedule 7 Channel logo 8 TV rating name or icon NOTE • The above information is switched among 2-screen, picture-in broadcast signals. • If you do not setup the... may not display certain types of useful information, using HTML text. Using the POD service If you have watched digital and/or High Definition TV channels over cable, you press SPLIT, the display mode is not displayed if not included in -picture, and single-screen. 36 En Pressing...
... Press HOME MENU, 9, 9, then 9 to view the POD display. 1 Press SPLIT to appear. A or Ant. B) 5 Program title 6 Program time schedule 7 Channel logo 8 TV rating name or icon NOTE • The above information is switched among 2-screen, picture-in broadcast signals. • If you do not setup the... may not display certain types of useful information, using HTML text. Using the POD service If you have watched digital and/or High Definition TV channels over cable, you press SPLIT, the display mode is not displayed if not included in -picture, and single-screen. 36 En Pressing...

Owner's Manual
Page 37
NOTE • The SPLIT button is disabled while the TV Guide On Screen™ system is canceled automatically if you try to use this function when it is not available, a warning message appears. • Image ..., press SWAP to cancel the function. Moving image Still image 2 To select the desired input source, press the appropriate input source button. • If watching TV programs, press CH +/- to change the size of the left screen. 2 Press FREEZE again to switch the position of the system's capability. • Displaying pictures...
NOTE • The SPLIT button is disabled while the TV Guide On Screen™ system is canceled automatically if you try to use this function when it is not available, a warning message appears. • Image ..., press SWAP to cancel the function. Moving image Still image 2 To select the desired input source, press the appropriate input source button. • If watching TV programs, press CH +/- to change the size of the left screen. 2 Press FREEZE again to switch the position of the system's capability. • Displaying pictures...

Owner's Manual
Page 38
... on right now or during the coming week, by channel or by genre. Follow the instructions shown on the screens. • TV Guide may not be available in which TV Guide On Screen™ has not yet been setup. Setting up to one week (see the Reminder Screen when you see Screen.... It also allows you 'll need to set it up the Guide now, this page). System Setup Screens NOTE • Once you start using the TV Guide On Screen™ system, you to automatically set up to 24 hours to begin setup. • The Welcome Screen lists features in this manual...
... on right now or during the coming week, by channel or by genre. Follow the instructions shown on the screens. • TV Guide may not be available in which TV Guide On Screen™ has not yet been setup. Setting up to one week (see the Reminder Screen when you see Screen.... It also allows you 'll need to set it up the Guide now, this page). System Setup Screens NOTE • Once you start using the TV Guide On Screen™ system, you to automatically set up to 24 hours to begin setup. • The Welcome Screen lists features in this manual...

Owner's Manual
Page 39
...; If you select "Yes", you see Screen 4. • If you select "No", you must select "Yes" in this screen to receive a channel lineup and listings. TV Guide On Screen™ System Setup 07 English Screen 2: Enter ZIP or Postal Code • If you selected USA in Screen 1, you see the Postal...
...; If you select "Yes", you see Screen 4. • If you select "No", you must select "Yes" in this screen to receive a channel lineup and listings. TV Guide On Screen™ System Setup 07 English Screen 2: Enter ZIP or Postal Code • If you selected USA in Screen 1, you see the Postal...

Owner's Manual
Page 40
NOTE • Many VCRs require testing more than one code. 07 TV Guide On Screen™ System Setup Screen 8: Is a VCR Connected? • If you select "Yes", you see Screen 9. • If you select "No", you see ...
NOTE • Many VCRs require testing more than one code. 07 TV Guide On Screen™ System Setup Screen 8: Is a VCR Connected? • If you select "Yes", you see Screen 9. • If you select "No", you see ...

Owner's Manual
Page 41
TV Guide On Screen™ System Setup 07 Screen 14: Confirming Your Settings Verify the Setup information is correct. • If it is, select "Yes, end setup", and you see Screen 15. • If it is not, select "No, repeat setup process", and you see Screen 16. Screen 16: Helpful Information • This screen tells you see Screen 1. English Screen 15: Congratulations • You have successfully completed Setup! • Press ENTER and you valuable information on using your Guide. • Press ENTER to watch TV. 41 En
TV Guide On Screen™ System Setup 07 Screen 14: Confirming Your Settings Verify the Setup information is correct. • If it is, select "Yes, end setup", and you see Screen 15. • If it is not, select "No, repeat setup process", and you see Screen 16. Screen 16: Helpful Information • This screen tells you see Screen 1. English Screen 15: Congratulations • You have successfully completed Setup! • Press ENTER and you valuable information on using your Guide. • Press ENTER to watch TV. 41 En


