Owner's Manual
Page 3
... time. Consult the dealer or an experienced radio/TV technician for a Class B digital device, pursuant to the following measures: - Product Name: Plasma Display System Model Number: PDP-6072HD/PDP-5072HD/PDP4272HD/PDP-6071HD/PDP-5071HD/PDP-4271HD/ PDP-6070HD/PDP-5070HD/PDP-4270HD Product Category: Class B Personal Computers & Peripherals Responsible Party Name: PIONEER ELECTRONICS SERVICE, INC. DOMINGUEZ ST. CAUTION: Operating Environment...
... time. Consult the dealer or an experienced radio/TV technician for a Class B digital device, pursuant to the following measures: - Product Name: Plasma Display System Model Number: PDP-6072HD/PDP-5072HD/PDP4272HD/PDP-6071HD/PDP-5071HD/PDP-4271HD/ PDP-6070HD/PDP-5070HD/PDP-4270HD Product Category: Class B Personal Computers & Peripherals Responsible Party Name: PIONEER ELECTRONICS SERVICE, INC. DOMINGUEZ ST. CAUTION: Operating Environment...
Owner's Manual
Page 4
...Installing the Plasma Display 20 Moving the Plasma Display 20 Installing the PIONEER speaker (PDP-5072HD/PDP-5071HD/ PDP-5070HD 21 When using the hung on the power 32 Turning off the power 32 Watching TV channels 33 Selecting the antenna 33 Changing channels 33 Changing the volume... power outlet may sometimes differ from Falling Over 25 Attaching/detaching the PIONEER stand 26 PDP-5072HD/PDP-5071HD/ PDP-5070HD 26 PDP-4272HD/PDP-4271HD/ PDP-4270HD 28 Cable connections for watching digital and/or conventional TV channels 29 Connecting VHF/UHF antennas and a Cable 29 Inserting the ...
...Installing the Plasma Display 20 Moving the Plasma Display 20 Installing the PIONEER speaker (PDP-5072HD/PDP-5071HD/ PDP-5070HD 21 When using the hung on the power 32 Turning off the power 32 Watching TV channels 33 Selecting the antenna 33 Changing channels 33 Changing the volume... power outlet may sometimes differ from Falling Over 25 Attaching/detaching the PIONEER stand 26 PDP-5072HD/PDP-5071HD/ PDP-5070HD 26 PDP-4272HD/PDP-4271HD/ PDP-4270HD 28 Cable connections for watching digital and/or conventional TV channels 29 Connecting VHF/UHF antennas and a Cable 29 Inserting the ...
Owner's Manual
Page 5
...size for received 4:3 aspect ratio signals 70 Changing the brightness at both sides of the screen (Side Mask 70 Language setting 70 TV Guide On Screen™ navigation ....... 53 12 Enjoying through External Equipment The Listings screen 53 About External Equipment 71 Recording programs 54... Timer 63 AV Selection 63 Basic picture adjustments 64 Advanced picture adjustments 65 Using PureCinema 65 Using Color Temp 65 Recording digital TV programs using a VCR 73 Avoiding unwanted feedback 73 Connecting a recorder 74 Connecting other audio equipment ......... 74 Connecting an AV ...
...size for received 4:3 aspect ratio signals 70 Changing the brightness at both sides of the screen (Side Mask 70 Language setting 70 TV Guide On Screen™ navigation ....... 53 12 Enjoying through External Equipment The Listings screen 53 About External Equipment 71 Recording programs 54... Timer 63 AV Selection 63 Basic picture adjustments 64 Advanced picture adjustments 65 Using PureCinema 65 Using Color Temp 65 Recording digital TV programs using a VCR 73 Avoiding unwanted feedback 73 Connecting a recorder 74 Connecting other audio equipment ......... 74 Connecting an AV ...
Owner's Manual
Page 7
...PIONEER will automatically power off in the "WIDE" or "FULL" screen setting for accident or damage caused by other companies. Usage guidelines All phosphor-based screens (including conventional tube-type televisions) can be installed by using the still picture mode from a TV,...a PC image or any other equipment, walls, etc. However, please limit its lifetime, the luminosity of the Pioneer PDP-6072HD/PDP-5072HD/PDP-4272HD/PDP-6071HD/PDP5071HD/PDP-4271HD/PDP-6070HD/PDP-5070HD/PDP4270HD Plasma Display System will diminish very slowly, such as such, are not covered by the above. &#...
...PIONEER will automatically power off in the "WIDE" or "FULL" screen setting for accident or damage caused by other companies. Usage guidelines All phosphor-based screens (including conventional tube-type televisions) can be installed by using the still picture mode from a TV,...a PC image or any other equipment, walls, etc. However, please limit its lifetime, the luminosity of the Pioneer PDP-6072HD/PDP-5072HD/PDP-4272HD/PDP-6071HD/PDP5071HD/PDP-4271HD/PDP-6070HD/PDP-5070HD/PDP4270HD Plasma Display System will diminish very slowly, such as such, are not covered by the above. &#...

Owner's Manual
Page 9
... after-images remaining on -screen menu is designed to scale to three seconds. Such images may occur due to help prevent damage from PC or TV game equipment, and/or fixed images such as still images for a long time may cause after displaying still images for a period of time may... still images and the time they will return to fill the entire screen with multiple wide-screen viewing modes; NOTE • When a program menu, TV Guide screen or frozen image is equipped with content. THE PRODUCT MAY FALL, CAUSING SERIOUS PERSONAL INJURY AND SERIOUS DAMAGE TO THE PRODUCT. Do not...
... after-images remaining on -screen menu is designed to scale to three seconds. Such images may occur due to help prevent damage from PC or TV game equipment, and/or fixed images such as still images for a long time may cause after displaying still images for a period of time may... still images and the time they will return to fill the entire screen with multiple wide-screen viewing modes; NOTE • When a program menu, TV Guide screen or frozen image is equipped with content. THE PRODUCT MAY FALL, CAUSING SERIOUS PERSONAL INJURY AND SERIOUS DAMAGE TO THE PRODUCT. Do not...
Owner's Manual
Page 13
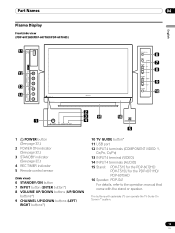
... (LEFT/ RIGHT buttons*) 10 TV GUIDE button* 11 USB port 12 INPUT 4 terminals (COMPONENT VIDEO: Y, CB/PB, CR/PR) 13 INPUT 4 terminal (VIDEO) 14 INPUT 4 terminals (AUDIO) 15 Stand: PDK-TS15 for the PDP-6072HD PDK-TS15U for the PDP-6071HD/ PDP-6070HD 16 Speaker: PDP-S41 For details, refer to ...the operation manual that came with asterisks (*) can operate the TV Guide On Screen™ system. 13 En The buttons with the stand or speaker...
... (LEFT/ RIGHT buttons*) 10 TV GUIDE button* 11 USB port 12 INPUT 4 terminals (COMPONENT VIDEO: Y, CB/PB, CR/PR) 13 INPUT 4 terminal (VIDEO) 14 INPUT 4 terminals (AUDIO) 15 Stand: PDK-TS15 for the PDP-6072HD PDK-TS15U for the PDP-6071HD/ PDP-6070HD 16 Speaker: PDP-S41 For details, refer to ...the operation manual that came with asterisks (*) can operate the TV Guide On Screen™ system. 13 En The buttons with the stand or speaker...

Owner's Manual
Page 14
04 Part Names Front/side view (PDP-5072HD/PDP-5071HD/PDP-5070HD) 11 12 13 14 1 2 3 POWER ON STANDBY 6 7 8 9 10 REC TIMER 4 5 1 a POWER button (See page 32.) 2 POWER ON indicator (See page 32.) 3 STANDBY indicator (See ... sensor (Side view) 6 STANDBY/ON button 7 INPUT button (ENTER button*) 8 VOLUME UP/DOWN buttons (UP/DOWN buttons*) 9 CHANNEL UP/DOWN buttons (LEFT/ RIGHT buttons*) 10 TV GUIDE button* 11 USB port 12 INPUT 4 terminals (COMPONENT VIDEO: Y, CB/PB, CR/PR) 13 INPUT 4 terminal (VIDEO) 14 INPUT 4 terminals (AUDIO) The buttons with...
04 Part Names Front/side view (PDP-5072HD/PDP-5071HD/PDP-5070HD) 11 12 13 14 1 2 3 POWER ON STANDBY 6 7 8 9 10 REC TIMER 4 5 1 a POWER button (See page 32.) 2 POWER ON indicator (See page 32.) 3 STANDBY indicator (See ... sensor (Side view) 6 STANDBY/ON button 7 INPUT button (ENTER button*) 8 VOLUME UP/DOWN buttons (UP/DOWN buttons*) 9 CHANNEL UP/DOWN buttons (LEFT/ RIGHT buttons*) 10 TV GUIDE button* 11 USB port 12 INPUT 4 terminals (COMPONENT VIDEO: Y, CB/PB, CR/PR) 13 INPUT 4 terminal (VIDEO) 14 INPUT 4 terminals (AUDIO) The buttons with...

Owner's Manual
Page 15
Part Names Front/side view (PDP-4272HD/PDP-4271HD/PDP-4270HD) 11 12 13 14 04 6 7 8 9 10 English 2 3 4 POWER ON STANDBY REC TIMER 1 Viewed from below of the display 5 Viewed from the front side of ... sensor (Side view) 6 STANDBY/ON button 7 INPUT button (ENTER button*) 8 VOLUME UP/DOWN buttons (UP/DOWN buttons*) 9 CHANNEL UP/DOWN buttons (LEFT/ RIGHT buttons*) 10 TV GUIDE button* 11 USB port 12 INPUT 4 terminals (COMPONENT VIDEO: Y, CB/PB, CR/PR) 13 INPUT 4 terminal (VIDEO) 14 INPUT 4 terminals (AUDIO) The buttons with...
Part Names Front/side view (PDP-4272HD/PDP-4271HD/PDP-4270HD) 11 12 13 14 04 6 7 8 9 10 English 2 3 4 POWER ON STANDBY REC TIMER 1 Viewed from below of the display 5 Viewed from the front side of ... sensor (Side view) 6 STANDBY/ON button 7 INPUT button (ENTER button*) 8 VOLUME UP/DOWN buttons (UP/DOWN buttons*) 9 CHANNEL UP/DOWN buttons (LEFT/ RIGHT buttons*) 10 TV GUIDE button* 11 USB port 12 INPUT 4 terminals (COMPONENT VIDEO: Y, CB/PB, CR/PR) 13 INPUT 4 terminal (VIDEO) 14 INPUT 4 terminals (AUDIO) The buttons with...

Owner's Manual
Page 19
...4, INPUT 5, INPUT 6 and PC.) 4 SCREEN SIZE: Selects the screen size. 5 SLEEP: Sets the sleep timer. 6 INFO: Displays a channel banner when a TV program is displayed. 28 VOL +/-: Sets the volume. 29 M MUTING: Mutes the sound. 30 SHIFT: Moves the location of the Plasma Display System. (INPUT 1, INPUT...a moving image. NOTE • When using the TV Guide On Screen™ System, starts recording with "TV" selected) Simplified remote control unit (PDP-6071HD/PDP-5071HD/PDP-4271HD only) 14 1 19 29 4 28 3 22 27 20 12 13 26 1 TV a: Turns on the main remote control unit are luminous...
...4, INPUT 5, INPUT 6 and PC.) 4 SCREEN SIZE: Selects the screen size. 5 SLEEP: Sets the sleep timer. 6 INFO: Displays a channel banner when a TV program is displayed. 28 VOL +/-: Sets the volume. 29 M MUTING: Mutes the sound. 30 SHIFT: Moves the location of the Plasma Display System. (INPUT 1, INPUT...a moving image. NOTE • When using the TV Guide On Screen™ System, starts recording with "TV" selected) Simplified remote control unit (PDP-6071HD/PDP-5071HD/PDP-4271HD only) 14 1 19 29 4 28 3 22 27 20 12 13 26 1 TV a: Turns on the main remote control unit are luminous...
Owner's Manual
Page 29
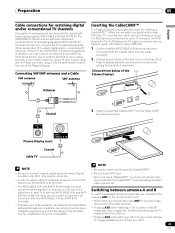
...ANT to connect coaxial cables as shown; In addition, you need not execute Auto Channel Preset; ANT/ CABLE A IN Plasma Display (rear) Cable TV Coaxial NOTE NOTE • Be sure to insert only the specified CableCARD™. • Be sure to view the image received from below of .../CABLE A IN and ANT B IN terminals must not receive the same signals. This service presents various types of useful information, using cable TV to enjoy clearer pictures. Switching between antenna A and B To watch broadcasts via the two antennas, you to use an outdoor antenna to watch cable...
...ANT to connect coaxial cables as shown; In addition, you need not execute Auto Channel Preset; ANT/ CABLE A IN Plasma Display (rear) Cable TV Coaxial NOTE NOTE • Be sure to insert only the specified CableCARD™. • Be sure to view the image received from below of .../CABLE A IN and ANT B IN terminals must not receive the same signals. This service presents various types of useful information, using cable TV to enjoy clearer pictures. Switching between antenna A and B To watch broadcasts via the two antennas, you to use an outdoor antenna to watch cable...
Owner's Manual
Page 32
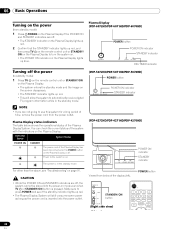
... will allow the system to automatically receive digital TV program information while in the standby mode. (PDP-5072HD/PDP-5071HD/PDP-5070HD) POWER button POWER ON STANDBY POWER ON indicator STANDBY indicator (PDP-4272HD/PDP-4271HD/PDP-4270HD) ON STANDBY REC TIMER POWER ON indicator...TV a on the remote control unit or STANDBY/ ON on the Plasma Display to press POWER and see "Troubleshooting"on the Plasma Display. Plasma Display status indicators The table below of the display (left). STANDBY/ON button POWER button (Right side view) 32 En Plasma Display (PDP-6072HD/PDP-6071HD/PDP...
... will allow the system to automatically receive digital TV program information while in the standby mode. (PDP-5072HD/PDP-5071HD/PDP-5070HD) POWER button POWER ON STANDBY POWER ON indicator STANDBY indicator (PDP-4272HD/PDP-4271HD/PDP-4270HD) ON STANDBY REC TIMER POWER ON indicator...TV a on the remote control unit or STANDBY/ ON on the Plasma Display to press POWER and see "Troubleshooting"on the Plasma Display. Plasma Display status indicators The table below of the display (left). STANDBY/ON button POWER button (Right side view) 32 En Plasma Display (PDP-6072HD/PDP-6071HD/PDP...

Owner's Manual
Page 33
...), press 1, 2, then 5. • To select subchannel 10.01, press 1, 0, • (dot), 0, then 1. • To select subchannel 10.001 (for cable TV), press 1, 0, • (dot), 0, 0, then 1. Those messages are broadcasted by pressing buttons 0 to 9. Selecting the antenna After confirming that the Mode switch on the remote... control unit has been set up TV channels" on the remote control unit. • Press CH RETURN to switch the currently tuned channel to the antenna input terminals at...
...), press 1, 2, then 5. • To select subchannel 10.01, press 1, 0, • (dot), 0, then 1. • To select subchannel 10.001 (for cable TV), press 1, 0, • (dot), 0, 0, then 1. Those messages are broadcasted by pressing buttons 0 to 9. Selecting the antenna After confirming that the Mode switch on the remote... control unit has been set up TV channels" on the remote control unit. • Press CH RETURN to switch the currently tuned channel to the antenna input terminals at...

Owner's Manual
Page 34
With a language other than English, French, and Spanish are watching a digital TV program without sound or language information, "N/A" appears on the screen. " " appears on the Plasma Display operates the same as VOL +/- To quit muting, press MUTING... screen. on the remote control unit. NOTE • Switchable languages differ depending on the remote control unit. Changing the language If you have selected a digital TV program that language. • If you are selected, "Others" will appear. 06 Basic Operations Changing the volume and sound To increase the volume, press VOL...
With a language other than English, French, and Spanish are watching a digital TV program without sound or language information, "N/A" appears on the screen. " " appears on the Plasma Display operates the same as VOL +/- To quit muting, press MUTING... screen. on the remote control unit. NOTE • Switchable languages differ depending on the remote control unit. Changing the language If you have selected a digital TV program that language. • If you are selected, "Others" will appear. 06 Basic Operations Changing the volume and sound To increase the volume, press VOL...

Owner's Manual
Page 35
... mode A 125 SAP (STEREO) In SAP mode STEREO SAP MONO A 125 MONO (SAP) In MONO mode NOTE • The MTS button is disabled while the TV Guide On Screen™ system is INPUT 1 to 6 or PC does not change the type of the MTS/SAP modes selected, the display changes depend... STEREO mode A 125 MAIN In SAP mode A 125 MONO In MONO mode 35 En Basic Operations 06 English Setting MTS/SAP mode When watching conventional TV programs, you may manually switch to the MONO mode to obtain clearer sound. • Once the MONO mode is selected, the Plasma Display System sound...
... mode A 125 SAP (STEREO) In SAP mode STEREO SAP MONO A 125 MONO (SAP) In MONO mode NOTE • The MTS button is disabled while the TV Guide On Screen™ system is INPUT 1 to 6 or PC does not change the type of the MTS/SAP modes selected, the display changes depend... STEREO mode A 125 MAIN In SAP mode A 125 MONO In MONO mode 35 En Basic Operations 06 English Setting MTS/SAP mode When watching conventional TV programs, you may manually switch to the MONO mode to obtain clearer sound. • Once the MONO mode is selected, the Plasma Display System sound...

Owner's Manual
Page 36
... 2-screen 56 78 1 Station name 2 Current time 3 Channel number 4 Input (Ant. 06 Basic Operations Viewing a channel banner While watching a TV program, pressing INFO causes the following procedure to appear. A or Ant. This service presents various types of program information. Using the POD service If...useful information, using HTML text. Picture-in -picture, and single-screen. 36 En B) 5 Program title 6 Program time schedule 7 Channel logo 8 TV rating name or icon NOTE • The above information is switched among 2-screen, picture-in -picture Press HOME MENU, 9, 9, then 9 to view...
... 2-screen 56 78 1 Station name 2 Current time 3 Channel number 4 Input (Ant. 06 Basic Operations Viewing a channel banner While watching a TV program, pressing INFO causes the following procedure to appear. A or Ant. This service presents various types of program information. Using the POD service If...useful information, using HTML text. Picture-in -picture, and single-screen. 36 En B) 5 Program title 6 Program time schedule 7 Channel logo 8 TV rating name or icon NOTE • The above information is switched among 2-screen, picture-in -picture Press HOME MENU, 9, 9, then 9 to view...

Owner's Manual
Page 37
English • In 2-screen mode, press SCREEN SIZE to change the channel. NOTE • The SPLIT button is disabled while the TV Guide On Screen™ system is allowed to cancel the function. Basic Operations 06 • In 2-screen or picture-in FREEZE mode for...to operate picture and sound. Moving image Still image 2 To select the desired input source, press the appropriate input source button. • If watching TV programs, press CH +/- to change the size of the system's capability. • Displaying pictures in multi-screen mode for an extended period may cause...
English • In 2-screen mode, press SCREEN SIZE to change the channel. NOTE • The SPLIT button is disabled while the TV Guide On Screen™ system is allowed to cancel the function. Basic Operations 06 • In 2-screen or picture-in FREEZE mode for...to operate picture and sound. Moving image Still image 2 To select the desired input source, press the appropriate input source button. • If watching TV programs, press CH +/- to change the size of the system's capability. • Displaying pictures in multi-screen mode for an extended period may cause...

Owner's Manual
Page 38
...through the setup process. Follow the instructions shown on the right column of all areas. As content providers move to digital programming and broadcasting, TV Guide data may differ from the one given in this manual. Receipt of this reminder screen will appear each time you decide not to one...8482; system When the Plasma Display System is a convenient way to set it up . System Setup Screens NOTE • Once you start using the TV Guide On Screen™ system, you the location of the setup screens may be accessed from appearing upon power on right now or during the...
...through the setup process. Follow the instructions shown on the right column of all areas. As content providers move to digital programming and broadcasting, TV Guide data may differ from the one given in this manual. Receipt of this reminder screen will appear each time you decide not to one...8482; system When the Plasma Display System is a convenient way to set it up . System Setup Screens NOTE • Once you start using the TV Guide On Screen™ system, you the location of the setup screens may be accessed from appearing upon power on right now or during the...

Owner's Manual
Page 39
... Screen 6. • If you selected Canada in this screen to receive a channel lineup and listings. Screen 7: Congratulations • Press ENTER to display Screen 8. 39 En TV Guide On Screen™ System Setup 07 English Screen 2: Enter ZIP or Postal Code • If you selected USA in Screen 1, you see the ZIP...
... Screen 6. • If you selected Canada in this screen to receive a channel lineup and listings. Screen 7: Congratulations • Press ENTER to display Screen 8. 39 En TV Guide On Screen™ System Setup 07 English Screen 2: Enter ZIP or Postal Code • If you selected USA in Screen 1, you see the ZIP...

Owner's Manual
Page 40
... display Screen 12. Screen 13: Did your VCR stop playing? • If you select "Yes", you see Screen 14. If you see Screen 10. 07 TV Guide On Screen™ System Setup Screen 8: Is a VCR Connected? • If you select "Yes", you see Screen 9. • If you select "No", you see...
... display Screen 12. Screen 13: Did your VCR stop playing? • If you select "Yes", you see Screen 14. If you see Screen 10. 07 TV Guide On Screen™ System Setup Screen 8: Is a VCR Connected? • If you select "Yes", you see Screen 9. • If you select "No", you see...

Owner's Manual
Page 41
Screen 16: Helpful Information • This screen tells you see Screen 1. TV Guide On Screen™ System Setup 07 Screen 14: Confirming Your Settings Verify the Setup information is correct. • If it is, select "Yes, end setup", and you see Screen 15. • If it is not, select "No, repeat setup process", and you valuable information on using your Guide. • Press ENTER to watch TV. 41 En English Screen 15: Congratulations • You have successfully completed Setup! • Press ENTER and you see Screen 16.
Screen 16: Helpful Information • This screen tells you see Screen 1. TV Guide On Screen™ System Setup 07 Screen 14: Confirming Your Settings Verify the Setup information is correct. • If it is, select "Yes, end setup", and you see Screen 15. • If it is not, select "No, repeat setup process", and you valuable information on using your Guide. • Press ENTER to watch TV. 41 En English Screen 15: Congratulations • You have successfully completed Setup! • Press ENTER and you see Screen 16.


