Owner's Manual
Page 3
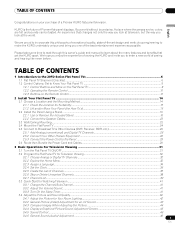
... Remove the Included Stand ...16 2.2.2 Connect the Speaker Cables ...20 2.3 Wall/Ceiling Mounting...22 2.4 Mount the Flat Panel TV ...24 2.5 Connect to Broadcast TV & Other Devices (DVR, Receiver, BDR, etc 26 2.5.1 Add Analog (conventional) and Digital TV Channels 26 2.5.2 Connect Your Other Pioneer Equipment...26 2.5.3 Connect the Power Cord to make the KURO undeniably unique and bring you look at the world. A place where the senses evolve, colors are proud to incorporate this owner's guide...
... Remove the Included Stand ...16 2.2.2 Connect the Speaker Cables ...20 2.3 Wall/Ceiling Mounting...22 2.4 Mount the Flat Panel TV ...24 2.5 Connect to Broadcast TV & Other Devices (DVR, Receiver, BDR, etc 26 2.5.1 Add Analog (conventional) and Digital TV Channels 26 2.5.2 Connect Your Other Pioneer Equipment...26 2.5.3 Connect the Power Cord to make the KURO undeniably unique and bring you look at the world. A place where the senses evolve, colors are proud to incorporate this owner's guide...

Owner's Manual
Page 4
... Settings ...67 4.7.5 Use Auto Volume Control (AVC)...67 4.8 Manage the Power ...67 5 Use Other Equipment With Your Flat Panel TV 69 5.1 Program the Remote Control to Operate Other Equipment 69 5.1.1 Assign a Manufacturing Code to the Remote Control 69 5.1.2 Issue a Library Search for a Manufacturer Code 69 5.1.3 Clear Added Manufacturer Codes from the Remote Control 70 5.1.4 Control a Pioneer Receiver ...70 5.1.5 Control a Cable (CBL) or Satellite (SAT) System 71 5.1.6 Control a Video Cassette Recorder (VCR) ...72 5.1.7 Control a DVD Player/DVR Recorder/BD Player 73 5.2 Use HDMI Inputs...
... Settings ...67 4.7.5 Use Auto Volume Control (AVC)...67 4.8 Manage the Power ...67 5 Use Other Equipment With Your Flat Panel TV 69 5.1 Program the Remote Control to Operate Other Equipment 69 5.1.1 Assign a Manufacturing Code to the Remote Control 69 5.1.2 Issue a Library Search for a Manufacturer Code 69 5.1.3 Clear Added Manufacturer Codes from the Remote Control 70 5.1.4 Control a Pioneer Receiver ...70 5.1.5 Control a Cable (CBL) or Satellite (SAT) System 71 5.1.6 Control a Video Cassette Recorder (VCR) ...72 5.1.7 Control a DVD Player/DVR Recorder/BD Player 73 5.2 Use HDMI Inputs...

Owner's Manual
Page 5
... Codes to Program into the Remote Control 128 8.2.1 Cable...128 8.2.2 Satellite...128 8.2.3 VCR (Brands A - Z) ...131 8.2.7 PVR ...132 8.2.8 BD (HD-DVD) ...132 8.2.9 DVD-R ...132 8.2.10 DVD (Brands A - TV Parental Guideline Ratings (age/category-based 126 8.1.3 MPAA Movie Ratings (age-based) ...126 8.1.4 Canadian - O)...130 8.2.5 VCR (Brands P - V) ...131 8.2.6 VCR (Brands W - English TABLE OF CONTENTS 5.5 Connect a Game Console or Camcorder ...82 5.6 Operate the Home Media Gallery ...83 5.6.1 Network Connections...84 5.6.2 Connect a USB Device...
... Codes to Program into the Remote Control 128 8.2.1 Cable...128 8.2.2 Satellite...128 8.2.3 VCR (Brands A - Z) ...131 8.2.7 PVR ...132 8.2.8 BD (HD-DVD) ...132 8.2.9 DVD-R ...132 8.2.10 DVD (Brands A - TV Parental Guideline Ratings (age/category-based 126 8.1.3 MPAA Movie Ratings (age-based) ...126 8.1.4 Canadian - O)...130 8.2.5 VCR (Brands P - V) ...131 8.2.6 VCR (Brands W - English TABLE OF CONTENTS 5.5 Connect a Game Console or Camcorder ...82 5.6 Operate the Home Media Gallery ...83 5.6.1 Network Connections...84 5.6.2 Connect a USB Device...
Owner's Manual
Page 6
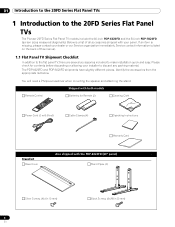
... (4) Operating Instructions Stand kit Base Cover Warranty Card Also shipped with your panel. Service contact information is a list of this manual. 1.1 Flat Panel TV Shipment Checklist In addition to the flat panel TV, there are several accessories included to the 20FD Series Flat Panel TVs The Pioneer 20FD Series Flat Panel TV models include the 60-inch PDP-6020FD and the 50-inch PDP-5020FD (screen sizes measured diagonally). 01 Introduction to the 20FD Series Flat Panel TVs 1 Introduction to make installation quick and easy. You will need...
... (4) Operating Instructions Stand kit Base Cover Warranty Card Also shipped with your panel. Service contact information is a list of this manual. 1.1 Flat Panel TV Shipment Checklist In addition to the flat panel TV, there are several accessories included to the 20FD Series Flat Panel TVs The Pioneer 20FD Series Flat Panel TV models include the 60-inch PDP-6020FD and the 50-inch PDP-5020FD (screen sizes measured diagonally). 01 Introduction to the 20FD Series Flat Panel TVs 1 Introduction to make installation quick and easy. You will need...

Owner's Manual
Page 14
Pioneer recommends working with the shipment. Regardless of the mounting method, anchor or secure your flat panel TV. Use installation accessories and parts included with a qualified installer whenever possible. The panel needs a solid surface and some sort of support structure (a stand, table, etc.) to install your installer or dealer to 0.7 inches) Rear view (PDP-5020FD) W Mounting hole W T W W Mounting hole W T W Note: Some installation options require a different type of bolt. This chapter walks you through how to choose...
Pioneer recommends working with the shipment. Regardless of the mounting method, anchor or secure your flat panel TV. Use installation accessories and parts included with a qualified installer whenever possible. The panel needs a solid surface and some sort of support structure (a stand, table, etc.) to install your installer or dealer to 0.7 inches) Rear view (PDP-5020FD) W Mounting hole W T W W Mounting hole W T W Note: Some installation options require a different type of bolt. This chapter walks you through how to choose...

Owner's Manual
Page 20
... vertically) after it is showing. 5 ) Repeat this process for each speaker bracket is not used when the panel remains on the rear of the flat panel TV. 02 Install Your Flat Panel TV 6 ) Attach the speaker to the side brackets using the supplied screws. . ➂ ➀ Speaker mounting screw (M5 x 10 mm) The bottom screw hole on each cable, matching the color of the wire to the appropriate terminal. 6 ) Connect the speaker cables to the speaker. 7 ) Bundle the speaker cables, power cord...
... vertically) after it is showing. 5 ) Repeat this process for each speaker bracket is not used when the panel remains on the rear of the flat panel TV. 02 Install Your Flat Panel TV 6 ) Attach the speaker to the side brackets using the supplied screws. . ➂ ➀ Speaker mounting screw (M5 x 10 mm) The bottom screw hole on each cable, matching the color of the wire to the appropriate terminal. 6 ) Connect the speaker cables to the speaker. 7 ) Bundle the speaker cables, power cord...
Owner's Manual
Page 26
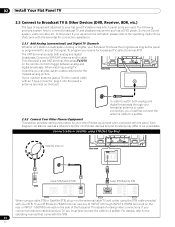
... diagram can also use any of INPUT 4 through INPUT 6 (HDMI terminal) on the rear or INPUT 7 (HDMI terminal) on the remote control to your flat panel TV determines which panel ports are used as a DVD player, Surround Sound system, video recorder, etc. When watching analog TV channels, you must first connect the antenna cable to the panel. The ANT terminal accepts both analog and digital broadcasts through your STB has an HDMI terminal, use an outdoor antenna for the Rear view clearest...
... diagram can also use any of INPUT 4 through INPUT 6 (HDMI terminal) on the rear or INPUT 7 (HDMI terminal) on the remote control to your flat panel TV determines which panel ports are used as a DVD player, Surround Sound system, video recorder, etc. When watching analog TV channels, you must first connect the antenna cable to the panel. The ANT terminal accepts both analog and digital broadcasts through your STB has an HDMI terminal, use an outdoor antenna for the Rear view clearest...
Owner's Manual
Page 41
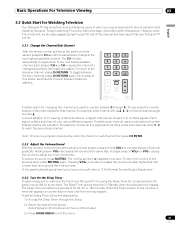
... the number buttons in the order needed for that your flat panel TV, try using the Sleep Timer for occasions when the panel may simply lack the time to set the Sleep Timer, follow the steps below. 1 ) Access the Sleep Timer through the rest of this manual and learning all sound, press MUTING. Each signal, called a sub-channel, can be left on screen. Note: To tune in a program more...
... the number buttons in the order needed for that your flat panel TV, try using the Sleep Timer for occasions when the panel may simply lack the time to set the Sleep Timer, follow the steps below. 1 ) Access the Sleep Timer through the rest of this manual and learning all sound, press MUTING. Each signal, called a sub-channel, can be left on screen. Note: To tune in a program more...

Owner's Manual
Page 43
... a channel number. 6 ) Select Tuner NR. 7 ) Select On. If the viewing option is On. 8 ) Press HOME MENU to exit the menu. 43 En For standard picture adjustments, follow the steps below to reduce noise on the broadcast signal level. This function is DYNAMIC, please refer to "4.1 Choose an AV Option (Video, Game, etc.)." The default setting is OPTIMUM, your flat panel TV automatically adjusts the picture to the best possible...
... a channel number. 6 ) Select Tuner NR. 7 ) Select On. If the viewing option is On. 8 ) Press HOME MENU to exit the menu. 43 En For standard picture adjustments, follow the steps below to reduce noise on the broadcast signal level. This function is DYNAMIC, please refer to "4.1 Choose an AV Option (Video, Game, etc.)." The default setting is OPTIMUM, your flat panel TV automatically adjusts the picture to the best possible...

Owner's Manual
Page 59
... HOME MENU to exit the menu. 6 ) Confirm that the word "AUTO" appears in the InfoBanner. This option is available when the Auto Size menu is set to Wide-Zoom and Side Mask Detection to Natural during the Auto Size process, gray bars replace the black bars. If the flat panel TV's Screen Size is set to Mode 1 or Mode 2. Mode 1 detects only black side masks and Mode 2 detects both sides of the picture.
... HOME MENU to exit the menu. 6 ) Confirm that the word "AUTO" appears in the InfoBanner. This option is available when the Auto Size menu is set to Wide-Zoom and Side Mask Detection to Natural during the Auto Size process, gray bars replace the black bars. If the flat panel TV's Screen Size is set to Mode 1 or Mode 2. Mode 1 detects only black side masks and Mode 2 detects both sides of the picture.

Owner's Manual
Page 65
... levels. Additional Picture and Sound Adjustment Options 04 English Closed Caption for Digital Programs There are six different closed caption service level (/). Digital Settings Digital Service : Font Size : Font : Font Color : Font Opacity : Background Color : Background Opacity : Service 1 Auto Auto Auto Auto Auto Auto 6 ) Press HOME MENU to exit the menu. 65 En Option Description Font Size Auto, Large, Standard, Small Font1 Auto, Font 1, Font 2, Font 3, Font 4, Font 5, Font 6, Font 7 Font Color Auto, Black, White, Red, Green, Blue, Yellow, Magenta...
... levels. Additional Picture and Sound Adjustment Options 04 English Closed Caption for Digital Programs There are six different closed caption service level (/). Digital Settings Digital Service : Font Size : Font : Font Color : Font Opacity : Background Color : Background Opacity : Service 1 Auto Auto Auto Auto Auto Auto 6 ) Press HOME MENU to exit the menu. 65 En Option Description Font Size Auto, Large, Standard, Small Font1 Auto, Font 1, Font 2, Font 3, Font 4, Font 5, Font 6, Font 7 Font Color Auto, Black, White, Red, Green, Blue, Yellow, Magenta...

Owner's Manual
Page 78
... Setup. 2 ) Select HDMI Control Setting from the Option menu. 3 ) Select Input Setting from DIGITAL OUT. 78 En 05 Use Other Equipment With Your Flat Panel TV To connect a device for HDMI Control, follow the steps below. 1 ) Access the Option through the panel's DIGITAL OUT using an optical digital cable and AUDIO OUT using an HDMI port other than the terminal selected in Input Setting, the equipment settings should support the HDMI Control functions between the panel and any other equipment is set for HDMI Control...
... Setup. 2 ) Select HDMI Control Setting from the Option menu. 3 ) Select Input Setting from DIGITAL OUT. 78 En 05 Use Other Equipment With Your Flat Panel TV To connect a device for HDMI Control, follow the steps below. 1 ) Access the Option through the panel's DIGITAL OUT using an optical digital cable and AUDIO OUT using an HDMI port other than the terminal selected in Input Setting, the equipment settings should support the HDMI Control functions between the panel and any other equipment is set for HDMI Control...

Owner's Manual
Page 84
... Flat Panel TV Even when files have pre-installed media server software and recorders with Windows XP Service Pack 2 (SP2) installed. Note: You cannot use or media server in your PC, you can choose from the media servers that have a supported file extension, some Home Media Gallery function(s) and content format(s) may operate properly. Contact your PC, or other connected equipment. This system may not display...
... Flat Panel TV Even when files have pre-installed media server software and recorders with Windows XP Service Pack 2 (SP2) installed. Note: You cannot use or media server in your PC, you can choose from the media servers that have a supported file extension, some Home Media Gallery function(s) and content format(s) may operate properly. Contact your PC, or other connected equipment. This system may not display...

Owner's Manual
Page 110
...unsupported file is not supported. Failed to obtain WMDRM Check for failure of router, hub, authorization other than above Important • Displaying pictures in the Home Media Gallery for an extended period may cause an after-image. 110 En The max...error other network devices. (505) Failed to authenticate. Failed to obtain DRM Check for failure of this file might be authorization invalid. 05 Use Other Equipment With Your Flat Panel TV Dialog Screen Message No. 001 100 101 102 103 300 301 500 501 502 503 504 505 506 507 508 Message Problem Content cannot be played...
...unsupported file is not supported. Failed to obtain WMDRM Check for failure of router, hub, authorization other than above Important • Displaying pictures in the Home Media Gallery for an extended period may cause an after-image. 110 En The max...error other network devices. (505) Failed to authenticate. Failed to obtain DRM Check for failure of this file might be authorization invalid. 05 Use Other Equipment With Your Flat Panel TV Dialog Screen Message No. 001 100 101 102 103 300 301 500 501 502 503 504 505 506 507 508 Message Problem Content cannot be played...

Owner's Manual
Page 114
... receiving computer signals. If you select Video for the front bezel. What can check the version of cloth and method as that your flat panel TV, unplug the power cord from the outlet. A dusty or rough-textured cloth (or if you panel. Do not use the same type of all software and hardware used in . • Set Screen Protection to two minutes. First turn the panel...
... receiving computer signals. If you select Video for the front bezel. What can check the version of cloth and method as that your flat panel TV, unplug the power cord from the outlet. A dusty or rough-textured cloth (or if you panel. Do not use the same type of all software and hardware used in . • Set Screen Protection to two minutes. First turn the panel...

Owner's Manual
Page 115
... lights red, press (a) on the remote control or STANDBY/ON on the panel for two or more minutes. Helpful Information 06 6.4 Troubleshooting & Service Information English General Issue Possible Solutions No power • Check the connection seating at the wall and panel. • See if the panel's Power On button is turned ON. • Confirm that the remote is set to watch a TV channel instead of an input source. Clean the vents or remove...
... lights red, press (a) on the remote control or STANDBY/ON on the panel for two or more minutes. Helpful Information 06 6.4 Troubleshooting & Service Information English General Issue Possible Solutions No power • Check the connection seating at the wall and panel. • See if the panel's Power On button is turned ON. • Confirm that the remote is set to watch a TV channel instead of an input source. Clean the vents or remove...

Owner's Manual
Page 116
or MUTING. Try playing another HDMI terminal. 116 En To restore the screen display, press any recorder/player is connected to burning. only or reversed between • Confirm that speaker cables are correct. Watch images in 4:3 mode or letterbox images are correct. setting to the operating instructions that came with the equipment. • Check the connections between the panel and the HDMI equipment. • Confirm that settings for shorter...
or MUTING. Try playing another HDMI terminal. 116 En To restore the screen display, press any recorder/player is connected to burning. only or reversed between • Confirm that speaker cables are correct. Watch images in 4:3 mode or letterbox images are correct. setting to the operating instructions that came with the equipment. • Check the connections between the panel and the HDMI equipment. • Confirm that settings for shorter...
Owner's Manual
Page 123
..., plasma, direct view CRT TVs, and projection TVs. This after the picture is known as still images for a long time may occur due to Mode 1 or Mode 2. Burned images may be seen close up to 10 minutes, the flat panel TV automatically turns the image off , or on screen whenever possible. • Display content in feature to prevent the screen from a PC or a TV game unit, for contact information. When a program menu, or frozen image...
..., plasma, direct view CRT TVs, and projection TVs. This after the picture is known as still images for a long time may occur due to Mode 1 or Mode 2. Burned images may be seen close up to 10 minutes, the flat panel TV automatically turns the image off , or on screen whenever possible. • Display content in feature to prevent the screen from a PC or a TV game unit, for contact information. When a program menu, or frozen image...

Owner's Manual
Page 138
...Inc. All advertising materials mentioning features or use in part on Apple Public Source License or the recent's rights thereunder see http:// developer.apple.com/ for any Windows specific code (or a derivative thereof) from the library being used are met: 138 En OR BUSINESS ...USE OF THIS SOFTWARE, EVEN IF ADVISED OF THE POSSIBILITY OF SUCH DAMAGE. If you must retain the copyright notice, this code cannot simply be changed. this list of conditions and the following disclaimer in binary form must display the following acknowledgement: "This product includes cryptographic software...
...Inc. All advertising materials mentioning features or use in part on Apple Public Source License or the recent's rights thereunder see http:// developer.apple.com/ for any Windows specific code (or a derivative thereof) from the library being used are met: 138 En OR BUSINESS ...USE OF THIS SOFTWARE, EVEN IF ADVISED OF THE POSSIBILITY OF SUCH DAMAGE. If you must retain the copyright notice, this code cannot simply be changed. this list of conditions and the following disclaimer in binary form must display the following acknowledgement: "This product includes cryptographic software...

Owner's Manual
Page 152
... for home network PCs and other digital devices, as a flat panel TV. This unit is utilized in music CDs. Digital Living Network Alliance (DLNA) is a node on a DLNAcompatible server connected through wired or wireless networks in order per each image refresh. Ethernet A frame-based computer networking technology for "progressive"). (Home Media Gallery) Default Gateway Default gateway is dedicated to a compatible digital audio and/or video device, such as set down in...
... for home network PCs and other digital devices, as a flat panel TV. This unit is utilized in music CDs. Digital Living Network Alliance (DLNA) is a node on a DLNAcompatible server connected through wired or wireless networks in order per each image refresh. Ethernet A frame-based computer networking technology for "progressive"). (Home Media Gallery) Default Gateway Default gateway is dedicated to a compatible digital audio and/or video device, such as set down in...


