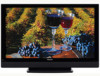
Owner's Manual
Page 3
... System Model Number: PDP-6072HD/PDP-5072HD/PDP4272HD/PDP-6071HD/PDP-5071HD/PDP-4271HD/ PDP-6070HD/PDP-5070HD/PDP-4270HD Product Category: Class B Personal Computers & Peripherals Responsible Party Name: PIONEER ELECTRONICS SERVICE, INC.... If this device must accept any interference received, including interference that interference will expose you to lead, a chemical known to the State of the FCC Rules. THIS IS FOR YOUR SECURITY. Increase the separation between the equipment and receiver. - Consult the dealer or an experienced radio/TV...
... System Model Number: PDP-6072HD/PDP-5072HD/PDP4272HD/PDP-6071HD/PDP-5071HD/PDP-4271HD/ PDP-6070HD/PDP-5070HD/PDP-4270HD Product Category: Class B Personal Computers & Peripherals Responsible Party Name: PIONEER ELECTRONICS SERVICE, INC.... If this device must accept any interference received, including interference that interference will expose you to lead, a chemical known to the State of the FCC Rules. THIS IS FOR YOUR SECURITY. Increase the separation between the equipment and receiver. - Consult the dealer or an experienced radio/TV...
Owner's Manual
Page 4
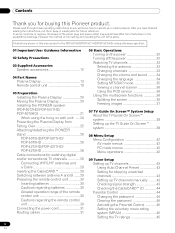
...and power outlet may sometimes differ from Falling Over 25 Attaching/detaching the PIONEER stand 26 PDP-5072HD/PDP-5071HD/ PDP-5070HD 26 PDP-4272HD/PDP-4271HD/ PDP-4270HD 28 Cable connections for watching digital and/or conventional TV channels 29 Connecting VHF/UHF antennas and a Cable 29 Inserting the ... Display 13 Remote control unit 19 05 Preparation Installing the Plasma Display 20 Moving the Plasma Display 20 Installing the PIONEER speaker (PDP-5072HD/PDP-5071HD/ PDP-5070HD 21 When using the hung on wall unit: .....24 Preventing the Plasma Display from that shown in a safe...
...and power outlet may sometimes differ from Falling Over 25 Attaching/detaching the PIONEER stand 26 PDP-5072HD/PDP-5071HD/ PDP-5070HD 26 PDP-4272HD/PDP-4271HD/ PDP-4270HD 28 Cable connections for watching digital and/or conventional TV channels 29 Connecting VHF/UHF antennas and a Cable 29 Inserting the ... Display 13 Remote control unit 19 05 Preparation Installing the Plasma Display 20 Moving the Plasma Display 20 Installing the PIONEER speaker (PDP-5072HD/PDP-5071HD/ PDP-5070HD 21 When using the hung on wall unit: .....24 Preventing the Plasma Display from that shown in a safe...
Owner's Manual
Page 5
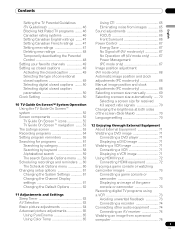
...size for received 4:3 aspect ratio signals 70 Changing the brightness at both sides of the screen (Side Mask 70 Language setting 70 TV Guide On Screen™ navigation ....... 53 12 Enjoying through External Equipment The Listings screen 53 About External Equipment 71 Recording programs 54... Timer 63 AV Selection 63 Basic picture adjustments 64 Advanced picture adjustments 65 Using PureCinema 65 Using Color Temp 65 Recording digital TV programs using a VCR 73 Avoiding unwanted feedback 73 Connecting a recorder 74 Connecting other audio equipment ......... 74 Connecting an AV ...
...size for received 4:3 aspect ratio signals 70 Changing the brightness at both sides of the screen (Side Mask 70 Language setting 70 TV Guide On Screen™ navigation ....... 53 12 Enjoying through External Equipment The Listings screen 53 About External Equipment 71 Recording programs 54... Timer 63 AV Selection 63 Basic picture adjustments 64 Advanced picture adjustments 65 Using PureCinema 65 Using Color Temp 65 Recording digital TV programs using a VCR 73 Avoiding unwanted feedback 73 Connecting a recorder 74 Connecting other audio equipment ......... 74 Connecting an AV ...
Owner's Manual
Page 7
... occurrence. However, PIONEER cannot be displayed for a prolonged period. The Pioneer PureVision PDP-6072HD/PDP-5072HD/PDP4272HD/PDP-6071HD/PDP-5071HD/PDP-4271HD/PDP6070HD/PDP-5070HD/PDP-4270HD incorporates the latest in the event of the Pioneer PDP-6072HD/PDP-5072HD/PDP-4272HD/PDP-6071HD/PDP5071HD/PDP-4271HD/PDP-6070HD/PDP-5070HD/PDP4270HD Plasma Display System... measures to mount or install the Plasma Display, in the "WIDE" or "FULL" screen setting for extended periods, from a TV, VCR, DVD player or any still image, it is poor. • Do not cover with a cloth, etc. •...
... occurrence. However, PIONEER cannot be displayed for a prolonged period. The Pioneer PureVision PDP-6072HD/PDP-5072HD/PDP4272HD/PDP-6071HD/PDP-5071HD/PDP-4271HD/PDP6070HD/PDP-5070HD/PDP-4270HD incorporates the latest in the event of the Pioneer PDP-6072HD/PDP-5072HD/PDP-4272HD/PDP-6071HD/PDP5071HD/PDP-4271HD/PDP-6070HD/PDP-5070HD/PDP4270HD Plasma Display System... measures to mount or install the Plasma Display, in the "WIDE" or "FULL" screen setting for extended periods, from a TV, VCR, DVD player or any still image, it is poor. • Do not cover with a cloth, etc. •...

Owner's Manual
Page 9
...images remaining on a display for long periods (such as permanent image retention or burn-in copyright infringement. NOTE • When a program menu, TV Guide screen or frozen image is displayed continuously for several hours, a faint imprint of time. CAUTION DO NOT PLACE THIS PRODUCT ON AN UNSTABLE CART...black bars above and below content) for 5 to 10 minutes, the system automatically turns the image off to help prevent damage from PC or TV game equipment, and/or fixed images such as still images for the after -image lagging. Image Retention When a static image is less of...
...images remaining on a display for long periods (such as permanent image retention or burn-in copyright infringement. NOTE • When a program menu, TV Guide screen or frozen image is displayed continuously for several hours, a faint imprint of time. CAUTION DO NOT PLACE THIS PRODUCT ON AN UNSTABLE CART...black bars above and below content) for 5 to 10 minutes, the system automatically turns the image off to help prevent damage from PC or TV game equipment, and/or fixed images such as still images for the after -image lagging. Image Retention When a static image is less of...
Owner's Manual
Page 13
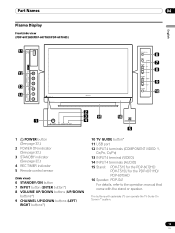
...Side view) 6 STANDBY/ON button 7 INPUT button (ENTER button*) 8 VOLUME UP/DOWN buttons (UP/DOWN buttons*) 9 CHANNEL UP/DOWN buttons (LEFT/ RIGHT buttons*) 10 TV GUIDE button* 11 USB port 12 INPUT 4 terminals (COMPONENT VIDEO: Y, CB/PB, CR/PR) 13 INPUT 4 terminal (VIDEO) 14 INPUT 4 terminals (AUDIO) 15 ...Stand: PDK-TS15 for the PDP-6072HD PDK-TS15U for the PDP-6071HD/ PDP-6070HD 16 Speaker: PDP-S41 For details, refer to the operation manual that came with asterisks (*) can operate the...
...Side view) 6 STANDBY/ON button 7 INPUT button (ENTER button*) 8 VOLUME UP/DOWN buttons (UP/DOWN buttons*) 9 CHANNEL UP/DOWN buttons (LEFT/ RIGHT buttons*) 10 TV GUIDE button* 11 USB port 12 INPUT 4 terminals (COMPONENT VIDEO: Y, CB/PB, CR/PR) 13 INPUT 4 terminal (VIDEO) 14 INPUT 4 terminals (AUDIO) 15 ...Stand: PDK-TS15 for the PDP-6072HD PDK-TS15U for the PDP-6071HD/ PDP-6070HD 16 Speaker: PDP-S41 For details, refer to the operation manual that came with asterisks (*) can operate the...

Owner's Manual
Page 14
04 Part Names Front/side view (PDP-5072HD/PDP-5071HD/PDP-5070HD) 11 12 13 14 1 2 3 POWER ON STANDBY 6 7 8 9 10 REC TIMER 4 5 1 a POWER button (See page 32.) 2 POWER ON indicator (See page 32.) 3 STANDBY indicator (See page ... sensor (Side view) 6 STANDBY/ON button 7 INPUT button (ENTER button*) 8 VOLUME UP/DOWN buttons (UP/DOWN buttons*) 9 CHANNEL UP/DOWN buttons (LEFT/ RIGHT buttons*) 10 TV GUIDE button* 11 USB port 12 INPUT 4 terminals (COMPONENT VIDEO: Y, CB/PB, CR/PR) 13 INPUT 4 terminal (VIDEO) 14 INPUT 4 terminals (AUDIO) The buttons with...
04 Part Names Front/side view (PDP-5072HD/PDP-5071HD/PDP-5070HD) 11 12 13 14 1 2 3 POWER ON STANDBY 6 7 8 9 10 REC TIMER 4 5 1 a POWER button (See page 32.) 2 POWER ON indicator (See page 32.) 3 STANDBY indicator (See page ... sensor (Side view) 6 STANDBY/ON button 7 INPUT button (ENTER button*) 8 VOLUME UP/DOWN buttons (UP/DOWN buttons*) 9 CHANNEL UP/DOWN buttons (LEFT/ RIGHT buttons*) 10 TV GUIDE button* 11 USB port 12 INPUT 4 terminals (COMPONENT VIDEO: Y, CB/PB, CR/PR) 13 INPUT 4 terminal (VIDEO) 14 INPUT 4 terminals (AUDIO) The buttons with...

Owner's Manual
Page 15
Part Names Front/side view (PDP-4272HD/PDP-4271HD/PDP-4270HD) 11 12 13 14 04 6 7 8 9 10 English 2 3 4 POWER ON STANDBY REC TIMER 1 Viewed from below of the display 5 Viewed from the front side of ... sensor (Side view) 6 STANDBY/ON button 7 INPUT button (ENTER button*) 8 VOLUME UP/DOWN buttons (UP/DOWN buttons*) 9 CHANNEL UP/DOWN buttons (LEFT/ RIGHT buttons*) 10 TV GUIDE button* 11 USB port 12 INPUT 4 terminals (COMPONENT VIDEO: Y, CB/PB, CR/PR) 13 INPUT 4 terminal (VIDEO) 14 INPUT 4 terminals (AUDIO) The buttons with...
Part Names Front/side view (PDP-4272HD/PDP-4271HD/PDP-4270HD) 11 12 13 14 04 6 7 8 9 10 English 2 3 4 POWER ON STANDBY REC TIMER 1 Viewed from below of the display 5 Viewed from the front side of ... sensor (Side view) 6 STANDBY/ON button 7 INPUT button (ENTER button*) 8 VOLUME UP/DOWN buttons (UP/DOWN buttons*) 9 CHANNEL UP/DOWN buttons (LEFT/ RIGHT buttons*) 10 TV GUIDE button* 11 USB port 12 INPUT 4 terminals (COMPONENT VIDEO: Y, CB/PB, CR/PR) 13 INPUT 4 terminal (VIDEO) 14 INPUT 4 terminals (AUDIO) The buttons with...

Owner's Manual
Page 19
... to the desired function when performing operations in -picture mode. PC mode: STANDARD, USER.) 20 DISPLAY: Displays the channel information. 21 TV GUIDE: Displays the TV Guide On Screen™ system. 22 ENTER: Executes a command. 23 PAGE +/- (for controlling other equipment, see "Using the remote ... See pages 81 to 90 for operating buttons not listed on the power to TV. NOTE • When using the TV Guide On Screen™ System, starts recording with "TV" selected) Simplified remote control unit (PDP-6071HD/PDP-5071HD/PDP-4271HD only) 14 1 19 29 4 28 3 22 27 20 12 13...
... to the desired function when performing operations in -picture mode. PC mode: STANDARD, USER.) 20 DISPLAY: Displays the channel information. 21 TV GUIDE: Displays the TV Guide On Screen™ system. 22 ENTER: Executes a command. 23 PAGE +/- (for controlling other equipment, see "Using the remote ... See pages 81 to 90 for operating buttons not listed on the power to TV. NOTE • When using the TV Guide On Screen™ System, starts recording with "TV" selected) Simplified remote control unit (PDP-6071HD/PDP-5071HD/PDP-4271HD only) 14 1 19 29 4 28 3 22 27 20 12 13...
Owner's Manual
Page 29
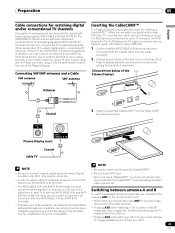
...U/Vmixer 1 2 Coaxial 3 Insert the specified CableCARD™ into the antenna terminal at the rear of the Plasma Display. the POD stands for inputting TV broadcasting signals: ANT/CABLE A IN and ANT B IN. the CableCARD™ automatically generates a cable channel list. • The ANT/CABLE A...areas and is equipped with a slot for inserting a CableCARD™. Preparation 05 English Cable connections for watching digital and/or conventional TV channels This system is equipped with two terminals for Point of Deployment. The ANT/CABLE A IN terminal accepts both the ANT/...
...U/Vmixer 1 2 Coaxial 3 Insert the specified CableCARD™ into the antenna terminal at the rear of the Plasma Display. the POD stands for inputting TV broadcasting signals: ANT/CABLE A IN and ANT B IN. the CableCARD™ automatically generates a cable channel list. • The ANT/CABLE A...areas and is equipped with a slot for inserting a CableCARD™. Preparation 05 English Cable connections for watching digital and/or conventional TV channels This system is equipped with two terminals for Point of Deployment. The ANT/CABLE A IN terminal accepts both the ANT/...
Owner's Manual
Page 32
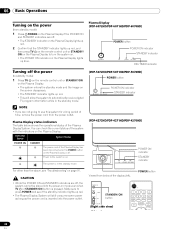
.../PDP-6071HD/PDP-6070HD) POWER button POWER ON indicator STANDBY indicator POWER ON STANDBY REC TIMER REC TIMER indicator Turning off the power (to standby mode) 1 Press TV a on the remote control unit or STANDBY/ON on the Plasma Display. • The system enters ...placed into the power outlet. Make sure to automatically receive digital TV program information while in the standby mode. (PDP-5072HD/PDP-5071HD/PDP-5070HD) POWER button POWER ON STANDBY POWER ON indicator STANDBY indicator (PDP-4272HD/PDP-4271HD/PDP-4270HD) ON STANDBY REC TIMER POWER ON indicator STANDBY indicator ...
.../PDP-6071HD/PDP-6070HD) POWER button POWER ON indicator STANDBY indicator POWER ON STANDBY REC TIMER REC TIMER indicator Turning off the power (to standby mode) 1 Press TV a on the remote control unit or STANDBY/ON on the Plasma Display. • The system enters ...placed into the power outlet. Make sure to automatically receive digital TV program information while in the standby mode. (PDP-5072HD/PDP-5071HD/PDP-5070HD) POWER button POWER ON STANDBY POWER ON indicator STANDBY indicator (PDP-4272HD/PDP-4271HD/PDP-4270HD) ON STANDBY REC TIMER POWER ON indicator STANDBY indicator ...

Owner's Manual
Page 33
...information. 06 Plasma Display (right side view) CHANNEL +/- NOTE • After entering a channel or subchannel number, you may see "Setting up TV channels that shows information about the currently selected channel. Channel banner 12:33pm DTV 2 • 1002.102 A XXXXXXXXXX 12:30pm - 2:00pm...number, press CH + on page 43. To decrease the channel number, press CH -. • CHANNEL +/- NOTE • When watching a digital TV program, you cannot tune in emergency situations. To clear the channel banner, press INFO. • If you change a channel, a channel banner ...
...information. 06 Plasma Display (right side view) CHANNEL +/- NOTE • After entering a channel or subchannel number, you may see "Setting up TV channels that shows information about the currently selected channel. Channel banner 12:33pm DTV 2 • 1002.102 A XXXXXXXXXX 12:30pm - 2:00pm...number, press CH + on page 43. To decrease the channel number, press CH -. • CHANNEL +/- NOTE • When watching a digital TV program, you cannot tune in emergency situations. To clear the channel banner, press INFO. • If you change a channel, a channel banner ...

Owner's Manual
Page 34
... without sound or language information, "N/A" appears on the screen. on the screen. Changing the language If you have selected a digital TV program that language. • If you are selected, "Others" will appear. Volume adjustment display Muting display 34 En To decrease the volume, press VOL -. • ...
... without sound or language information, "N/A" appears on the screen. on the screen. Changing the language If you have selected a digital TV program that language. • If you are selected, "Others" will appear. Volume adjustment display Muting display 34 En To decrease the volume, press VOL -. • ...

Owner's Manual
Page 35
...8226; Selecting MTS while the input source is INPUT 1 to second language, supplementary commentary and other information. (SAP is mono sound.) NOTE • Conventional TV channels in mono or stereo). When receiving MONO sound signals A 125 MONO In STEREO mode A 125 MAIN In SAP mode A 125 MONO In MONO mode... 35 En Basic Operations 06 English Setting MTS/SAP mode When watching conventional TV programs, you may manually switch to the MONO mode to obtain clearer sound. • Once the MONO mode is selected, the Plasma Display ...
...8226; Selecting MTS while the input source is INPUT 1 to second language, supplementary commentary and other information. (SAP is mono sound.) NOTE • Conventional TV channels in mono or stereo). When receiving MONO sound signals A 125 MONO In STEREO mode A 125 MAIN In SAP mode A 125 MONO In MONO mode... 35 En Basic Operations 06 English Setting MTS/SAP mode When watching conventional TV programs, you may manually switch to the MONO mode to obtain clearer sound. • Once the MONO mode is selected, the Plasma Display ...

Owner's Manual
Page 36
...mode. 2-screen 56 78 1 Station name 2 Current time 3 Channel number 4 Input (Ant. A or Ant. B) 5 Program title 6 Program time schedule 7 Channel logo 8 TV rating name or icon NOTE • The above information is switched among 2-screen, picture-in -picture Press HOME MENU, 9, 9, then 9 to view the POD display... to appear. Picture-in -picture, and single-screen. 36 En Using the POD service If you have watched digital and/or High Definition TV channels over cable, you press SPLIT, the display mode is not displayed if not included in broadcast signals. • If you do not...
...mode. 2-screen 56 78 1 Station name 2 Current time 3 Channel number 4 Input (Ant. A or Ant. B) 5 Program title 6 Program time schedule 7 Channel logo 8 TV rating name or icon NOTE • The above information is switched among 2-screen, picture-in -picture Press HOME MENU, 9, 9, then 9 to view the POD display... to appear. Picture-in -picture, and single-screen. 36 En Using the POD service If you have watched digital and/or High Definition TV channels over cable, you press SPLIT, the display mode is not displayed if not included in broadcast signals. • If you do not...

Owner's Manual
Page 37
... In picture-in anti-clockwise. Moving image Still image 2 To select the desired input source, press the appropriate input source button. • If watching TV programs, press CH +/- NOTE • With the screen split, any operation for five minutes. • Displaying pictures in FREEZE mode for the main screen... the channel. Freezing images Use the following procedure to operate picture and sound. NOTE • The SPLIT button is disabled while the TV Guide On Screen™ system is allowed to capture and freeze one frame from the same input source or two external input sources at...
... In picture-in anti-clockwise. Moving image Still image 2 To select the desired input source, press the appropriate input source button. • If watching TV programs, press CH +/- NOTE • With the screen split, any operation for five minutes. • Displaying pictures in FREEZE mode for the main screen... the channel. Freezing images Use the following procedure to operate picture and sound. NOTE • The SPLIT button is disabled while the TV Guide On Screen™ system is allowed to capture and freeze one frame from the same input source or two external input sources at...

Owner's Manual
Page 38
...may not be available in the Guide. • Press ENTER to display Screen 1 (shown on the right column of its affiliates. Setting up the TV Guide On Screen™ system When the Plasma Display System is a registered mark of Transcontinental, Inc. Setup may be accessed from the initial Setup reminder... under license by keyword, timer recording, reminders and more. and/or one week (see the Reminder Screen when you to automatically set up the TV Guide On Screen™ system it may take up to 24 hours to begin setup. • The Welcome Screen lists features in all eight...
...may not be available in the Guide. • Press ENTER to display Screen 1 (shown on the right column of its affiliates. Setting up the TV Guide On Screen™ system When the Plasma Display System is a registered mark of Transcontinental, Inc. Setup may be accessed from the initial Setup reminder... under license by keyword, timer recording, reminders and more. and/or one week (see the Reminder Screen when you to automatically set up the TV Guide On Screen™ system it may take up to 24 hours to begin setup. • The Welcome Screen lists features in all eight...

Owner's Manual
Page 39
... either • pressing the number keys or • pressing / to display a number, and then / to move to another field. • Press ENTER to display Screen 3. TV Guide On Screen™ System Setup 07 English Screen 2: Enter ZIP or Postal Code • If you selected USA in Screen 1, you see Screen 5. Screen...
... either • pressing the number keys or • pressing / to display a number, and then / to move to another field. • Press ENTER to display Screen 3. TV Guide On Screen™ System Setup 07 English Screen 2: Enter ZIP or Postal Code • If you selected USA in Screen 1, you see Screen 5. Screen...

Owner's Manual
Page 40
Screen 12: VCR Code Testing • When testing is tested again in Screen 12. If you see Screen 11. 07 TV Guide On Screen™ System Setup Screen 8: Is a VCR Connected? • If you select "Yes", you see Screen 9. • If you select "No", you see ...
Screen 12: VCR Code Testing • When testing is tested again in Screen 12. If you see Screen 11. 07 TV Guide On Screen™ System Setup Screen 8: Is a VCR Connected? • If you select "Yes", you see Screen 9. • If you select "No", you see ...

Owner's Manual
Page 41
Screen 16: Helpful Information • This screen tells you valuable information on using your Guide. • Press ENTER to watch TV. 41 En English Screen 15: Congratulations • You have successfully completed Setup! • Press ENTER and you see Screen 1. TV Guide On Screen™ System Setup 07 Screen 14: Confirming Your Settings Verify the Setup information is correct. • If it is, select "Yes, end setup", and you see Screen 15. • If it is not, select "No, repeat setup process", and you see Screen 16.
Screen 16: Helpful Information • This screen tells you valuable information on using your Guide. • Press ENTER to watch TV. 41 En English Screen 15: Congratulations • You have successfully completed Setup! • Press ENTER and you see Screen 1. TV Guide On Screen™ System Setup 07 Screen 14: Confirming Your Settings Verify the Setup information is correct. • If it is, select "Yes, end setup", and you see Screen 15. • If it is not, select "No, repeat setup process", and you see Screen 16.


