
Owner's Manual
Page 2
...manufacturer, or sold with the apparatus. The wide blade or the third prong are provided for replacement of the obsolete outlet. 10) Protect the power cord from being walked on or pinched particularly at plugs, convenience receptacles, and the point where they exit from tip-over. 13) Unplug ... Heed all warnings. 4) Follow all servicing to rain or moisture, does not operate normally, or has been dropped. Install in any way, such as power-supply cord or plug is capable of time. 14) Refer all instructions. 5) Do not use this apparatus near any ventilation openings. If the provided plug...
...manufacturer, or sold with the apparatus. The wide blade or the third prong are provided for replacement of the obsolete outlet. 10) Protect the power cord from being walked on or pinched particularly at plugs, convenience receptacles, and the point where they exit from tip-over. 13) Unplug ... Heed all warnings. 4) Follow all servicing to rain or moisture, does not operate normally, or has been dropped. Install in any way, such as power-supply cord or plug is capable of time. 14) Refer all instructions. 5) Do not use this apparatus near any ventilation openings. If the provided plug...
Owner's Manual
Page 4
...regions, the shape of the power plug and power outlet may sometimes differ from Falling Over 18 08 Menu Setup Menu Configuration 37 AV mode menus 37 PC mode menus 37 Menu operations 37 Connecting the system cable 19 Cable connections for buying this Pioneer product. However the method ...batteries 22 Cautions regarding batteries 22 Allowed operation range of the remote control unit 22 Cautions regarding the remote control unit 22 Connecting the power cord 23 Routing cables 24 09 Tuner Setup Setting up TV channels 38 Using Auto Channel Preset 38 Setting up TV channels manually ...
...regions, the shape of the power plug and power outlet may sometimes differ from Falling Over 18 08 Menu Setup Menu Configuration 37 AV mode menus 37 PC mode menus 37 Menu operations 37 Connecting the system cable 19 Cable connections for buying this Pioneer product. However the method ...batteries 22 Cautions regarding batteries 22 Allowed operation range of the remote control unit 22 Cautions regarding the remote control unit 22 Connecting the power cord 23 Routing cables 24 09 Tuner Setup Setting up TV channels 38 Using Auto Channel Preset 38 Setting up TV channels manually ...

Owner's Manual
Page 5
... adjustments 60 Using PureCinema 60 Using Color Temp 60 Using CTI 60 Eliminating noise from images 61 Sound adjustments 61 FOCUS 62 Front Surround 62 Power Control 62 Energy Save 62 No Signal off (AV mode only 62 No Operation off (AV mode only) ........ 63... Power Management (PC mode only 63 Image position adjustment (AV mode only 63 console or camcorder 69 Recording digital TV programs using a VCR 69 Avoiding unwanted ...
... adjustments 60 Using PureCinema 60 Using Color Temp 60 Using CTI 60 Eliminating noise from images 61 Sound adjustments 61 FOCUS 62 Front Surround 62 Power Control 62 Energy Save 62 No Signal off (AV mode only 62 No Operation off (AV mode only) ........ 63... Power Management (PC mode only 63 Image position adjustment (AV mode only 63 console or camcorder 69 Recording digital TV programs using a VCR 69 Avoiding unwanted ...
Owner's Manual
Page 7
...well as very precise and highly advanced technology. When the surrounding or internal temperature exceeds a certain degree, the display will automatically power off in color filter technology - NOTE The following the recommendations listed below . Usage guidelines All phosphor-based screens (including conventional... some basic precautions. Malfunction can be caused by using a vacuum cleaner set to its lifetime, the luminosity of the Pioneer PDP-5060HD/PDP-4360HD Plasma Display System will not be installed by many years to come, please carefully read this product. Important User ...
...well as very precise and highly advanced technology. When the surrounding or internal temperature exceeds a certain degree, the display will automatically power off in color filter technology - NOTE The following the recommendations listed below . Usage guidelines All phosphor-based screens (including conventional... some basic precautions. Malfunction can be caused by using a vacuum cleaner set to its lifetime, the luminosity of the Pioneer PDP-5060HD/PDP-4360HD Plasma Display System will not be installed by many years to come, please carefully read this product. Important User ...
Owner's Manual
Page 10
... work , request the service technician to perform safety checks to ensure that the product needs servicing. 18. Ventilation-The vents and other dangerous conditions. Power cord protection-The power cords must be observed closely. 4. Be careful not to be injured by a qualified technician. Servicing-Do not attempt to follow the manufacturer's instructions... engineered and manufactured with the highest priority on a cart, it can block ventilation openings. The Plasma Display weighs about 31.8 kg (70.1 lbs.) for the PDP-506PU and about 25.8 kg (56.9 lbs.) for future reference. 3.
... work , request the service technician to perform safety checks to ensure that the product needs servicing. 18. Ventilation-The vents and other dangerous conditions. Power cord protection-The power cords must be observed closely. 4. Be careful not to be injured by a qualified technician. Servicing-Do not attempt to follow the manufacturer's instructions... engineered and manufactured with the highest priority on a cart, it can block ventilation openings. The Plasma Display weighs about 31.8 kg (70.1 lbs.) for the PDP-506PU and about 25.8 kg (56.9 lbs.) for future reference. 3.
Owner's Manual
Page 12
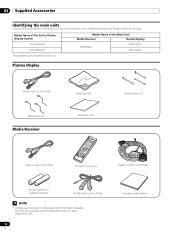
Model Name of the Main Unit Media Receiver Plasma Display PDP-R06U PDP-506PU PDP-436PU Plasma Display Power cord (2 m/6.6 feet) Bead band × 3 Media Receiver Cleaning cloth Warranty card Speed clamp × 3 Power cord (2 m/6.6 feet) Remote control unit System cable (3 m/9.8 feet) AA size battery × 2 (Alkaline battery) G-LINK cable (3 m/9.8 feet) NOTE • Always... table to check that you have received the correct Media Receiver and Plasma Receiver models. Model Name of the Entire Plasma Display System PDP-5060HD PDP-4360HD The speakers are available as options.
Model Name of the Main Unit Media Receiver Plasma Display PDP-R06U PDP-506PU PDP-436PU Plasma Display Power cord (2 m/6.6 feet) Bead band × 3 Media Receiver Cleaning cloth Warranty card Speed clamp × 3 Power cord (2 m/6.6 feet) Remote control unit System cable (3 m/9.8 feet) AA size battery × 2 (Alkaline battery) G-LINK cable (3 m/9.8 feet) NOTE • Always... table to check that you have received the correct Media Receiver and Plasma Receiver models. Model Name of the Entire Plasma Display System PDP-5060HD PDP-4360HD The speakers are available as options.
Owner's Manual
Page 13
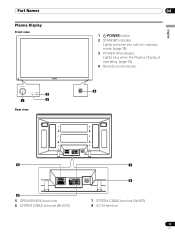
Part Names Part Names Plasma Display Front view 2 1 3 Rear view 04 1 a POWER button 2 STANDBY indicator Lights red when the unit is in standby mode. (page 25) 3 POWER ON indicator Lights blue when the Plasma Display is operating. (page 25) 4 Remote control sensor 4 English 5 SYSTEM CABLE WHITE BLACK SYSTEM CABLE WHITE BLACK 6 5 SPEAKER (R/L) terminals 6 SYSTEM CABLE terminal (BLACK) 7 8 7 SYSTEM CABLE terminal (WHITE) 8 AC IN terminal 13 En
Part Names Part Names Plasma Display Front view 2 1 3 Rear view 04 1 a POWER button 2 STANDBY indicator Lights red when the unit is in standby mode. (page 25) 3 POWER ON indicator Lights blue when the Plasma Display is operating. (page 25) 4 Remote control sensor 4 English 5 SYSTEM CABLE WHITE BLACK SYSTEM CABLE WHITE BLACK 6 5 SPEAKER (R/L) terminals 6 SYSTEM CABLE terminal (BLACK) 7 8 7 SYSTEM CABLE terminal (WHITE) 8 AC IN terminal 13 En

Owner's Manual
Page 14
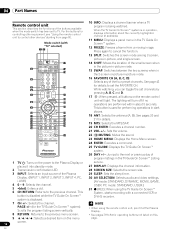
... UP LEFT RIGHT INPUT DOWN UP VOLUME DOWN UP CHANNEL Y CB / PB CR / PR COMPONENT VIDEO S-VIDEO VIDEO INPUT 4 L AUDIO R PC ANALOG RGB PC 4 56 7 8 1 POWER ON indicator 2 STANDBY indicator 3 REC TIMER indicator 4 STANDBY/ON button 5 TV GUIDE button* 6 INPUT button (ENTER button*) 7 VOLUME UP/DOWN buttons (UP/DOWN buttons*) 8 CHANNEL...
... UP LEFT RIGHT INPUT DOWN UP VOLUME DOWN UP CHANNEL Y CB / PB CR / PR COMPONENT VIDEO S-VIDEO VIDEO INPUT 4 L AUDIO R PC ANALOG RGB PC 4 56 7 8 1 POWER ON indicator 2 STANDBY indicator 3 REC TIMER indicator 4 STANDBY/ON button 5 TV GUIDE button* 6 INPUT button (ENTER button*) 7 VOLUME UP/DOWN buttons (UP/DOWN buttons*) 8 CHANNEL...
Owner's Manual
Page 16
...; system. 26 DAY +/-: Jumps to the next or previous day of program listings in the TV Guide On Screen™ Listing 1 TV a: Turns on the power to the previous channel. i.LINK) (AV mode: STANDARD, DYNAMIC, MOVIE, GAME, 4 0 - 9: Selects the channel. USER. Mode switch (with a connected VCR or D-VHS recorder. 7 CH +/-: Selects...
...; system. 26 DAY +/-: Jumps to the next or previous day of program listings in the TV Guide On Screen™ Listing 1 TV a: Turns on the power to the previous channel. i.LINK) (AV mode: STANDARD, DYNAMIC, MOVIE, GAME, 4 0 - 9: Selects the channel. USER. Mode switch (with a connected VCR or D-VHS recorder. 7 CH +/-: Selects...
Owner's Manual
Page 23
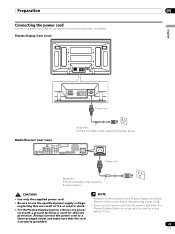
... For the Plasma Display System, a three-core power cord with a ground terminal is used for a long period of the Plasma Display and Media Receiver when connecting or disconnecting power cords. • Disconnect the power cord from the power outlet when the Plasma Display System is properly grounded.... 23 En Always connect the power cord to a three-pronged outlet and make sure that the ...
... For the Plasma Display System, a three-core power cord with a ground terminal is used for a long period of the Plasma Display and Media Receiver when connecting or disconnecting power cords. • Disconnect the power cord from the power outlet when the Plasma Display System is properly grounded.... 23 En Always connect the power cord to a three-pronged outlet and make sure that the ...
Owner's Manual
Page 25
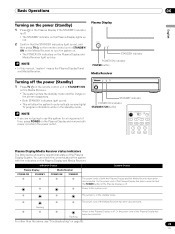
...; If you are not going to the Plasma Display is on. Indicator Status System Status Plasma Display Media Receiver POWER ON STANDBY POWER ON STANDBY The power cords of time, press POWER on the Plasma Display and remove both the Plasma Display and the Media Receiver have been disconnected. Flashing Flashing...screen disappears. • Both STANDBY indicators light up red. • This will allow the system to turn the system on. • The POWER ON indicators on the Plasma Display and Media Receiver light up red, and then press TV a on the remote control unit or STANDBY/ ON ...
...; If you are not going to the Plasma Display is on. Indicator Status System Status Plasma Display Media Receiver POWER ON STANDBY POWER ON STANDBY The power cords of time, press POWER on the Plasma Display and remove both the Plasma Display and the Media Receiver have been disconnected. Flashing Flashing...screen disappears. • Both STANDBY indicators light up red. • This will allow the system to turn the system on. • The POWER ON indicators on the Plasma Display and Media Receiver light up red, and then press TV a on the remote control unit or STANDBY/ ON ...
Owner's Manual
Page 31
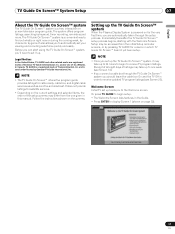
... of its affiliates. Before you can start using the TV Guide On Screen™ system, you connect a cable box through the setup process. and is powered on page 32). 31 En The system offers program listings, searching by Gemstar-TV Guide International, Inc. and/or one week (see Screen 14). •...
... of its affiliates. Before you can start using the TV Guide On Screen™ system, you connect a cable box through the setup process. and is powered on page 32). 31 En The system offers program listings, searching by Gemstar-TV Guide International, Inc. and/or one week (see Screen 14). •...

Owner's Manual
Page 32
... start the setup procedure, you entered incorrect information, continue with setup. Screen 2: Enter ZIP or Postal Code • If you selected USA in Screen 1, you power on . NOTE If you decide not to set it up the Guide now, this reminder screen will appear each time you... the TV (except if you selected "Don't remind me again" returns you to watching TV and stops the reminder screen from appearing upon power on your TV. • Press / to highlight a country. • Press ENTER to the previous screens. If you realize you cannot return to display Screen 2. • ...
... start the setup procedure, you entered incorrect information, continue with setup. Screen 2: Enter ZIP or Postal Code • If you selected USA in Screen 1, you power on . NOTE If you decide not to set it up the Guide now, this reminder screen will appear each time you... the TV (except if you selected "Don't remind me again" returns you to watching TV and stops the reminder screen from appearing upon power on your TV. • Press / to highlight a country. • Press ENTER to the previous screens. If you realize you cannot return to display Screen 2. • ...
Owner's Manual
Page 37
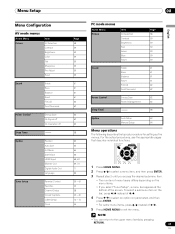
... mode menus Home Menu Picture Item AV Selection Contrast Brightness Color Tint Sharpness Pro Adjust Reset Sound Treble Bass Balance Reset FOCUS Front Surround Power Control Energy Save No Signal off No Operation off Sleep Timer Option Position Auto Size 4:3 Mode Side Mask HDMI Input Monitor Out Digital... 58 59 59 59 59 59 59 Sound Treble 61 Bass 61 Balance 61 Reset 61 FOCUS 62 Front Surround 62 Power Control Energy Save 62 Power Management 63 Sleep Timer 58 Option Auto Setup 63 Manual Setup 64 Menu operations The following describes the typical procedure for ...
... mode menus Home Menu Picture Item AV Selection Contrast Brightness Color Tint Sharpness Pro Adjust Reset Sound Treble Bass Balance Reset FOCUS Front Surround Power Control Energy Save No Signal off No Operation off Sleep Timer Option Position Auto Size 4:3 Mode Side Mask HDMI Input Monitor Out Digital... 58 59 59 59 59 59 59 Sound Treble 61 Bass 61 Balance 61 Reset 61 FOCUS 62 Front Surround 62 Power Control Energy Save 62 Power Management 63 Sleep Timer 58 Option Auto Setup 63 Manual Setup 64 Menu operations The following describes the typical procedure for ...

Owner's Manual
Page 45
...xxxxxxxxxxxxxxxxxxxxx Home Menu Exit 11 Press HOME MENU to clear the dialog box. press A to exit the menu. If you disconnect the power cord from the selected channel. If you select parameters other than "Auto", the selected parameters are used ; Item Font Size Font1 ...17/04 xxxxxxxxxxxxxxxxxxxxx xxxxxxxxxxxxxxxxxxxxx xxxxxxxxxxxxxxxxxxxxx Home Menu Exit • The date and time will be automatically corrected using data from the power outlet or power blackout occurs, the set the date and time using the menu. Daylight Savings Time Applies Does Not Apply Current Time: ...
...xxxxxxxxxxxxxxxxxxxxx Home Menu Exit 11 Press HOME MENU to clear the dialog box. press A to exit the menu. If you disconnect the power cord from the selected channel. If you select parameters other than "Auto", the selected parameters are used ; Item Font Size Font1 ...17/04 xxxxxxxxxxxxxxxxxxxxx xxxxxxxxxxxxxxxxxxxxx xxxxxxxxxxxxxxxxxxxxx Home Menu Exit • The date and time will be automatically corrected using data from the power outlet or power blackout occurs, the set the date and time using the menu. Daylight Savings Time Applies Does Not Apply Current Time: ...
Owner's Manual
Page 62
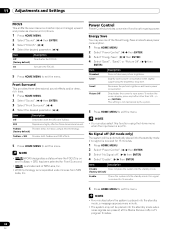
... menu when the input source is not memorized by the system. 5 Press HOME MENU to exit the menu. Save1 Slightly lowers power consumption while slightly suppressing the brightness drop level. To restore the screen display, press any button other than VOL +/- NOTE •... Receiver after a TV program finishes. 62 En Activates the FOCUS. 5 Press HOME MENU to exit the menu. Power Control Power Control provides convenient functions for saving power. 11 Adjustments and Settings FOCUS This shifts the sound-source direction (sound image) upward and produces clear sound contours....
... menu when the input source is not memorized by the system. 5 Press HOME MENU to exit the menu. Save1 Slightly lowers power consumption while slightly suppressing the brightness drop level. To restore the screen display, press any button other than VOL +/- NOTE •... Receiver after a TV program finishes. 62 En Activates the FOCUS. 5 Press HOME MENU to exit the menu. Power Control Power Control provides convenient functions for saving power. 11 Adjustments and Settings FOCUS This shifts the sound-source direction (sound image) upward and produces clear sound contours....
Owner's Manual
Page 63
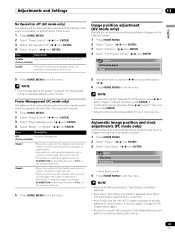
...into the standby mode when no signal is received for all the items, press / to select "Reset" in step 4, and then press ENTER. Power Management (PC mode only) The system will be automatically placed into the standby mode when no signal is received from the personal computer. 1 Press HOME...(AV mode only) The system will be automatically placed into the standby mode when no operation is performed for three hours. 1 Press HOME MENU. 2 Select "Power Control". ( / then ENTER) 3 Select "No Operation off . • The system is switched on again by pressing STANDBY/ON on the Media Receiver or...
...into the standby mode when no signal is received for all the items, press / to select "Reset" in step 4, and then press ENTER. Power Management (PC mode only) The system will be automatically placed into the standby mode when no signal is received from the personal computer. 1 Press HOME...(AV mode only) The system will be automatically placed into the standby mode when no operation is performed for three hours. 1 Press HOME MENU. 2 Select "Power Control". ( / then ENTER) 3 Select "No Operation off . • The system is switched on again by pressing STANDBY/ON on the Media Receiver or...

Owner's Manual
Page 67
.... NOTE • Refer to the relevant instruction manual (DVD player, personal computer, etc.) carefully before connecting to select INPUT1. To view images coming from the power outlet before making connections.
.... NOTE • Refer to the relevant instruction manual (DVD player, personal computer, etc.) carefully before connecting to select INPUT1. To view images coming from the power outlet before making connections.

Owner's Manual
Page 72
... a personal computer or its peripheral device can result in image and sound interruption. • Some D-VHS recorders that support i.LINK cannot relay data when their power is off. • Do not make the following loop connections: Media Receiver REC ON STANDBY TIMER STANDBY/ON D-VHS recorder PULL OPEN D-VHS recorder Media... • Use S400 i.LINK cables that have 4-pin plugs and are shorter than 3.5 m (11.48 feet). • Some i.LINK devices cannot relay data when their power is off.
... a personal computer or its peripheral device can result in image and sound interruption. • Some D-VHS recorders that support i.LINK cannot relay data when their power is off. • Do not make the following loop connections: Media Receiver REC ON STANDBY TIMER STANDBY/ON D-VHS recorder PULL OPEN D-VHS recorder Media... • Use S400 i.LINK cables that have 4-pin plugs and are shorter than 3.5 m (11.48 feet). • Some i.LINK devices cannot relay data when their power is off.

Owner's Manual
Page 77
...Plasma Display when operating the connected equipment. NOTE • Make sure that came with the PIONEER AV receiver supporting SR+. For more information, see the instruction manual that the power is temporarily reduced. CONTROL IN OUT CONTROL IN OUT The control cables (commercially available) ...are mono sound cables with a PIONEER AV receiver. You can then operate the connected equipment by sending commands...
...Plasma Display when operating the connected equipment. NOTE • Make sure that came with the PIONEER AV receiver supporting SR+. For more information, see the instruction manual that the power is temporarily reduced. CONTROL IN OUT CONTROL IN OUT The control cables (commercially available) ...are mono sound cables with a PIONEER AV receiver. You can then operate the connected equipment by sending commands...

