Owner's Manual
Page 6
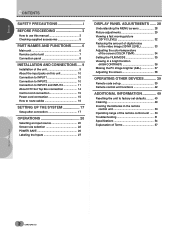
...CONTRAST 36 Making the PC image brighter (ABL 37 Adjusting the screen 38 OPERATING OTHER DEVICES 39 Remote code set up 39 Remote control unit functions 42 ADDITIONAL INFORMATION 49 Resetting the unit to factory set defaults .......... 49 Cleaning 49... Insering the batteries in the remote control unit 50 Operating range of the remote control unit ..... 50 Troubleshooting 51 Specifications 54 Explanation of Terms 57 PARTBENFAORMESPARNODCEFEUDINNCGTIONS ○ ○ ○ ○...
...CONTRAST 36 Making the PC image brighter (ABL 37 Adjusting the screen 38 OPERATING OTHER DEVICES 39 Remote code set up 39 Remote control unit functions 42 ADDITIONAL INFORMATION 49 Resetting the unit to factory set defaults .......... 49 Cleaning 49... Insering the batteries in the remote control unit 50 Operating range of the remote control unit ..... 50 Troubleshooting 51 Specifications 54 Explanation of Terms 57 PARTBENFAORMESPARNODCEFEUDINNCGTIONS ○ ○ ○ ○...
Owner's Manual
Page 7
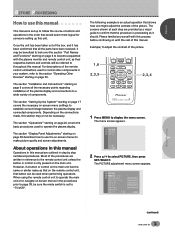
...9675; ○ ○ ○ ○ ○ ○ ○ ○ ○ USE: END: MENU 2 Press 5/∞ to the remote control unit unless the button or control is only present on the main unit. The section "Installation and Connections" starting on page 6 to become acquainted...9675; ○ ○ ○ ○ ○ ○ ○ ○ ○ ○ ○ Example) To adjust the contrast of the remote control unit buttons used to control other components in step by step numbered procedures. PICTURE MOD E : S T D CON T RA S T BLACK LVL . The ...
...9675; ○ ○ ○ ○ ○ ○ ○ ○ ○ USE: END: MENU 2 Press 5/∞ to the remote control unit unless the button or control is only present on the main unit. The section "Installation and Connections" starting on page 6 to become acquainted...9675; ○ ○ ○ ○ ○ ○ ○ ○ ○ ○ ○ Example) To adjust the contrast of the remote control unit buttons used to control other components in step by step numbered procedures. PICTURE MOD E : S T D CON T RA S T BLACK LVL . The ...
Owner's Manual
Page 9
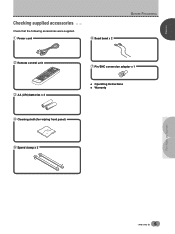
...9675; ○ 6 Bead band x 2 ○ ○ ○ ○ ○ ○ ○ ○ ○ 2 Remote control unit 7 4 1 2 MODESCREEN STA/IVNNCTDPRVUBTY/S/COABTNL DTV/LDDVD 3 POWER AUTO 4 AUDIO INPUT CC STILL RECEIVER DISPLAY 1 5 2 3 CLEAR ...POWSEORULRECAEREDNIT/ % % MTEONPUDMVENDU 1 SELSEECTT/ % % ¶ 7VCRFRAEVCORIT3ES TMVE/SNATU/DRTEVC/DMEVIUVDETRING GSUAIDTE/DTV IN(FSOAT)/DTV 4 ¡ VOL ENTCEHR PLCAUS-MPDAPD00IS8PLAY REMOTE CONTROL UNITÎ ¢ 3 AA (LR6) batteries x 2 ○ ○ ○ ○ ○ ○ ○ ○...
...9675; ○ 6 Bead band x 2 ○ ○ ○ ○ ○ ○ ○ ○ ○ 2 Remote control unit 7 4 1 2 MODESCREEN STA/IVNNCTDPRVUBTY/S/COABTNL DTV/LDDVD 3 POWER AUTO 4 AUDIO INPUT CC STILL RECEIVER DISPLAY 1 5 2 3 CLEAR ...POWSEORULRECAEREDNIT/ % % MTEONPUDMVENDU 1 SELSEECTT/ % % ¶ 7VCRFRAEVCORIT3ES TMVE/SNATU/DRTEVC/DMEVIUVDETRING GSUAIDTE/DTV IN(FSOAT)/DTV 4 ¡ VOL ENTCEHR PLCAUS-MPDAPD00IS8PLAY REMOTE CONTROL UNITÎ ¢ 3 AA (LR6) batteries x 2 ○ ○ ○ ○ ○ ○ ○ ○...
Owner's Manual
Page 10
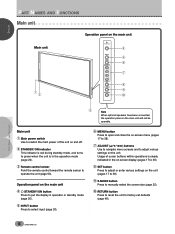
...; ○ ○ Main unit 1 Main power switch Use to switch the main power of cursor buttons within operations is in the operation mode (page 20). 3 Remote control sensor Point the remote control toward the remote sensor to operate the unit (page 50).
...; ○ ○ Main unit 1 Main power switch Use to switch the main power of cursor buttons within operations is in the operation mode (page 20). 3 Remote control sensor Point the remote control toward the remote sensor to operate the unit (page 50).
Owner's Manual
Page 11
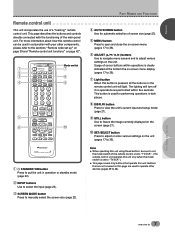
...○un○it ○ ○ This unit incorporates the use of cursor buttons within five seconds. Usage of a "learning" remote control unit. This page describes the buttons and controls directly connected with your other devices (pages 39 to adjust or enter various settings on...○ ○ ○ En 7 The lighting will light. Buttons that operate this button is clearly indicated at the bottom the on the remote control unit will turn off if no operations are used in conjunction with the functioning of screen size (page 23). 5 MENU button Press to open...
...○un○it ○ ○ This unit incorporates the use of cursor buttons within five seconds. Usage of a "learning" remote control unit. This page describes the buttons and controls directly connected with your other devices (pages 39 to adjust or enter various settings on...○ ○ ○ En 7 The lighting will light. Buttons that operate this button is clearly indicated at the bottom the on the remote control unit will turn off if no operations are used in conjunction with the functioning of screen size (page 23). 5 MENU button Press to open...
Owner's Manual
Page 19
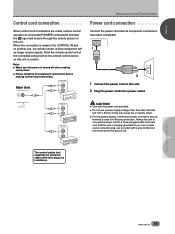
...component connections have been completed. 1 2 1 Connect the power cord to this unit. Point the remote control unit of connected PIONEER components that bear the Î logo mark is done through the remote sensor on this unit. 2 Plug the power cord into a power outlet. ○ ○ ...to a three-pronged outlet and make sure that indicated (AC 120 V, 60 Hz) as this unit to the CONTROL IN jack on another unit, the remote sensor of that component will no resistance). ○ ○ INSTALLATION AND CONNECTIONS ○ ○ ○ ○ ○ ○ ○...
...component connections have been completed. 1 2 1 Connect the power cord to this unit. Point the remote control unit of connected PIONEER components that bear the Î logo mark is done through the remote sensor on this unit. 2 Plug the power cord into a power outlet. ○ ○ ...to a three-pronged outlet and make sure that indicated (AC 120 V, 60 Hz) as this unit to the CONTROL IN jack on another unit, the remote sensor of that component will no resistance). ○ ○ INSTALLATION AND CONNECTIONS ○ ○ ○ ○ ○ ○ ○...
Owner's Manual
Page 21
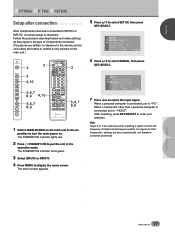
... a signal of other than a personal computer is necessary. The STANDBY/ON indicator lights red. 2 Press STANDBY/ON to put the unit in reference to the remote control unit unless the button or control is connected, set to "VIDEO". SET UP P OWE R S A V E : O F F S I GNAL : V I DEO PC G ...% SAT/DTV GUIDE SET/ SELECT % (SAT)/DTV INFO FAVORITES 7 3 VCR REC ¶ 4 ¡ ¢ 3 5,6,7 8,9 CU-PDP008 Î PLASMA DISPLAY REMOTE CONTROL UNIT 1 Switch MAIN POWER on the main unit to the on position to turn the main power on. When a component other frequencies, settings are...
... a signal of other than a personal computer is necessary. The STANDBY/ON indicator lights red. 2 Press STANDBY/ON to put the unit in reference to the remote control unit unless the button or control is connected, set to "VIDEO". SET UP P OWE R S A V E : O F F S I GNAL : V I DEO PC G ...% SAT/DTV GUIDE SET/ SELECT % (SAT)/DTV INFO FAVORITES 7 3 VCR REC ¶ 4 ¡ ¢ 3 5,6,7 8,9 CU-PDP008 Î PLASMA DISPLAY REMOTE CONTROL UNIT 1 Switch MAIN POWER on the main unit to the on position to turn the main power on. When a component other frequencies, settings are...
Owner's Manual
Page 23
... MENU 1 8 % % TV/SAT/DTV/DVD MENU % SAT/DTV GUIDE SET/ SELECT % FAVORITES 7 3 VCR REC ¶ 4 (SAT)/DTV INFO ¡ ¢ 2,3,4 CU-PDP008 Î PLASMA DISPLAY REMOTE CONTROL UNIT 1 Press MENU to carefully check the signal output of 5 signals: R, G, B, HD and VD. With G ON SYNC connection, however, the signal is completed, press...
... MENU 1 8 % % TV/SAT/DTV/DVD MENU % SAT/DTV GUIDE SET/ SELECT % FAVORITES 7 3 VCR REC ¶ 4 (SAT)/DTV INFO ¡ ¢ 2,3,4 CU-PDP008 Î PLASMA DISPLAY REMOTE CONTROL UNIT 1 Press MENU to carefully check the signal output of 5 signals: R, G, B, HD and VD. With G ON SYNC connection, however, the signal is completed, press...
Owner's Manual
Page 24
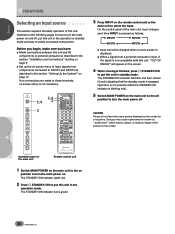
... MENU 1 8 TV/SAT/DTV/DVD MENU % SAT/DTV GUIDE SET/ SELECT % FAVORITES 7 3 VCR REC ¶ 4 (SAT)/DTV INFO ¡ ¢ CU-PDP008 Î PLASMA DISPLAY REMOTE CONTROL UNIT ○ ○ ○ ○ ○ ○ ○ ○ ○ ○ ○ ○ ○ ○ ○ ○ ○ ○...247; When a signal from components connected to INPUT3 and INPUT4 as described in the section "Setting Up the System" on the remote control unit or the main unit to select the input. The STANDBY/ON indicator lights red. 2 Press STANDBY/ON to select ...
... MENU 1 8 TV/SAT/DTV/DVD MENU % SAT/DTV GUIDE SET/ SELECT % FAVORITES 7 3 VCR REC ¶ 4 (SAT)/DTV INFO ¡ ¢ CU-PDP008 Î PLASMA DISPLAY REMOTE CONTROL UNIT ○ ○ ○ ○ ○ ○ ○ ○ ○ ○ ○ ○ ○ ○ ○ ○ ○ ○...247; When a signal from components connected to INPUT3 and INPUT4 as described in the section "Setting Up the System" on the remote control unit or the main unit to select the input. The STANDBY/ON indicator lights red. 2 Press STANDBY/ON to select ...
Owner's Manual
Page 25
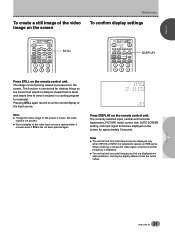
... STILL 4 DISPLAY POWER AUDIO INPUT RECEIVER C C CLEAR DTV VIEW MODE 123 456 DISPLAY FH : FV : I NPUT 4 P C RGB 4 8 . 0 k HZ 6 0 . 0 HZ STD F UL L Press DISPLAY on the remote control unit. This function is not paused. ÷ Normal display of the video image on the screen ○ ○ ○ ○ To confirm display settings... size, AUTO SCREEN setting, and input signal format are displayed only when INPUT3 or INPUT4 is preserved on the screen for viewing things on the remote control unit.
... STILL 4 DISPLAY POWER AUDIO INPUT RECEIVER C C CLEAR DTV VIEW MODE 123 456 DISPLAY FH : FV : I NPUT 4 P C RGB 4 8 . 0 k HZ 6 0 . 0 HZ STD F UL L Press DISPLAY on the remote control unit. This function is not paused. ÷ Normal display of the video image on the screen ○ ○ ○ ○ To confirm display settings... size, AUTO SCREEN setting, and input signal format are displayed only when INPUT3 or INPUT4 is preserved on the screen for viewing things on the remote control unit.
Owner's Manual
Page 26
... MENU 1 8 TV/SAT/DTV/DVD MENU % SAT/DTV GUIDE SET/ SELECT % FAVORITES 7 3 VCR REC ¶ 4 (SAT)/DTV INFO ¡ ¢ CU-PDP008 Î PLASMA DISPLAY REMOTE CONTROL UNIT ○ ○ ○ ○ ○ ○ ○ ○ ○ ○ ○ ○ ○ ○ ○ ○ ○ ○ ○...size of the picture or the picture's range projected on the screen can be slightly different each time SCREEN MODE on the remote control, or S.MODE on the main unit is used for business or public viewing purposes and the CINEMA WIDE mode or ...
... MENU 1 8 TV/SAT/DTV/DVD MENU % SAT/DTV GUIDE SET/ SELECT % FAVORITES 7 3 VCR REC ¶ 4 (SAT)/DTV INFO ¡ ¢ CU-PDP008 Î PLASMA DISPLAY REMOTE CONTROL UNIT ○ ○ ○ ○ ○ ○ ○ ○ ○ ○ ○ ○ ○ ○ ○ ○ ○ ○ ○...size of the picture or the picture's range projected on the screen can be slightly different each time SCREEN MODE on the remote control, or S.MODE on the main unit is used for business or public viewing purposes and the CINEMA WIDE mode or ...

Owner's Manual
Page 27
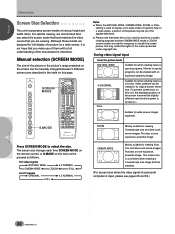
... being used . Therefore, in order to select AUTO SCREEN setting. ENGLISH OPERATIONS Auto selection (AUTO SCREEN) A number of different video formats will appear on the remote control unit. SCREEN C I N EMA W I T USE: END: MENU ○ ○ Vista size CINEMA WIDE (AUTO) Cinemascope size or 16:9 size ZOOM ... original format. Please note, however, that the original source aspect and screen may not switch to an appropriate size. Using the remote control unit TV CBL DTVDVD /VCR /SAT /LD STANDBY/ON INPUT 1 23 SCREEN MODE AUTO STILL 4 DISPLAY POWER AUDIO INPUT...
... being used . Therefore, in order to select AUTO SCREEN setting. ENGLISH OPERATIONS Auto selection (AUTO SCREEN) A number of different video formats will appear on the remote control unit. SCREEN C I N EMA W I T USE: END: MENU ○ ○ Vista size CINEMA WIDE (AUTO) Cinemascope size or 16:9 size ZOOM ... original format. Please note, however, that the original source aspect and screen may not switch to an appropriate size. Using the remote control unit TV CBL DTVDVD /VCR /SAT /LD STANDBY/ON INPUT 1 23 SCREEN MODE AUTO STILL 4 DISPLAY POWER AUDIO INPUT...

Owner's Manual
Page 30
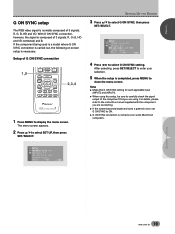
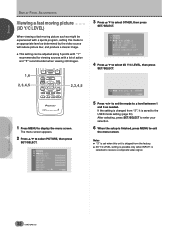
... selected. However, if the synchronization signal is restored, this unit is put back in operation mode again Press STANDBY/ON on the main unit or remote control unit. SET UP P OWE R S A V E : O F F S I GNAL : PC G ON SYNC : OFF I NPUT LABEL EXI T USE: END: MENU ○ ○ ○ ○ ○ &#... to display the menu screen. When the unit is in the POWER SAVE mode, resuming PC operation or pressing INPUT on the main unit or remote control unit can be automatically put in operation mode again. ○ ○ ○ ○ ○ 3 Press 5/∞ to select...
... selected. However, if the synchronization signal is restored, this unit is put back in operation mode again Press STANDBY/ON on the main unit or remote control unit. SET UP P OWE R S A V E : O F F S I GNAL : PC G ON SYNC : OFF I NPUT LABEL EXI T USE: END: MENU ○ ○ ○ ○ ○ &#... to display the menu screen. When the unit is in the POWER SAVE mode, resuming PC operation or pressing INPUT on the main unit or remote control unit can be automatically put in operation mode again. ○ ○ ○ ○ ○ 3 Press 5/∞ to select...
Owner's Manual
Page 32
... with externally connected components (pages 17 to 19, 26, and 27). ○ ○ ○ CU-PDP008 Î PLASMA DISPLAY REMOTE CONTROL UNIT 1 Press MENU to the SCREEN MODE that had been previously displayed. The MAIN MENU screen is turned off the menu screen by...9675; ○ ○ ○ ○ ○ ○ 3 To close the menu screen, press MENU. Select the desired menu item using 5/∞ on the remote control unit or the main unit, then press SET/SELECT to perform the desired operations and settings. ○ ○ ○ ○ ○ ○ ○ ...
... with externally connected components (pages 17 to 19, 26, and 27). ○ ○ ○ CU-PDP008 Î PLASMA DISPLAY REMOTE CONTROL UNIT 1 Press MENU to the SCREEN MODE that had been previously displayed. The MAIN MENU screen is turned off the menu screen by...9675; ○ ○ ○ ○ ○ ○ 3 To close the menu screen, press MENU. Select the desired menu item using 5/∞ on the remote control unit or the main unit, then press SET/SELECT to perform the desired operations and settings. ○ ○ ○ ○ ○ ○ ○ ...
Owner's Manual
Page 33
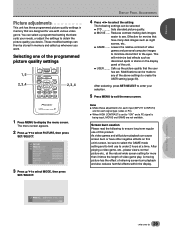
... following settings can select a programmed setting that best suits your selection. 5 Press MENU to exit the menu screen. ○ ○ CU-PDP008 Î PLASMA DISPLAY REMOTE CONTROL UNIT 1 Press MENU to obtain the picture quality you want.
... following settings can select a programmed setting that best suits your selection. 5 Press MENU to exit the menu screen. ○ ○ CU-PDP008 Î PLASMA DISPLAY REMOTE CONTROL UNIT 1 Press MENU to obtain the picture quality you want.
Owner's Manual
Page 34
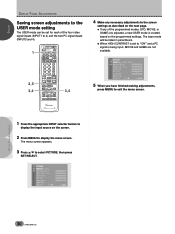
... I T USE: END: MENU 5 When you have finished making adjustments, press MENU to exit the menu screen. ○ ○ ○ ○ CU-PDP008 Î PLASMA DISPLAY REMOTE CONTROL UNIT ○ ○ ○ ○ ○ ○ ○ ○ ○ ○ ○ ○ ○ ○ ○ ○ ○ ○ ○ ○ 1 Press the appropriate...
... I T USE: END: MENU 5 When you have finished making adjustments, press MENU to exit the menu screen. ○ ○ ○ ○ CU-PDP008 Î PLASMA DISPLAY REMOTE CONTROL UNIT ○ ○ ○ ○ ○ ○ ○ ○ ○ ○ ○ ○ ○ ○ ○ ○ ○ ○ ○ ○ 1 Press the appropriate...

Owner's Manual
Page 35
... MENU 1 8 % % TV/SAT/DTV/DVD MENU % SAT/DTV GUIDE SET/ SELECT % FAVORITES 7 3 VCR REC ¶ 4 (SAT)/DTV INFO ¡ ¢ 2,3,4 CU-PDP008 Î PLASMA DISPLAY REMOTE CONTROL UNIT 1 Press MENU to the left of center. PICTURE adjustment: CONTRAST Adjust according to "ON" and "OFF". G LEVEL Adjust the amount of the picture...
... MENU 1 8 % % TV/SAT/DTV/DVD MENU % SAT/DTV GUIDE SET/ SELECT % FAVORITES 7 3 VCR REC ¶ 4 (SAT)/DTV INFO ¡ ¢ 2,3,4 CU-PDP008 Î PLASMA DISPLAY REMOTE CONTROL UNIT 1 Press MENU to the left of center. PICTURE adjustment: CONTRAST Adjust according to "ON" and "OFF". G LEVEL Adjust the amount of the picture...
Owner's Manual
Page 36
... MENU 1 8 TV/SAT/DTV/DVD MENU % SAT/DTV GUIDE SET/ SELECT % FAVORITES 7 3 VCR REC ¶ 4 (SAT)/DTV INFO ¡ ¢ 2,3,4,5 CU-PDP008 Î PLASMA DISPLAY REMOTE CONTROL UNIT 1 Press MENU to display the menu screen. ENGLISH DISPLAY PANEL ADJUSTMENTS % % DISPLAY PANEL ADJUSTMENTS V○ie○w○in○g○a○fa...
... MENU 1 8 TV/SAT/DTV/DVD MENU % SAT/DTV GUIDE SET/ SELECT % FAVORITES 7 3 VCR REC ¶ 4 (SAT)/DTV INFO ¡ ¢ 2,3,4,5 CU-PDP008 Î PLASMA DISPLAY REMOTE CONTROL UNIT 1 Press MENU to display the menu screen. ENGLISH DISPLAY PANEL ADJUSTMENTS % % DISPLAY PANEL ADJUSTMENTS V○ie○w○in○g○a○fa...

Owner's Manual
Page 37
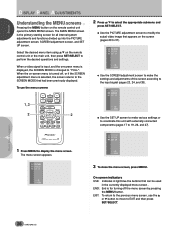
... MENU 1 8 % % TV/SAT/DTV/DVD MENU % SAT/DTV GUIDE SET/ SELECT % FAVORITES 7 3 VCR REC ¶ 4 (SAT)/DTV INFO ¡ ¢ 2,3,4,5 CU-PDP008 Î PLASMA DISPLAY REMOTE CONTROL UNIT 1 Press MENU to exit the menu screen. PICTURE OTHER 3D Y / C LEVEL : 3 3D NR L EVE L : 1 CO L OR T EMP : S T D F I LM MOD E : O F F H I GH CONTRAST : O F F EX I T USE...
... MENU 1 8 % % TV/SAT/DTV/DVD MENU % SAT/DTV GUIDE SET/ SELECT % FAVORITES 7 3 VCR REC ¶ 4 (SAT)/DTV INFO ¡ ¢ 2,3,4,5 CU-PDP008 Î PLASMA DISPLAY REMOTE CONTROL UNIT 1 Press MENU to exit the menu screen. PICTURE OTHER 3D Y / C LEVEL : 3 3D NR L EVE L : 1 CO L OR T EMP : S T D F I LM MOD E : O F F H I GH CONTRAST : O F F EX I T USE...

Owner's Manual
Page 38
... OTHER EX I T USE: END: MENU 4 Press 5/∞ to select COLOR TEMP, then press SET/SELECT. ○ ○ ○ ○ ○ CU-PDP008 Î PLASMA DISPLAY REMOTE CONTROL UNIT 1 Press MENU to exit the menu screen. PICTURE MOD E : S T D CON T RA S T BLACK LVL . T EMP : S T D USE: END: MENU 5 Press 2/3 to appear in warmer hues...
... OTHER EX I T USE: END: MENU 4 Press 5/∞ to select COLOR TEMP, then press SET/SELECT. ○ ○ ○ ○ ○ CU-PDP008 Î PLASMA DISPLAY REMOTE CONTROL UNIT 1 Press MENU to exit the menu screen. PICTURE MOD E : S T D CON T RA S T BLACK LVL . T EMP : S T D USE: END: MENU 5 Press 2/3 to appear in warmer hues...


