
Technical Manual
Page 1
TECHNICAL MANUAL (Ver. 1.0) HANDWRITING DEVICE: PDK-50HW3 Supported plasma displays: PDP-504CMX PDP-503CMX PDP-50MXE1 PDP-50MXE1-S PDP-503MXE This manual provides precautions and information for installation, preparation, and handling of this product, or resulting from modifications ... information. Before installation and preparatory work to change without notice. If adequate safeguards are subject to qualified personnel, or consult the nearest PIONEER dealer for assistance. ÷ We accept no responsibility for those supplied by us. • We guarantee the performance of our products...
TECHNICAL MANUAL (Ver. 1.0) HANDWRITING DEVICE: PDK-50HW3 Supported plasma displays: PDP-504CMX PDP-503CMX PDP-50MXE1 PDP-50MXE1-S PDP-503MXE This manual provides precautions and information for installation, preparation, and handling of this product, or resulting from modifications ... information. Before installation and preparatory work to change without notice. If adequate safeguards are subject to qualified personnel, or consult the nearest PIONEER dealer for assistance. ÷ We accept no responsibility for those supplied by us. • We guarantee the performance of our products...
Technical Manual
Page 3
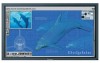
... (excluding screw heads) ] PDK-50HW2A PDK-50HW3 d) USB cable clip location A clip for securing two USB cables is provided on the rear panel to check plasma display operating status. ] PDK-50HW2A f) The flash pattern of the PEN-NORMAL mode selector switch has changed . ] See page 21. e) A power indicator makes it possible...
... (excluding screw heads) ] PDK-50HW2A PDK-50HW3 d) USB cable clip location A clip for securing two USB cables is provided on the rear panel to check plasma display operating status. ] PDK-50HW2A f) The flash pattern of the PEN-NORMAL mode selector switch has changed . ] See page 21. e) A power indicator makes it possible...
Technical Manual
Page 6
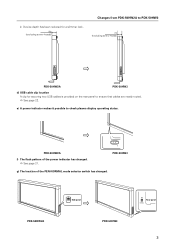
...Parts & Pin Layout 11 1.4.1 Plasma display monitor (PDP-504CMX/PDP-50MXE1/PDP-50MXE1-S) ... 11 1.4.2 Handwriting device (PDK-50HW3 11 2. Q & A 43 7.1 Hardware-Related Q&A 43 7.2 Driver Software-Related Q&A 45 8. Troubleshooting 47 8.1 Plasma Display (PDP-504CMX/PDP-50MXE1/PDP-50MXE1-S 47 8.2 Handwriting Device ...Device 50 9.1 IR Scanning System 50 9.2 Resolution 50 6 Installation Procedures 15 3.1 Unpacking 15 3.1.1 Plasma display monitor (PDP-504CMX/PDP-50MXE1/PDP-50MXE1-S) ... 15 3.1.2 Handwriting device (PDK-50HW3 16 3.2 Assembly and Connections 17 3.2.1 Installing the ...
...Parts & Pin Layout 11 1.4.1 Plasma display monitor (PDP-504CMX/PDP-50MXE1/PDP-50MXE1-S) ... 11 1.4.2 Handwriting device (PDK-50HW3 11 2. Q & A 43 7.1 Hardware-Related Q&A 43 7.2 Driver Software-Related Q&A 45 8. Troubleshooting 47 8.1 Plasma Display (PDP-504CMX/PDP-50MXE1/PDP-50MXE1-S 47 8.2 Handwriting Device ...Device 50 9.1 IR Scanning System 50 9.2 Resolution 50 6 Installation Procedures 15 3.1 Unpacking 15 3.1.1 Plasma display monitor (PDP-504CMX/PDP-50MXE1/PDP-50MXE1-S) ... 15 3.1.2 Handwriting device (PDK-50HW3 16 3.2 Assembly and Connections 17 3.2.1 Installing the ...

Technical Manual
Page 7
...176;C Operating humidity range: 20 to 90% Operating atmospheric pressure: 670 to 1500 hpa Separate plasma display (PDP-504CMX) specifications Refer to the PDP-504CMX. Separate handwriting device (PDK-50HW3) specifications Scan device Scanning system Infrared scanning Power indicator LED ...0.5 A max. Note 1 Allow for 400 W 400 VA of packaging Plasma display (PDP-504CMX) 1341 (W) x 846 (H) x 424 (D) mm Handwriting device 1360 (W) x 900 (H) x 220 (D) mm Weight when packaged Plasma display (PDP-504CMX) 55.0 kg Handwriting device 12.7 kg Operating temperature: 0° to 40...
...176;C Operating humidity range: 20 to 90% Operating atmospheric pressure: 670 to 1500 hpa Separate plasma display (PDP-504CMX) specifications Refer to the PDP-504CMX. Separate handwriting device (PDK-50HW3) specifications Scan device Scanning system Infrared scanning Power indicator LED ...0.5 A max. Note 1 Allow for 400 W 400 VA of packaging Plasma display (PDP-504CMX) 1341 (W) x 846 (H) x 424 (D) mm Handwriting device 1360 (W) x 900 (H) x 220 (D) mm Weight when packaged Plasma display (PDP-504CMX) 55.0 kg Handwriting device 12.7 kg Operating temperature: 0° to 40...
Technical Manual
Page 8
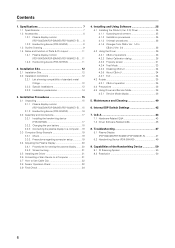
...) batteries x 2 Cleaning cloth (for wiping front panel) Washer x 2 Hex hole bolt x 2 Speed clamp x 2 Ferrite core (PDP-50MXE1/PDP-50MXE1-S only) Remote control unit case x 1 Use as a holder for the remote control unit. Specifications 1.2 Accessories 1.2.1 Plasma display monitor (PDP-504CMX/PDP-50MXE1/PDP-50MXE1-S) Check that the following accessories were supplied. 1. When attaching to the rear of the...
...) batteries x 2 Cleaning cloth (for wiping front panel) Washer x 2 Hex hole bolt x 2 Speed clamp x 2 Ferrite core (PDP-50MXE1/PDP-50MXE1-S only) Remote control unit case x 1 Use as a holder for the remote control unit. Specifications 1.2 Accessories 1.2.1 Plasma display monitor (PDP-504CMX/PDP-50MXE1/PDP-50MXE1-S) Check that the following accessories were supplied. 1. When attaching to the rear of the...

Technical Manual
Page 9
Metal plate Finish: Front panel (frame Painting (Pioneer original color) Base shield, corner reinforcement .... Plating 1258 115 92 82 74 (excluding screw heads and plasma display) 758 56 Plasma display indicator Remote control sensor 220 120 58 Display operation panel 43 21 15 9 ...;30 36 95 (From center of plasma display 49 Rear panel of plasma display 22 screen) 149 135 ø26 (excluding screw heads and 44 43 plasma display) 74 82 9 1. Specifications 1.3 Outline Drawing System weight: 48.4 kg (plasma display (PDP-504CMX) 41.0 kg plus handwriting device 7.4...
Metal plate Finish: Front panel (frame Painting (Pioneer original color) Base shield, corner reinforcement .... Plating 1258 115 92 82 74 (excluding screw heads and plasma display) 758 56 Plasma display indicator Remote control sensor 220 120 58 Display operation panel 43 21 15 9 ...;30 36 95 (From center of plasma display 49 Rear panel of plasma display 22 screen) 149 135 ø26 (excluding screw heads and 44 43 plasma display) 74 82 9 1. Specifications 1.3 Outline Drawing System weight: 48.4 kg (plasma display (PDP-504CMX) 41.0 kg plus handwriting device 7.4...
Technical Manual
Page 10
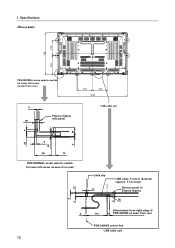
Specifications 278 758 344 PEN NORMAL PEN-NORMAL mode selector switch (in lower left corner as seen from rear) 4 20 PPEN NNORMAL Plasma display side panel 9 6 33 278 278 1258 USB cable exit 22 3 22 66 14 PEN-NORMAL mode selector switch (in lower left corner as seen from rear) 17 5 2 6 Cable clip 11 USB cable, 5 mm in diameter (approx. 1.4 m long) Bottom panel of plasma display R4 9 Dimensions from right edge of 115 14 PDK-50HW3 as seen from rear PDK-50HW3 center line USB cable exit 10 1.
Specifications 278 758 344 PEN NORMAL PEN-NORMAL mode selector switch (in lower left corner as seen from rear) 4 20 PPEN NNORMAL Plasma display side panel 9 6 33 278 278 1258 USB cable exit 22 3 22 66 14 PEN-NORMAL mode selector switch (in lower left corner as seen from rear) 17 5 2 6 Cable clip 11 USB cable, 5 mm in diameter (approx. 1.4 m long) Bottom panel of plasma display R4 9 Dimensions from right edge of 115 14 PDK-50HW3 as seen from rear PDK-50HW3 center line USB cable exit 10 1.
Technical Manual
Page 11
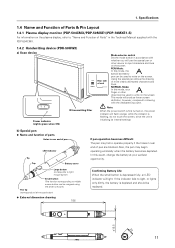
... holes in accordance with the dedicated input pen. Specifications 1.4 Name and Function of Parts & Pin Layout 1.4.1 Plasma display monitor (PDP-504CMX/PDP-50MXE1/PDP-50MXE1-S) For information on the plasma display, refer to left mouse button) ¶ External dimension drawing 186 Confirming Battery Life: When the small... assigned using the driver software.) Pen tip (corresponds to "Name and Function of Parts" in the Technical Manual supplied with the PDP-504CMX. 1.4.2 Handwriting device (PDK-50HW3) a) Scan device PEN NORMAL Rear side of unit Mode selector switch Set the mode switch in...
... holes in accordance with the dedicated input pen. Specifications 1.4 Name and Function of Parts & Pin Layout 1.4.1 Plasma display monitor (PDP-504CMX/PDP-50MXE1/PDP-50MXE1-S) For information on the plasma display, refer to left mouse button) ¶ External dimension drawing 186 Confirming Battery Life: When the small... assigned using the driver software.) Pen tip (corresponds to "Name and Function of Parts" in the Technical Manual supplied with the PDP-504CMX. 1.4.2 Handwriting device (PDK-50HW3) a) Scan device PEN NORMAL Rear side of unit Mode selector switch Set the mode switch in...
Technical Manual
Page 12
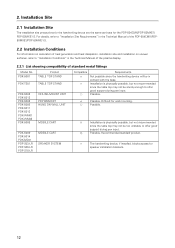
... to "Installation Site Requirements" in the Technical Manual of the plasma display. 2.2.1 List showing compatibility of heat generation and heat dissipation, installation site and installation on uneven surfaces, refer to offer good support during pen input. Possible. Difficult for the PDP-504CMX/PDP-50MXE1/ PDP-50MXE1-S. Installation Site 2.1 Installation Site The installation site precautions for...
... to "Installation Site Requirements" in the Technical Manual of the plasma display. 2.2.1 List showing compatibility of heat generation and heat dissipation, installation site and installation on uneven surfaces, refer to offer good support during pen input. Possible. Difficult for the PDP-504CMX/PDP-50MXE1/ PDP-50MXE1-S. Installation Site 2.1 Installation Site The installation site precautions for...

Technical Manual
Page 13
.... 2. Also, someone may deform it, cause malfunction or damage it, it is required to "Special Installation" in the Technical Manual of the plasma display. ¶ Calculate the distance between the monitor and surroundings (wall, etc.) based on the frame may use the horizontal screen in this ... it is performed in simplified setting rather than in contact with it, and dust that it is installed horizontally so that may for the plasma display. The foreign object may cause sensor malfunction. The following cautions are the same as for example include a liquid (juice, coffee,...
.... 2. Also, someone may deform it, cause malfunction or damage it, it is required to "Special Installation" in the Technical Manual of the plasma display. ¶ Calculate the distance between the monitor and surroundings (wall, etc.) based on the frame may use the horizontal screen in this ... it is performed in simplified setting rather than in contact with it, and dust that it is installed horizontally so that may for the plasma display. The foreign object may cause sensor malfunction. The following cautions are the same as for example include a liquid (juice, coffee,...

Technical Manual
Page 14
... lighting, move the light source away or change its operation is installed in proximity (the interference may be checked in such a location will make the plasma display difficult to prevent malfunction. This needs to function as partitions). This needs to be observed even when the areas are shown below. ¶ Adjacent...
... lighting, move the light source away or change its operation is installed in proximity (the interference may be checked in such a location will make the plasma display difficult to prevent malfunction. This needs to function as partitions). This needs to be observed even when the areas are shown below. ¶ Adjacent...
Technical Manual
Page 15
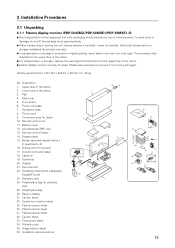
... 12. Binder assembly (speed clamp x 2, bead band x 2) 16. Cable tie 19. Operating instructions (Japanese/ English/French) 23. Warranty card 24. Plasma caution sheet 30. Installation Procedures 3.1 Unpacking 3.1.1 Plasma display monitor (PDP-504CMX/PDP-50MXE1/PDP-50MXE1-S) ¶ Any transportation of the unopened unit in original packing, never stack more persons. Please take precations to prevent it...
... 12. Binder assembly (speed clamp x 2, bead band x 2) 16. Cable tie 19. Operating instructions (Japanese/ English/French) 23. Warranty card 24. Plasma caution sheet 30. Installation Procedures 3.1 Unpacking 3.1.1 Plasma display monitor (PDP-504CMX/PDP-50MXE1/PDP-50MXE1-S) ¶ Any transportation of the unopened unit in original packing, never stack more persons. Please take precations to prevent it...

Technical Manual
Page 17
... on a mobile cart before installing scan device. ¶ After installing scan device, never attempt to lift the plasma display to install on a mobile cart. ¶ If the need arises to move scan device after it is installed on a mobile cart, take care not ...
... on a mobile cart before installing scan device. ¶ After installing scan device, never attempt to lift the plasma display to install on a mobile cart. ¶ If the need arises to move scan device after it is installed on a mobile cart, take care not ...

Technical Manual
Page 19
... Properties" = "Effects" = "Visual effects"= "Display icons in the Operating Instructions supplied with computer type. Installation Procedures 3.2.3 Connecting the plasma display to a computer For information on whether the PC video cable is permanently on required computer specifications. 3.3.2 Precautions regarding computer setup Be .... Note: Turn the power off before making or changing connections. 3.3 Computer Setup Example Setup procedure differs with the plasma display. Disable sleep, standby and all other power saving features set using the power options so that the power is...
... Properties" = "Effects" = "Visual effects"= "Display icons in the Operating Instructions supplied with computer type. Installation Procedures 3.2.3 Connecting the plasma display to a computer For information on whether the PC video cable is permanently on required computer specifications. 3.3.2 Precautions regarding computer setup Be .... Note: Turn the power off before making or changing connections. 3.3 Computer Setup Example Setup procedure differs with the plasma display. Disable sleep, standby and all other power saving features set using the power options so that the power is...
Technical Manual
Page 20
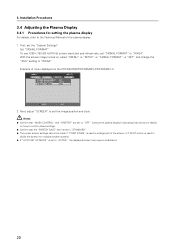
... into multiple smaller screens. ¶ If "AUTO SET UP MODE" is set to the Technical Manual of menu displayed on the PDP-504CMX/PDP-50MXE1/PDP-50MXE1-S MENU INPUT1 PICTURE SCREEN SETUP OPTION POWER MANAGEMENT CLAMP POSITION SIGNAL FORMAT : OFF : AUTO : XGA SET ENTER MENU EXIT ...select "MENU" = "SETUP" = "SIGNAL FORMAT" = "SET", and change the "XGA" setting to "OFF". Consult the plasma display's Operating Instructions for setting the plasma display For details, refer to "ACTIVE", the displayed screen may require recalibration. 20 With the screen image turned on how to confirm...
... into multiple smaller screens. ¶ If "AUTO SET UP MODE" is set to the Technical Manual of menu displayed on the PDP-504CMX/PDP-50MXE1/PDP-50MXE1-S MENU INPUT1 PICTURE SCREEN SETUP OPTION POWER MANAGEMENT CLAMP POSITION SIGNAL FORMAT : OFF : AUTO : XGA SET ENTER MENU EXIT ...select "MENU" = "SETUP" = "SIGNAL FORMAT" = "SET", and change the "XGA" setting to "OFF". Consult the plasma display's Operating Instructions for setting the plasma display For details, refer to "ACTIVE", the displayed screen may require recalibration. 20 With the screen image turned on how to confirm...

Technical Manual
Page 21
... the USB1.1 or USB2.0 port.) USB cable Computer Note: When connecting a USB hub, use only self-powered types (with AC outlet power connection) with the plasma display. 3.5 Installing the Driver 1. There are being made during this time. 3. Installation Procedures 3.4.2 Screen burning Refer to "Screen Burning" in green and orange. When a USB...
... the USB1.1 or USB2.0 port.) USB cable Computer Note: When connecting a USB hub, use only self-powered types (with AC outlet power connection) with the plasma display. 3.5 Installing the Driver 1. There are being made during this time. 3. Installation Procedures 3.4.2 Screen burning Refer to "Screen Burning" in green and orange. When a USB...

Technical Manual
Page 22
... this opens it. USB cable Cable clip 3.8 Sensor Operation Check a) Check in PEN mode 1. Touch the plasma display to [PEN]. 3. Installation Procedures 3.7 How to Use Cable Clip Use the cable clip to check that plasma display locations are correctly recognized during pen usage. ("M" and "R" correspond to the small and large pen button...
... this opens it. USB cable Cable clip 3.8 Sensor Operation Check a) Check in PEN mode 1. Touch the plasma display to [PEN]. 3. Installation Procedures 3.7 How to Use Cable Clip Use the cable clip to check that plasma display locations are correctly recognized during pen usage. ("M" and "R" correspond to the small and large pen button...
Technical Manual
Page 25
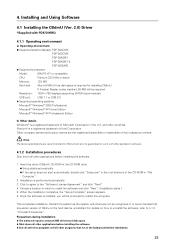
... U.S. Note: The above specifications are recommended for installing CBdrvU. Click to agree to work with PDK-50HW3 4.1.1 Operating environment a) Operating environment ¶ Supported plasma displays: PDP-504CMX PDP-503CMX PDP-50MXE1 PDP-50MXE1-S PDP-503MXE ¶ Supported computers Model: IBM PC-AT or compatible CPU: Pentium 333 MHz or better Memory: 128 MB Hard disk: About 6 MB...
... U.S. Note: The above specifications are recommended for installing CBdrvU. Click to agree to work with PDK-50HW3 4.1.1 Operating environment a) Operating environment ¶ Supported plasma displays: PDP-504CMX PDP-503CMX PDP-50MXE1 PDP-50MXE1-S PDP-503MXE ¶ Supported computers Model: IBM PC-AT or compatible CPU: Pentium 333 MHz or better Memory: 128 MB Hard disk: About 6 MB...

Technical Manual
Page 29
... shown below to perform manual calibration of pen tip and cursor position. a) Calibration (Detail-1) Tap the four points in the "PARTIAL" plasma display mode. ¶ Use Detail-1 when Easy Setting is available only during Easy Setting. Be sure to make the settings in this ...; Check the screen mode before making settings. Detaile Setting: Use to perform detailed calibration. OK button: Press to the resolution for the plasma display in the section "Precautions" in this Technical Manual.) ¶ Only modes with resolution. Apply button: Temporarily applies the preset value...
... shown below to perform manual calibration of pen tip and cursor position. a) Calibration (Detail-1) Tap the four points in the "PARTIAL" plasma display mode. ¶ Use Detail-1 when Easy Setting is available only during Easy Setting. Be sure to make the settings in this ...; Check the screen mode before making settings. Detaile Setting: Use to perform detailed calibration. OK button: Press to the resolution for the plasma display in the section "Precautions" in this Technical Manual.) ¶ Only modes with resolution. Apply button: Temporarily applies the preset value...

Technical Manual
Page 30
... the two points, the upper and lower points to calibrate. 4. c) Easy Setting Press the assigned hot keys to verify the display position and adjust the plasma display. Notes: ¶ Use the mouse to make settings in this screen. ¶ The set calibration is stored and is available atsubsequent startups. ¶ Although... but disappears automatically after setup. The name of the screen mode being adjusted appears at current resolution. Installing and Using Software b) Calibration (Detail-2) When the plasma display is still possible to set . 30
... the two points, the upper and lower points to calibrate. 4. c) Easy Setting Press the assigned hot keys to verify the display position and adjust the plasma display. Notes: ¶ Use the mouse to make settings in this screen. ¶ The set calibration is stored and is available atsubsequent startups. ¶ Although... but disappears automatically after setup. The name of the screen mode being adjusted appears at current resolution. Installing and Using Software b) Calibration (Detail-2) When the plasma display is still possible to set . 30


