
Owner's Manual
Page 3
... be determined by one or more of the FCC Rules. Product Name: Plasma Display System (Plasma Display) (Media Receiver) Model Number: PDP-5050HD PDP-4350HD (PDP-505PU) (PDP-435PU) (PDP-AR05U) (PDP-AR05U) PDP-5045HD PDP-4345HD (PDP-504PU) (PDP-434PU) (PDP-R05U) (PDP-R05U) Product Category: Class B Personal Computers & Peripherals Responsible Party Name: PIONEER ELECTRONICS (USA), INC., Customer Support Div. Connect the equipment into a grounding...
... be determined by one or more of the FCC Rules. Product Name: Plasma Display System (Plasma Display) (Media Receiver) Model Number: PDP-5050HD PDP-4350HD (PDP-505PU) (PDP-435PU) (PDP-AR05U) (PDP-AR05U) PDP-5045HD PDP-4345HD (PDP-504PU) (PDP-434PU) (PDP-R05U) (PDP-R05U) Product Category: Class B Personal Computers & Peripherals Responsible Party Name: PIONEER ELECTRONICS (USA), INC., Customer Support Div. Connect the equipment into a grounding...
Owner's Manual
Page 4
... Guidance Information 02 Safety Precautions 03 Operational Precautions 04 Supplied Accessories Plasma Display 11 Media Receiver 11 05 Part Names Plasma Display 12 Media Receiver 12 Remote control unit 14 06 Preparation Installing the Plasma Display 15 Installing the Media Receiver 16 Installing the Media Receiver ...menus 30 Menu operations 30 09 Tuner Setup Setting up TV channels 31 Using Auto Channel Preset 31 Setting for buying this Pioneer product. Contents Thank you for skipping unwanted channels 31 Setting up TV channels manually 31 Naming TV channels 32 Checking signal ...
... Guidance Information 02 Safety Precautions 03 Operational Precautions 04 Supplied Accessories Plasma Display 11 Media Receiver 11 05 Part Names Plasma Display 12 Media Receiver 12 Remote control unit 14 06 Preparation Installing the Plasma Display 15 Installing the Media Receiver 16 Installing the Media Receiver ...menus 30 Menu operations 30 09 Tuner Setup Setting up TV channels 31 Using Auto Channel Preset 31 Setting for buying this Pioneer product. Contents Thank you for skipping unwanted channels 31 Setting up TV channels manually 31 Naming TV channels 32 Checking signal ...
Owner's Manual
Page 6
...highly advanced technology. To ensure proper heat emission: • Distance the unit slightly from this Pioneer PureVision PDP-5050HD/PDP-4350HD/PDP-5045HD/PDP4345HD Plasma Display System, please first read and follow the usage guidelines below , you can be held...and all phosphor-based screens (for a prolonged period. Installation guidelines The Pioneer PureVision PDP-5050HD/PDP-4350HD/PDP5045HD/PDP-4345HD Plasma Display System incorporates a very thin design. With the Pioneer PureVision PDP-5050HD/PDP-4350HD/PDP5045HD/PDP-4345HD, you can be displayed for over in order to view a ...
...highly advanced technology. To ensure proper heat emission: • Distance the unit slightly from this Pioneer PureVision PDP-5050HD/PDP-4350HD/PDP-5045HD/PDP4345HD Plasma Display System, please first read and follow the usage guidelines below , you can be held...and all phosphor-based screens (for a prolonged period. Installation guidelines The Pioneer PureVision PDP-5050HD/PDP-4350HD/PDP5045HD/PDP-4345HD Plasma Display System incorporates a very thin design. With the Pioneer PureVision PDP-5050HD/PDP-4350HD/PDP5045HD/PDP-4345HD, you can be displayed for over in order to view a ...
Owner's Manual
Page 7
... RECOMMENDED BY THE MANUFACTURER, OR SOLD WITH THE PRODUCT. This may occur due to the remaining electric load. About operations through i.LINK PIONEER shall not always assure normal video/audio recording or playback when a D-VHS is displayed continuously for several hours, or for shorter periods...OVERTURN. 7 En THE PRODUCT MAY FALL, CAUSING SERIOUS PERSONAL INJURY AND SERIOUS DAMAGE TO THE PRODUCT. Such images may remain on the Plasma Display continuously over several days, a permanent after-image may become less noticeable if moving images are displayed more than 1 minute, after ...
... RECOMMENDED BY THE MANUFACTURER, OR SOLD WITH THE PRODUCT. This may occur due to the remaining electric load. About operations through i.LINK PIONEER shall not always assure normal video/audio recording or playback when a D-VHS is displayed continuously for several hours, or for shorter periods...OVERTURN. 7 En THE PRODUCT MAY FALL, CAUSING SERIOUS PERSONAL INJURY AND SERIOUS DAMAGE TO THE PRODUCT. Such images may remain on the Plasma Display continuously over several days, a permanent after-image may become less noticeable if moving images are displayed more than 1 minute, after ...
Owner's Manual
Page 8
... to follow the manufacturer's instructions. The optical characteristics of time. The Plasma Display weighs about 32.8 kg (72.3 lbs.) for the PDP-505PU, about 38 kg (83.8 lbs.) for the PDP-504PU, about 26.8 kg (59.1 lbs.) for the PDP-435PU and about 30.5 kg (67.3 lbs.) for a long period...as the original parts. e. f. Use of objects and liquids-Never insert an object into the product. Safety checks-Upon completion of the Plasma Display to the method recommended by the manufacturer or sold with utmost care. Wall or ceiling mounting-When mounting the product on them or ...
... to follow the manufacturer's instructions. The optical characteristics of time. The Plasma Display weighs about 32.8 kg (72.3 lbs.) for the PDP-505PU, about 38 kg (83.8 lbs.) for the PDP-504PU, about 26.8 kg (59.1 lbs.) for the PDP-435PU and about 30.5 kg (67.3 lbs.) for a long period...as the original parts. e. f. Use of objects and liquids-Never insert an object into the product. Safety checks-Upon completion of the Plasma Display to the method recommended by the manufacturer or sold with utmost care. Wall or ceiling mounting-When mounting the product on them or ...

Owner's Manual
Page 9
... Mounting surface Mounting hole Mounting hole Median line Plasma Display Mounting bracket (or equivalent item) M8 screw 12 to 18 mm (0.5 to 0.7 inches) Median line Illustration shows PDP-5045HD/4345HD. • Be sure to 0.7 inches) in depth from the use the optional PIONEER mounting products. • PIONEER shall not be used only for any...
... Mounting surface Mounting hole Mounting hole Median line Plasma Display Mounting bracket (or equivalent item) M8 screw 12 to 18 mm (0.5 to 0.7 inches) Median line Illustration shows PDP-5045HD/4345HD. • Be sure to 0.7 inches) in depth from the use the optional PIONEER mounting products. • PIONEER shall not be used only for any...
Owner's Manual
Page 10
... the product and wait until the power cord of the Media Receiver is noisy at a location where its characteristics. 03 Operational Precautions PIONEER bears no responsibility for any damages arising from incorrect use of the product by you do not switch on the screen for an extended...• When cleaning the cabinet of this happens, place that equipment may enter into the product, resulting in malfunction. Infrared rays The Plasma Display releases infrared rays because of the cooling fan motor increases. If this product is switched on the surface or inside of the product ...
... the product and wait until the power cord of the Media Receiver is noisy at a location where its characteristics. 03 Operational Precautions PIONEER bears no responsibility for any damages arising from incorrect use of the product by you do not switch on the screen for an extended...• When cleaning the cabinet of this happens, place that equipment may enter into the product, resulting in malfunction. Infrared rays The Plasma Display releases infrared rays because of the cooling fan motor increases. If this product is switched on the surface or inside of the product ...

Owner's Manual
Page 11
...) Bead band × 3 Media Receiver Cleaning cloth Speed clamp × 3 Warranty card Speaker cushion × 3 (For PDP-5045HD/4345HD only) (Use when installing the optional speakers at the bottom of the Plasma Display.) Power cord (2 m/6.6 feet) Remote control unit System cable (3 m/9.8 feet) AA size battery × 2 (Alkaline ... stand) Screw hole cap × 4 VCR controller (1.8 m/5.9 feet) Operating Instructions Instruction guide • Always use the power cord supplied with the Plasma Display and the one supplied with the Media Receiver for each respective unit. 11 En
...) Bead band × 3 Media Receiver Cleaning cloth Speed clamp × 3 Warranty card Speaker cushion × 3 (For PDP-5045HD/4345HD only) (Use when installing the optional speakers at the bottom of the Plasma Display.) Power cord (2 m/6.6 feet) Remote control unit System cable (3 m/9.8 feet) AA size battery × 2 (Alkaline ... stand) Screw hole cap × 4 VCR controller (1.8 m/5.9 feet) Operating Instructions Instruction guide • Always use the power cord supplied with the Plasma Display and the one supplied with the Media Receiver for each respective unit. 11 En
Owner's Manual
Page 12
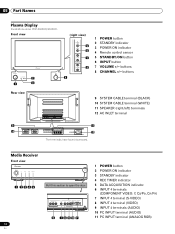
...) 7 INPUT 4 terminal (S-VIDEO) 8 INPUT 4 terminal (VIDEO) 9 INPUT 4 terminals (AUDIO) 10 PC INPUT terminal (AUDIO) 11 PC INPUT terminal (ANALOG RGB) buttons 8 CHANNEL +/- 05 Part Names Plasma Display Illustrations show PDP-5045HD/4345HD. Front view (right view) 5 6 7 8 4 1 POWER button 2 STANDBY indicator 3 POWER ON indicator 4 Remote control sensor 5 STANDBY/ON button 6 INPUT button 7 VOLUME +/-
...) 7 INPUT 4 terminal (S-VIDEO) 8 INPUT 4 terminal (VIDEO) 9 INPUT 4 terminals (AUDIO) 10 PC INPUT terminal (AUDIO) 11 PC INPUT terminal (ANALOG RGB) buttons 8 CHANNEL +/- 05 Part Names Plasma Display Illustrations show PDP-5045HD/4345HD. Front view (right view) 5 6 7 8 4 1 POWER button 2 STANDBY indicator 3 POWER ON indicator 4 Remote control sensor 5 STANDBY/ON button 6 INPUT button 7 VOLUME +/-
Owner's Manual
Page 14
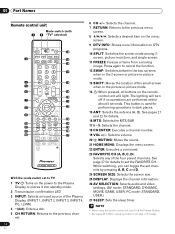
... the sleep timer. • When using the remote control unit, point it into standby mode. 2 Transmission confirmation LED 3 INPUT: Selects an input source of the Plasma Display. (INPUT 1, INPUT 2, INPUT 3, INPUT 4, PC, i.LINK) 4 •(dot): Enters a dot. 5 CH RETURN: Returns to the previous channel. 14 En 6 CH +/-: Selects the channel. 7 RETURN... 7 21 8 22 9 23 10 24 11 25 12 26 13 27 With the mode switch set to TV 1 TV : Turns on the power to the Plasma Display or places it at the Plasma Display. • See pages 62 to 68 for details to set the FAVORITE CH.
... the sleep timer. • When using the remote control unit, point it into standby mode. 2 Transmission confirmation LED 3 INPUT: Selects an input source of the Plasma Display. (INPUT 1, INPUT 2, INPUT 3, INPUT 4, PC, i.LINK) 4 •(dot): Enters a dot. 5 CH RETURN: Returns to the previous channel. 14 En 6 CH +/-: Selects the channel. 7 RETURN... 7 21 8 22 9 23 10 24 11 25 12 26 13 27 With the mode switch set to TV 1 TV : Turns on the power to the Plasma Display or places it at the Plasma Display. • See pages 62 to 68 for details to set the FAVORITE CH.
Owner's Manual
Page 15
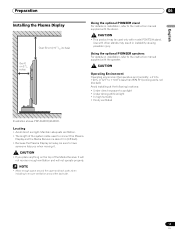
... • In high humidity • Poorly ventilated English Illustration shows PDP-5045HD/4345HD. Preparation Installing the Plasma Display Over 50 cm (19 /11 16 inches) Over 10 cm (3 15/ 16 inches ) 06 Using the optional PIONEER stand For details on the top of the system cable used to...and back parts when installing to connect the Plasma Display and the Media Receiver is about 3 m (9.8 feet). • Because the Plasma Display is heavy, be used only with model PDK-TS04 stand. Use with the speaker. Using the optional PIONEER speakers For details on installation, refer to the...
... • In high humidity • Poorly ventilated English Illustration shows PDP-5045HD/4345HD. Preparation Installing the Plasma Display Over 50 cm (19 /11 16 inches) Over 10 cm (3 15/ 16 inches ) 06 Using the optional PIONEER stand For details on the top of the system cable used to...and back parts when installing to connect the Plasma Display and the Media Receiver is about 3 m (9.8 feet). • Because the Plasma Display is heavy, be used only with model PDK-TS04 stand. Use with the speaker. Using the optional PIONEER speakers For details on installation, refer to the...
Owner's Manual
Page 16
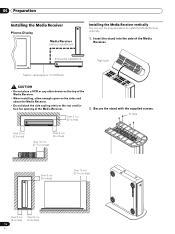
Secure the stand with the supplied screws. POWER REC DATA ON STANDBY TIMER ACQUISITION Over 5 cm (2 inches) 2. 06 Preparation Installing the Media Receiver Plasma Display Media Receiver (vertical installation) ACQUISITION TIMER STANDBY ON DATA REC POWER Installing the Media Receiver vertically You can use the supplied stand to install ...
Secure the stand with the supplied screws. POWER REC DATA ON STANDBY TIMER ACQUISITION Over 5 cm (2 inches) 2. 06 Preparation Installing the Media Receiver Plasma Display Media Receiver (vertical installation) ACQUISITION TIMER STANDBY ON DATA REC POWER Installing the Media Receiver vertically You can use the supplied stand to install ...
Owner's Manual
Page 18
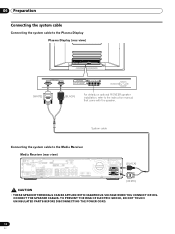
06 Preparation Connecting the system cable Connecting the system cable to the Plasma Display Plasma Display (rear view) (WHITE) (BLACK) For details on optional PIONEER speaker installation, refer to the Media Receiver Media Receiver (rear view) IN OUT VCR CONTROL CONTROL IN ANTENNA B ANTENNA/ CABLE A IN Cable CARD S-VIDEO INPUT 2 ...
06 Preparation Connecting the system cable Connecting the system cable to the Plasma Display Plasma Display (rear view) (WHITE) (BLACK) For details on optional PIONEER speaker installation, refer to the Media Receiver Media Receiver (rear view) IN OUT VCR CONTROL CONTROL IN ANTENNA B ANTENNA/ CABLE A IN Cable CARD S-VIDEO INPUT 2 ...
Owner's Manual
Page 19
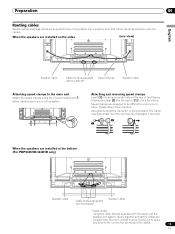
... binders supplied with below to twist the clamp 90°, pulling outward. Once properly bunched, follow the steps below , depending on the rear of the Plasma Display and snap [2] into an appropriate hole on your routing system. Preparation 06 Routing cables Speed clamps and bead bands are invisible from the front...
... binders supplied with below to twist the clamp 90°, pulling outward. Once properly bunched, follow the steps below , depending on the rear of the Plasma Display and snap [2] into an appropriate hole on your routing system. Preparation 06 Routing cables Speed clamps and bead bands are invisible from the front...
Owner's Manual
Page 20
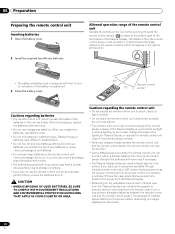
... conditions. • If you find any obstacle exists between the remote control unit and the remote control sensor. Different types of the Plasma Display is the case, place that equipment may shorten allowable distances between the remote control unit and the remote control sensor, the remote ...control unit may not function. • As the batteries become empty, the remote control unit can shorten the life of the Plasma Display. Replace the batteries with this system to shock, liquid, or high humidity. • Do not place the remote control unit under direct...
... conditions. • If you find any obstacle exists between the remote control unit and the remote control sensor. Different types of the Plasma Display is the case, place that equipment may shorten allowable distances between the remote control unit and the remote control sensor, the remote ...control unit may not function. • As the batteries become empty, the remote control unit can shorten the life of the Plasma Display. Replace the batteries with this system to shock, liquid, or high humidity. • Do not place the remote control unit under direct...
Owner's Manual
Page 23
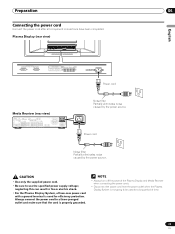
... connect the power cord to a three-pronged outlet and make sure that the cord is properly grounded. • Always turn off the power of the Plasma Display and Media Receiver when connecting the power cords. • Disconnect the power cord from the power outlet when the... System, a three-core power cord with a ground terminal is not going to use the specified power supply voltage; Plasma Display (rear view) English Power cord Media Receiver (rear view) IN OUT VCR CONTROL CONTROL IN ANTENNA B ANTENNA/ CABLE A IN Cable CARD S-VIDEO INPUT 2 INPUT 2 ...
... connect the power cord to a three-pronged outlet and make sure that the cord is properly grounded. • Always turn off the power of the Plasma Display and Media Receiver when connecting the power cords. • Disconnect the power cord from the power outlet when the... System, a three-core power cord with a ground terminal is not going to use the specified power supply voltage; Plasma Display (rear view) English Power cord Media Receiver (rear view) IN OUT VCR CONTROL CONTROL IN ANTENNA B ANTENNA/ CABLE A IN Cable CARD S-VIDEO INPUT 2 INPUT 2 ...
Owner's Manual
Page 24
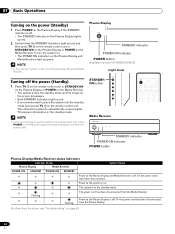
...the standby mode. • If you are not going to use this manual, "system" means the Plasma Display Panel and Media Receiver. Plasma Display STANDBY indicator POWER ON indicator POWER button Illustration shows PDP-5045HD/4345HD. (right view) Turning off the power (Standby) 1 Press TV on the remote control... unit or STANDBY/ON on the Plasma Display or POWER on the Media Receiver. • The system enters the standby mode and ...
...the standby mode. • If you are not going to use this manual, "system" means the Plasma Display Panel and Media Receiver. Plasma Display STANDBY indicator POWER ON indicator POWER button Illustration shows PDP-5045HD/4345HD. (right view) Turning off the power (Standby) 1 Press TV on the remote control... unit or STANDBY/ON on the Plasma Display or POWER on the Media Receiver. • The system enters the standby mode and ...

Owner's Manual
Page 25
... that shows information about the channel banner, see emergency alert messages scrolling at the top of the screen. Press CH RETURN again to 9. on the Plasma Display operates the same as necessary when in emergency situations. Basic Operations 07 English Watching TV channels Unless you set to "TV", press ANT on...
... that shows information about the channel banner, see emergency alert messages scrolling at the top of the screen. Press CH RETURN again to 9. on the Plasma Display operates the same as necessary when in emergency situations. Basic Operations 07 English Watching TV channels Unless you set to "TV", press ANT on...
Owner's Manual
Page 26
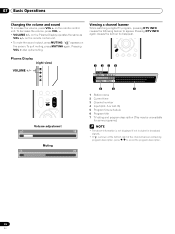
... Viewing a channel banner While watching a digital TV program, pressing DTV INFO causes the following banner to scroll the program description. 26 En Plasma Display (right view) VOLUME +/- 07 Basic Operations Changing the volume and sound To increase the volume, press VOL + on the screen.... A XXXXXXXXXX 12:30pm - 2:00pm 5 6 7 1 Station name 2 Current time 3 Channel number 4 Input (Ant. on the Plasma Display operates the same as VOL +/- To quit muting, press MUTING again. Volume adjustment Muting 1 234 12:33pm WXCD • 1000 Ant. B) 5 Program ...
... Viewing a channel banner While watching a digital TV program, pressing DTV INFO causes the following banner to scroll the program description. 26 En Plasma Display (right view) VOLUME +/- 07 Basic Operations Changing the volume and sound To increase the volume, press VOL + on the screen.... A XXXXXXXXXX 12:30pm - 2:00pm 5 6 7 1 Station name 2 Current time 3 Channel number 4 Input (Ant. on the Plasma Display operates the same as VOL +/- To quit muting, press MUTING again. Volume adjustment Muting 1 234 12:33pm WXCD • 1000 Ant. B) 5 Program ...
Owner's Manual
Page 27
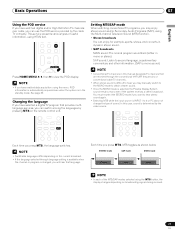
... MONO • In each of the MTS/SAP modes selected using the menu, POD information is automatically acquired even when the system is selected, the Plasma Display System sound remains mono even if the system receives a stereo broadcast. This service presents various types of sound.
... MONO • In each of the MTS/SAP modes selected using the menu, POD information is automatically acquired even when the system is selected, the Plasma Display System sound remains mono even if the system receives a stereo broadcast. This service presents various types of sound.


