Operating Instructions
Page 6
..., Markham, Ontario L3R OP2 (905)479-4411 1(877)283-5901 For warranty information please see the Limited Warranty sheet included with Video Card Model Number: PDP-504CMX / PDP-434CMX (Plasma Display) PDA-5003/PDA-5004 (Video Card) Product Category: Class B Personal Computers & Peripherals Responsible Party Name: PIONEER ELECTRONICS (USA) INC. S021_EF iivi En Safety Precautions
..., Markham, Ontario L3R OP2 (905)479-4411 1(877)283-5901 For warranty information please see the Limited Warranty sheet included with Video Card Model Number: PDP-504CMX / PDP-434CMX (Plasma Display) PDA-5003/PDA-5004 (Video Card) Product Category: Class B Personal Computers & Peripherals Responsible Party Name: PIONEER ELECTRONICS (USA) INC. S021_EF iivi En Safety Precautions
Operating Instructions
Page 9
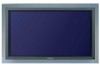
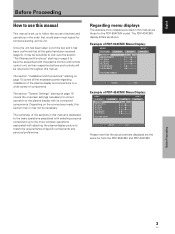
...OPTION PICTURE RESET SET ENTER MENU EXIT Example of the box and it has been confirmed that would seem most logical for the PDP-504CMX model. The section "Installation and Connections" starting on page 16 covers the on page 10 covers all the necessary points regarding installation of...of components. Before Proceeding 3 En The section "System Settings" starting on -screen settings necessary for both the PDP-504CMX and PDP-434CMX. The PDP-434CMX display differs as their respective buttons and controls will be necessary. English Before Proceeding How to use this manual This...
...OPTION PICTURE RESET SET ENTER MENU EXIT Example of the box and it has been confirmed that would seem most logical for the PDP-504CMX model. The section "Installation and Connections" starting on page 16 covers the on page 10 covers all the necessary points regarding installation of...of components. Before Proceeding 3 En The section "System Settings" starting on -screen settings necessary for both the PDP-504CMX and PDP-434CMX. The PDP-434CMX display differs as their respective buttons and controls will be necessary. English Before Proceeding How to use this manual This...
Operating Instructions
Page 15
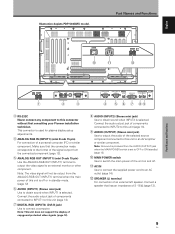
... an AC outlet (page 14). = SPEAKER (L) terminal For connection of the selected source component connected to this connector without first consulting your Pioneer installation technician. Connect the audio output jack of components connected to INPUT2 to this unit (page 13). 9 AUDIO (OUTPUT) (Stereo mini ...from the ANALOG RGB OUT (INPUT1) terminal when the main power of a personal computer (PC) or similar component. English Illustration depicts PDP-504CMX model. Note: The video signal will not be output from the AUDIO (OUTPUT) jack when the MAIN POWER switch is used for plasma...
... an AC outlet (page 14). = SPEAKER (L) terminal For connection of the selected source component connected to this connector without first consulting your Pioneer installation technician. Connect the audio output jack of components connected to INPUT2 to this unit (page 13). 9 AUDIO (OUTPUT) (Stereo mini ...from the ANALOG RGB OUT (INPUT1) terminal when the main power of a personal computer (PC) or similar component. English Illustration depicts PDP-504CMX model. Note: The video signal will not be output from the AUDIO (OUTPUT) jack when the MAIN POWER switch is used for plasma...

Operating Instructions
Page 18
... and this unit is off or in standby. DIGITAL RGB DVI-D INPUT2 AUDIO Installation and Connections Connect the cable corresponding to the shape of computer model being connected, a conversion connector or adapter etc. Notes ¶ Use a DVI-D 24-pin (digital only) cable for details. English Installation and Connections Connection to a personal...
... and this unit is off or in standby. DIGITAL RGB DVI-D INPUT2 AUDIO Installation and Connections Connect the cable corresponding to the shape of computer model being connected, a conversion connector or adapter etc. Notes ¶ Use a DVI-D 24-pin (digital only) cable for details. English Installation and Connections Connection to a personal...

Operating Instructions
Page 21
... the ends of the display. Installation and Connections To remove speed clamps Using pliers, twist the clamp 90° and pull it outward. Illustration depicts PDP-504CMX model. * As viewed from the rear of 1 to fix the clamp. Note Cables can be difficult to undo once in place. Insert 1 into the back...
... the ends of the display. Installation and Connections To remove speed clamps Using pliers, twist the clamp 90° and pull it outward. Illustration depicts PDP-504CMX model. * As viewed from the rear of 1 to fix the clamp. Note Cables can be difficult to undo once in place. Insert 1 into the back...
Operating Instructions
Page 40
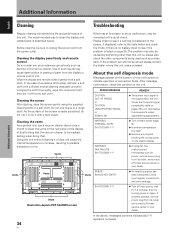
...35. If displayed, refer to see if a warning is no display check to the table below . Vents Illustration depicts PDP-504CMX model. Additional Information English Additional Information Cleaning Troubleshooting Regular cleaning will cause the internal temperature to see if the problem is listed ... the display and remote control gently with a quick check. If problem persists, remove power plug from its outlet and consult a Pioneer service center or your dealer. As the surface of excessive dirt buildup, dampen a soft cloth with a diluted neutral cleaning detergent and...
...35. If displayed, refer to see if a warning is no display check to the table below . Vents Illustration depicts PDP-504CMX model. Additional Information English Additional Information Cleaning Troubleshooting Regular cleaning will cause the internal temperature to see if the problem is listed ... the display and remote control gently with a quick check. If problem persists, remove power plug from its outlet and consult a Pioneer service center or your dealer. As the surface of excessive dirt buildup, dampen a soft cloth with a diluted neutral cleaning detergent and...


