Owner's Manual
Page 4
...auto channel select 59 Recording TV programs using a D-VHS recorder ...... 60 Recording TV programs via a VCR controller 61 Setting the timer manually 62 Priority rules for skipping unwanted channels 42 Media Receiver 14 Setting your model properly. After you will know how to operate your ... Allowed operation range of the power plug and power outlet may sometimes differ from that shown in a safe place for buying this Pioneer product. Please read through these operating instructions so you have finished reading the instructions, put them away in the explanatory drawings. 00...
...auto channel select 59 Recording TV programs using a D-VHS recorder ...... 60 Recording TV programs via a VCR controller 61 Setting the timer manually 62 Priority rules for skipping unwanted channels 42 Media Receiver 14 Setting your model properly. After you will know how to operate your ... Allowed operation range of the power plug and power outlet may sometimes differ from that shown in a safe place for buying this Pioneer product. Please read through these operating instructions so you have finished reading the instructions, put them away in the explanatory drawings. 00...

Owner's Manual
Page 5
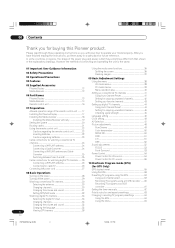
... Useful Adjustment Settings Adjusting image positions (AV mode only 81 Adjusting image positions and clock automatically (PC mode only 81 Adjusting image positions and clock manually (PC mode only 82 Selecting a screen size 83 Changing the brightness at both sides of the screen (Side Mask 84 Sleep Timer 85 Closed caption...
... Useful Adjustment Settings Adjusting image positions (AV mode only 81 Adjusting image positions and clock automatically (PC mode only 81 Adjusting image positions and clock manually (PC mode only 82 Selecting a screen size 83 Changing the brightness at both sides of the screen (Side Mask 84 Sleep Timer 85 Closed caption...
Owner's Manual
Page 8
... in a safe place-These safety and operating instructions must be routed properly to prevent people from stepping on them . The plasma Display used in this manual in a safe place for ventilation. Therefore, it can cause the product to fall , resulting in the product, and inserting an object can also cause personal...
... in a safe place-These safety and operating instructions must be routed properly to prevent people from stepping on them . The plasma Display used in this manual in a safe place for ventilation. Therefore, it can cause the product to fall , resulting in the product, and inserting an object can also cause personal...
Owner's Manual
Page 17
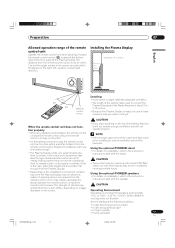
... receive commands from the remote control unit or may be within a shorter distance from the remote control sensor. Using the optional PIONEER stand • For details on the top of the Media Receiver it will not receive enough ventilation and will not operate properly.... • Allow enough space around the upper and back parts when installing to the instruction manual provided with other stands may result in the right, left, upward, or downward direction. Operating Environment Operating environment temperature and humidity: ...
... receive commands from the remote control unit or may be within a shorter distance from the remote control sensor. Using the optional PIONEER stand • For details on the top of the Media Receiver it will not receive enough ventilation and will not operate properly.... • Allow enough space around the upper and back parts when installing to the instruction manual provided with other stands may result in the right, left, upward, or downward direction. Operating Environment Operating environment temperature and humidity: ...
Owner's Manual
Page 20
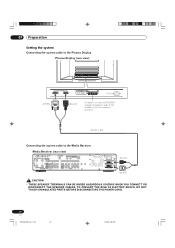
System cable Connecting the system cable to the speaker instruction manual provided. TO PREVENT THE RISK OF ELECTRIC SHOCK, DO NOT TOUCH UNINSULATED PARTS BEFORE DISCONNECTING THE POWER CORD. 20 En PDP5040HD-Eng (17-27) 20 7/..., 6:06 PM 07 Preparation Setting the system Connecting the system cable to the Plasma Display Plasma Display (rear view) (WHITE) (BLACK) For details on optional PIONEER speaker installation, refer to the Media Receiver Media Receiver (rear view) SERVICE ONLY IN OUT CONTROL VCR CONTROL IN OUT IN OUT S-VIDEO DIGITAL OUT...
System cable Connecting the system cable to the speaker instruction manual provided. TO PREVENT THE RISK OF ELECTRIC SHOCK, DO NOT TOUCH UNINSULATED PARTS BEFORE DISCONNECTING THE POWER CORD. 20 En PDP5040HD-Eng (17-27) 20 7/..., 6:06 PM 07 Preparation Setting the system Connecting the system cable to the Plasma Display Plasma Display (rear view) (WHITE) (BLACK) For details on optional PIONEER speaker installation, refer to the Media Receiver Media Receiver (rear view) SERVICE ONLY IN OUT CONTROL VCR CONTROL IN OUT IN OUT S-VIDEO DIGITAL OUT...

Owner's Manual
Page 28
... POWER ON indicators on the Plasma Display and Media Receiver light up green. Media Receiver STANDBY indicator POWER ON indicator POWER button • In this manual, "system" means the Plasma Display Panel and Media Receiver. • You can also reverse steps 1 and 2. 28 En PDP5040HD-Eng (28-37) 28 7/24/03...
... POWER ON indicators on the Plasma Display and Media Receiver light up green. Media Receiver STANDBY indicator POWER ON indicator POWER button • In this manual, "system" means the Plasma Display Panel and Media Receiver. • You can also reverse steps 1 and 2. 28 En PDP5040HD-Eng (28-37) 28 7/24/03...
Owner's Manual
Page 30
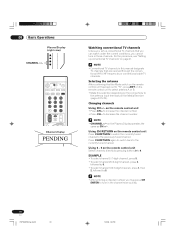
... channels in this selection depending on the connections to the antenna input terminals on the remote control unit to select antenna A or B. • Make this manual designate TV channels that you can watch under the current conditions, you may press CH ENTER to 9. on the remote control unit Press CH RETURN...
... channels in this selection depending on the connections to the antenna input terminals on the remote control unit to select antenna A or B. • Make this manual designate TV channels that you can watch under the current conditions, you may press CH ENTER to 9. on the remote control unit Press CH RETURN...

Owner's Manual
Page 32
... mono or stereo). You must reselect the STEREO mode if you press MTS, MTS toggles as shown below. In this case, sound is determined by manually switching to the MONO mode. • Once the MONO mode is selected, the Plasma Display System sound remains mono even if the system receives a stereo...
... mono or stereo). You must reselect the STEREO mode if you press MTS, MTS toggles as shown below. In this case, sound is determined by manually switching to the MONO mode. • Once the MONO mode is selected, the Plasma Display System sound remains mono even if the system receives a stereo...
Owner's Manual
Page 38
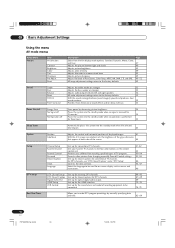
.... 53 Provides three-dimensional sound effects and/or deep, rich bass. 53 Power Control Energy Save No Signal off No Operation off Saves power by manually specifying date and time. 62-64 38 En PDP5040HD-Eng (38-39) 38 7/24/03, 1:58 PM Adjusts picture sharpness. Sets up for on the...
.... 53 Provides three-dimensional sound effects and/or deep, rich bass. 53 Power Control Energy Save No Signal off No Operation off Saves power by manually specifying date and time. 62-64 38 En PDP5040HD-Eng (38-39) 38 7/24/03, 1:58 PM Adjusts picture sharpness. Sets up for on the...
Owner's Manual
Page 39
... mode when no signal is received from the two display mode options; Adjusts picture brightness. Adjusts green color intensity. All image adjustment settings return to manually adjust image positions and clock. 82 PDP5040HD-Eng (38-39) 39 39 En 7/24/03, 1:59 PM Page 47 49 49 49 49 49 49... Management Automatically places the system into the standby mode when the selected time elapses. 85 Option Auto Setup Automatically optimizes image positions and clock. 81 Manual Setup Allows you to the factory defaults. Standard and User.
... mode when no signal is received from the two display mode options; Adjusts picture brightness. Adjusts green color intensity. All image adjustment settings return to manually adjust image positions and clock. 82 PDP5040HD-Eng (38-39) 39 39 En 7/24/03, 1:59 PM Page 47 49 49 49 49 49 49... Management Automatically places the system into the standby mode when the selected time elapses. 85 Option Auto Setup Automatically optimizes image positions and clock. 81 Manual Setup Allows you to the factory defaults. Standard and User.

Owner's Manual
Page 41
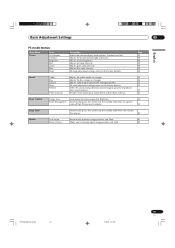
.../ UHF frequencies or conventional cable TV channels. Basic Adjustment Settings 09 English Setting up conventional TV channels This section describes how to manually add Cable Converter output channels. Using Auto Channel Preset Auto Channel Preset automatically searches and sets up conventional TV channels. 1 Press HOME...tune in those channels. 7 Press / to select "Preset:Start", and then press ENTER. • Conventional TV channels in this manual designate TV channels that you may need to search and set up conventional TV channels using the Cable Converter, you can watch under...
.../ UHF frequencies or conventional cable TV channels. Basic Adjustment Settings 09 English Setting up conventional TV channels This section describes how to manually add Cable Converter output channels. Using Auto Channel Preset Auto Channel Preset automatically searches and sets up conventional TV channels. 1 Press HOME...tune in those channels. 7 Press / to select "Preset:Start", and then press ENTER. • Conventional TV channels in this manual designate TV channels that you may need to search and set up conventional TV channels using the Cable Converter, you can watch under...

Owner's Manual
Page 42
...; To restore skipped channels, use the above procedure except that you select "Add" in step 7. • When using Auto Channel Preset, you may need to manually add Cable Converter output channels. 6 Press / to select "Channel", and then press / to select a channel to be skipped. 42 En PDP5040HD-Eng (40-55) 42...
...; To restore skipped channels, use the above procedure except that you select "Add" in step 7. • When using Auto Channel Preset, you may need to manually add Cable Converter output channels. 6 Press / to select "Channel", and then press / to select a channel to be skipped. 42 En PDP5040HD-Eng (40-55) 42...

Owner's Manual
Page 46
...the following procedure to set automatically. With "Auto" selected for Clock Setting, time information is then acquired and set the time correctly. With "Manual" selected, you then need to manually set the correct time again. 1 Press HOME MENU. 2 Press / to select "Setup", and then press ENTER. 3 Press / to... select "Clock", and then press ENTER. 4 Press / to select "Clock Setting", and then press / to select "Auto" or "Manual". 5 Press HOME MENU to exit the menu. • If you disconnect the power cord from the power outlet or power blackout occurs after setting the...
...the following procedure to set automatically. With "Auto" selected for Clock Setting, time information is then acquired and set the time correctly. With "Manual" selected, you then need to manually set the correct time again. 1 Press HOME MENU. 2 Press / to select "Setup", and then press ENTER. 3 Press / to... select "Clock", and then press ENTER. 4 Press / to select "Clock Setting", and then press / to select "Auto" or "Manual". 5 Press HOME MENU to exit the menu. • If you disconnect the power cord from the power outlet or power blackout occurs after setting the...

Owner's Manual
Page 48
... Description For a highly defined image in a normally bright room DYNAMIC For a very sharp image with the maximum (factory default) contrast This mode does not allow manual image quality adjustment.
... Description For a highly defined image in a normally bright room DYNAMIC For a very sharp image with the maximum (factory default) contrast This mode does not allow manual image quality adjustment.

Owner's Manual
Page 62
... program is accepted, and "Rec OK" appears when presetting for auto channel select. Select a D-VHS recorder when presetting it for DTV Only) Setting the timer manually Using the menu, you switch off the power. 62 En PDP5040HD-Eng (56-64) 62 7/24/03, 2:00 PM Be careful not to exit the...
... program is accepted, and "Rec OK" appears when presetting for auto channel select. Select a D-VHS recorder when presetting it for DTV Only) Setting the timer manually Using the menu, you switch off the power. 62 En PDP5040HD-Eng (56-64) 62 7/24/03, 2:00 PM Be careful not to exit the...
Owner's Manual
Page 65
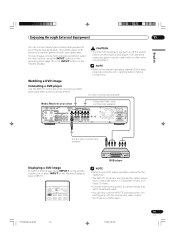
... player Use the INPUT 1 terminals when connecting a DVD player and other external equipment. • Refer to the relevant operation manual (DVD player, personal computer, etc.) carefully before connecting to your DVD player operation manual for the signal type. • The INPUT 1 terminals are checked for cable connections in the order where; 1) Component...
... player Use the INPUT 1 terminals when connecting a DVD player and other external equipment. • Refer to the relevant operation manual (DVD player, personal computer, etc.) carefully before connecting to your DVD player operation manual for the signal type. • The INPUT 1 terminals are checked for cable connections in the order where; 1) Component...
Owner's Manual
Page 69
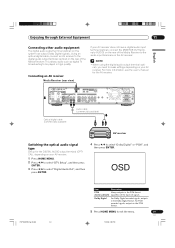
... Receiver. This allows audio such as digital TV broadcasting to exit the menu. 69 En 7/24/03, 2:00 PM For more information, see the user's manual for the DIGITAL AUDIO output terminal (OPTICAL), depending on your AV receiver. 1 Press HOME MENU. 2 Press / to select "DTV Setup", and then press ENTER. 3 Press...
... Receiver. This allows audio such as digital TV broadcasting to exit the menu. 69 En 7/24/03, 2:00 PM For more information, see the user's manual for the DIGITAL AUDIO output terminal (OPTICAL), depending on your AV receiver. 1 Press HOME MENU. 2 Press / to select "DTV Setup", and then press ENTER. 3 Press...

Owner's Manual
Page 72
.... • Some D-VHS recorders connected though i.LINK may not allow this system to be copied from that does not support the DTCP. Check the user's manual for data relay in image and sound interruption. • Some D-VHS recorders that presents data coding and device authentification. • i.LINK may not allow video...
.... • Some D-VHS recorders connected though i.LINK may not allow this system to be copied from that does not support the DTCP. Check the user's manual for data relay in image and sound interruption. • Some D-VHS recorders that presents data coding and device authentification. • i.LINK may not allow video...

Owner's Manual
Page 80
For more information, see the user's manual for the PIONEER AV receiver supporting SR+. • While in connection through External Equipment Connecting control cords Connect control codes between the Media Receiver and other PIONEER equipment having the t logo. Face the remote control units to the remote control sensor on the Media ...IN OUT 80 En PDP5040HD-Eng (65-80) 80 CONTROL IN OUT The control cables (commercially available) are mono sound cables with a PIONEER AV receiver. You can then operate the connected equipment by sending commands from the remote control units.
For more information, see the user's manual for the PIONEER AV receiver supporting SR+. • While in connection through External Equipment Connecting control cords Connect control codes between the Media Receiver and other PIONEER equipment having the t logo. Face the remote control units to the remote control sensor on the Media ...IN OUT 80 En PDP5040HD-Eng (65-80) 80 CONTROL IN OUT The control cables (commercially available) are mono sound cables with a PIONEER AV receiver. You can then operate the connected equipment by sending commands from the remote control units.

Owner's Manual
Page 82
...optimize the positions and clock of images when necessary. 1 Press HOME MENU. 2 Press / to select "Option", and then press ENTER. 3 Press / to select "Manual Setup", and then press ENTER. 4 Press / to select the item to be adjusted, and then press ENTER. 5 Press / (and / ) to perform adjustment. ... / only when you can easily adjust the positions and clock of images using Auto Setup. 12 Useful Adjustment Settings Adjusting image positions and clock manually (PC mode only) Usually you adjust the vertical position after selecting "H/V Position Adjust". 6 Press HOME MENU to exit the menu. •...
...optimize the positions and clock of images when necessary. 1 Press HOME MENU. 2 Press / to select "Option", and then press ENTER. 3 Press / to select "Manual Setup", and then press ENTER. 4 Press / to select the item to be adjusted, and then press ENTER. 5 Press / (and / ) to perform adjustment. ... / only when you can easily adjust the positions and clock of images using Auto Setup. 12 Useful Adjustment Settings Adjusting image positions and clock manually (PC mode only) Usually you adjust the vertical position after selecting "H/V Position Adjust". 6 Press HOME MENU to exit the menu. •...


