Owner's Manual
Page 4
...34 Changing the Screen Size 35 Viewing the Input Source 35 Setting for the language of on-screen display 35 Setting for buying this Pioneer product. In some countries or regions, the shape of the power plug and power outlet may sometimes differ from Falling Over 14 ... digital TV 36 Screen Saver 36 Setting the Full White mode 36 Power Control 37 Switching the Plasma Display Off Automatically ...... 37 Setting the Plasma Display On Time 37 Setting the Plasma Display Off Time 37 10 Enjoying through these operating instructions so you have finished reading the instructions,...
...34 Changing the Screen Size 35 Viewing the Input Source 35 Setting for the language of on-screen display 35 Setting for buying this Pioneer product. In some countries or regions, the shape of the power plug and power outlet may sometimes differ from Falling Over 14 ... digital TV 36 Screen Saver 36 Setting the Full White mode 36 Power Control 37 Switching the Plasma Display Off Automatically ...... 37 Setting the Plasma Display On Time 37 Setting the Plasma Display Off Time 37 10 Enjoying through these operating instructions so you have finished reading the instructions,...
Owner's Manual
Page 5
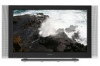
... static images for accidents or malfunction caused by side should be displayed for a prolonged period of the Pioneer PDP-42A3HD/PDP-4214HD Plasma Display System will not be held responsible for many factors: inappropriate installation site, improper assembly/installation/mounting,...picture freeze-framed or paused continuously over 3 times longer than the PIONEER installation bracket may cause the internal temperature to come, please carefully read this Pioneer PureVision PDP-42A3HD/PDP-4214HD Plasma Display System, please first read and follow the usage guidelines below ...
... static images for accidents or malfunction caused by side should be displayed for a prolonged period of the Pioneer PDP-42A3HD/PDP-4214HD Plasma Display System will not be held responsible for many factors: inappropriate installation site, improper assembly/installation/mounting,...picture freeze-framed or paused continuously over 3 times longer than the PIONEER installation bracket may cause the internal temperature to come, please carefully read this Pioneer PureVision PDP-42A3HD/PDP-4214HD Plasma Display System, please first read and follow the usage guidelines below ...
Owner's Manual
Page 6
...rubber or vinyl products for example. Condensation • Condensation may enter into the product, resulting in malfunction. Information of pixel defect Plasma Display systems display images consisting of hundreds of thousands of minute pixels (light emitting cells), and there is composed of extremely fine ... a wet cloth, water droplets on the surface may take place on and run the product occasionally. 01 Important User Guidance Information PIONEER bears no responsibility for any damages arising from incorrect use of the product by you or other people, malfunctions when in use, ...
...rubber or vinyl products for example. Condensation • Condensation may enter into the product, resulting in malfunction. Information of pixel defect Plasma Display systems display images consisting of hundreds of thousands of minute pixels (light emitting cells), and there is composed of extremely fine ... a wet cloth, water droplets on the surface may take place on and run the product occasionally. 01 Important User Guidance Information PIONEER bears no responsibility for any damages arising from incorrect use of the product by you or other people, malfunctions when in use, ...
Owner's Manual
Page 7
.... 2. If the same image is displayed continuously for several hours, or for shorter periods of time over several days, a permanent after -images remaining on the Plasma Display continuously over a long period of the still images and the time they will disappear when moving images are displayed more than 1 minute, after -image...
.... 2. If the same image is displayed continuously for several hours, or for shorter periods of time over several days, a permanent after -images remaining on the Plasma Display continuously over a long period of the still images and the time they will disappear when moving images are displayed more than 1 minute, after -image...
Owner's Manual
Page 8
... your product, please read and understood before cleaning the product. Safety checks-Upon completion of time. Do not expose the Plasma Display to the product. Removing covers can result in the instructions must be broken, resulting in the product, and inserting ...can cause the product to high voltage and other soft clothes (e.g., cotton, flannel). Any noticeable abnormality in a safe place for the PDP-42A3HD/PDP-4214HD. Request a qualified service person to follow the manufacturer's instructions. When mounting the product on the product or when objects have ...
... your product, please read and understood before cleaning the product. Safety checks-Upon completion of time. Do not expose the Plasma Display to the product. Removing covers can result in the instructions must be broken, resulting in the product, and inserting ...can cause the product to high voltage and other soft clothes (e.g., cotton, flannel). Any noticeable abnormality in a safe place for the PDP-42A3HD/PDP-4214HD. Request a qualified service person to follow the manufacturer's instructions. When mounting the product on the product or when objects have ...
Owner's Manual
Page 9
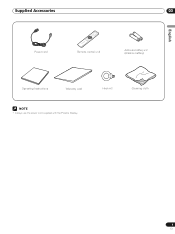
Supplied Accessories 03 English Power cord Remote control unit AAA size battery × 2 (Alkaline battery) Operating Instructions Warranty card Hook × 2 Cleaning cloth • Always use the power cord supplied with the Plasma Display. 9 En
Supplied Accessories 03 English Power cord Remote control unit AAA size battery × 2 (Alkaline battery) Operating Instructions Warranty card Hook × 2 Cleaning cloth • Always use the power cord supplied with the Plasma Display. 9 En

Owner's Manual
Page 10
04 Part Names Plasma Display Front view S TA N D B Y DTV TV VCR DVD HDMI POWER S TA N D B Y DTV TV VCR DVD HDMI STANDBY /ON 2 3 4 POWER STANDBY /ON 1 1 POWER button 2 STANDBY indicator 3 Current input source indicators 4 Remote control sensor 5 INPUT button 56 7 8 9 10 6 OK button 7 MENU button 8 VOLUME -/+ buttons 9 CHANNEL -/+ buttons 10 STANDBY/ON button 10 En
04 Part Names Plasma Display Front view S TA N D B Y DTV TV VCR DVD HDMI POWER S TA N D B Y DTV TV VCR DVD HDMI STANDBY /ON 2 3 4 POWER STANDBY /ON 1 1 POWER button 2 STANDBY indicator 3 Current input source indicators 4 Remote control sensor 5 INPUT button 56 7 8 9 10 6 OK button 7 MENU button 8 VOLUME -/+ buttons 9 CHANNEL -/+ buttons 10 STANDBY/ON button 10 En
Owner's Manual
Page 13
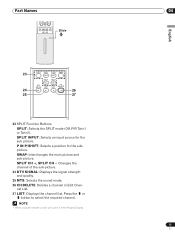
... SPLIT CH+ MTS SPLIT CH- Press the c or d button to select the required channel. • When using the remote control unit, point it at the Plasma Display. 13 En SPLIT INPUT: Selects an input source for the subpicture. Part Names CH MUTING VOL SPLIT SPLIT INPUT P IN P SHIFT SWAP DTV SIGNAL...
... SPLIT CH+ MTS SPLIT CH- Press the c or d button to select the required channel. • When using the remote control unit, point it at the Plasma Display. 13 En SPLIT INPUT: Selects an input source for the subpicture. Part Names CH MUTING VOL SPLIT SPLIT INPUT P IN P SHIFT SWAP DTV SIGNAL...

Owner's Manual
Page 14
Using a wall for both the left and right sides. • Use ropes, chains and fittings that are available on the top of the Plasma Display it will not receive enough ventilation and will not operate properly. 1 Hook 2 Cord or chain 3 Fitting • Allow enough space around... from falling or overturning in the same way for stabilization 1 Attach the supplied falling prevention bolts (hooks) to the Plasma Display. 2 Use storing cords or chains to stabilize the Plasma Display appropriately and firmly to a wall, pillar, or other study element. • Perform this work in case of ...
Using a wall for both the left and right sides. • Use ropes, chains and fittings that are available on the top of the Plasma Display it will not receive enough ventilation and will not operate properly. 1 Hook 2 Cord or chain 3 Fitting • Allow enough space around... from falling or overturning in the same way for stabilization 1 Attach the supplied falling prevention bolts (hooks) to the Plasma Display. 2 Use storing cords or chains to stabilize the Plasma Display appropriately and firmly to a wall, pillar, or other study element. • Perform this work in case of ...

Owner's Manual
Page 15
... a shorter life expectancy due to the sensor must correspond with new ones. • Do not use alkaline ones. • Do not mix batteries of the Plasma Display. The distance from it toward the remote control sensor located at the bottom center of the front panel of different types. Preparation 05 English...
... a shorter life expectancy due to the sensor must correspond with new ones. • Do not use alkaline ones. • Do not mix batteries of the Plasma Display. The distance from it toward the remote control sensor located at the bottom center of the front panel of different types. Preparation 05 English...
Owner's Manual
Page 16
...on the installation environment, infrared rays from the remote control sensor. Replace the batteries with two terminals for the best outcome of the Plasma Display is the case, place that equipment may not function. • As the batteries become empty, the remote control unit can ...function within a shorter distance from the Plasma Display may not allow this is under direct sunlight; The ANTENNA/CABLE IN terminal accepts conventional TV broadcasting signals. DTVANTENNA IN Connecting the...
...on the installation environment, infrared rays from the remote control sensor. Replace the batteries with two terminals for the best outcome of the Plasma Display is the case, place that equipment may not function. • As the batteries become empty, the remote control unit can ...function within a shorter distance from the Plasma Display may not allow this is under direct sunlight; The ANTENNA/CABLE IN terminal accepts conventional TV broadcasting signals. DTVANTENNA IN Connecting the...

Owner's Manual
Page 17
Preparation 05 Connecting the power cord Connect the power cord after all component connections are completed. Plasma Display (rear view) English DTVANTENNA IN ANTENNA / CABLE IN VIDEO 2 L-AUDIO-R L R VIDEO AUDIO MONITOR OUT...long period of time. 17 En neglecting this can result in fire or electric shock. • For the Plasma Display, a three-core power cord with a ground terminal is not going to use the specified power supply ...• Always turn off the power of the Plasma Display when connecting the power cord. • Disconnect the power cord from the power outlet when ...
Preparation 05 Connecting the power cord Connect the power cord after all component connections are completed. Plasma Display (rear view) English DTVANTENNA IN ANTENNA / CABLE IN VIDEO 2 L-AUDIO-R L R VIDEO AUDIO MONITOR OUT...long period of time. 17 En neglecting this can result in fire or electric shock. • For the Plasma Display, a three-core power cord with a ground terminal is not going to use the specified power supply ...• Always turn off the power of the Plasma Display when connecting the power cord. • Disconnect the power cord from the power outlet when ...

Owner's Manual
Page 18
... VCR DVD HDMI Current input source indicator 18 En The STANDBY indicator lights off and the current input source indicator lights up. 3 To switch the Plasma Display off, press the TV button on the remote control or the STANDBY/ ON button on the bottom of the...; The STANDBY indicator lights up. 2 Press the TV button on the remote control or the STANDBY/ ON button on the bottom of the Plasma Display. • The Plasma Display switches to on automatically by the "On Timer" setting. 06 Basic Operations Turning the power on and off completely, it cannot switch the...
... VCR DVD HDMI Current input source indicator 18 En The STANDBY indicator lights off and the current input source indicator lights up. 3 To switch the Plasma Display off, press the TV button on the remote control or the STANDBY/ ON button on the bottom of the...; The STANDBY indicator lights up. 2 Press the TV button on the remote control or the STANDBY/ ON button on the bottom of the Plasma Display. • The Plasma Display switches to on automatically by the "On Timer" setting. 06 Basic Operations Turning the power on and off completely, it cannot switch the...

Owner's Manual
Page 19
... you select channels quickly. • To return to 9. TV INPUT HD WIDE AV SELECTION SOUND EFFECT SCREEN SIZE 123 456 789 0 CH ENTER C.C. on the Plasma Display has the same function as necessary when in those channels. Those messages are broadcast by TV stations as CH +/- To decrease the channel number...
... you select channels quickly. • To return to 9. TV INPUT HD WIDE AV SELECTION SOUND EFFECT SCREEN SIZE 123 456 789 0 CH ENTER C.C. on the Plasma Display has the same function as necessary when in those channels. Those messages are broadcast by TV stations as CH +/- To decrease the channel number...
Owner's Manual
Page 20
...on the remote control unit. • To mute the sound output, press the MUTING button. buttons on the remote control unit. " " appears on the Plasma Display operates the same as the VOL +/- button. • The VOLUME +/- To quit muting, press the MUTING button again. To decrease the volume, ...Sports 8 : 30 am For SPLIT (digital reception) DTV 11-2 NBC Sports VIDEO 1 8 : 30 am Press the DISPLAY button. For analog TV 3 C9 Mono Plasma Display (bottom view) 8 : 30 am For SPLIT STANDBY /ON TV 3 C9 Mono DTV 112 VOLUME -/+ buttons CH MUTING VOL 8 : 30 am For external ...
...on the remote control unit. • To mute the sound output, press the MUTING button. buttons on the remote control unit. " " appears on the Plasma Display operates the same as the VOL +/- button. • The VOLUME +/- To quit muting, press the MUTING button again. To decrease the volume, ...Sports 8 : 30 am For SPLIT (digital reception) DTV 11-2 NBC Sports VIDEO 1 8 : 30 am Press the DISPLAY button. For analog TV 3 C9 Mono Plasma Display (bottom view) 8 : 30 am For SPLIT STANDBY /ON TV 3 C9 Mono DTV 112 VOLUME -/+ buttons CH MUTING VOL 8 : 30 am For external ...

Owner's Manual
Page 21
... you press the MTS button, MTS toggles as shown below to obtain clearer sound. • Once the MONO mode is selected, the Plasma Display sound remains mono even if the Plasma Display receives a stereo broadcast. LIST CH DELETE Each time you press the MTS button, the language switches. • Switchable languages differ...
... you press the MTS button, MTS toggles as shown below to obtain clearer sound. • Once the MONO mode is selected, the Plasma Display sound remains mono even if the Plasma Display receives a stereo broadcast. LIST CH DELETE Each time you press the MTS button, the language switches. • Switchable languages differ...

Owner's Manual
Page 26
... 2 To tune to a specific channel in some jurisdictions). When an attempt is displayed. All ages admitted. X A rating that has now been superseded by parents, the Plasma Display shows nothing but a message. View Not rated. • The voluntary movie rating system only uses an age-based rating. Content TV Rating-General Dialog...
... 2 To tune to a specific channel in some jurisdictions). When an attempt is displayed. All ages admitted. X A rating that has now been superseded by parents, the Plasma Display shows nothing but a message. View Not rated. • The voluntary movie rating system only uses an age-based rating. Content TV Rating-General Dialog...
Owner's Manual
Page 28
...17 X View Adjust Return • The factory default is "View". 9 Press the EXIT button. • The default password for a new Plasma Display is 0000. Fantasy Violence TV Rating-General: Age - Sex Violence 10 Press the c or d button to select the required rating, then..., but may see on the Canadian Radio-Television and Telecommunications Commission (CRTC) policy. Canadian English ratings Rating Description C Children: Intended for a new Plasma Display is displayed again. 7 Press the c or d button to move to Parental Control, then press the \ or OK button. PG - ...
...17 X View Adjust Return • The factory default is "View". 9 Press the EXIT button. • The default password for a new Plasma Display is 0000. Fantasy Violence TV Rating-General: Age - Sex Violence 10 Press the c or d button to select the required rating, then..., but may see on the Canadian Radio-Television and Telecommunications Commission (CRTC) policy. Canadian English ratings Rating Description C Children: Intended for a new Plasma Display is displayed again. 7 Press the c or d button to move to Parental Control, then press the \ or OK button. PG - ...
Owner's Manual
Page 29
...Change Password and press the \ or OK button to change depending on the remote control. 29 En These captions are usually subtitles for a new Plasma Display is "CC1". 6 To set up Closed Captions for digital channels, select DTV CC using the c or d buttons, then press the ...Press the EXIT button. • The default password for the hearing impaired or in other languages. Text2 - Viewing Closed Caption Information Your Plasma Display decodes and displays closed captions information that is displayed. 4 Enter your password by a wide public audience, but could contain scenes disturbing...
...Change Password and press the \ or OK button to change depending on the remote control. 29 En These captions are usually subtitles for a new Plasma Display is "CC1". 6 To set up Closed Captions for digital channels, select DTV CC using the c or d buttons, then press the ...Press the EXIT button. • The default password for the hearing impaired or in other languages. Text2 - Viewing Closed Caption Information Your Plasma Display decodes and displays closed captions information that is displayed. 4 Enter your password by a wide public audience, but could contain scenes disturbing...
Owner's Manual
Page 31
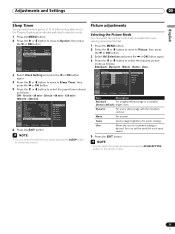
... the a or OK button. Movie - Adjustments and Settings 09 English Sleep Timer You can select a time period of 10 to 240 minutes after which the Plasma Display automatically switches to standby mode. 1 Press the MENU button. 2 Press the c or d button to move to customize setting as desired. Game -
... the a or OK button. Movie - Adjustments and Settings 09 English Sleep Timer You can select a time period of 10 to 240 minutes after which the Plasma Display automatically switches to standby mode. 1 Press the MENU button. 2 Press the c or d button to move to customize setting as desired. Game -


