
Owner's Manual
Page 3
... avoid fire hazard, the power cord should also be performed when the indicator is no guarantee that to correct the interference by turning the equipment off and on, the user is in accordance with the instructions, may not cause harmful interference, and (2) this ...This device complies with part 15 of the FCC Rules. Product Name: Plasma Display System Model Number: PDP-5080HD/PDP-4280HD Product Category: Class B Personal Computers & Peripherals Responsible Party Name: PIONEER ELECTRONICS SERVICE, INC. THIS IS FOR YOUR SECURITY. Therefore, make sure the unit has been installed...
... avoid fire hazard, the power cord should also be performed when the indicator is no guarantee that to correct the interference by turning the equipment off and on, the user is in accordance with the instructions, may not cause harmful interference, and (2) this ...This device complies with part 15 of the FCC Rules. Product Name: Plasma Display System Model Number: PDP-5080HD/PDP-4280HD Product Category: Class B Personal Computers & Peripherals Responsible Party Name: PIONEER ELECTRONICS SERVICE, INC. THIS IS FOR YOUR SECURITY. Therefore, make sure the unit has been installed...

Owner's Manual
Page 4
... cord 25 Preparing the remote control unit 26 Allowed operation range of the remote control unit 26 06 Basic Operations 27 Turning on the power 27 Turning off the power 27 Watching TV channels 28 Selecting the antenna 28 Changing channels 28 Changing the volume and sound .........29... 13 Plasma display 13 Remote control unit 15 05 Preparation 16 Installing the plasma display 16 Moving the plasma display 16 Installing the Pioneer speaker (PDP-5080HD 16 When using the hung on wall unit: .....20 Preventing the plasma display from that shown in the explanatory drawings. Contents...
... cord 25 Preparing the remote control unit 26 Allowed operation range of the remote control unit 26 06 Basic Operations 27 Turning on the power 27 Turning off the power 27 Watching TV channels 28 Selecting the antenna 28 Changing channels 28 Changing the volume and sound .........29... 13 Plasma display 13 Remote control unit 15 05 Preparation 16 Installing the plasma display 16 Moving the plasma display 16 Installing the Pioneer speaker (PDP-5080HD 16 When using the hung on wall unit: .....20 Preventing the plasma display from that shown in the explanatory drawings. Contents...

Owner's Manual
Page 9
... may happen, for public viewing may temporarily shrink or enlarge until the scaling is displayed on the screen (for 5 to 10 minutes, the system automatically turns the image off to prevent damage from screen burning • Set the Side Mask detection function to burning of time by different things, image retention...
... may happen, for public viewing may temporarily shrink or enlarge until the scaling is displayed on the screen (for 5 to 10 minutes, the system automatically turns the image off to prevent damage from screen burning • Set the Side Mask detection function to burning of time by different things, image retention...

Owner's Manual
Page 15
... 5 20 6 21 7 22 8 23 9 10 24 11 12 13 25 26 14 27 28 15 29 16 30 17 Mode switch (with "TV" selected) 1 TV a: Turns on the program being watched. While watching, you can toggle the set the FAVORITE CH. Note • When using the remote control unit, point it...
... 5 20 6 21 7 22 8 23 9 10 24 11 12 13 25 26 14 27 28 15 29 16 30 17 Mode switch (with "TV" selected) 1 TV a: Turns on the program being watched. While watching, you can toggle the set the FAVORITE CH. Note • When using the remote control unit, point it...

Owner's Manual
Page 16
...volume. • Please handle the speaker with anything other than the plasma display. 05 Preparation Chapter 5 Preparation Installing the plasma display (PDP-4280HD) Over 50 cm (19 11/16 inches) Over 10 cm (3 15/16 inches) Caution When installing on to the mounting fittings.... the screws firmly. 16 En Installing the Pioneer speaker (PDP-5080HD) Location • Avoid direct sunlight. Maintain adequate ventilation. Therefore, at least two people must assemble and install it . (PDP-5080HD) Caution • If you want to turn the connected devices off from the speaker. Doing...
...volume. • Please handle the speaker with anything other than the plasma display. 05 Preparation Chapter 5 Preparation Installing the plasma display (PDP-4280HD) Over 50 cm (19 11/16 inches) Over 10 cm (3 15/16 inches) Caution When installing on to the mounting fittings.... the screws firmly. 16 En Installing the Pioneer speaker (PDP-5080HD) Location • Avoid direct sunlight. Maintain adequate ventilation. Therefore, at least two people must assemble and install it . (PDP-5080HD) Caution • If you want to turn the connected devices off from the speaker. Doing...

Owner's Manual
Page 19
... any pressure. Rear view Bead band Speaker cable 19 En Please insert it clamps onto the speaker cable.· Caution Lever • Be sure to turn the connected devices off and remove the power cord from the wall outlet beforehand when changing the connection or installation method. • If you may...
... any pressure. Rear view Bead band Speaker cable 19 En Please insert it clamps onto the speaker cable.· Caution Lever • Be sure to turn the connected devices off and remove the power cord from the wall outlet beforehand when changing the connection or installation method. • If you may...

Owner's Manual
Page 25
... and become damaged if removed. 2 1 for PDP-4280HD Note 4 5 • Use the supplied bead bands and speed clamps as necessary. • When tidying up your routing system. Always connect the power cord to any pressure. Note • Always turn off the power of the plasma display when connecting... power supply voltage; Caution • Use only the supplied power cord. • Be sure to twist the clamp 90º, pulling outward. for PDP-5080HD 4 5 Attaching and removing speed clamps Insert [1] into an appropriate hole on the rear of the plasma display and snap [2] into the back...
... and become damaged if removed. 2 1 for PDP-4280HD Note 4 5 • Use the supplied bead bands and speed clamps as necessary. • When tidying up your routing system. Always connect the power cord to any pressure. Note • Always turn off the power of the plasma display when connecting... power supply voltage; Caution • Use only the supplied power cord. • Be sure to twist the clamp 90º, pulling outward. for PDP-5080HD 4 5 Attaching and removing speed clamps Insert [1] into an appropriate hole on the rear of the plasma display and snap [2] into the back...

Owner's Manual
Page 27
... remove the power cord from below shows the operational status of the plasma display has been disconnected. Basic Operations 06 English Chapter 6 Basic Operations Turning on the power • Press a on the plasma display when the POWER ON and STANDBY indicators are off. • The POWER ON ... display. • The system enters the standby mode and the image on page 88. ON STANDBY POWER ON indicator STANDBY indicator (PDP-4280HD) POWER ON indicator STANDBY indicator ON STANDBY SLEEP Viewed from the power outlet. For other than the above, see Blue LED Dimmer on .
... remove the power cord from below shows the operational status of the plasma display has been disconnected. Basic Operations 06 English Chapter 6 Basic Operations Turning on the power • Press a on the plasma display when the POWER ON and STANDBY indicators are off. • The POWER ON ... display. • The system enters the standby mode and the image on page 88. ON STANDBY POWER ON indicator STANDBY indicator (PDP-4280HD) POWER ON indicator STANDBY indicator ON STANDBY SLEEP Viewed from the power outlet. For other than the above, see Blue LED Dimmer on .
Owner's Manual
Page 45
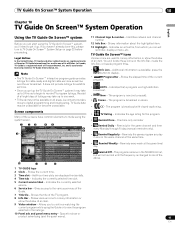
...; system it may take up to one of the above. 10 11 12 13 1 TV GUIDE logo 2 Clock - If you haven't already done this, please turn to display. • Progress Bar - and/or one week. • TV Guide may not be unavailable or become unavailable. In Canada, TV Guide is broadcast...
...; system it may take up to one of the above. 10 11 12 13 1 TV GUIDE logo 2 Clock - If you haven't already done this, please turn to display. • Progress Bar - and/or one week. • TV Guide may not be unavailable or become unavailable. In Canada, TV Guide is broadcast...

Owner's Manual
Page 69
... • When the connected equipment is used (a, b, and c): The control cables (commercially available) are mono sound cables with a Pioneer AV receiver. You can then operate the connected equipment by sending commands from the remote control units. After the CONTROL IN terminals have been...resistance). Plasma display 4 5 Rear view CONTROL IN OUT CONTROL IN OUT 12 a b English c CONTROL IN OUT When SR+ is turned off when making connections. • Complete all component connections before making control cord connections with one or more information, see the instruction manual...
... • When the connected equipment is used (a, b, and c): The control cables (commercially available) are mono sound cables with a Pioneer AV receiver. You can then operate the connected equipment by sending commands from the remote control units. After the CONTROL IN terminals have been...resistance). Plasma display 4 5 Rear view CONTROL IN OUT CONTROL IN OUT 12 a b English c CONTROL IN OUT When SR+ is turned off when making connections. • Complete all component connections before making control cord connections with one or more information, see the instruction manual...

Owner's Manual
Page 70
.... • JPEG 4:2:2 and 4:2:0 format • The image resolution must be damaged. • Do not turn the digital camera off . Note • For details on or off while the Home Gallery screen is switched on connectable devices, see Pioneer's website: http://www.pioneerelectronics.com • Be sure to the plasma display using a digital...
.... • JPEG 4:2:2 and 4:2:0 format • The image resolution must be damaged. • Do not turn the digital camera off . Note • For details on or off while the Home Gallery screen is switched on connectable devices, see Pioneer's website: http://www.pioneerelectronics.com • Be sure to the plasma display using a digital...

Owner's Manual
Page 74
For details, see the operation manual that can operate such Pioneer devices as a recorder, player or AV system support the HDMI Control functions using the remote control of the plasma display. For details, see the table ... unit of the plasma display (volume, surround mode and input selection of the HDMI terminal) Power On The plasma display can be turned Off when the plasma display is turned Off Recorder/ player/AV system • Press VOL +/- Note • Maximum number of devices that came with the recorder or player. Recorder...
For details, see the operation manual that can operate such Pioneer devices as a recorder, player or AV system support the HDMI Control functions using the remote control of the plasma display. For details, see the table ... unit of the plasma display (volume, surround mode and input selection of the HDMI terminal) Power On The plasma display can be turned Off when the plasma display is turned Off Recorder/ player/AV system • Press VOL +/- Note • Maximum number of devices that came with the recorder or player. Recorder...

Owner's Manual
Page 75
... order, or to switch the input source in order or in "Input Setting" for the "HDMI Control Setting", perform the following procedure: 1 Turn on the plasma display and all the connected devices. 2 Confirm that supports the HDMI Control functions or settings for "HDMI Control Setting" is properly... available) AV amp HDMI compliant cable (HDMI cable having the HDMI mark) BD player 75 En Pressing ENTER starts playback and HDMI CONTROL turns the control panel screen off to return to the HDMI Control menu and select the desired function again. Note • You cannot operate the...
... order, or to switch the input source in order or in "Input Setting" for the "HDMI Control Setting", perform the following procedure: 1 Turn on the plasma display and all the connected devices. 2 Confirm that supports the HDMI Control functions or settings for "HDMI Control Setting" is properly... available) AV amp HDMI compliant cable (HDMI cable having the HDMI mark) BD player 75 En Pressing ENTER starts playback and HDMI CONTROL turns the control panel screen off to return to the HDMI Control menu and select the desired function again. Note • You cannot operate the...

Owner's Manual
Page 77
... is pressed on the plasma display Switch to AV Sound (Switch to PDP Sound) Switches between the plasma display and the connected device. Selecting the...the external device(s) so that can select whether or not the plasma display is turned On when the connected Pioneer recorder or player is turned On and images are input to the plasma display. (factory default is valid...connected AV system to which sound is displayed. Note • To use the HDMI Control functions, a Pioneer recorder, player or AV system that supports the HDMI Control functions by selecting and using an HDMI terminal...
... is pressed on the plasma display Switch to AV Sound (Switch to PDP Sound) Switches between the plasma display and the connected device. Selecting the...the external device(s) so that can select whether or not the plasma display is turned On when the connected Pioneer recorder or player is turned On and images are input to the plasma display. (factory default is valid...connected AV system to which sound is displayed. Note • To use the HDMI Control functions, a Pioneer recorder, player or AV system that supports the HDMI Control functions by selecting and using an HDMI terminal...

Owner's Manual
Page 78
... indicator flashes for more than one second and the remote control unit returns to normal operation. The remote control unit returns to normal operation after turning the LED indicator on for one second for that device mode and sample functions from each code in order to find the code that the... device code for a particular target unit is "PIONEER". • You may not be found, press / to advance to the next code or return to control some equipment in any Mode switch position at...
... indicator flashes for more than one second and the remote control unit returns to normal operation. The remote control unit returns to normal operation after turning the LED indicator on for one second for that device mode and sample functions from each code in order to find the code that the... device code for a particular target unit is "PIONEER". • You may not be found, press / to advance to the next code or return to control some equipment in any Mode switch position at...

Owner's Manual
Page 84
to increase the volume and VOL - Adjusts the Pioneer receiver volume level. RECEIVER VOL +/- Press VOL + to decrease it. 1 2 3 Mode switch (buttons operate at any position) 84 En RECEIVER INPUT Selects the input source connected to 3. 1. RECEIVER (STANDBY/ON) Turns the Pioneer receiver power on and off. 2. 14 Useful Remote Control Features Using the remote control unit to control other devices Receiver control buttons When a Pioneer receiver is connected to the display, the receiver can be operated using buttons 1 to the Pioneer receiver. 3.
to increase the volume and VOL - Adjusts the Pioneer receiver volume level. RECEIVER VOL +/- Press VOL + to decrease it. 1 2 3 Mode switch (buttons operate at any position) 84 En RECEIVER INPUT Selects the input source connected to 3. 1. RECEIVER (STANDBY/ON) Turns the Pioneer receiver power on and off. 2. 14 Useful Remote Control Features Using the remote control unit to control other devices Receiver control buttons When a Pioneer receiver is connected to the display, the receiver can be operated using buttons 1 to the Pioneer receiver. 3.

Owner's Manual
Page 85
... watching immediately before. * Some cable converter manufacturers do not preset CH ENTER and CH RETURN. SAT MENU Displays the satellite broadcasting menu screen. 2. SOURCE Turns the equipment power on the SAT GUIDE screen or SAT MENU screen. 3. 0 to 9 Press a button (or buttons) that corresponds to watch. 4. ENTER, / / / ENTER: Activates the...
... watching immediately before. * Some cable converter manufacturers do not preset CH ENTER and CH RETURN. SAT MENU Displays the satellite broadcasting menu screen. 2. SOURCE Turns the equipment power on the SAT GUIDE screen or SAT MENU screen. 3. 0 to 9 Press a button (or buttons) that corresponds to watch. 4. ENTER, / / / ENTER: Activates the...

Owner's Manual
Page 86
... the remote control signals of the VCR on the VCR. 2. (PLAY) Selects playback. 3. (REW) Rewinds the tape and allows picture search. 4. SOURCE Turns the power of the devices have been preset.
... the remote control signals of the VCR on the VCR. 2. (PLAY) Selects playback. 3. (REW) Rewinds the tape and allows picture search. 4. SOURCE Turns the power of the devices have been preset.

Owner's Manual
Page 87
...PAUSE/STILL) Pauses playback and displays still pictures. 6. See page 78. 1. DVD MENU Displays the DVD menu. 7. Each time you press it , you to only Pioneer DVD recorders. CH +/- (DVD recorder only) Changes the channel of the tuner built into the DVD recorder. 2. (PLAY) Selects playback. 3. ... unit if the remote control signals of the next chapter. Pressing quickly once takes you move back to stop recording. SOURCE Turns the equipment power on the remote control unit function as the input terminal connected to a DVD player, DVD recorder or a BD player...
...PAUSE/STILL) Pauses playback and displays still pictures. 6. See page 78. 1. DVD MENU Displays the DVD menu. 7. Each time you press it , you to only Pioneer DVD recorders. CH +/- (DVD recorder only) Changes the channel of the tuner built into the DVD recorder. 2. (PLAY) Selects playback. 3. ... unit if the remote control signals of the next chapter. Pressing quickly once takes you move back to stop recording. SOURCE Turns the equipment power on the remote control unit function as the input terminal connected to a DVD player, DVD recorder or a BD player...

Owner's Manual
Page 88
.../SOUND • No image and audio is presented. • Check if the input source for PDP-5080HD only). (See page 19.) • Sound is output from the power outlet, and then turn the power off by removing the AC power cord from only a single • Has the balance...58.) • Images are presented but no image is deactivated; With this , contact the nearest Pioneer Authorized Independent Service Company, or the Customer Support Division (see back cover). only audio is suddenly turned off. • Is the sleep timer set correctly? Clean the vents, or remove any button other...
.../SOUND • No image and audio is presented. • Check if the input source for PDP-5080HD only). (See page 19.) • Sound is output from the power outlet, and then turn the power off by removing the AC power cord from only a single • Has the balance...58.) • Images are presented but no image is deactivated; With this , contact the nearest Pioneer Authorized Independent Service Company, or the Customer Support Division (see back cover). only audio is suddenly turned off. • Is the sleep timer set correctly? Clean the vents, or remove any button other...


