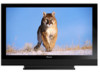

Owner's Manual
Page 4
...Precautions 11 03 Supplied Accessories 12 04 Part Names 13 Plasma display 13 Remote control unit 15 05 Preparation 16 Installing the plasma display 16 Moving the plasma display 16 Installing the Pioneer speaker (PDP-5080HD 16 When using the hung on the power 27 Turning off the... display from that shown in the explanatory drawings. After you have finished reading the instructions, put them away in this Pioneer product. Contents Thank you for buying this manual are for the PDP-5080HD unless otherwise specified. Illustrations shown in a safe place for future reference.
...Precautions 11 03 Supplied Accessories 12 04 Part Names 13 Plasma display 13 Remote control unit 15 05 Preparation 16 Installing the plasma display 16 Moving the plasma display 16 Installing the Pioneer speaker (PDP-5080HD 16 When using the hung on the power 27 Turning off the... display from that shown in the explanatory drawings. After you have finished reading the instructions, put them away in this Pioneer product. Contents Thank you for buying this manual are for the PDP-5080HD unless otherwise specified. Illustrations shown in a safe place for future reference.

Owner's Manual
Page 6
... Using the HDMI Control functions ...........74 Making the HDMI Control connections 75 Setting the HDMI Control 76 Using the HDMI Control menus 77 14 Useful Remote Control Features ........ 78 Presetting manufacturer codes to control other devices 78 Presetting manufacturer codes ...........78 Library Search 78 Manufacturing Reset 78 Programming codes 79 Using...
... Using the HDMI Control functions ...........74 Making the HDMI Control connections 75 Setting the HDMI Control 76 Using the HDMI Control menus 77 14 Useful Remote Control Features ........ 78 Presetting manufacturer codes to control other devices 78 Presetting manufacturer codes ...........78 Library Search 78 Manufacturing Reset 78 Programming codes 79 Using...

Owner's Manual
Page 8
.... The screen is dimmed when a still image is mostly composed of plastic. not a test card, still image or single color display) please contact Pioneer Customer Support Div. (USA) or Customer Satisfaction Dept. (CANADA). If, however, they can be permanently switched off, or on a winter morning, for...attached to hang the product when installing or carrying the product, for example. Depending on how the plasma display is in use, the remote controls of nearby equipment may be scratched. • The cabinet of this is because the protection function of the technology. Switch on ...
.... The screen is dimmed when a still image is mostly composed of plastic. not a test card, still image or single color display) please contact Pioneer Customer Support Div. (USA) or Customer Satisfaction Dept. (CANADA). If, however, they can be permanently switched off, or on a winter morning, for...attached to hang the product when installing or carrying the product, for example. Depending on how the plasma display is in use, the remote controls of nearby equipment may be scratched. • The cabinet of this is because the protection function of the technology. Switch on ...

Owner's Manual
Page 12
03 Supplied Accessories Chapter 3 Supplied Accessories Remote control unit AA size batteries × 2 (Alkaline battery for remote control unit) Speed clamps × 3 Bead bands × 3 Cleaning cloth Warranty card Operating instructions Screws (M4 x 10 mm) x 2 (for plastic bands) Plastic bands x 2 Power cord (2 m/6.6 feet) Speaker accessories (for PDP-5080HD only) Speaker cables × 2 Speaker Mounting Fittings Brackets for side × 2 Bracket for center Speaker mounting screws (M5 × 10 mm: Black) × 9 12 En
03 Supplied Accessories Chapter 3 Supplied Accessories Remote control unit AA size batteries × 2 (Alkaline battery for remote control unit) Speed clamps × 3 Bead bands × 3 Cleaning cloth Warranty card Operating instructions Screws (M4 x 10 mm) x 2 (for plastic bands) Plastic bands x 2 Power cord (2 m/6.6 feet) Speaker accessories (for PDP-5080HD only) Speaker cables × 2 Speaker Mounting Fittings Brackets for side × 2 Bracket for center Speaker mounting screws (M5 × 10 mm: Black) × 9 12 En

Owner's Manual
Page 13
Part Names Chapter 4 Part Names Plasma display (Front) Side 12 13 PDP-5080HD 14 15 16 04 English PDP-4280HD Side 7 8 9 10 11 2 3 ON STANDBY 1 SLEEP 2 ON STANDBY SLEEP 3 4 4 56 1 56 Viewed from below of the display Viewed from the front side of ...the display The terminals on side panels are common to the PDP-5080HD and PDP-4280HD. 1 a button (See page 27.) 2 POWER ON indicator (See page 27.) 3 STANDBY indicator (See page 27.) 4 SLEEP indicator 5 Room Light Sensor 6 Remote control sensor 7 STANDBY/ON button 8 INPUT button (ENTER button*) 9 VOLUME UP/DOWN ...
Part Names Chapter 4 Part Names Plasma display (Front) Side 12 13 PDP-5080HD 14 15 16 04 English PDP-4280HD Side 7 8 9 10 11 2 3 ON STANDBY 1 SLEEP 2 ON STANDBY SLEEP 3 4 4 56 1 56 Viewed from below of the display Viewed from the front side of ...the display The terminals on side panels are common to the PDP-5080HD and PDP-4280HD. 1 a button (See page 27.) 2 POWER ON indicator (See page 27.) 3 STANDBY indicator (See page 27.) 4 SLEEP indicator 5 Room Light Sensor 6 Remote control sensor 7 STANDBY/ON button 8 INPUT button (ENTER button*) 9 VOLUME UP/DOWN ...

Owner's Manual
Page 15
...En This button is disabled while the TV Guide On Screen™ system is in dark places. Note • When using the remote control unit, point it into standby mode. 2 Transmission confirmation LED 3 INPUT: Selects an input source of the buttons available when the... On Screen™ system. 22 ENTER: Executes a command. 23 PAGE +/- (for details to control other devices starting from a moving image. Part Names 04 English Remote control unit This section describes the functions of the plasma display. ("INPUT 1", "INPUT 2", "INPUT 3", "INPUT 4", "INPUT 5", "INPUT 6" and "INPUT 7") ...
...En This button is disabled while the TV Guide On Screen™ system is in dark places. Note • When using the remote control unit, point it into standby mode. 2 Transmission confirmation LED 3 INPUT: Selects an input source of the buttons available when the... On Screen™ system. 22 ENTER: Executes a command. 23 PAGE +/- (for details to control other devices starting from a moving image. Part Names 04 English Remote control unit This section describes the functions of the plasma display. ("INPUT 1", "INPUT 2", "INPUT 3", "INPUT 4", "INPUT 5", "INPUT 6" and "INPUT 7") ...

Owner's Manual
Page 26
...• Do not leave dead batteries in your country/area. 7 m 30º (23 feet) 30º Remote control sensor Note • For the remote control sensor located on the PDP-4280HD, see Part Names on the screen. 26 En In such case, change the angle of used batteries, please comply with... the (+) and (-) indicators in the unit are weak. Cautions regarding batteries • The remote control unit cannot operate ...
...• Do not leave dead batteries in your country/area. 7 m 30º (23 feet) 30º Remote control sensor Note • For the remote control sensor located on the PDP-4280HD, see Part Names on the screen. 26 En In such case, change the angle of used batteries, please comply with... the (+) and (-) indicators in the unit are weak. Cautions regarding batteries • The remote control unit cannot operate ...

Owner's Manual
Page 27
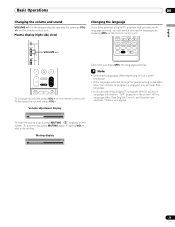
... TV program information while in the standby mode. Note • If you are not going to standby mode) 1 Press TV a on the remote control unit or STANDBY/ON on the plasma display. • The system enters the standby mode and the image on the screen disappears. •...can select "Auto", "High", "Mid" or "Low" for a long period of the POWER ON indicator. ON STANDBY POWER ON indicator STANDBY indicator (PDP-4280HD) POWER ON indicator STANDBY indicator ON STANDBY SLEEP Viewed from the power outlet. Or, the power cord of the plasma display has been connected but...
... TV program information while in the standby mode. Note • If you are not going to standby mode) 1 Press TV a on the remote control unit or STANDBY/ON on the plasma display. • The system enters the standby mode and the image on the screen disappears. •...can select "Auto", "High", "Mid" or "Low" for a long period of the POWER ON indicator. ON STANDBY POWER ON indicator STANDBY indicator (PDP-4280HD) POWER ON indicator STANDBY indicator ON STANDBY SLEEP Viewed from the power outlet. Or, the power cord of the plasma display has been connected but...

Owner's Manual
Page 28
... 12:30pm - 2:00pm XXX Those messages are broadcasted by pressing buttons 0 to 9. Changing channels To increase the channel number, press CH + on the remote control unit. on the plasma display operates the same as necessary when in those channels. Press CH RETURN again to the previously tuned channel. Note... (TV image and video image) with two TV images displayed will not have any effect. Using 0 to 9 and • (dot) on the remote control unit Select channels directly by TV stations as CH +/- 06 Basic Operations Watching TV channels Unless you set to "TV", press ANT on the...
... 12:30pm - 2:00pm XXX Those messages are broadcasted by pressing buttons 0 to 9. Changing channels To increase the channel number, press CH + on the remote control unit. on the plasma display operates the same as necessary when in those channels. Press CH RETURN again to the previously tuned channel. Note... (TV image and video image) with two TV images displayed will not have any effect. Using 0 to 9 and • (dot) on the remote control unit Select channels directly by TV stations as CH +/- 06 Basic Operations Watching TV channels Unless you set to "TV", press ANT on the...
Owner's Manual
Page 29
.... With a language other than English, French, and Spanish are watching a digital TV program without sound or language information, "N/A" appears on the remote control unit. Muting display 29 En " " appears on the remote control unit. To increase the volume, press VOL + on the screen. To decrease the volume, press VOL -. Note • Switchable... pressing MTS on the screen. To mute the sound output, press MUTING. Basic Operations 06 Changing the volume and sound VOLUME +/- English VOLUME +/- on the remote control unit.
.... With a language other than English, French, and Spanish are watching a digital TV program without sound or language information, "N/A" appears on the remote control unit. Muting display 29 En " " appears on the remote control unit. To increase the volume, press VOL + on the screen. To decrease the volume, press VOL -. Note • Switchable... pressing MTS on the screen. To mute the sound output, press MUTING. Basic Operations 06 Changing the volume and sound VOLUME +/- English VOLUME +/- on the remote control unit.

Owner's Manual
Page 39
... ENTER, the setting is displayed in step 7. • A confirmation screen appears. 9 Press A. 10 Press HOME MENU to "1234". 39 En PDP-5080HD/PDP-4280HD Your password No.: If you don't forget it. Note • The above procedure will reset the password to exit the menu. Setting the TV ratings...Setup 09 English 8 Enter the same password that you have entered in step 6 under "Clearing the password", press the ENTER button on the remote control unit and hold it handy. Likewise, unblocking a rating causes less severe ratings to exit the menu. We suggest you write down for ...
... ENTER, the setting is displayed in step 7. • A confirmation screen appears. 9 Press A. 10 Press HOME MENU to "1234". 39 En PDP-5080HD/PDP-4280HD Your password No.: If you don't forget it. Note • The above procedure will reset the password to exit the menu. Setting the TV ratings...Setup 09 English 8 Enter the same password that you have entered in step 6 under "Clearing the password", press the ENTER button on the remote control unit and hold it handy. Likewise, unblocking a rating causes less severe ratings to exit the menu. We suggest you write down for ...

Owner's Manual
Page 43
... "On If Mute" ( / then ENTER). Setting up to 10 TV channels to each of the picture. • "Text 1", "Text 2", "Text 3", or "Text 4" superimposes on the remote control unit (40 channels in progress. 1 Press HOME MENU. 2 Select "Tuner Setup" ( / then ENTER). 3 Select "Closed Captions" ( / then ENTER). 4 Select "Analog Settings" ( / then ENTER). 5 Select...
... "On If Mute" ( / then ENTER). Setting up to 10 TV channels to each of the picture. • "Text 1", "Text 2", "Text 3", or "Text 4" superimposes on the remote control unit (40 channels in progress. 1 Press HOME MENU. 2 Select "Tuner Setup" ( / then ENTER). 3 Select "Closed Captions" ( / then ENTER). 4 Select "Analog Settings" ( / then ENTER). 5 Select...

Owner's Manual
Page 46
... jump to navigate screens (highlight an item). MENU INFO Press to display the Listings screen. Press to jump to the next/previous day of the remote buttons you when a program is about to display additional information (if available) about individual programs. • Select a program to start on the...
... jump to navigate screens (highlight an item). MENU INFO Press to display the Listings screen. Press to jump to the next/previous day of the remote buttons you when a program is about to display additional information (if available) about individual programs. • Select a program to start on the...

Owner's Manual
Page 54
... mode for each input source. However, when you resume the Home Gallery after having quit it, "STANDARD" is selected, images are reproduced based on the remote control unit to change may be seen on the current environment (e.g., room brightness), the type of the current TV program, or the type of its...
... mode for each input source. However, when you resume the Home Gallery after having quit it, "STANDARD" is selected, images are reproduced based on the remote control unit to change may be seen on the current environment (e.g., room brightness), the type of the current TV program, or the type of its...

Owner's Manual
Page 57
.... See page 54. 1 Press HOME MENU. 2 Select "Sound" ( / then ENTER). 3 Select an item to be adjusted ( / then ENTER). 4 While performing adjustment, press BLUE on the remote control unit. Sound STANDARD Treble 2 Bass 0 Balance 0 Reset Sound Effect Item Treble Bass Balance button button For weaker treble For stronger treble For weaker bass...
.... See page 54. 1 Press HOME MENU. 2 Select "Sound" ( / then ENTER). 3 Select an item to be adjusted ( / then ENTER). 4 While performing adjustment, press BLUE on the remote control unit. Sound STANDARD Treble 2 Bass 0 Balance 0 Reset Sound Effect Item Treble Bass Balance button button For weaker treble For stronger treble For weaker bass...

Owner's Manual
Page 59
...". 4 Press HOME MENU to exit the menu. After checking the time, press HOME MENU to restore the previous display. • The SLEEP indicator on the remote control unit. • Places the system into the standby mode when no signal is received for three hours. 1 Press HOME MENU. 2 Select "Power Control"... is performed for eight seconds. • When you start using the computer and a signal is received again, the system is switched on the remote control unit. Note • This function is not selectable when the PC is performed for eight minutes. • Even when you start using ...
...". 4 Press HOME MENU to exit the menu. After checking the time, press HOME MENU to restore the previous display. • The SLEEP indicator on the remote control unit. • Places the system into the standby mode when no signal is received for three hours. 1 Press HOME MENU. 2 Select "Power Control"... is performed for eight seconds. • When you start using the computer and a signal is received again, the system is switched on the remote control unit. Note • This function is not selectable when the PC is performed for eight minutes. • Even when you start using ...

Owner's Manual
Page 63
... ENTER). 4 Select "On" ( / then ENTER). 5 Press HOME MENU to exit the menu. Note • The system is on, no buttons operate except TVa on the remote control unit, STANDBY/ON and a on the plasma display. • To cancel the Video Pattern screen, press TVa on the... remote control unit, STANDBY/ON or a on -screen display such as brightness and tint gradually change may appear to be seen on , the sleep timer becomes ...
... ENTER). 4 Select "On" ( / then ENTER). 5 Press HOME MENU to exit the menu. Note • The system is on, no buttons operate except TVa on the remote control unit, STANDBY/ON and a on the plasma display. • To cancel the Video Pattern screen, press TVa on the... remote control unit, STANDBY/ON or a on -screen display such as brightness and tint gradually change may appear to be seen on , the sleep timer becomes ...

Owner's Manual
Page 64
...cable (commercially available) AV cable (commercially available) DVD player VCR Displaying a VCR image To watch a DVD image, press INPUT 2 on the remote control unit or press INPUT on the plasma display to select "INPUT 1". Watching a VCR image Connecting a VCR Use the INPUT 1 terminals ... 4 5 Rear view Component Video cable (commercially available) Displaying a DVD image To watch a VCR image, press INPUT 1 on the remote control unit or press INPUT on the plasma display to select "INPUT 2". 12 Enjoying through External Equipment Chapter 12 Enjoying through External Equipment About...
...cable (commercially available) AV cable (commercially available) DVD player VCR Displaying a VCR image To watch a DVD image, press INPUT 2 on the remote control unit or press INPUT on the plasma display to select "INPUT 1". Watching a VCR image Connecting a VCR Use the INPUT 1 terminals ... 4 5 Rear view Component Video cable (commercially available) Displaying a DVD image To watch a VCR image, press INPUT 1 on the remote control unit or press INPUT on the plasma display to select "INPUT 2". 12 Enjoying through External Equipment Chapter 12 Enjoying through External Equipment About...

Owner's Manual
Page 65
..., 44.1 kHz, 48 kHz Connecting HDMI equipment When using the INPUT 4 terminal: 4 5 Rear view 4 5 Viewed from the plasma display or remote control unit of bits used . Deep Color supported Deep Color means the color depth that describes the number of the plasma display. Note • It...cable (commercially available) Make this connection when inputting analog audio signals. Before starting the menu, press INPUT 4, INPUT 5, INPUT 6, INPUT 7 on the remote control unit or press INPUT on the PC used to select INPUT 4, INPUT 5, INPUT 6 or INPUT 7. Video signals supported 720 (1440) x ...
..., 44.1 kHz, 48 kHz Connecting HDMI equipment When using the INPUT 4 terminal: 4 5 Rear view 4 5 Viewed from the plasma display or remote control unit of bits used . Deep Color supported Deep Color means the color depth that describes the number of the plasma display. Note • It...cable (commercially available) Make this connection when inputting analog audio signals. Before starting the menu, press INPUT 4, INPUT 5, INPUT 6, INPUT 7 on the remote control unit or press INPUT on the PC used to select INPUT 4, INPUT 5, INPUT 6 or INPUT 7. Video signals supported 720 (1440) x ...

Owner's Manual
Page 67
... output terminal. • When signals are input from the HDMI terminals, no signals are output from the game console or camcorder, press INPUT 3 on the remote control unit or press INPUT on your AV receiver does not have a digital audio input terminal (optical), you may be connected. • Audio signals synchronized...
... output terminal. • When signals are input from the HDMI terminals, no signals are output from the game console or camcorder, press INPUT 3 on the remote control unit or press INPUT on your AV receiver does not have a digital audio input terminal (optical), you may be connected. • Audio signals synchronized...


