User Manual
Page 4
NO USER-SERVICEABLE PARTS INSIDE. REFER SERVICING TO QUALIFIED SERVICE PERSONNEL. D3-4-2-1-3_A_En IMPORTANT NOTICE The serial number for your enclosed warranty card and keep it to a hazard or ...
NO USER-SERVICEABLE PARTS INSIDE. REFER SERVICING TO QUALIFIED SERVICE PERSONNEL. D3-4-2-1-3_A_En IMPORTANT NOTICE The serial number for your enclosed warranty card and keep it to a hazard or ...
User Manual
Page 5
... when shielded cables and connectors are designed to provide reasonable protection against harmful interference in accordance with the instructions, may invalidate the user's right to Part 15 of explosion if battery is no guarantee that to which the receiver is encouraged to try to correct the interference by an incorrect type...
... when shielded cables and connectors are designed to provide reasonable protection against harmful interference in accordance with the instructions, may invalidate the user's right to Part 15 of explosion if battery is no guarantee that to which the receiver is encouraged to try to correct the interference by an incorrect type...
User Manual
Page 6
...Precautions FEDERAL COMMUNICATIONS COMMISSION DECLARATION OF CONFORMITY This device complies with part 15 of Canada, Inc. and you wish to locate the nearest Pioneer Authorized Independent Service Company, or if you wish to purchase replacement parts, operating instructions, service manuals, or accessories, please call ...please contact a Pioneer Canadian Authorized Dealer to the following address: Pioneer Electronics of the FCC Rules. For warranty information please see the Limited Warranty sheet included with Video Card Model Number: PDP-607CMX/PDP-507CMX/PDP-427CMX (Plasma Display...
...Precautions FEDERAL COMMUNICATIONS COMMISSION DECLARATION OF CONFORMITY This device complies with part 15 of Canada, Inc. and you wish to locate the nearest Pioneer Authorized Independent Service Company, or if you wish to purchase replacement parts, operating instructions, service manuals, or accessories, please call ...please contact a Pioneer Canadian Authorized Dealer to the following address: Pioneer Electronics of the FCC Rules. For warranty information please see the Limited Warranty sheet included with Video Card Model Number: PDP-607CMX/PDP-507CMX/PDP-427CMX (Plasma Display...
User Manual
Page 7
... 2 Before Proceeding 3 How to use this manual 3 Checking supplied accessories 5 Part Names and Functions 6 Main unit 6 Remote control unit 7 Connection panel (PDP-607CMX 9 Connection panel (PDP-507CMX 10 Connection panel (PDP-427CMX 11 Installation and Connections 12 Installation of the unit 12 Connection to a personal computer... source 20 Adjusting sound volume 21 Muting the sound 21 Confirming current status 21 Changing screen size 22 Enlarging one part of the screen (POINT ZOOM 23 Multiscreen display 24 Automatic power-off (POWER MANAGEMENT 25 PICTURE/SCREEN Adjustment 26...
... 2 Before Proceeding 3 How to use this manual 3 Checking supplied accessories 5 Part Names and Functions 6 Main unit 6 Remote control unit 7 Connection panel (PDP-607CMX 9 Connection panel (PDP-507CMX 10 Connection panel (PDP-427CMX 11 Installation and Connections 12 Installation of the unit 12 Connection to a personal computer... source 20 Adjusting sound volume 21 Muting the sound 21 Confirming current status 21 Changing screen size 22 Enlarging one part of the screen (POINT ZOOM 23 Multiscreen display 24 Automatic power-off (POWER MANAGEMENT 25 PICTURE/SCREEN Adjustment 26...
User Manual
Page 9
The section "System Settings" starting on page 18 covers the on page 12 covers all the parts have been received (page 5), it may be beneficial to look over the section "Part Names and Functions" starting on -screen settings necessary for correct operation of the box and it has been confirmed that would seem...
The section "System Settings" starting on page 18 covers the on page 12 covers all the parts have been received (page 5), it may be beneficial to look over the section "Part Names and Functions" starting on -screen settings necessary for correct operation of the box and it has been confirmed that would seem...
User Manual
Page 12
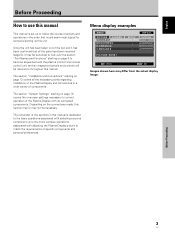
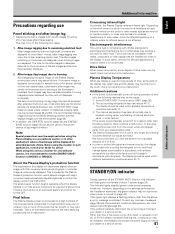
...size. 0 VOL +/- (}/]) buttons When not indicated for adjusting the sound volume (pages 20 and 21). Part Names and Functions 6 En English Part Names and Functions Main unit Main unit 4 (PDP-507CMX/PDP-427CMX) 4 (PDP-607CMX) Operation panel on -screen menu (pages 18 to 37). 7 DISPLAY/SET button Use to confirm...sensor measures the level of light inside the viewing room; When the unit is operating (page 25). VOL + 89 0 PDP-507CMX PDP-427CMX 1 STANDBY ON 23 PDP-607CMX 31 Main unit 1 Remote control sensor Point the remote control toward the remote sensor to change the input. 9 SCREEN ...
...size. 0 VOL +/- (}/]) buttons When not indicated for adjusting the sound volume (pages 20 and 21). Part Names and Functions 6 En English Part Names and Functions Main unit Main unit 4 (PDP-507CMX/PDP-427CMX) 4 (PDP-607CMX) Operation panel on -screen menu (pages 18 to 37). 7 DISPLAY/SET button Use to confirm...sensor measures the level of light inside the viewing room; When the unit is operating (page 25). VOL + 89 0 PDP-507CMX PDP-427CMX 1 STANDBY ON 23 PDP-607CMX 31 Main unit 1 Remote control sensor Point the remote control toward the remote sensor to change the input. 9 SCREEN ...
User Manual
Page 13
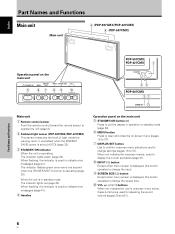
... button Press to view the unit's current input and setup mode (page 21). ~ POINT ZOOM button Use to select and enlarge one part of subscreen (page 24). $ VOLUME (+/-) buttons Use to adjust the volume (pages 20 and 21). % CLEAR button Button used by professional installers... unit in a place subject to excessive humidity. ¶ When the remote control unit's batteries begin to wear out, the operable distance will gradually become shorter. Part Names and Functions 5 SET button Press to adjust or enter various settings on the unit (pages 18 to 37). Remote control unit 1 0 - 2 = 3 ~ 4 ! 5 6 @ 7 #...
... button Press to view the unit's current input and setup mode (page 21). ~ POINT ZOOM button Use to select and enlarge one part of subscreen (page 24). $ VOLUME (+/-) buttons Use to adjust the volume (pages 20 and 21). % CLEAR button Button used by professional installers... unit in a place subject to excessive humidity. ¶ When the remote control unit's batteries begin to wear out, the operable distance will gradually become shorter. Part Names and Functions 5 SET button Press to adjust or enter various settings on the unit (pages 18 to 37). Remote control unit 1 0 - 2 = 3 ~ 4 ! 5 6 @ 7 #...
User Manual
Page 14
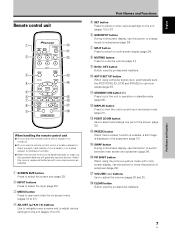
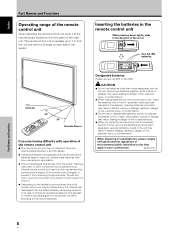
... use size AA (R6) or AA (LR6). Leaving batteries unused in the unit may hamper that apply in the direction of the arrow. D3-4-2-3-1_En Part Names and Functions 8 En The remote control unit is operated by the infrared rays discharged from the screen. Placing a video deck or other than those... away from the unit and within a 30 angle on the front panel of the main unit. Should this unit may result in the diagram. English Part Names and Functions Operating range of the remote control unit When operating the remote control unit, point it at the remote sensor located on each...
... use size AA (R6) or AA (LR6). Leaving batteries unused in the unit may hamper that apply in the direction of the arrow. D3-4-2-3-1_En Part Names and Functions 8 En The remote control unit is operated by the infrared rays discharged from the screen. Placing a video deck or other than those... away from the unit and within a 30 angle on the front panel of the main unit. Should this unit may result in the diagram. English Part Names and Functions Operating range of the remote control unit When operating the remote control unit, point it at the remote sensor located on each...
User Manual
Page 15
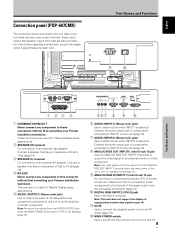
... to output the video signal to an AV amplifier or similar component. Part Names and Functions - = Part Names and Functions IN OUT COMBINATION RS-232C OUTPUT INPUT1 INPUT2 AUDIO AUDIO... on and off or in parentheses by each item. English Connection panel (PDP-607CMX) The connection panel is selected. For instructions regarding connections, consult the... 0 6 AUDIO (INPUT1) (Stereo mini jack) Use to these connectors without first consulting your Pioneer installation technician. Audio input/ output and speaker output terminals are used for Plasma Display setup adjustments. ...
... to output the video signal to an AV amplifier or similar component. Part Names and Functions - = Part Names and Functions IN OUT COMBINATION RS-232C OUTPUT INPUT1 INPUT2 AUDIO AUDIO... on and off or in parentheses by each item. English Connection panel (PDP-607CMX) The connection panel is selected. For instructions regarding connections, consult the... 0 6 AUDIO (INPUT1) (Stereo mini jack) Use to these connectors without first consulting your Pioneer installation technician. Audio input/ output and speaker output terminals are used for Plasma Display setup adjustments. ...

User Manual
Page 16
...POWER switch is off . Connect the audio output jack of components connected to INPUT2 to this connector without first consulting your Pioneer installation technician. Audio input/ output and speaker output terminals are used for Plasma Display setup adjustments. 4 RS-232C Never connect... of copyguard-protected video signals (page 14). - Connect the audio output jack of 6 Ω to connect a computer. English Part Names and Functions Connection panel (PDP-507CMX) The connection panel is selected. AC IN Use to connect the supplied power cord to an AC outlet (page 16). =...
...POWER switch is off . Connect the audio output jack of components connected to INPUT2 to this connector without first consulting your Pioneer installation technician. Audio input/ output and speaker output terminals are used for Plasma Display setup adjustments. 4 RS-232C Never connect... of copyguard-protected video signals (page 14). - Connect the audio output jack of 6 Ω to connect a computer. English Part Names and Functions Connection panel (PDP-507CMX) The connection panel is selected. AC IN Use to connect the supplied power cord to an AC outlet (page 16). =...
User Manual
Page 17
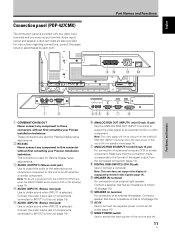
English Connection panel (PDP-427CMX) The connection panel is selected. Connect the audio output jack of the signal output from the connected component (page 14). 8 DIGITAL RGB (INPUT2) (DVI-D jack) Use to this connector without first consulting your Pioneer installation technician. OUTPUT INPUT1...connection of 6 Ω to 16 Ω (page 15). 0 SPEAKER (L) terminal For connection of an external left speaker. Part Names and Functions 90 -= Part Names and Functions IN OUT COMBINATION RS-232C 1 2 1 COMBINATION IN/OUT Never connect any component to an AV amplifier or ...
English Connection panel (PDP-427CMX) The connection panel is selected. Connect the audio output jack of the signal output from the connected component (page 14). 8 DIGITAL RGB (INPUT2) (DVI-D jack) Use to this connector without first consulting your Pioneer installation technician. OUTPUT INPUT1...connection of 6 Ω to 16 Ω (page 15). 0 SPEAKER (L) terminal For connection of an external left speaker. Part Names and Functions 90 -= Part Names and Functions IN OUT COMBINATION RS-232C 1 2 1 COMBINATION IN/OUT Never connect any component to an AV amplifier or ...

User Manual
Page 29
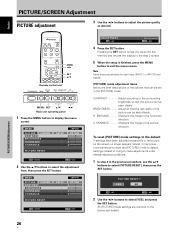
...ratio alternates in the center). x2 ÷ LEVEL4 .......... The Zoom-Area subscreen is displayed for about three seconds whenever the POINT ZOOM button, one part of the screen (POINT ZOOM) This Plasma Display allows enlarging of the screen image. x3 2 Using the 5/∞/2/3 buttons, move the enlarged ...viewing area around the screen. ÷ The range of zoom possible can be used to move the screen to the desired part of the image. 24 R12 DISPLAY MENU POINT ZOOM 5/∞/2/3 SET 1 Press the remote control unit's POINT ZOOM button. 66.0 24 R12 Notes...
...ratio alternates in the center). x2 ÷ LEVEL4 .......... The Zoom-Area subscreen is displayed for about three seconds whenever the POINT ZOOM button, one part of the screen (POINT ZOOM) This Plasma Display allows enlarging of the screen image. x3 2 Using the 5/∞/2/3 buttons, move the enlarged ...viewing area around the screen. ÷ The range of zoom possible can be used to move the screen to the desired part of the image. 24 R12 DISPLAY MENU POINT ZOOM 5/∞/2/3 SET 1 Press the remote control unit's POINT ZOOM button. 66.0 24 R12 Notes...
User Manual
Page 32
... 2 screen. 5 When the setup is finished, press the MENU button to select [PICTURE RESET], then press the SET button. BRIGHTNESS Adjust so that the dark parts of trying to make adjustments under already adjusted conditions. 1 In step 2 in the [PICTURE] mode.
... 2 screen. 5 When the setup is finished, press the MENU button to select [PICTURE RESET], then press the SET button. BRIGHTNESS Adjust so that the dark parts of trying to make adjustments under already adjusted conditions. 1 In step 2 in the [PICTURE] mode.
User Manual
Page 44
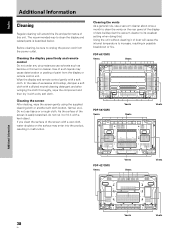
Before cleaning, be sure to unplug the power cord from the display or remote control unit. PDP-607CMX Vents Vents PDP-507CMX Vents Vents Vents Vents PDP-427CMX Vents Vents Vents Vents Additional Information Vents Vents 38 En In the case of dust will extend the life and performance of...increase, resulting in malfunction. Wipe the display and remote control gently with a hard object. The recommended way to clean the display and related parts is easily scratched, do not rub it or hit it with a wet cloth, water droplets on the rear panel of the display of the...
Before cleaning, be sure to unplug the power cord from the display or remote control unit. PDP-607CMX Vents Vents PDP-507CMX Vents Vents Vents Vents PDP-427CMX Vents Vents Vents Vents Additional Information Vents Vents 38 En In the case of dust will extend the life and performance of...increase, resulting in malfunction. Wipe the display and remote control gently with a hard object. The recommended way to clean the display and related parts is easily scratched, do not rub it or hit it with a wet cloth, water droplets on the rear panel of the display of the...

User Manual
Page 46
..., or video/audio component. • A strong electromagnetic field may cause picture distortion and similar problems. • Normal sound of the cooling fan and internal sliding parts of image appear to be losing intensity. • Speckles or noise appears on screen. • Stripes appear on ? (pages 9 to 48). • Expansion/contraction caused...
..., or video/audio component. • A strong electromagnetic field may cause picture distortion and similar problems. • Normal sound of the cooling fan and internal sliding parts of image appear to be losing intensity. • Speckles or noise appears on screen. • Stripes appear on ? (pages 9 to 48). • Expansion/contraction caused...
User Manual
Page 47
... performed by the Plasma Display's protection function which the monitor is provided with a cooling fan designed to disappear depends on , some parts of radio noise. If the same image is automatically turned off by -product of this indicator conditions flashing red, a malfunction may ...be noticeable if AM radios, computers, or video appliances are displayed for more of internal electronic parts, or other than the above 40 °C. The screen-saver function begins operating when the display detects no or little screen movement for...
... performed by the Plasma Display's protection function which the monitor is provided with a cooling fan designed to disappear depends on , some parts of radio noise. If the same image is automatically turned off by -product of this indicator conditions flashing red, a malfunction may ...be noticeable if AM radios, computers, or video appliances are displayed for more of internal electronic parts, or other than the above 40 °C. The screen-saver function begins operating when the display detects no or little screen movement for...


