User Manual
Page 4
... to the State of California and other governmental entities to cause cancer and birth defect or other reproductive harm. WARNING Perchlorate Material - NO USER-SERVICEABLE PARTS INSIDE. English Safety Precautions IMPORTANT CAUTION RISK OF ELECTRIC SHOCK DO NOT OPEN The lightning flash with arrowhead symbol, within the product's enclosure that may...
... to the State of California and other governmental entities to cause cancer and birth defect or other reproductive harm. WARNING Perchlorate Material - NO USER-SERVICEABLE PARTS INSIDE. English Safety Precautions IMPORTANT CAUTION RISK OF ELECTRIC SHOCK DO NOT OPEN The lightning flash with arrowhead symbol, within the product's enclosure that may...
User Manual
Page 5
... protection against harmful interference in a residential installation. D8-10-3a_En CAUTION: When changing batteries, use shielded cables and connectors for a Class B digital device, pursuant to Part 15 of used to connect the unit to other equipment. Dispose of the FCC Rules. This equipment generates, uses, and can be determined by turning...
... protection against harmful interference in a residential installation. D8-10-3a_En CAUTION: When changing batteries, use shielded cables and connectors for a Class B digital device, pursuant to Part 15 of used to connect the unit to other equipment. Dispose of the FCC Rules. This equipment generates, uses, and can be determined by turning...
User Manual
Page 6
...of Canada, Inc. Dominguez st., Logn Beach, CA. 90801-1760, U.S.A. Should this product require service in Canada, please contact a Pioneer Canadian Authorized Dealer to purchase replacement parts, operating instructions, service manuals, or accessories, please call the number shown below. 8 0 0 - 4 2 1 - 1 6... device complies with Video Card Model Number: PDP-607CMX/PDP-507CMX/PDP-427CMX (Plasma Display) PDA-5003/PDA-5004 (Video Card) Product Category: Class B Personal Computers & Peripherals Responsible Party Name: PIONEER ELECTRONICS SERVICE, INC. Alternatively, please contact ...
...of Canada, Inc. Dominguez st., Logn Beach, CA. 90801-1760, U.S.A. Should this product require service in Canada, please contact a Pioneer Canadian Authorized Dealer to purchase replacement parts, operating instructions, service manuals, or accessories, please call the number shown below. 8 0 0 - 4 2 1 - 1 6... device complies with Video Card Model Number: PDP-607CMX/PDP-507CMX/PDP-427CMX (Plasma Display) PDA-5003/PDA-5004 (Video Card) Product Category: Class B Personal Computers & Peripherals Responsible Party Name: PIONEER ELECTRONICS SERVICE, INC. Alternatively, please contact ...
User Manual
Page 7
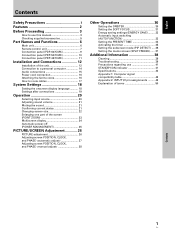
... 2 Before Proceeding 3 How to use this manual 3 Checking supplied accessories 5 Part Names and Functions 6 Main unit 6 Remote control unit 7 Connection panel (PDP-607CMX 9 Connection panel (PDP-507CMX 10 Connection panel (PDP-427CMX 11 Installation and Connections 12 Installation of the unit 12 Connection to a personal computer... source 20 Adjusting sound volume 21 Muting the sound 21 Confirming current status 21 Changing screen size 22 Enlarging one part of the screen (POINT ZOOM 23 Multiscreen display 24 Automatic power-off (POWER MANAGEMENT 25 PICTURE/SCREEN Adjustment 26...
... 2 Before Proceeding 3 How to use this manual 3 Checking supplied accessories 5 Part Names and Functions 6 Main unit 6 Remote control unit 7 Connection panel (PDP-607CMX 9 Connection panel (PDP-507CMX 10 Connection panel (PDP-427CMX 11 Installation and Connections 12 Installation of the unit 12 Connection to a personal computer... source 20 Adjusting sound volume 21 Muting the sound 21 Confirming current status 21 Changing screen size 22 Enlarging one part of the screen (POINT ZOOM 23 Multiscreen display 24 Automatic power-off (POWER MANAGEMENT 25 PICTURE/SCREEN Adjustment 26...
User Manual
Page 9
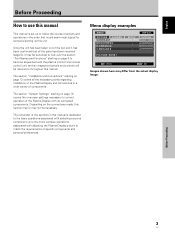
... components and personal preferences. Depending on the connections made, this manual. The section "System Settings" starting on page 12 covers all the parts have been received (page 5), it may differ from the actual display image. Before Proceeding 3 En The section "Installation and Connections" starting... with the plasma monitor and remote control unit, as their respective buttons and controls will be beneficial to look over the section "Part Names and Functions" starting on -screen settings necessary for correct operation of the box and it has been confirmed that would seem...
... components and personal preferences. Depending on the connections made, this manual. The section "System Settings" starting on page 12 covers all the parts have been received (page 5), it may differ from the actual display image. Before Proceeding 3 En The section "Installation and Connections" starting... with the plasma monitor and remote control unit, as their respective buttons and controls will be beneficial to look over the section "Part Names and Functions" starting on -screen settings necessary for correct operation of the box and it has been confirmed that would seem...
User Manual
Page 12
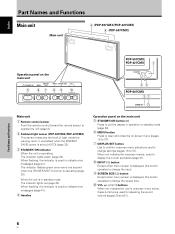
...size. 0 VOL +/- (}/]) buttons When not indicated for adjusting the sound volume (pages 20 and 21). VOL + 89 0 PDP-507CMX PDP-427CMX 1 STANDBY ON 23 PDP-607CMX 31 Main unit 1 Remote control sensor Point the remote control toward the remote sensor to 37). The indicator flashes green once...STANDBY/ON button ( ) Press to put the display in standby mode: The indicator lights red (page 20). English Part Names and Functions Main unit Main unit 4 (PDP-507CMX/PDP-427CMX) 4 (PDP-607CMX) Operation panel on -screen menu (pages 18 to 37). 7 DISPLAY/SET button Use to confirm onscreen menu ...
...size. 0 VOL +/- (}/]) buttons When not indicated for adjusting the sound volume (pages 20 and 21). VOL + 89 0 PDP-507CMX PDP-427CMX 1 STANDBY ON 23 PDP-607CMX 31 Main unit 1 Remote control sensor Point the remote control toward the remote sensor to 37). The indicator flashes green once...STANDBY/ON button ( ) Press to put the display in standby mode: The indicator lights red (page 20). English Part Names and Functions Main unit Main unit 4 (PDP-507CMX/PDP-427CMX) 4 (PDP-607CMX) Operation panel on -screen menu (pages 18 to 37). 7 DISPLAY/SET button Use to confirm onscreen menu ...
User Manual
Page 13
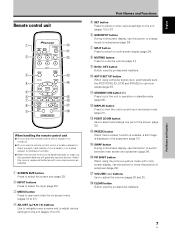
... = DISPLAY button Press to view the unit's current input and setup mode (page 21). ~ POINT ZOOM button Use to select and enlarge one part of subscreen (page 24). $ VOLUME (+/-) buttons Use to adjust the volume (pages 20 and 21). % CLEAR button Button used by professional installers. 7 ...En Part Names and Functions English Part Names and Functions 5 SET button Press to adjust or enter various settings on the unit (pages 18 to 37). FREEZE button When memo screen...
... = DISPLAY button Press to view the unit's current input and setup mode (page 21). ~ POINT ZOOM button Use to select and enlarge one part of subscreen (page 24). $ VOLUME (+/-) buttons Use to adjust the volume (pages 20 and 21). % CLEAR button Button used by professional installers. 7 ...En Part Names and Functions English Part Names and Functions 5 SET button Press to adjust or enter various settings on the unit (pages 18 to 37). FREEZE button When memo screen...
User Manual
Page 14
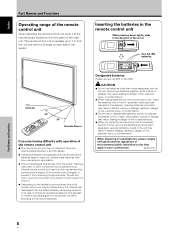
...injury. ¶ When not using the remote control unit for extended periods of time, remove the batteries and store them separately. D3-4-2-3-1_En Part Names and Functions 8 En The remote control unit is operated by the infrared rays discharged from the Plasma Display, hampering reception of its rays... located on each side of the remote control unit ¶ The remote control unit may hamper that apply in your country/area. English Part Names and Functions Operating range of the remote control unit When operating the remote control unit, point it and the display. ¶ Operational...
...injury. ¶ When not using the remote control unit for extended periods of time, remove the batteries and store them separately. D3-4-2-3-1_En Part Names and Functions 8 En The remote control unit is operated by the infrared rays discharged from the Plasma Display, hampering reception of its rays... located on each side of the remote control unit ¶ The remote control unit may hamper that apply in your country/area. English Part Names and Functions Operating range of the remote control unit When operating the remote control unit, point it and the display. ¶ Operational...
User Manual
Page 15
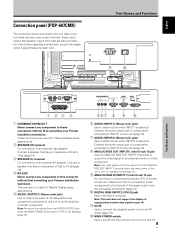
...Ω to 16 Ω (page 15). 4 RS-232C Never connect any component to an external monitor or other component. Part Names and Functions - = Part Names and Functions IN OUT COMBINATION RS-232C OUTPUT INPUT1 INPUT2 AUDIO AUDIO AUDIO ANALOG RGB OUT (D-Sub) INPUT1 ANALOG RGB IN ... an external left speaker. Make sure that has an impedance of 6 Ω to this connector without first consulting your Pioneer installation technician. English Connection panel (PDP-607CMX) The connection panel is off . 9 En Connect a speaker that the connection made corresponds to the format of...
...Ω to 16 Ω (page 15). 4 RS-232C Never connect any component to an external monitor or other component. Part Names and Functions - = Part Names and Functions IN OUT COMBINATION RS-232C OUTPUT INPUT1 INPUT2 AUDIO AUDIO AUDIO ANALOG RGB OUT (D-Sub) INPUT1 ANALOG RGB IN ... an external left speaker. Make sure that has an impedance of 6 Ω to this connector without first consulting your Pioneer installation technician. English Connection panel (PDP-607CMX) The connection panel is off . 9 En Connect a speaker that the connection made corresponds to the format of...

User Manual
Page 16
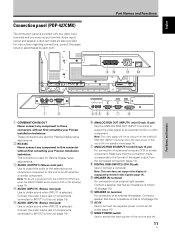
...of an external left speaker. Connect a speaker that has an impedance of 6 Ω to these connectors without first consulting your Pioneer installation technician. Connect the audio output jack of copyguard-protected video signals (page 14). - Audio input/ output and speaker output ...not support the display of components connected to INPUT2 to this unit to an external monitor or other component. English Part Names and Functions Connection panel (PDP-507CMX) The connection panel is off . For instructions regarding connections, consult the pages noted in standby mode (...
...of an external left speaker. Connect a speaker that has an impedance of 6 Ω to these connectors without first consulting your Pioneer installation technician. Connect the audio output jack of copyguard-protected video signals (page 14). - Audio input/ output and speaker output ...not support the display of components connected to INPUT2 to this unit to an external monitor or other component. English Part Names and Functions Connection panel (PDP-507CMX) The connection panel is off . For instructions regarding connections, consult the pages noted in standby mode (...
User Manual
Page 17
English Connection panel (PDP-427CMX) The connection panel is used for Plasma Display setup adjustments. 3 AUDIO (OUTPUT) (Stereo mini jack) Use to output the audio of the selected source component connected to this unit to this unit is selected. Part Names and Functions 90 -= Part Names and Functions IN OUT ...). = MAIN POWER switch Use to switch the main power of components connected to INPUT1 to this connector without first consulting your Pioneer installation technician. Connect the audio output jack of the unit on and off or in parentheses by each item. Make sure that...
English Connection panel (PDP-427CMX) The connection panel is used for Plasma Display setup adjustments. 3 AUDIO (OUTPUT) (Stereo mini jack) Use to output the audio of the selected source component connected to this unit to this unit is selected. Part Names and Functions 90 -= Part Names and Functions IN OUT ...). = MAIN POWER switch Use to switch the main power of components connected to INPUT1 to this connector without first consulting your Pioneer installation technician. Connect the audio output jack of the unit on and off or in parentheses by each item. Make sure that...

User Manual
Page 29
... mode is selected, the POINT ZOOM function will be canceled. x1.5 ÷ LEVEL3 .......... x3 2 Using the 5/∞/2/3 buttons, move the screen to the desired part of the image. 24 R12 DISPLAY MENU POINT ZOOM 5/∞/2/3 SET 1 Press the remote control unit's POINT ZOOM button. 66.0 24 R12 Notes ¶ During...LEVEL4 .......... Zoom-Area subscreen 23 En x1 ÷ LEVEL2 .......... The Zoom-Area subscreen is displayed for about three seconds whenever the POINT ZOOM button, one part of the screen (POINT ZOOM) This Plasma Display allows enlarging of the screen image.
... mode is selected, the POINT ZOOM function will be canceled. x1.5 ÷ LEVEL3 .......... x3 2 Using the 5/∞/2/3 buttons, move the screen to the desired part of the image. 24 R12 DISPLAY MENU POINT ZOOM 5/∞/2/3 SET 1 Press the remote control unit's POINT ZOOM button. 66.0 24 R12 Notes ¶ During...LEVEL4 .......... Zoom-Area subscreen 23 En x1 ÷ LEVEL2 .......... The Zoom-Area subscreen is displayed for about three seconds whenever the POINT ZOOM button, one part of the screen (POINT ZOOM) This Plasma Display allows enlarging of the screen image.
User Manual
Page 32
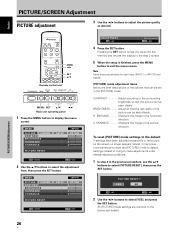
... ENTER MENU EXIT 2 Use the 5/∞ buttons to exit the menu screen. All [PICTURE] mode settings are brief descriptions of the options that the dark parts of trying to default settings instead of the picture can be seen clearly. Pressing the SET button writes the value into the memory and returns...
... ENTER MENU EXIT 2 Use the 5/∞ buttons to exit the menu screen. All [PICTURE] mode settings are brief descriptions of the options that the dark parts of trying to default settings instead of the picture can be seen clearly. Pressing the SET button writes the value into the memory and returns...
User Manual
Page 44
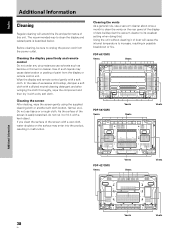
... is described below. Using the unit without cleaning it of dust will extend the life and performance of this ). PDP-607CMX Vents Vents PDP-507CMX Vents Vents Vents Vents PDP-427CMX Vents Vents Vents Vents Additional Information Vents Vents 38 En Before cleaning, be sure to unplug the power cord from ... component and then dry it with a soft cloth. In the case of dust buildup (set the vacuum cleaner to clean the display and related parts is easily scratched, do not rub it or hit it with a dry soft cloth. Wipe the display and remote control gently with a hard object...
... is described below. Using the unit without cleaning it of dust will extend the life and performance of this ). PDP-607CMX Vents Vents PDP-507CMX Vents Vents Vents Vents PDP-427CMX Vents Vents Vents Vents Additional Information Vents Vents 38 En Before cleaning, be sure to unplug the power cord from ... component and then dry it with a soft cloth. In the case of dust buildup (set the vacuum cleaner to clean the display and related parts is easily scratched, do not rub it or hit it with a dry soft cloth. Wipe the display and remote control gently with a hard object...

User Manual
Page 46
...; No picture. Not a malfunction. • The ON indicator may cause picture distortion and similar problems. • Normal sound of the cooling fan and internal sliding parts of the Plasma Display panel. Additional Information 40 En Not a malfunction. • Fan speed changes automatically in accordance with motors such as hair dryers, electric...
...; No picture. Not a malfunction. • The ON indicator may cause picture distortion and similar problems. • Normal sound of the cooling fan and internal sliding parts of the Plasma Display panel. Additional Information 40 En Not a malfunction. • Fan speed changes automatically in accordance with motors such as hair dryers, electric...
User Manual
Page 47
...Immediately disconnect the power plug and consult your dealer or a service center. Such images may produce a low level of internal electronic parts, or other factors. the function is turned on the environment in such applications, consult your nearest sales outlet. • The Plasma... a single [4:3] screen size, or [DOT BY DOT] image. Electromagnetic interferrence This unit is not affected. Depending on , some parts of the still images and the time they will cause eye strain. After-image lagging due to remaining electrical load When image patterns...
...Immediately disconnect the power plug and consult your dealer or a service center. Such images may produce a low level of internal electronic parts, or other factors. the function is turned on the environment in such applications, consult your nearest sales outlet. • The Plasma... a single [4:3] screen size, or [DOT BY DOT] image. Electromagnetic interferrence This unit is not affected. Depending on , some parts of the still images and the time they will cause eye strain. After-image lagging due to remaining electrical load When image patterns...


