User Manual
Page 5
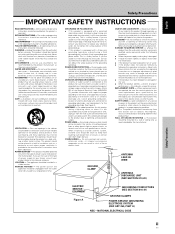
...- Do not use a mounting accessory recommended by the product manufacturer as they may expose you are not sure of the type of power supply to a wall or ceiling only as opening or removing covers may cause hazards. Do not place this product yourself as recommended by ... retained for ventilation and to protect it from the wall outlet and refer servicing to qualified service personnel under the following conditions: ÷ When the power-supply cord or plug is operated. or near a bathtub, wash bowl, kitchen sink, or laundry tub; ACCESSORIES - Use only with a cart, stand, ...
...- Do not use a mounting accessory recommended by the product manufacturer as they may expose you are not sure of the type of power supply to a wall or ceiling only as opening or removing covers may cause hazards. Do not place this product yourself as recommended by ... retained for ventilation and to protect it from the wall outlet and refer servicing to qualified service personnel under the following conditions: ÷ When the power-supply cord or plug is operated. or near a bathtub, wash bowl, kitchen sink, or laundry tub; ACCESSORIES - Use only with a cart, stand, ...
User Manual
Page 7
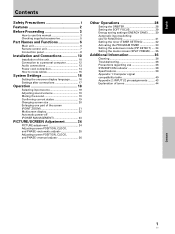
...Before Proceeding 3 How to use this manual 3 Checking supplied accessories 5 Part Names and Functions 6 Main unit 6 Remote control unit 7 Connection panel 8 Installation and Connections 10 Installation of the unit 10 Connection to a personal computer 12 Audio connections 13 Power cord connection 14 How to route cables 15 System Settings... status 19 Changing screen size 20 Enlarging one part of the screen (POINT ZOOM 21 Multiscreen display 22 Automatic power-off (POWER MANAGEMENT 23 PICTURE/SCREEN Adjustment 24 PICTURE adjustment 24 Adjusting screen POSITION, CLOCK, and PHASE
...Before Proceeding 3 How to use this manual 3 Checking supplied accessories 5 Part Names and Functions 6 Main unit 6 Remote control unit 7 Connection panel 8 Installation and Connections 10 Installation of the unit 10 Connection to a personal computer 12 Audio connections 13 Power cord connection 14 How to route cables 15 System Settings... status 19 Changing screen size 20 Enlarging one part of the screen (POINT ZOOM 21 Multiscreen display 22 Automatic power-off (POWER MANAGEMENT 23 PICTURE/SCREEN Adjustment 24 PICTURE adjustment 24 Adjusting screen POSITION, CLOCK, and PHASE

User Manual
Page 11
...) 9 Washers (x 2) 0 Hex hole bolts (x 2) - When attaching to the rear of the main unit, be careful not to cover the vents. English Checking supplied accessories Check that the following accessories were supplied. 1 Power cord 2 Remote control unit Before Proceeding 7 Ferrite cores (x 3) (for audio cables) 8 Display stands (x 2) 3 AA (R6) batteries (x 2) 4 Cleaning cloth (for screen) 5 Speed...
...) 9 Washers (x 2) 0 Hex hole bolts (x 2) - When attaching to the rear of the main unit, be careful not to cover the vents. English Checking supplied accessories Check that the following accessories were supplied. 1 Power cord 2 Remote control unit Before Proceeding 7 Ferrite cores (x 3) (for audio cables) 8 Display stands (x 2) 3 AA (R6) batteries (x 2) 4 Cleaning cloth (for screen) 5 Speed...
User Manual
Page 15
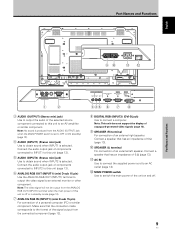
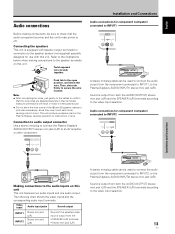
...9 SPEAKER (R) terminal For connection of a personal computer (PC) or similar component. AC IN Use to connect the supplied power cord to an AC outlet (page 14). = MAIN POWER switch Use to switch the main power of components connected to INPUT1 to this unit is selected. Connect the audio output jack of the unit... (INPUT1) (mini D-sub 15 pin) For connection of an external right speaker. Note: No sound is produced from the AUDIO (OUTPUT) jack when the MAIN POWER switch is set to OFF or ON (standby) (page 13). 4 AUDIO (INPUT1) (Stereo mini jack) Use to obtain sound when INPUT1 is off . 9...
...9 SPEAKER (R) terminal For connection of a personal computer (PC) or similar component. AC IN Use to connect the supplied power cord to an AC outlet (page 14). = MAIN POWER switch Use to switch the main power of components connected to INPUT1 to this unit is selected. Connect the audio output jack of the unit... (INPUT1) (mini D-sub 15 pin) For connection of an external right speaker. Note: No sound is produced from the AUDIO (OUTPUT) jack when the MAIN POWER switch is set to OFF or ON (standby) (page 13). 4 AUDIO (INPUT1) (Stereo mini jack) Use to obtain sound when INPUT1 is off . 9...
User Manual
Page 19
... this unit. 12 mm Twist exposed wire strands together. Push tab to confirm that the audio component's power and the unit's main power is equipped with speaker output terminals for connection to the speaker system (not supplied) specially designed for component (computer) connected to INPUT2 OUTPUT INPUT1 INPUT2 AUDIO AUDIO AUDIO Installation and...
... this unit. 12 mm Twist exposed wire strands together. Push tab to confirm that the audio component's power and the unit's main power is equipped with speaker output terminals for connection to the speaker system (not supplied) specially designed for component (computer) connected to INPUT2 OUTPUT INPUT1 INPUT2 AUDIO AUDIO AUDIO Installation and...
User Manual
Page 20
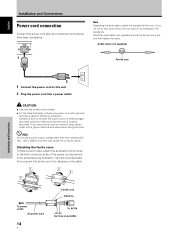
...shown in the accompanying illustration. AC IN Note Regarding the audio cable, attach the supplied ferrite core. If you do not do this, this unit. 2 Plug the power cord into a power outlet. Use the provided cable tie to a three-pronged grounded outlet and make sure...the cable. English Installation and Connections Power cord connection Connect the power cord after all component connections have been completed. Do not use an outlet with a ground terminal is properly grounded. If you use a power source converter plug, use a power supply voltage other than that the cord...
...shown in the accompanying illustration. AC IN Note Regarding the audio cable, attach the supplied ferrite core. If you do not do this, this unit. 2 Plug the power cord into a power outlet. Use the provided cable tie to a three-pronged grounded outlet and make sure...the cable. English Installation and Connections Power cord connection Connect the power cord after all component connections have been completed. Do not use an outlet with a ground terminal is properly grounded. If you use a power source converter plug, use a power supply voltage other than that the cord...
User Manual
Page 42
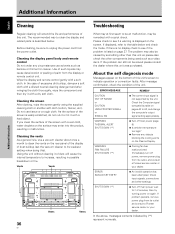
... on the surface may also be caused by something other than this unit. Immediately turn off power, remove power plug from its outlet and consult a Pioneer service center or your dealer. ¶ An invalid operation has been attempted. If problem persists, remove... power plug from its weakest setting when doing this unit was purchased. In the above, messages contents indicated by the unit. Cleaning the screen After dusting, wipe the screen gently using the supplied...
... on the surface may also be caused by something other than this unit. Immediately turn off power, remove power plug from its outlet and consult a Pioneer service center or your dealer. ¶ An invalid operation has been attempted. If problem persists, remove... power plug from its weakest setting when doing this unit was purchased. In the above, messages contents indicated by the unit. Cleaning the screen After dusting, wipe the screen gently using the supplied...

User Manual
Page 45
... notice. D-sub 9 pin (pin connector) COMBINATION IN/OUT ... Additional Information 39 En HD/VS, VD ... Mini DIN 6 pin (x2) Accessories Power cord 1 Remote control unit 1 Remote control unit holder 1 AA (R6) batteries 2 Cleaning cloth (for screen 1 Speed clamps 5 Display stands 2 ...type AC Plasma Panel 92.16 cm (W) x 51.53 cm (H) x 105.59 cm (diagonal) Number of pixels 1024 x 768 Power supply AC 100 - 120 V, 50/60 Hz Rated current 3.0 A - 2.5 A Standby power consumption 1.2 W External dimensions 1022 mm (W) x 610 mm (H) x 98 mm (D: Not including handles) 40-1/4 in. (W) x 24...
... notice. D-sub 9 pin (pin connector) COMBINATION IN/OUT ... Additional Information 39 En HD/VS, VD ... Mini DIN 6 pin (x2) Accessories Power cord 1 Remote control unit 1 Remote control unit holder 1 AA (R6) batteries 2 Cleaning cloth (for screen 1 Speed clamps 5 Display stands 2 ...type AC Plasma Panel 92.16 cm (W) x 51.53 cm (H) x 105.59 cm (diagonal) Number of pixels 1024 x 768 Power supply AC 100 - 120 V, 50/60 Hz Rated current 3.0 A - 2.5 A Standby power consumption 1.2 W External dimensions 1022 mm (W) x 610 mm (H) x 98 mm (D: Not including handles) 40-1/4 in. (W) x 24...
Brochure
Page 5
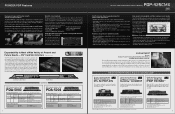
... and four energy saver modes This PDP-425CMX achieves the industry's lowest power consumption of 285W thanks to the high light emission efficiency of designated functions according to a schedule You can be transmitted over longer distances. PIONEER PDP Features High speed image switching for smooth displays and presentations The PDP-425CMX has a high performance dual image processing...
... and four energy saver modes This PDP-425CMX achieves the industry's lowest power consumption of 285W thanks to the high light emission efficiency of designated functions according to a schedule You can be transmitted over longer distances. PIONEER PDP Features High speed image switching for smooth displays and presentations The PDP-425CMX has a high performance dual image processing...


