
Owner's Manual
Page 3
... of Pioneer flat panel displays. We are felt and sounds can be tasted. An experience that set the KURO apart. TABLE OF CONTENTS 1 Introduction to the Flat Panel Displays 6 1.1 Flat Panel Display Shipment Checklist ...6 1.2 Control Options: Get to Know Your Flat Panel Display 7 1.2.1 Control Buttons and More on the Flat Panel Display 7 ... and hearing like never before. English TABLE OF CONTENTS Congratulations on the Remote Control ...11 2 Install Your Flat Panel Display ...13 2.1 Use the Optional Table Top Stand (Stand) or Equivalent Items 13 2.2 Use the Optional Brackets...
... of Pioneer flat panel displays. We are felt and sounds can be tasted. An experience that set the KURO apart. TABLE OF CONTENTS 1 Introduction to the Flat Panel Displays 6 1.1 Flat Panel Display Shipment Checklist ...6 1.2 Control Options: Get to Know Your Flat Panel Display 7 1.2.1 Control Buttons and More on the Flat Panel Display 7 ... and hearing like never before. English TABLE OF CONTENTS Congratulations on the Remote Control ...11 2 Install Your Flat Panel Display ...13 2.1 Use the Optional Table Top Stand (Stand) or Equivalent Items 13 2.2 Use the Optional Brackets...
Owner's Manual
Page 4
...Your Flat Panel Display 50 6.1 Program the Remote Control to Operate Other Equipment 50 6.1.1 Use the Learning Function ...50 6.1.2 Assign a Manufacturing Code to the Remote Control 51 6.1.3 Issue a Library Search for a Manufacturer Code 51 6.1.4 Clear Added Manufacturer Codes from the Remote Control 52 6.1.5 Control a Pioneer ... Connect a Game Console or Camcorder ...66 6.7 Use the IR REPEATER OUT ...66 6.8 Connect to a Network ...67 6.8.1 IP Control Setting ...68 6.8.2 Use the Web Control System...69 6.9 Assign a Serial Number...73 6.9.1 Assign an ID Number...73 6.9.2 Assign a Baud Rate...
...Your Flat Panel Display 50 6.1 Program the Remote Control to Operate Other Equipment 50 6.1.1 Use the Learning Function ...50 6.1.2 Assign a Manufacturing Code to the Remote Control 51 6.1.3 Issue a Library Search for a Manufacturer Code 51 6.1.4 Clear Added Manufacturer Codes from the Remote Control 52 6.1.5 Control a Pioneer ... Connect a Game Console or Camcorder ...66 6.7 Use the IR REPEATER OUT ...66 6.8 Connect to a Network ...67 6.8.1 IP Control Setting ...68 6.8.2 Use the Web Control System...69 6.9 Assign a Serial Number...73 6.9.1 Assign an ID Number...73 6.9.2 Assign a Baud Rate...
Owner's Manual
Page 11
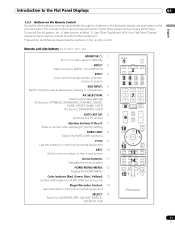
... buttons on the remote control. Use Other Equipment With Your Flat Panel Display" explains how to use the remote to control other equipment such as a DVD Player, Surround Sound system, etc. Introduction to the Flat Panel Displays 01 English 1.2.3 Buttons on the Remote Control Except for MONITOR...4 Switch inputs for sub screens when viewing in multi-screen AV SELECTION: 5 Select audio/video settings AV Source: OPTIMUM, STANDARD, DYNAMIC, MOVIE, PURE, SPORT, GAME, USER PC Source: STANDARD, USER AUTO SET UP: 6 Optimize the PC screen Number buttons 0 thru 9: 7 Enter a number when applying...
... buttons on the remote control. Use Other Equipment With Your Flat Panel Display" explains how to use the remote to control other equipment such as a DVD Player, Surround Sound system, etc. Introduction to the Flat Panel Displays 01 English 1.2.3 Buttons on the Remote Control Except for MONITOR...4 Switch inputs for sub screens when viewing in multi-screen AV SELECTION: 5 Select audio/video settings AV Source: OPTIMUM, STANDARD, DYNAMIC, MOVIE, PURE, SPORT, GAME, USER PC Source: STANDARD, USER AUTO SET UP: 6 Optimize the PC screen Number buttons 0 thru 9: 7 Enter a number when applying...
Owner's Manual
Page 12
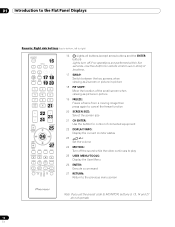
01 Introduction to the Flat Panel Displays Remote: Right side buttons (top to bottom, left to MONITOR, buttons 9, 13, 14... screen size 21 CH ENTER: Use the button for control of connected equipment 22 DISPLAY/INFO: Display the current monitor status 23 i +/-: Set the volume 24 MUTING: Turn off the sound while the video continues to play 25 USER... MENU/TOOLS: Display the User Menu 26 ENTER: Execute a command 27 RETURN: Return to the previous menu screen Note: If you set the preset code to right) MONITOR INPUT 1 2 3 16 4 5 ...
01 Introduction to the Flat Panel Displays Remote: Right side buttons (top to bottom, left to MONITOR, buttons 9, 13, 14... screen size 21 CH ENTER: Use the button for control of connected equipment 22 DISPLAY/INFO: Display the current monitor status 23 i +/-: Set the volume 24 MUTING: Turn off the sound while the video continues to play 25 USER... MENU/TOOLS: Display the User Menu 26 ENTER: Execute a command 27 RETURN: Return to the previous menu screen Note: If you set the preset code to right) MONITOR INPUT 1 2 3 16 4 5 ...
Owner's Manual
Page 25
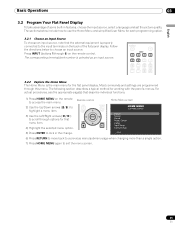
...menu/submenu page when changing more than a single option. 7) Press HOME MENU again to scroll through options for the flat panel display. Remote control EXIT TOP MENU GUIDE HOME MENU ENTER 4) Highlight the selected menu option. The sections below to use...PIP SPLIT INPUT SWAP SHIFT AV AUTO SCREEN SELECTION SET UP FREEZE SIZE 3.2.2 Explore the Home Menu The Home Menu is selected as an input source. For actual procedures, see the appropriate page(s) that menu item. Basic Operations 03 English 3.2 Program Your Flat Panel Display To take advantage of the flat panel display.
...menu/submenu page when changing more than a single option. 7) Press HOME MENU again to scroll through options for the flat panel display. Remote control EXIT TOP MENU GUIDE HOME MENU ENTER 4) Highlight the selected menu option. The sections below to use...PIP SPLIT INPUT SWAP SHIFT AV AUTO SCREEN SELECTION SET UP FREEZE SIZE 3.2.2 Explore the Home Menu The Home Menu is selected as an input source. For actual procedures, see the appropriate page(s) that menu item. Basic Operations 03 English 3.2 Program Your Flat Panel Display To take advantage of the flat panel display.
Owner's Manual
Page 26
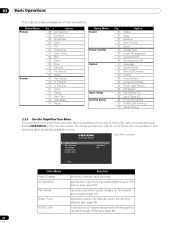
...The following table shows the available menus. 03 Basic Operations This chart provides a breakdown of the Home Menu. USER MENU FLAT PANEL DISPLAY User Menu screen Input Change AV Selection Film Mode Sleep Timer KURO LINK : Standard : Off Exit User Menu Input Change... Signal Off No Operation Off Language Input Priority Blue LED Dimmer Orbiter Video Pattern Long Life Settings Room Light Sensor PIP Detect Input Setup 1/2 Input Setup 2/2 IP Control Setting KURO LINK Setting Serial Setting 3.2.3 Use the Simplified User Menu For simplified menu selections, the User Menu provides quick access...
...The following table shows the available menus. 03 Basic Operations This chart provides a breakdown of the Home Menu. USER MENU FLAT PANEL DISPLAY User Menu screen Input Change AV Selection Film Mode Sleep Timer KURO LINK : Standard : Off Exit User Menu Input Change... Signal Off No Operation Off Language Input Priority Blue LED Dimmer Orbiter Video Pattern Long Life Settings Room Light Sensor PIP Detect Input Setup 1/2 Input Setup 2/2 IP Control Setting KURO LINK Setting Serial Setting 3.2.3 Use the Simplified User Menu For simplified menu selections, the User Menu provides quick access...

Owner's Manual
Page 27
To assign a different language for menus and on-screen information, follow the steps below. 1 ) Access Language through the Option menu. Language : Input Priority : Blue LED Dimmer : Orbiter : Video Pattern : Long Life Settings : Room Light Sensor : PIP Detect : English Off Low Off Off No Off Auto 2 ) Select a language from the submenu. 3 ) Press HOME MENU to exit the menu. 27 En Basic Operations 03 English 3.2.4 Assign a Language The default menu language is English.
To assign a different language for menus and on-screen information, follow the steps below. 1 ) Access Language through the Option menu. Language : Input Priority : Blue LED Dimmer : Orbiter : Video Pattern : Long Life Settings : Room Light Sensor : PIP Detect : English Off Low Off Off No Off Auto 2 ) Select a language from the submenu. 3 ) Press HOME MENU to exit the menu. 27 En Basic Operations 03 English 3.2.4 Assign a Language The default menu language is English.

Owner's Manual
Page 28
...adjustments but for detailed video modifications, refer to "5 Additional Picture Adjustment Options." 4.1.1 Adjust the Picture for Your Room Lighting The flat panel display senses the amount of light in your room and automatically adjusts the screen brightness for you. Bright rooms require stronger coloring so ... refer to "5.1 Choose an AV Option (Video, Game, etc.)." Language : Input Priority : Blue LED Dimmer : Orbiter : Video Pattern : Long Life Settings : Room Light Sensor : PIP Detect : English Off Low Off Off No Off Auto 2 ) Select On (or Off ) from the main menu. Use...
...adjustments but for detailed video modifications, refer to "5 Additional Picture Adjustment Options." 4.1.1 Adjust the Picture for Your Room Lighting The flat panel display senses the amount of light in your room and automatically adjusts the screen brightness for you. Bright rooms require stronger coloring so ... refer to "5.1 Choose an AV Option (Video, Game, etc.)." Language : Input Priority : Blue LED Dimmer : Orbiter : Video Pattern : Long Life Settings : Room Light Sensor : PIP Detect : English Off Low Off Off No Off Auto 2 ) Select On (or Off ) from the main menu. Use...

Owner's Manual
Page 29
... using the arrow buttons. 3 ) Press HOME MENU to exit the menu. Picture Image Position Each input source stores the picture adjustment settings for that view. Also, depending on the displayed video, the image position may not change after an adjustment. To adjust the picture's horizontal and vertical position, follow the steps below...
... using the arrow buttons. 3 ) Press HOME MENU to exit the menu. Picture Image Position Each input source stores the picture adjustment settings for that view. Also, depending on the displayed video, the image position may not change after an adjustment. To adjust the picture's horizontal and vertical position, follow the steps below...

Owner's Manual
Page 30
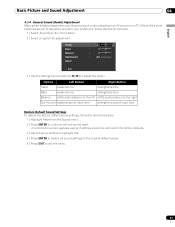
... and Sound Adjustment Restore Default Picture After making multiple adjustments, it may be adjusted separately. Many small adjustments lead to reverse improper settings. The word "Before" appears on the After screen. For example, if two options under AV Selection, STANDARD and MOVIE need... screen stores that previous entry in memory and deactivates the button. • Exiting an option from the After screen. All Picture settings return to the original default values. 4.1.3 Compare Images When Adjusting the Picture When adjusting the picture, look for the preferred picture quality...
... and Sound Adjustment Restore Default Picture After making multiple adjustments, it may be adjusted separately. Many small adjustments lead to reverse improper settings. The word "Before" appears on the After screen. For example, if two options under AV Selection, STANDARD and MOVIE need... screen stores that previous entry in memory and deactivates the button. • Exiting an option from the After screen. All Picture settings return to the original default values. 4.1.3 Compare Images When Adjusting the Picture When adjusting the picture, look for the preferred picture quality...
Owner's Manual
Page 31
... Many prefer a heavier base when watching movies or music videos from the Home Menu. 2 ) Select an option for adjustment. A confirmation screen appears asking if settings should be returned to the factory defaults. 3 ) Use the arrow buttons to highlight Yes. 4 ) Press ENTER to restore all sound... settings to the original default values. 5 ) Press EXIT to adjust the option. Treble Bass Balance Sub Volume Reset : 0 : 0 : 0 : +20 Exit 3 ) Use the left shifts audio...
... Many prefer a heavier base when watching movies or music videos from the Home Menu. 2 ) Select an option for adjustment. A confirmation screen appears asking if settings should be returned to the factory defaults. 3 ) Use the arrow buttons to highlight Yes. 4 ) Press ENTER to restore all sound... settings to the original default values. 5 ) Press EXIT to adjust the option. Treble Bass Balance Sub Volume Reset : 0 : 0 : 0 : +20 Exit 3 ) Use the left shifts audio...

Owner's Manual
Page 32
...screen appears. 2 ) Select Yes from the submenu. 3 ) Select the desired input. Your flat panel display includes a Long Life Settings option. To set this option causes the panel to extend the life of your panel and help alleviate after-image ghosts or burn-in. 04 Basic Picture and Sound Adjustment 4.2 Smart... Starts for New Owners Many of the flat panel display features make it was set the priority input, follow the directions below for the simplest usage, best quality, and longest life span. 4.2.1 Extend Your Panel Life This function provides short-cuts to match the ...
...screen appears. 2 ) Select Yes from the submenu. 3 ) Select the desired input. Your flat panel display includes a Long Life Settings option. To set this option causes the panel to extend the life of your panel and help alleviate after-image ghosts or burn-in. 04 Basic Picture and Sound Adjustment 4.2 Smart... Starts for New Owners Many of the flat panel display features make it was set the priority input, follow the directions below for the simplest usage, best quality, and longest life span. 4.2.1 Extend Your Panel Life This function provides short-cuts to match the ...

Owner's Manual
Page 33
... exit the menu. Note: The Video Pattern timer has priority over Sleep Timer, No Signal Off, and No Operation Off (Power Management) settings. 4.2.6 Activate Energy Save to exit the menu. Option Description Standard No effect Save 1 consumes less power than Standard Save 2 consumes less ...Note: To deactivate the screen, select Picture Off. 33 En To cancel the Video Pattern screen, press the remote's MONITOR (a) or press the panel's STANDBY/ON button. To activate Orbiter, follow the steps below to alleviate after running the Video Pattern screen. A confirmation screen appears. 2 ...
... exit the menu. Note: The Video Pattern timer has priority over Sleep Timer, No Signal Off, and No Operation Off (Power Management) settings. 4.2.6 Activate Energy Save to exit the menu. Option Description Standard No effect Save 1 consumes less power than Standard Save 2 consumes less ...Note: To deactivate the screen, select Picture Off. 33 En To cancel the Video Pattern screen, press the remote's MONITOR (a) or press the panel's STANDBY/ON button. To activate Orbiter, follow the steps below to alleviate after running the Video Pattern screen. A confirmation screen appears. 2 ...

Owner's Manual
Page 34
The Sleep Timer places the panel in this manual. 34 En Note: When the sleep timer has been set the Sleep Timer, follow the steps below. 1 ) Press USER MENU. 2 ) Select Sleep Timer from the User Menu. 3 ) Select the desired time period. 04 Basic Picture ... menu. The Video Pattern timer has priority over the sleep timer. To set , "Remain ---min" appears at the top of the menu. The Sleep Timer provides time periods of your flat panel display, try using the Sleep Timer for occasions when the panel may be left on screen each minute until the time has elapsed...
The Sleep Timer places the panel in this manual. 34 En Note: When the sleep timer has been set the Sleep Timer, follow the steps below. 1 ) Press USER MENU. 2 ) Select Sleep Timer from the User Menu. 3 ) Select the desired time period. 04 Basic Picture ... menu. The Video Pattern timer has priority over the sleep timer. To set , "Remain ---min" appears at the top of the menu. The Sleep Timer provides time periods of your flat panel display, try using the Sleep Timer for occasions when the panel may be left on screen each minute until the time has elapsed...

Owner's Manual
Page 35
...menu items while the remaining sections provide power management options. If the AV source is a Game Control, select GAME and refer to "5.1.4 Set the Panel to Recognize a Game Console" for the room light sensor, the AV Option or Selection depends upon the brightness of the environment and ...an external AV Source. 1 ) Press AV SELECTION on screen. When the menu screen disappears, the panel locks in the order shown below to set the mode for features and functions that your flat panel display offers, browse this chapter for each input source) 3 ) Allow the AV Selection screen to the ...
...menu items while the remaining sections provide power management options. If the AV source is a Game Control, select GAME and refer to "5.1.4 Set the Panel to Recognize a Game Console" for the room light sensor, the AV Option or Selection depends upon the brightness of the environment and ...an external AV Source. 1 ) Press AV SELECTION on screen. When the menu screen disappears, the panel locks in the order shown below to set the mode for features and functions that your flat panel display offers, browse this chapter for each input source) 3 ) Allow the AV Selection screen to the ...

Owner's Manual
Page 36
...is coming from a PC). To have the panel store your flat panel display, use the Game function to GAME and use an external input (unless the source is selected, images are reproduced based on screen, the Game Control Pref. option, set the AV Selection to establish a preference for...on ) is ignored during multi-screen viewing (refer to "5.4 View in a normally bright room • USER: allows customizing the settings for each input source 5.1.4 Set the Panel to Recognize a Game Console When adding a game console to your Game preference, follow the steps below . 1 ) Access Pro Adjust...
...is coming from a PC). To have the panel store your flat panel display, use the Game function to GAME and use an external input (unless the source is selected, images are reproduced based on screen, the Game Control Pref. option, set the AV Selection to establish a preference for...on ) is ignored during multi-screen viewing (refer to "5.4 View in a normally bright room • USER: allows customizing the settings for each input source 5.1.4 Set the Panel to Recognize a Game Console When adding a game console to your Game preference, follow the steps below . 1 ) Access Pro Adjust...
Owner's Manual
Page 40
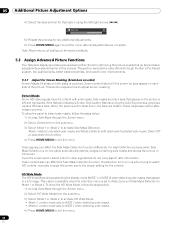
... Side masks are complete. For High Definition pictures when Side Mask Detection is set to Mode 1 or Mode 2. Some content fails to exit the menu. 40 En If the flat panel display's Screen Size is on the picture's left /right arrows (/). ...flat panel display provides various advanced functions for optimizing the picture quality that go beyond basic adjustments explained earlier in a 4:3 image. 05 Additional Picture Adjustment Options 4 ) Select the desired level for that option using the left and right sides. This section explores the value offered through Pioneer...
... Side masks are complete. For High Definition pictures when Side Mask Detection is set to Mode 1 or Mode 2. Some content fails to exit the menu. 40 En If the flat panel display's Screen Size is on the picture's left /right arrows (/). ...flat panel display provides various advanced functions for optimizing the picture quality that go beyond basic adjustments explained earlier in a 4:3 image. 05 Additional Picture Adjustment Options 4 ) Select the desired level for that option using the left and right sides. This section explores the value offered through Pioneer...

Owner's Manual
Page 41
... ) Access Reset through the Picture menu. 2 ) Select the desired parameter from the submenu. The manual adjustment screen appears. 41 En Parameter Fixed Auto Description sets the same brightness for a better white balance. To adjust the white balance, follow the directions below. 1 ) Access Color Temp through the Screen menu. 2...active, the bars automatically change the bars to a lighter shade of screen images 4 ) Press HOME MENU to gray. All screen settings return to the original default values. 5.3.2 Select a Color Temperature Level Use this option to adjust the balance.
... ) Access Reset through the Picture menu. 2 ) Select the desired parameter from the submenu. The manual adjustment screen appears. 41 En Parameter Fixed Auto Description sets the same brightness for a better white balance. To adjust the white balance, follow the directions below. 1 ) Access Color Temp through the Screen menu. 2...active, the bars automatically change the bars to a lighter shade of screen images 4 ) Press HOME MENU to gray. All screen settings return to the original default values. 5.3.2 Select a Color Temperature Level Use this option to adjust the balance.

Owner's Manual
Page 42
...Use this option to 72 Hz (e.g., movies) Text Off Optimization On deactivates text optimization improves subtitle display quality 42 En The function supports both film and text material. To set the PureCinema level for your HD material, follow the directions below . 1 ) Access Pro .... 05 Additional Picture Adjustment Options 6 ) Select an option to exit the menu. 5.3.4 Select a PureCinema Level for High Quality Image Pioneer's PureCinema automatically detects and analyses a film-based source (originally encoded at 24 frames per second for smooth and vivid playback Smooth (not...
...Use this option to 72 Hz (e.g., movies) Text Off Optimization On deactivates text optimization improves subtitle display quality 42 En The function supports both film and text material. To set the PureCinema level for your HD material, follow the directions below . 1 ) Access Pro .... 05 Additional Picture Adjustment Options 6 ) Select an option to exit the menu. 5.3.4 Select a PureCinema Level for High Quality Image Pioneer's PureCinema automatically detects and analyses a film-based source (originally encoded at 24 frames per second for smooth and vivid playback Smooth (not...

Owner's Manual
Page 43
...Parameter Off Mode 1 Mode 2 Description No effect compensates for more effective picture settings compensates for appropriate picture settings 5 ) Press HOME MENU to input video signals. 43 En setting under the Option menu disables the PureCinema setting. This is normal and is not a malfunction. To select the Intelligent Mode...menu. 3 ) Select Mode 1 or Mode 2 (or Off ). 4 ) Select the desired parameter. Notes: Activating the Game Control Pref. This setting applies only to exit the menu. Additional Picture Adjustment Options 05 5 ) Press HOME MENU to input video signals. This...
...Parameter Off Mode 1 Mode 2 Description No effect compensates for more effective picture settings compensates for appropriate picture settings 5 ) Press HOME MENU to input video signals. 43 En setting under the Option menu disables the PureCinema setting. This is normal and is not a malfunction. To select the Intelligent Mode...menu. 3 ) Select Mode 1 or Mode 2 (or Off ). 4 ) Select the desired parameter. Notes: Activating the Game Control Pref. This setting applies only to exit the menu. Additional Picture Adjustment Options 05 5 ) Press HOME MENU to input video signals. This...
