Owner's Manual
Page 3
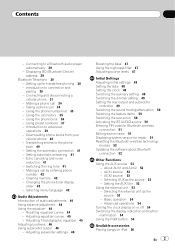
...the bass 47 Using the high pass filter 47 Adjusting source levels 47 Initial Settings Adjusting initial settings 48 Setting the date 48 Setting the clock 48 Switching the auxiliary setting 49 Switching the dimmer setting 49 Setting the rear output and subwoofer controller 49 Switching the sound muting/attenuation 50 ...51 Editing device name 51 Displaying system version for hands-free phoning 30 - Setting the AUX title 53 Using the external unit 53 - Basic operation 54 - Advanced operations 54 Turning the clock display on or off 54 Switching the display indication and button illumination 54 ...
...the bass 47 Using the high pass filter 47 Adjusting source levels 47 Initial Settings Adjusting initial settings 48 Setting the date 48 Setting the clock 48 Switching the auxiliary setting 49 Switching the dimmer setting 49 Setting the rear output and subwoofer controller 49 Switching the sound muting/attenuation 50 ...51 Editing device name 51 Displaying system version for hands-free phoning 30 - Setting the AUX title 53 Using the external unit 53 - Basic operation 54 - Advanced operations 54 Turning the clock display on or off 54 Switching the display indication and button illumination 54 ...
Owner's Manual
Page 10
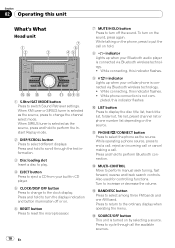
...button Press to reset the microprocessor. 7 MUTE/HOLD button Press to turn on hold. 8 indicator Lights up when your built-in CD player. 5 CLOCK/DISP OFF button Press to change to change the channel select mode. b PHONE/ /CONNECT button Press to cycle through the text ... menu. Press and hold to increase or decrease the volume. While connecting, this indicator flashes. Press to return to switch Sound Retriever settings. pleted, this indicator flashes. ! Turn to perform Bluetooth connection. ogy. ! While connecting, this indicator flashes. 9 indicator Lights up...
...button Press to reset the microprocessor. 7 MUTE/HOLD button Press to turn on hold. 8 indicator Lights up when your built-in CD player. 5 CLOCK/DISP OFF button Press to change to change the channel select mode. b PHONE/ /CONNECT button Press to cycle through the text ... menu. Press and hold to increase or decrease the volume. While connecting, this indicator flashes. Press to return to switch Sound Retriever settings. pleted, this indicator flashes. ! Turn to perform Bluetooth connection. ogy. ! While connecting, this indicator flashes. 9 indicator Lights up...
Owner's Manual
Page 30
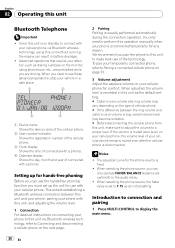
...free phoning function you are driving. Since this unit without running the engine can only operate FADER/BALANCE (balance adjustment) in battery drainage. ! Setting up the unit for comfort. When selecting the phone source, you can use with your cellular phone. Introduction to connection and pairing 1 Press ... for any reason. When you pair the phone to this unit to make sure to adjust the volume to use of the cellular phone. 3 Clock display Shows the time (if connected with a phone). 4 Calendar display Shows the day, month and year (if connected with this unit via ...
...free phoning function you are driving. Since this unit without running the engine can only operate FADER/BALANCE (balance adjustment) in battery drainage. ! Setting up the unit for comfort. When selecting the phone source, you can use with your cellular phone. Introduction to connection and pairing 1 Press ... for any reason. When you pair the phone to this unit to make sure to adjust the volume to use of the cellular phone. 3 Clock display Shows the time (if connected with a phone). 4 Calendar display Shows the day, month and year (if connected with this unit via ...
Owner's Manual
Page 48
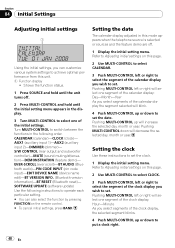
... MULTI-CONTROL and hold until the unit turns off . 1 Display the initial setting menu. CALENDAR (calendar)-CLOCK (clock)- Section 04 Initial Settings Adjusting initial settings Using the initial settings, you wish to set. S/W CONTROL (rear output and subwoofer controller)-MUTE (sound muting/attenuation)-DEMONSTRATION (feature demo)- Setting the date The calender display adjusted in this unit. 1 Function display !
... MULTI-CONTROL and hold until the unit turns off . 1 Display the initial setting menu. CALENDAR (calendar)-CLOCK (clock)- Section 04 Initial Settings Adjusting initial settings Using the initial settings, you wish to set. S/W CONTROL (rear output and subwoofer controller)-MUTE (sound muting/attenuation)-DEMONSTRATION (feature demo)- Setting the date The calender display adjusted in this unit. 1 Function display !

Owner's Manual
Page 49
... to select AUX1/ AUX2. 3 Press MULTI-CONTROL to turn dimmer on. # To turn dimmer off , press MULTI-CONTROL again. Refer to Adjusting initial settings on the previous page. 2 Use MULTI-CONTROL to select DIMMER. 3 Press MULTI-CONTROL to turn AUX1/ AUX2 on. # To turn AUX off , ... MULTI-CONTROL again. If you can be activated individually. For more information about connecting or using . You can match the clock to REAR SP :S/W, you switch the rear output setting to a time signal by pressing MULTI-CONTROL. ! Pressing MULTI-CONTROL will switch between REAR SP :FULL (full-range speaker...
... to select AUX1/ AUX2. 3 Press MULTI-CONTROL to turn dimmer on. # To turn dimmer off , press MULTI-CONTROL again. Refer to Adjusting initial settings on the previous page. 2 Use MULTI-CONTROL to select DIMMER. 3 Press MULTI-CONTROL to turn AUX1/ AUX2 on. # To turn AUX off , ... MULTI-CONTROL again. If you can be activated individually. For more information about connecting or using . You can match the clock to REAR SP :S/W, you switch the rear output setting to a time signal by pressing MULTI-CONTROL. ! Pressing MULTI-CONTROL will switch between REAR SP :FULL (full-range speaker...


