
Owner's Manual
Page 2
... be adhered to qualified service personnel under the following the operating instructions. POWER SOURCES - GROUNDING OR POLARIZATION ÷ If this Pioneer product. If you are unable to replace your electrician to insert the plug fully into the outlet, contact your obsolete outlet. This...mast and supporting structure, grounding of the lead-in performance - Do not defeat the safety purpose of antenna-discharge unit, connection to replace your electrician to grounding electrodes, and requirements for the grounding electrode. Do not use a mounting accessory recommended by...
... be adhered to qualified service personnel under the following the operating instructions. POWER SOURCES - GROUNDING OR POLARIZATION ÷ If this Pioneer product. If you are unable to replace your electrician to insert the plug fully into the outlet, contact your obsolete outlet. This...mast and supporting structure, grounding of the lead-in performance - Do not defeat the safety purpose of antenna-discharge unit, connection to replace your electrician to grounding electrodes, and requirements for the grounding electrode. Do not use a mounting accessory recommended by...
Owner's Manual
Page 3
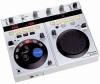
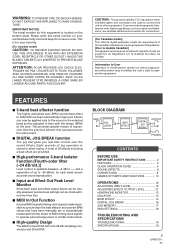
... OR OTHER OUTLET UNLESS THE BLADES CAN BE FULLY INSERTED TO PREVENT BLADE EXPOSURE. FEATURES 7 3-band beat effector function The highly acclaimed auto BPM counter/beat effect in the selected band and be made without appropriate authorization... BREAK OUTPUT PHONES CONTENTS BEFORE USE IMPORTANT SAFETY INSTRUCTIONS 2 FEATURES 3 QUICK OPERATION GUIDE 4 SOUND EFFECTS 6 CONNECTIONS 8 NAMES OF PARTS AND FUNCTIONS 10 OPERATIONS 12 ADJUSTING INPUT LEVEL 12 ADJUSTING EFFECT OUTPUT LEVEL 12 HEADPHONE MONITOR... now be applied only to the sound in DJM-500 has been substantially improved.
... OR OTHER OUTLET UNLESS THE BLADES CAN BE FULLY INSERTED TO PREVENT BLADE EXPOSURE. FEATURES 7 3-band beat effector function The highly acclaimed auto BPM counter/beat effect in the selected band and be made without appropriate authorization... BREAK OUTPUT PHONES CONTENTS BEFORE USE IMPORTANT SAFETY INSTRUCTIONS 2 FEATURES 3 QUICK OPERATION GUIDE 4 SOUND EFFECTS 6 CONNECTIONS 8 NAMES OF PARTS AND FUNCTIONS 10 OPERATIONS 12 ADJUSTING INPUT LEVEL 12 ADJUSTING EFFECT OUTPUT LEVEL 12 HEADPHONE MONITOR... now be applied only to the sound in DJM-500 has been substantially improved.
Owner's Manual
Page 8
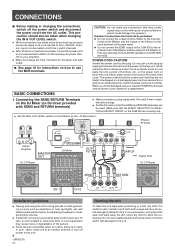
...the speakers. will damage to the -10 dB position. Connecting the SEND/RETURN Terminals on the DJ Mixer (on DJ mixer provided with 1/4-inch/6.3 mm in the cord or tie it damaged, ask your nearest PIONEER authorized service center or your amplifier. ÷ Make ... short circuit or electric shock. Effector EFX-500 Stereo Amplifier MASTER OUT DJ CD Player DJ Mixer OUTPUT SEND INPUT : Signal flow DJ CD Player RETURN CH-1 CH-2 Installation guidelines ÷ Placing and using cables with SEND and RETURN terminals) ÷ Make connections using the unit for instructions on...
...the speakers. will damage to the -10 dB position. Connecting the SEND/RETURN Terminals on the DJ Mixer (on DJ mixer provided with 1/4-inch/6.3 mm in the cord or tie it damaged, ask your nearest PIONEER authorized service center or your amplifier. ÷ Make ... short circuit or electric shock. Effector EFX-500 Stereo Amplifier MASTER OUT DJ CD Player DJ Mixer OUTPUT SEND INPUT : Signal flow DJ CD Player RETURN CH-1 CH-2 Installation guidelines ÷ Placing and using cables with SEND and RETURN terminals) ÷ Make connections using the unit for instructions on...
Owner's Manual
Page 9
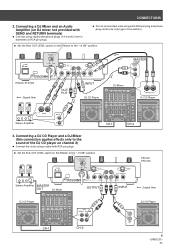
Effector EFX-500 : Signal flow R L INPUT OUT- R L PUT DJ CD Player L R MASTER OUT L R DJ Mixer DJ CD Player Stereo Amplifier 3. Connecting a DJ CD Player and a DJ Mixer (this connection applies effects only to the sound of connection). ¶ Set the IN & OUT LEVEL switch on the Effector to the "+4 dB" position. CH-1 CH-2 Effector EFX-500 Stereo Amplifier MASTER OUT DJ Mixer DJ CD Player OUTPUT L R R L INPUT L R L R : Signal...
Effector EFX-500 : Signal flow R L INPUT OUT- R L PUT DJ CD Player L R MASTER OUT L R DJ Mixer DJ CD Player Stereo Amplifier 3. Connecting a DJ CD Player and a DJ Mixer (this connection applies effects only to the sound of connection). ¶ Set the IN & OUT LEVEL switch on the Effector to the "+4 dB" position. CH-1 CH-2 Effector EFX-500 Stereo Amplifier MASTER OUT DJ Mixer DJ CD Player OUTPUT L R R L INPUT L R L R : Signal...
Owner's Manual
Page 11
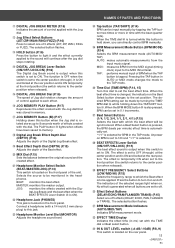
MASTER: monitors the master output. JOG: monitors the effects created with a 1/4-inch/6.3 mm stereo plug) to this dial to ON. Connect a headphone (with the Digital Jog Break (and the beat effect when the BEAT EFFECTS Lever Switch £ is ON). ( Headphone Jack (PHONES) This jack is ...
MASTER: monitors the master output. JOG: monitors the effects created with a 1/4-inch/6.3 mm stereo plug) to this dial to ON. Connect a headphone (with the Digital Jog Break (and the beat effect when the BEAT EFFECTS Lever Switch £ is ON). ( Headphone Jack (PHONES) This jack is ...

Owner's Manual
Page 13
... function allows you to monitor (pre-listen) sound effects (the sound normally output through the output terminals) without routing the sound through the output terminal. 1 Connect the headphone plug to the headphone jack (PHONES) on the front panel. ¶ Use a headphone with a standard 1/4-inch/6.3 mm stereo plug. 2 Select the source to...
... function allows you to monitor (pre-listen) sound effects (the sound normally output through the output terminals) without routing the sound through the output terminal. 1 Connect the headphone plug to the headphone jack (PHONES) on the front panel. ¶ Use a headphone with a standard 1/4-inch/6.3 mm stereo plug. 2 Select the source to...
Owner's Manual
Page 18
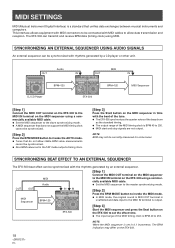
...sequencer. MIDI Audio [Step 1] Connect the MIDI OUT terminal on the MIDI sequencer to the master synchronizing mode. The EFX-500 can be synchronized. ¶ Also BPM values set in time with MIDI cables to be correctly measured for some tunes. OUT Audio DJ CD Player BPM=120 MIDI IN... OUT IN EFX-500 BPM=120 MIDI Sequencer [Step 1] Connect the MIDI OUT terminal on the EFX-500 to the MIDI IN terminal on the MIDI sequencer using a commercially available MIDI cable...
...sequencer. MIDI Audio [Step 1] Connect the MIDI OUT terminal on the MIDI sequencer to the master synchronizing mode. The EFX-500 can be synchronized. ¶ Also BPM values set in time with MIDI cables to be correctly measured for some tunes. OUT Audio DJ CD Player BPM=120 MIDI IN... OUT IN EFX-500 BPM=120 MIDI Sequencer [Step 1] Connect the MIDI OUT terminal on the EFX-500 to the MIDI IN terminal on the MIDI sequencer using a commercially available MIDI cable...
Owner's Manual
Page 19
.../ +4 dBu is output continuously. A MIDI sequencer that does not support the MIDI timing clock cannot be mistaken for 30 seconds and connect the power plug again. Audio Unit Sampling rate 48 kHz A/D, D/A Resolution 20 bits Frequency characteristics 20 Hz to a malfunction in the ... Should this be possible to 180. Number of channels 2 channels (stereo) 3. If the problem still persists, contact your nearest authorized Pioneer service center. SPECIFICATIONS 1. If you believe the unit is not synchronized. Symptom No effect is set to malfunction. Turn the DEPTH dial ...
.../ +4 dBu is output continuously. A MIDI sequencer that does not support the MIDI timing clock cannot be mistaken for 30 seconds and connect the power plug again. Audio Unit Sampling rate 48 kHz A/D, D/A Resolution 20 bits Frequency characteristics 20 Hz to a malfunction in the ... Should this be possible to 180. Number of channels 2 channels (stereo) 3. If the problem still persists, contact your nearest authorized Pioneer service center. SPECIFICATIONS 1. If you believe the unit is not synchronized. Symptom No effect is set to malfunction. Turn the DEPTH dial ...
Owner's Manual
Page 20
... by turning the equipment off and on a circuit different from that interference will not occur in the U.S.A. PIONEER ELECTRONICS SERVICE, INC. CUSTOMER SUPPORT DIVISION P.O. Increase the separation between the equipment and receiver. - These limits...@@@@@@@2'V(Y?W@@@@@@@@IX)&(Y?7 J 42 However, there is encouraged to try to radio or television reception, which the receiver is connected. - and you wish to locate the nearest Pioneer Authorized Independent Service Company, or if you wish to purchase replacement parts, operating instructions, service manuals, or accessories...
... by turning the equipment off and on a circuit different from that interference will not occur in the U.S.A. PIONEER ELECTRONICS SERVICE, INC. CUSTOMER SUPPORT DIVISION P.O. Increase the separation between the equipment and receiver. - These limits...@@@@@@@2'V(Y?W@@@@@@@@IX)&(Y?7 J 42 However, there is encouraged to try to radio or television reception, which the receiver is connected. - and you wish to locate the nearest Pioneer Authorized Independent Service Company, or if you wish to purchase replacement parts, operating instructions, service manuals, or accessories...


