Owner's Manual
Page 5
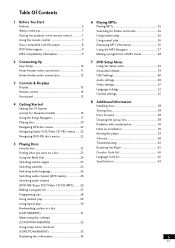
... 8 DVD Video regions 9 MP3 compatibility information 9 2 Connecting Up Easy Setup 10 Home theater video connections 11 Home theater audio connections 12 3 Controls & Displays Display 13 Remote control 14 Front panel 15 4 Getting Started Setting the TV System (except for Taiwanese model 16 Using the Setup Navigator 17 Playing discs 20 Navigating...
... 8 DVD Video regions 9 MP3 compatibility information 9 2 Connecting Up Easy Setup 10 Home theater video connections 11 Home theater audio connections 12 3 Controls & Displays Display 13 Remote control 14 Front panel 15 4 Getting Started Setting the TV System (except for Taiwanese model 16 Using the Setup Navigator 17 Playing discs 20 Navigating...

Owner's Manual
Page 7
...audio cable (red/white) • Video cable (yellow) • Power cable • These operating instructions Putting the batteries in the remote control 1 Open the battery compartment cover on the unit. • Use within the operating range and angle, as leakage and bursting.... Please confirm that isn't going to this Pioneer product. Confidential unpublished works. © 19921997 Dolby Laboratories. H048 En Using the remote control Keep in mind the following : • Don't mix new and old batteries together. &#...
...audio cable (red/white) • Video cable (yellow) • Power cable • These operating instructions Putting the batteries in the remote control 1 Open the battery compartment cover on the unit. • Use within the operating range and angle, as leakage and bursting.... Please confirm that isn't going to this Pioneer product. Confidential unpublished works. © 19921997 Dolby Laboratories. H048 En Using the remote control Keep in mind the following : • Don't mix new and old batteries together. &#...
Owner's Manual
Page 10
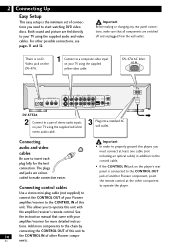
...; If the CONTROL IN jack on the player's rear panel is connected to the CONTROL OUT jack of another Pioneer component, point the remote control at the other component to a pair of stereo audio inputs on your TV using the supplied red/white ...remote control. For other Pioneer compo- Connecting control cables Use a stereo mini-plug cable (not supplied) to connect the CONTROL OUT of your Pioneer amplifier/receiver to insert each plug fully for more components to the chain by connecting the CONTROL OUT of this unit to operate this unit. Add more detailed instruc- DV-47A...
...; If the CONTROL IN jack on the player's rear panel is connected to the CONTROL OUT jack of another Pioneer component, point the remote control at the other component to a pair of stereo audio inputs on your TV using the supplied red/white ...remote control. For other Pioneer compo- Connecting control cables Use a stereo mini-plug cable (not supplied) to connect the CONTROL OUT of your Pioneer amplifier/receiver to insert each plug fully for more components to the chain by connecting the CONTROL OUT of this unit to operate this unit. Add more detailed instruc- DV-47A...
Owner's Manual
Page 14
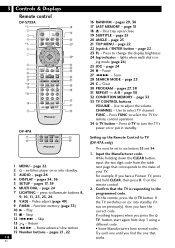
...1. Video adjust (page 49) 9 F.MEM - pages 29, 36 17 LAST MEMORY - page 25 20 ANGLE - Setting up the Remote Control to TV (DV-47A only) This most be set to select TV channel. While holiding down the CLEAR button, input the two digit code from step 1 ... buttons 8, 9, 10, 11, 23, 25, 26 8 V.ADJ - FUNC - Try each one until you have a Pioneer TV, press and hold CLEAR, then press 0, 0 on or put in jog mode (page 24) 25 JOG - CHANNEL - 3 Controls & Displays Remote control DV-S733A *1 2 3 4 *5 6 OPEN / CLOSE DISPLAY AUDIO SUBTITLE ANGLE SET UP MENU TOP MENU 7 ENTER 8 9...
...1. Video adjust (page 49) 9 F.MEM - pages 29, 36 17 LAST MEMORY - page 25 20 ANGLE - Setting up the Remote Control to TV (DV-47A only) This most be set to select TV channel. While holiding down the CLEAR button, input the two digit code from step 1 ... buttons 8, 9, 10, 11, 23, 25, 26 8 V.ADJ - FUNC - Try each one until you have a Pioneer TV, press and hold CLEAR, then press 0, 0 on or put in jog mode (page 24) 25 JOG - CHANNEL - 3 Controls & Displays Remote control DV-S733A *1 2 3 4 *5 6 OPEN / CLOSE DISPLAY AUDIO SUBTITLE ANGLE SET UP MENU TOP MENU 7 ENTER 8 9...
Owner's Manual
Page 15
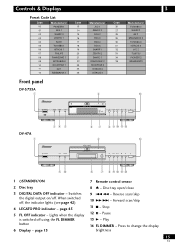
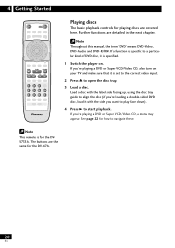
...Stop 12 8 - Press to change the display brightness 15 En page 13 7 Remote control sensor 8 0 - Controls & Displays 3 Preset Code List Code 00 01 02 03 04 05 06 07 08 09 10 11 12 Manufacturer PIONEER 1 RCA 1 SHARP 3 ZENITH 1 SONY TOSHIBA 1 HITACHI 1 PHILIPS PANASONIC 1...26 27 28 29 30 31 32 33 34 35 Manufacturer TOSHIBA 2 SHARP 2 GE 2 MAGNAVOX 2 TOSHIBA 3 HITACHI 4 JVC 2 FUJITSU PIONEER 2 GRANDIENTE Front panel DV-S733A 1 2 ~ STANDBY/ON DIGITAL DATA OFF LEGATO PRO FL OFF DV-47A 1 34 5 STANDBY/ON FL OFF FL DIMMER 0 41 ¡¢ 7 8 3 Î 67 8 90 -= 2 ~ Î...
...Stop 12 8 - Press to change the display brightness 15 En page 13 7 Remote control sensor 8 0 - Controls & Displays 3 Preset Code List Code 00 01 02 03 04 05 06 07 08 09 10 11 12 Manufacturer PIONEER 1 RCA 1 SHARP 3 ZENITH 1 SONY TOSHIBA 1 HITACHI 1 PHILIPS PANASONIC 1...26 27 28 29 30 31 32 33 34 35 Manufacturer TOSHIBA 2 SHARP 2 GE 2 MAGNAVOX 2 TOSHIBA 3 HITACHI 4 JVC 2 FUJITSU PIONEER 2 GRANDIENTE Front panel DV-S733A 1 2 ~ STANDBY/ON DIGITAL DATA OFF LEGATO PRO FL OFF DV-47A 1 34 5 STANDBY/ON FL OFF FL DIMMER 0 41 ¡¢ 7 8 3 Î 67 8 90 -= 2 ~ Î...

Owner's Manual
Page 17
... standby and on -screen display (OSD) appears: DVD PLAYER Î Note This remote is for the DVS733A. cursor up /down ENTER - go back to the previous question. The control possibilities for the current OSD are the same for the DV-47A. The buttons are shown at the bottom of the following OSDs using...
... standby and on -screen display (OSD) appears: DVD PLAYER Î Note This remote is for the DVS733A. cursor up /down ENTER - go back to the previous question. The control possibilities for the current OSD are the same for the DV-47A. The buttons are shown at the bottom of the following OSDs using...
Owner's Manual
Page 20
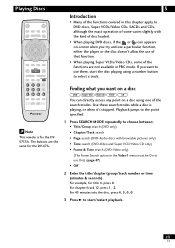
... 8 PREVIOUS NEXT 4¢ REV FWD 1¡ 1 2 3 4 5 6 +10 7890 DVD PLAYER Î Playing discs The basic playback controls for playing discs are the same for the DV-47A. 20 En The buttons are covered here. Note This remote is for the DVS733A. Further functions are detailed in the next chapter.
... 8 PREVIOUS NEXT 4¢ REV FWD 1¡ 1 2 3 4 5 6 +10 7890 DVD PLAYER Î Playing discs The basic playback controls for playing discs are the same for the DV-47A. 20 En The buttons are covered here. Note This remote is for the DVS733A. Further functions are detailed in the next chapter.
Owner's Manual
Page 23
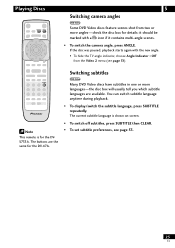
...select a track. Use these search modes while a disc is for title 4, press 4. Playing Discs PLAY 3 SEARCH MODE 1 2 3 4 5 6 7890 DVD PLAYER Î Note This remote is playing, or when it's stopped. Finding what you want on a disc You can directly access any point on -screen when you try and use...the disc doesn't allow the use of that function. • When playing Super VCDs/Video CDs, some of the functions are the same for the DV-47A. 5 Introduction • Many of the functions covered in this chapter apply to DVD discs, Super VCDs/Video CDs, SACDs and CDs, although the ...
...select a track. Use these search modes while a disc is for title 4, press 4. Playing Discs PLAY 3 SEARCH MODE 1 2 3 4 5 6 7890 DVD PLAYER Î Note This remote is playing, or when it's stopped. Finding what you want on a disc You can directly access any point on -screen when you try and use...the disc doesn't allow the use of that function. • When playing Super VCDs/Video CDs, some of the functions are the same for the DV-47A. 5 Introduction • Many of the functions covered in this chapter apply to DVD discs, Super VCDs/Video CDs, SACDs and CDs, although the ...
Owner's Manual
Page 25
... angle, press ANGLE. Switching subtitles CLEAR C DVD PLAYER Î Note This remote is shown on-screen. • To switch off subtitles, press SUBTITLE then CLEAR. • To set subtitle preferences, see page 51). The current subtitle language is for the DV-47A. The buttons are available. You can switch subtitle language anytime during...
... angle, press ANGLE. Switching subtitles CLEAR C DVD PLAYER Î Note This remote is shown on-screen. • To switch off subtitles, press SUBTITLE then CLEAR. • To set subtitle preferences, see page 51). The current subtitle language is for the DV-47A. The buttons are available. You can switch subtitle language anytime during...
Owner's Manual
Page 26
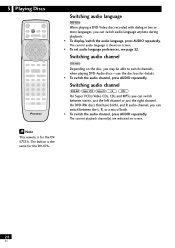
... or just the right channel. The current playback channel(s) are indicated on -screen. • To set audio language preferences, see the disc box for the DV-47A. 26 En Note This remote is the same for details. • To switch the audio channel, press AUDIO repeatedly.
... or just the right channel. The current playback channel(s) are indicated on -screen. • To set audio language preferences, see the disc box for the DV-47A. 26 En Note This remote is the same for details. • To switch the audio channel, press AUDIO repeatedly.

Owner's Manual
Page 27
...1 (Chapter 1~18) Program Chapter Program Title Current: Title 2(/20) CLEAR 1 2 3 C 4 5 6 +10 7890 PROGRAM DVD PLAYER Î Note This remote is not available for the DVS733A. Off Move ENTER Play PROGRAM Exit 2 Move the Joystick left/right to select 'Program Chapter' or 'Program Title'. 3 Move... Joystick down to 'Program Memory' and set it to 'On'. For titles/chapters 1-9, use the +10 button (+10, +10, 4 for the DV-47A. Off Move ENTER Play PROGRAM Exit Program Memory - Program Chapter Program Title Current: Title 09 07 Title 1 18 7 Chapter 1 (Chapter 1~18)...
...1 (Chapter 1~18) Program Chapter Program Title Current: Title 2(/20) CLEAR 1 2 3 C 4 5 6 +10 7890 PROGRAM DVD PLAYER Î Note This remote is not available for the DVS733A. Off Move ENTER Play PROGRAM Exit 2 Move the Joystick left/right to select 'Program Chapter' or 'Program Title'. 3 Move... Joystick down to 'Program Memory' and set it to 'On'. For titles/chapters 1-9, use the +10 button (+10, +10, 4 for the DV-47A. Off Move ENTER Play PROGRAM Exit Program Memory - Program Chapter Program Title Current: Title 09 07 Title 1 18 7 Chapter 1 (Chapter 1~18)...

Owner's Manual
Page 29
The mode is for the DV-47A. The buttons are the same for the DVS733A. ENTER 1 Press RANDOM repeatedly to select a random play , the 4 and ¢ buttons function a little differently to normal: 4 returns to the beginning of the disc plays out. Note This remote is displayed on-screen: STOP 7 PREVIOUS NEXT 4¢ CLEAR C RANDOM...
The mode is for the DV-47A. The buttons are the same for the DVS733A. ENTER 1 Press RANDOM repeatedly to select a random play , the 4 and ¢ buttons function a little differently to normal: 4 returns to the beginning of the disc plays out. Note This remote is displayed on-screen: STOP 7 PREVIOUS NEXT 4¢ CLEAR C RANDOM...
Owner's Manual
Page 30
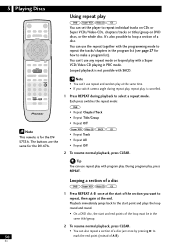
... and end points of A-B). En Each press switches the repeat mode: • Repeat Chapter/Track • Repeat Title/Group • Repeat Off Note This remote is for the DV-47A. • Repeat Track • Repeat All • Repeat Off 2 To resume normal playback, press CLEAR. You can also repeat a section of a disc just...
... and end points of A-B). En Each press switches the repeat mode: • Repeat Chapter/Track • Repeat Title/Group • Repeat Off Note This remote is for the DV-47A. • Repeat Track • Repeat All • Repeat Off 2 To resume normal playback, press CLEAR. You can also repeat a section of a disc just...
Owner's Manual
Page 33
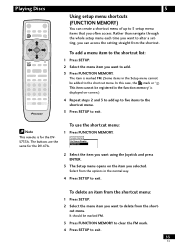
... setup menu each time you selected. Select from the options in the function memory' is displayed on the item you want to exit. Note This remote is marked FM. (Some items in the Setup menu cannot be registered in the normal way. 4 Press SETUP to the shortcut list: 1 Press SETUP. 2 ...Select the menu item you often access. To use the shortcut menu: 1 Press FUNCTION MEMORY. cut menu. The item is for the DV-47A. It should be marked FM. 3 Press FUNCTION MEMORY to clear the FM mark. 4 Press SETUP to 5 setup menu items that you want using the Joystick...
... setup menu each time you selected. Select from the options in the function memory' is displayed on the item you want to exit. Note This remote is marked FM. (Some items in the Setup menu cannot be registered in the normal way. 4 Press SETUP to the shortcut list: 1 Press SETUP. 2 ...Select the menu item you often access. To use the shortcut menu: 1 Press FUNCTION MEMORY. cut menu. The item is for the DV-47A. It should be marked FM. 3 Press FUNCTION MEMORY to clear the FM mark. 4 Press SETUP to 5 setup menu items that you want using the Joystick...
Owner's Manual
Page 34
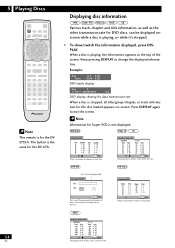
5 Playing Discs Displaying disc information DISPLAY DVD PLAYER Î Note This remote is for the disc loaded appears on-screen. Rate : 9.2 DVD display showing the data transmission rate When a disc is stopped, all title/group/chapter, or ... the screen. The button is playing, the information appears at the top of disc, tracks and track times When a disc is the same for the DV-47A.
5 Playing Discs Displaying disc information DISPLAY DVD PLAYER Î Note This remote is for the disc loaded appears on-screen. Rate : 9.2 DVD display showing the data transmission rate When a disc is stopped, all title/group/chapter, or ... the screen. The button is playing, the information appears at the top of disc, tracks and track times When a disc is the same for the DV-47A.
Owner's Manual
Page 35
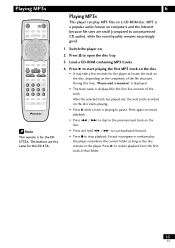
... 7890 DVD PLAYER Î Note This remote is displayed for the first five seconds of the track. Press again to restart playback. • Press 4 / ¢ to skip to the previous/next track on computers and the Internet because file sizes are the same for the DV-47A. 1 Switch the player on. 2 Press 0 to...
... 7890 DVD PLAYER Î Note This remote is displayed for the first five seconds of the track. Press again to restart playback. • Press 4 / ¢ to skip to the previous/next track on computers and the Internet because file sizes are the same for the DV-47A. 1 Switch the player on. 2 Press 0 to...
Owner's Manual
Page 39
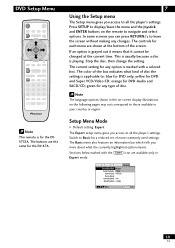
... a colored box. The buttons are available only in the on-screen display illustrations on the remote to leave the screen without making any changes. Expert Setup Navigator Basic Parental Lock - orange for the DV-47A. 7 Using the Setup menu The Setup menu gives you more commonly used settings. icon are... the same for DVD-Audio and SACD/CD; DVD Setup Menu SET UP ENTER STOP 7 RETURN DVD PLAYER Î Note This remote is for any type of disc....
... a colored box. The buttons are available only in the on-screen display illustrations on the remote to leave the screen without making any changes. Expert Setup Navigator Basic Parental Lock - orange for the DV-47A. 7 Using the Setup menu The Setup menu gives you more commonly used settings. icon are... the same for DVD-Audio and SACD/CD; DVD Setup Menu SET UP ENTER STOP 7 RETURN DVD PLAYER Î Note This remote is for any type of disc....

Owner's Manual
Page 63
...when the Setup screen is opened. • If the Setup screen is opened during playback or dark. • This player is compatible with the remote sensor is too wide. Picture disturbance during playback of this player. • When using the COMPONENT VIDEO OUT jacks, set to Interlace (page 48... this case, even if Down Sample Off is too far from the front L/R speakers, set to 2 Channel. In this player. • The remote control is selected, the player automatically outputs the audio at 48 kHz. Clean the disc (page 58). • Interconnects are not fully inserted into the...
...when the Setup screen is opened. • If the Setup screen is opened during playback or dark. • This player is compatible with the remote sensor is too wide. Picture disturbance during playback of this player. • When using the COMPONENT VIDEO OUT jacks, set to Interlace (page 48... this case, even if Down Sample Off is too far from the front L/R speakers, set to 2 Channel. In this player. • The remote control is selected, the player automatically outputs the audio at 48 kHz. Clean the disc (page 58). • Interconnects are not fully inserted into the...
Owner's Manual
Page 69
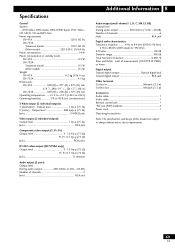
... 69 En PEAK) or lower Digital output Optical digital output Optical digital jack Coaxial digital output RCA jack Other terminals Control in .) DV-733A 420 (W) x 278 (D) x 97.5 (H) mm Operating temperature ...... +5°C to +35°C (+36°F to ... standby mode DV-47A 0.3 W DV-733A Taiwanese model 0.3 W Other models 0.5 W Weight DV-47A 4.2 kg (9 lb 4 oz) DV-733A 4.5 kg Dimensions DV-47A 420 (W) x 277 (D) x 97.5 (H) mm (16 9/16 (W) x 10 15/16 (D) x 3 7/8 (H) in Minijack (3.5 ø) Control out Minijack (3.5 ø) Accessories Audio cable 1 Video cable 1 Remote control unit ...
... 69 En PEAK) or lower Digital output Optical digital output Optical digital jack Coaxial digital output RCA jack Other terminals Control in .) DV-733A 420 (W) x 278 (D) x 97.5 (H) mm Operating temperature ...... +5°C to +35°C (+36°F to ... standby mode DV-47A 0.3 W DV-733A Taiwanese model 0.3 W Other models 0.5 W Weight DV-47A 4.2 kg (9 lb 4 oz) DV-733A 4.5 kg Dimensions DV-47A 420 (W) x 277 (D) x 97.5 (H) mm (16 9/16 (W) x 10 15/16 (D) x 3 7/8 (H) in Minijack (3.5 ø) Control out Minijack (3.5 ø) Accessories Audio cable 1 Video cable 1 Remote control unit ...


