Owner's Manual
Page 6
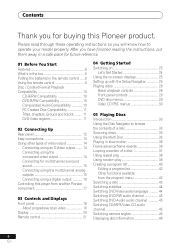
...reverse 36 Looping a section of video output 14 Connecting using an S-Video output ........ 14 Connecting using a digital output 16 Controlling this Pioneer product. Please read through these operating instructions so you will know how to browse the contents of a disc 33 Scanning discs 35 Using... Creating a program list 40 Editing a program list 42 Other functions available from another Pioneer component 17 03 Controls and Displays Front panel 18 About progressive scan video 19 Display 20 Remote control 21 04 Getting Started Switching on 23 Let's Get Started 24 Using the on...
...reverse 36 Looping a section of video output 14 Connecting using an S-Video output ........ 14 Connecting using a digital output 16 Controlling this Pioneer product. Please read through these operating instructions so you will know how to browse the contents of a disc 33 Scanning discs 35 Using... Creating a program list 40 Editing a program list 42 Other functions available from another Pioneer component 17 03 Controls and Displays Front panel 18 About progressive scan video 19 Display 20 Remote control 21 04 Getting Started Switching on 23 Let's Get Started 24 Using the on...
Owner's Manual
Page 9
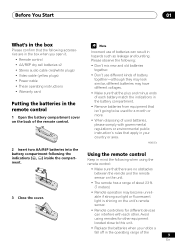
... be used for different devices can result in the remote control 1 Open the battery compartment cover on the unit's remote sensor. • Remote controllers for a month or more. • When disposing of the remote control. Using the remote control Keep in the operating range of batteries can... battery compartment. • Remove batteries from equipment that isn't going to this unit. • Replace the batteries when you open it. • Remote control • AA/R6P dry cell batteries x2 • Stereo audio cable (red/white plugs) • Video cable (yellow plugs) • ...
... be used for different devices can result in the remote control 1 Open the battery compartment cover on the unit's remote sensor. • Remote controllers for a month or more. • When disposing of the remote control. Using the remote control Keep in the operating range of batteries can... battery compartment. • Remove batteries from equipment that isn't going to this unit. • Replace the batteries when you open it. • Remote control • AA/R6P dry cell batteries x2 • Stereo audio cable (red/white plugs) • Video cable (yellow plugs) • ...
Owner's Manual
Page 12
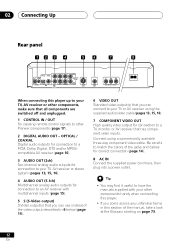
... jacks and cables for connection to other components, make sure that all components are switched off and unplugged. 1 CONTROL IN / OUT For passing remote control signals to a TV, monitor or AV receiver that has component video inputs. Be careful to match the colors of the video output described... in 6 below (page 14). 6 VIDEO OUT Standard video output(s) that you can connect to your TV, AV receiver or other Pioneer components (page 17). 2 DIGITAL AUDIO OUT - Connect using the supplied audio/video cable (pages 13, 15, 16). 7 COMPONENT VIDEO OUT High quality ...
... jacks and cables for connection to other components, make sure that all components are switched off and unplugged. 1 CONTROL IN / OUT For passing remote control signals to a TV, monitor or AV receiver that has component video inputs. Be careful to match the colors of the video output described... in 6 below (page 14). 6 VIDEO OUT Standard video output(s) that you can connect to your TV, AV receiver or other Pioneer components (page 17). 2 DIGITAL AUDIO OUT - Connect using the supplied audio/video cable (pages 13, 15, 16). 7 COMPONENT VIDEO OUT High quality ...
Owner's Manual
Page 13
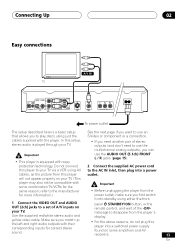
... use an that allows you first switch it into standby using AV to the AC IN inlet, then plug into a switched power supply found on remote control, and wait of A/V inputs on some combination TV/VCRs for the same reason; Do not connect 2 Connect the supplied AC power cord this setup...
... use an that allows you first switch it into standby using AV to the AC IN inlet, then plug into a switched power supply found on remote control, and wait of A/V inputs on some combination TV/VCRs for the same reason; Do not connect 2 Connect the supplied AC power cord this setup...
Owner's Manual
Page 17
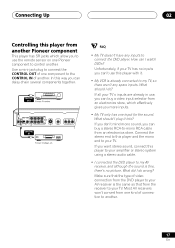
... wrong? Connecting Up 02 Controlling this player from an electronics store, which allow you to use the remote sensor on one Pioneer component to control another . 17 En How can buy a video input selector from another Pioneer component This player has SR jacks which effectively gives you more inputs. • My TV only...
... wrong? Connecting Up 02 Controlling this player from an electronics store, which allow you to use the remote sensor on one Pioneer component to control another . 17 En How can buy a video input selector from another Pioneer component This player has SR jacks which effectively gives you more inputs. • My TV only...
Owner's Manual
Page 18
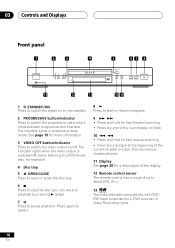
... the beginning of the current chapter or track, then to previous chapters/tracks 11 Display See page 20 for a description of the display 12 Remote control sensor The remote control has a range of up to about 23ft. (7m ) 13 Ths mark indicates compatibility with DVDRW discs receorded on a DVD recorder in progressive...
... the beginning of the current chapter or track, then to previous chapters/tracks 11 Display See page 20 for a description of the display 12 Remote control sensor The remote control has a range of up to about 23ft. (7m ) 13 Ths mark indicates compatibility with DVDRW discs receorded on a DVD recorder in progressive...
Owner's Manual
Page 21
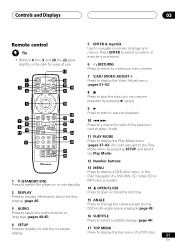
... 44) 4 SETUP Press to display the top menu of use. 13 1 2 3 4 OPEN / CLOSE DISPLAY AUDIO SUBTITLE ANGLE SETUP MENU TOP MENU - Controls and Displays 03 Remote control • Buttons 6 thru 9 and 20 thu 22 glow slightly in the dark for ease of a DVD disc 21 En
... 44) 4 SETUP Press to display the top menu of use. 13 1 2 3 4 OPEN / CLOSE DISPLAY AUDIO SUBTITLE ANGLE SETUP MENU TOP MENU - Controls and Displays 03 Remote control • Buttons 6 thru 9 and 20 thu 22 glow slightly in the dark for ease of a DVD disc 21 En
Owner's Manual
Page 22
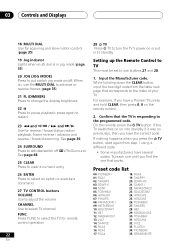
...several codes. If the TV swithches on (or into standby if it was on the remote control. 2. While holiding down the CLEAR button, input the two digit code from step 1 using a different code. • Some manufacturers have a Pioneer TV, press and hold CLEAR, then press 0, 0 on previously), then you find the... one that the TV is in jog mode (page 35) Setting up the Remote Control to TV This most be set to use buttons 27 and...
...several codes. If the TV swithches on (or into standby if it was on the remote control. 2. While holiding down the CLEAR button, input the two digit code from step 1 using a different code. • Some manufacturers have a Pioneer TV, press and hold CLEAR, then press 0, 0 on previously), then you find the... one that the TV is in jog mode (page 35) Setting up the Remote Control to TV This most be set to use buttons 27 and...
Owner's Manual
Page 23
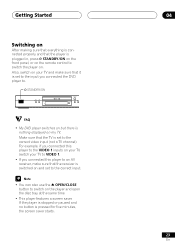
...; If you connected the DVD player to. Make sure that the player is plugged in, press STANDBY/ON on the front panel, or on the remote control to switch the player on. If the player is stopped or paused and no button is nothing displayed on and set to the correct...
...; If you connected the DVD player to. Make sure that the player is plugged in, press STANDBY/ON on the front panel, or on the remote control to switch the player on. If the player is stopped or paused and no button is nothing displayed on and set to the correct...
Owner's Manual
Page 24
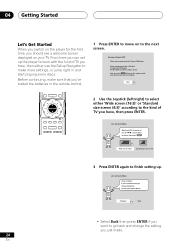
...setting up the player to work with the kind of TV do you have , then either 'Wide screen (16:9)' or 'Standard size screen (4:3)' according to Pioneer DVD! Let's Get Started Menu What kind of TV you have ? Use the / cursor buttons to choose, then press ENTER Wide screen (16:9) Standard size... screen (4:3) 3 Press ENTER again to setup your DVD player Put the batteries into the remote control Next, press the ENTER button on your TV. From here you can set up . 04 Getting Started Let's Get Started When you switch on...
...setting up the player to work with the kind of TV do you have , then either 'Wide screen (16:9)' or 'Standard size screen (4:3)' according to Pioneer DVD! Let's Get Started Menu What kind of TV you have ? Use the / cursor buttons to choose, then press ENTER Wide screen (16:9) Standard size... screen (4:3) 3 Press ENTER again to setup your DVD player Put the batteries into the remote control Next, press the ENTER button on your TV. From here you can set up . 04 Getting Started Let's Get Started When you switch on...
Owner's Manual
Page 28
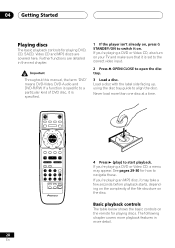
... the label side facing up, using the disc tray guide to start playback. If you 're playing a DVD or Video CD, also turn on the remote for how to open the disc tray. 3 Load a disc. Basic playback controls The table below shows the basic controls on your TV and make sure...
... the label side facing up, using the disc tray guide to start playback. If you 're playing a DVD or Video CD, also turn on the remote for how to open the disc tray. 3 Load a disc. Basic playback controls The table below shows the basic controls on your TV and make sure...

Owner's Manual
Page 29
.../SACD/Video CD/MP3). • If the disc is not a malfunction. DVD disc menus Many DVD-Video and DVD-Audio discs contain menus from the remote buttons. This is playing, playback jumps to enter a title/group/track number. Getting Started 04 Button 3 8 7 1 ¡ 4 ¢ Numbers What it does Starts playback. Stops... you start of the current track or chapter, then to additional features, such as subtitle and audio language selection, or special features such as their remote control equivalents. Press 3 (play ) to the next track or chapter.
.../SACD/Video CD/MP3). • If the disc is not a malfunction. DVD disc menus Many DVD-Video and DVD-Audio discs contain menus from the remote buttons. This is playing, playback jumps to enter a title/group/track number. Getting Started 04 Button 3 8 7 1 ¡ 4 ¢ Numbers What it does Starts playback. Stops... you start of the current track or chapter, then to additional features, such as subtitle and audio language selection, or special features such as their remote control equivalents. Press 3 (play ) to the next track or chapter.

Owner's Manual
Page 35
...). anticlockwise for forward; anticlockwise for forward; Playing Discs 05 Scanning discs You can fast-scan discs forward or backward at various different speeds using the remote. 1 During playback, press 1 or ¡ to start scanning. 2 Press repeatedly to increase the scan speed- the speed is reached on a DVD-Video disc. To switch...
...). anticlockwise for forward; anticlockwise for forward; Playing Discs 05 Scanning discs You can fast-scan discs forward or backward at various different speeds using the remote. 1 During playback, press 1 or ¡ to start scanning. 2 Press repeatedly to increase the scan speed- the speed is reached on a DVD-Video disc. To switch...
Owner's Manual
Page 48
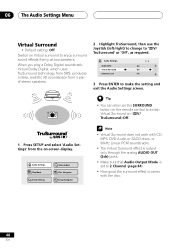
... 1/ 2 Off Off Fix 3 Press ENTER to make the setting and exit the Audio Settings screen. • You can also use the SURROUND button on the remote control to switch Virtual Surround on (2V/ TruSurround)/Off. 1 Press SETUP and select 'Audio Settings' from the on Virtual surround to enjoy surround sound effects...
... 1/ 2 Off Off Fix 3 Press ENTER to make the setting and exit the Audio Settings screen. • You can also use the SURROUND button on the remote control to switch Virtual Surround on (2V/ TruSurround)/Off. 1 Press SETUP and select 'Audio Settings' from the on Virtual surround to enjoy surround sound effects...
Owner's Manual
Page 75
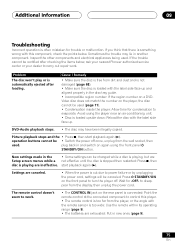
...trouble or malfunction. Avoid using the front panel STANDBY/ON button. Inspect the other components and electrical appliances being used . Settings are ineffective. The remote control doesn't seem to work. • The CONTROL IN jack on the player, the disc cannot be used (page 11). • ... for -OFF- Problem The disc won't play or is cut due to control this component, check the points below , ask your nearest Pioneer authorized service center or your dealer to evaporate. New settings made in the • Some settings can be canceled: Press STANDBY/ON on ...
...trouble or malfunction. Avoid using the front panel STANDBY/ON button. Inspect the other components and electrical appliances being used . Settings are ineffective. The remote control doesn't seem to work. • The CONTROL IN jack on the player, the disc cannot be used (page 11). • ... for -OFF- Problem The disc won't play or is cut due to control this component, check the points below , ask your nearest Pioneer authorized service center or your dealer to evaporate. New settings made in the • Some settings can be canceled: Press STANDBY/ON on ...
Owner's Manual
Page 79
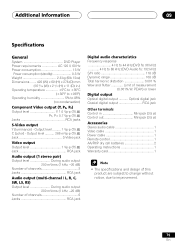
... (5lb 12oz) Dimensions ....... 420 (W) x 69 (H) x 278 (D) mm (16 9/16 (W) x 2 3/4 (H) x 11 (D) in Minijack (3.5 ø) Control out Minijack (3.5 ø) Accessories Stereo audio cable 1 Video cable 1 Power cable 1 Remote control 1 AA/R6P dry cell batteries 2 Operating Instructions 1 Warranty card 1 • The specifications and design of measurement (0.001% W.
... (5lb 12oz) Dimensions ....... 420 (W) x 69 (H) x 278 (D) mm (16 9/16 (W) x 2 3/4 (H) x 11 (D) in Minijack (3.5 ø) Control out Minijack (3.5 ø) Accessories Stereo audio cable 1 Video cable 1 Power cable 1 Remote control 1 AA/R6P dry cell batteries 2 Operating Instructions 1 Warranty card 1 • The specifications and design of measurement (0.001% W.


