
Owner's Manual
Page 2
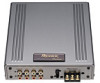
When the Cover is Closed - Switching to the Audio Menu Audio Adjustment When the Cover is Open Before Using This Product 7 About This Product 7 About This Manual 7 Important 8 About the Digital Network 8 MODE Switch Setting 9 Resetting the Microprocessor 10 Precaution 11 After-sales Service for Pioneer Products ........ 12 Audio Adjustment 13 Audio Menu 13 - Contents Dear Customer 3 Key Finder 4 Head Unit (DEX-P9 4 Remote Controller (DEX-P9 4 Opening and Closing the Remote Controller Cover 5 -
When the Cover is Closed - Switching to the Audio Menu Audio Adjustment When the Cover is Open Before Using This Product 7 About This Product 7 About This Manual 7 Important 8 About the Digital Network 8 MODE Switch Setting 9 Resetting the Microprocessor 10 Precaution 11 After-sales Service for Pioneer Products ........ 12 Audio Adjustment 13 Audio Menu 13 - Contents Dear Customer 3 Key Finder 4 Head Unit (DEX-P9 4 Remote Controller (DEX-P9 4 Opening and Closing the Remote Controller Cover 5 -
Owner's Manual
Page 8
You can be conducted with the combined head unit DEX-P9 (sold head unit. All are designed for the easiest possible use, but many are not provided on page 11 and in other sections. This manual mainly explains the remote controller operation. And all of audio adjustment ...and operation. Before Using This Product About This Product This product is universal digital preamp equalizer which are not self-explanatory. This operation manual is especially important that you read and observe the "Precaution" on the head unit. We recommend that you familiarize yourself with separately ...
You can be conducted with the combined head unit DEX-P9 (sold head unit. All are designed for the easiest possible use, but many are not provided on page 11 and in other sections. This manual mainly explains the remote controller operation. And all of audio adjustment ...and operation. Before Using This Product About This Product This product is universal digital preamp equalizer which are not self-explanatory. This operation manual is especially important that you read and observe the "Precaution" on the head unit. We recommend that you familiarize yourself with separately ...

Owner's Manual
Page 12
THE USE OF OPTICAL INSTRUMENTS WITH THIS PRODUCT WILL INCREASE EYE HAZARD. • Keep this manual handy as a reference for operating procedures and precautions. • Always keep the volume low enough for outside sounds to be audible. • Protect the product from moisture. • If the battery is disconnected, the preset memory will be erased and must be repro- grammed. 11 Before Using This Product Precaution CAUTION: CAUTION: USE OF CONTROL OR ADJUSTMENT OR PERFORMANCE OF PROCEDURES OTHER THAN THOSE SPECIFIED HEREIN MAY RESULT IN HAZARDOUS RADIATION EXPOSURE.
THE USE OF OPTICAL INSTRUMENTS WITH THIS PRODUCT WILL INCREASE EYE HAZARD. • Keep this manual handy as a reference for operating procedures and precautions. • Always keep the volume low enough for outside sounds to be audible. • Protect the product from moisture. • If the battery is disconnected, the preset memory will be erased and must be repro- grammed. 11 Before Using This Product Precaution CAUTION: CAUTION: USE OF CONTROL OR ADJUSTMENT OR PERFORMANCE OF PROCEDURES OTHER THAN THOSE SPECIFIED HEREIN MAY RESULT IN HAZARDOUS RADIATION EXPOSURE.
Owner's Manual
Page 22
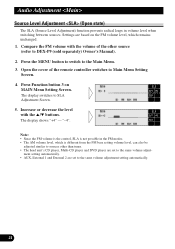
.... 3. Open the cover of the other than tuner. • The head unit's CD player, Multi-CD player and DVD player are set to DEX-P9 (sold separately) Owner's Manual). 2. The display shows "+4" - ment setting automatically. • AUX, External 1 and External 2 are based on MAIN Menu Setting Screen. Settings are set to SLA...
.... 3. Open the cover of the other than tuner. • The head unit's CD player, Multi-CD player and DVD player are set to DEX-P9 (sold separately) Owner's Manual). 2. The display shows "+4" - ment setting automatically. • AUX, External 1 and External 2 are based on MAIN Menu Setting Screen. Settings are set to SLA...
Owner's Manual
Page 39
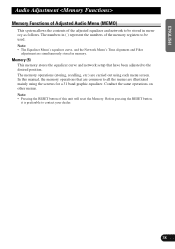
... menu screen. The numbers in ( ) represent the numbers of the adjusted equalizer and network to be used. Note: • Pressing the RESET button of this manual, the memory operations that have been adjusted to contact your dealer. 38 FRANÇAIS ITALIANO NEDERLANDS ENGLISH ESPAÑOL DEUTSCH Audio Adjustment Memory...
... menu screen. The numbers in ( ) represent the numbers of the adjusted equalizer and network to be used. Note: • Pressing the RESET button of this manual, the memory operations that have been adjusted to contact your dealer. 38 FRANÇAIS ITALIANO NEDERLANDS ENGLISH ESPAÑOL DEUTSCH Audio Adjustment Memory...

Owner's Manual
Page 52
...-circuiting to other products may be sure to disconnect the ≠ battery cable before beginning installation. • Refer to the supplied Installation manuals of high-current products such as the gear shift, handbrake, and seat rails. Please ground this product to another product, refer to the owner...'s manual for vehicles with this system, be sure not to connect the blue/white lead to the amp's power terminal. • To prevent incorrect...
...-circuiting to other products may be sure to disconnect the ≠ battery cable before beginning installation. • Refer to the supplied Installation manuals of high-current products such as the gear shift, handbrake, and seat rails. Please ground this product to another product, refer to the owner...'s manual for vehicles with this system, be sure not to connect the blue/white lead to the amp's power terminal. • To prevent incorrect...


