Other Manual
Page 13
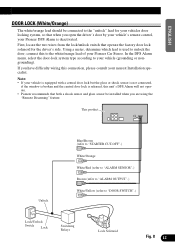
...to your vehicle (grounding or nongrounding). In the DFS Alarm menu, select the door-lock system type according to the white/orange lead of your Pioneer Car Stereo. Note: • If your vehicle is equipped with a central door lock but the glass or shock sensor is not connected, if the ...OL DOOR LOCK (White/Orange) The white/orange lead should be installed when you open the driver's door by your vehicle's remote control, your Pioneer DFS Alarm is deactivated. This product DEUTSCH FRANÇAIS ITALIANO NEDERLANDS Unlock Blue/Brown (refer to "STARTER CUT-OFF".) White/Orange White/Red...
...to your vehicle (grounding or nongrounding). In the DFS Alarm menu, select the door-lock system type according to the white/orange lead of your Pioneer Car Stereo. Note: • If your vehicle is equipped with a central door lock but the glass or shock sensor is not connected, if the ...OL DOOR LOCK (White/Orange) The white/orange lead should be installed when you open the driver's door by your vehicle's remote control, your Pioneer DFS Alarm is deactivated. This product DEUTSCH FRANÇAIS ITALIANO NEDERLANDS Unlock Blue/Brown (refer to "STARTER CUT-OFF".) White/Orange White/Red...

Other Manual
Page 17
Dash panel Fig. 12 DEUTSCH FRANÇAIS ITALIANO NEDERLANDS 16 Sub dash 1 2 Quickie bolt slot Tube spacer Vehicle supplied bracket (not included) Quickie bolt Hex nut (5 mm) Vehicle supplied screw (not included) Bracket (not included) In some cases, this may not be provided on the vehicle to the unit in Fig. 12. Fit the bracket provided on the vehicle. ENGLISH ESPAÑOL GM Panel Type Installation An example is shown in the same way that it was fitted to the original car stereo.
Dash panel Fig. 12 DEUTSCH FRANÇAIS ITALIANO NEDERLANDS 16 Sub dash 1 2 Quickie bolt slot Tube spacer Vehicle supplied bracket (not included) Quickie bolt Hex nut (5 mm) Vehicle supplied screw (not included) Bracket (not included) In some cases, this may not be provided on the vehicle to the unit in Fig. 12. Fit the bracket provided on the vehicle. ENGLISH ESPAÑOL GM Panel Type Installation An example is shown in the same way that it was fitted to the original car stereo.

Other Manual
Page 18
Fit the bracket provided on the vehicule. Sub dash Bracket (L) 1 2 Quickie bolt slot Tube spacer Bracket (R) Hex nut (5 mm) Quickie bolt Vehicle supplied screw (not included) Bracket (not included) In some cases, this may not be provided on the vehicle to the original car stereo. Dash panel Fig. 13 17 Installation GM ('94 & Newer Vehicles) Panel Type Installation An example is shown in the same way that it was fitted to the unit in Fig. 13.
Fit the bracket provided on the vehicule. Sub dash Bracket (L) 1 2 Quickie bolt slot Tube spacer Bracket (R) Hex nut (5 mm) Quickie bolt Vehicle supplied screw (not included) Bracket (not included) In some cases, this may not be provided on the vehicle to the original car stereo. Dash panel Fig. 13 17 Installation GM ('94 & Newer Vehicles) Panel Type Installation An example is shown in the same way that it was fitted to the unit in Fig. 13.

Other Manual
Page 19
Fit the bracket provided on the vehicle to the original car stereo. ENGLISH ESPAÑOL GM ('95 & Newer Monte Carlo, Caprice Classic, Lumina, Cavalier) Installation An example is shown in the same way that it was fitted to the unit in Fig. 14. Sub dash Screw (3 × 5 mm) Bracket Vehicle supplied screw (not included) Dash panel Fig. 14 DEUTSCH FRANÇAIS ITALIANO NEDERLANDS 18
Fit the bracket provided on the vehicle to the original car stereo. ENGLISH ESPAÑOL GM ('95 & Newer Monte Carlo, Caprice Classic, Lumina, Cavalier) Installation An example is shown in the same way that it was fitted to the unit in Fig. 14. Sub dash Screw (3 × 5 mm) Bracket Vehicle supplied screw (not included) Dash panel Fig. 14 DEUTSCH FRANÇAIS ITALIANO NEDERLANDS 18
Other Manual
Page 20
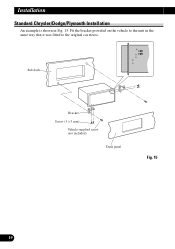
Sub dash Bracket Screw (3 × 5 mm) Vehicle supplied screw (not included) Dash panel Fig. 15 19 Fit the bracket provided on the vehicle to the unit in Fig. 15. Installation Standard Chrysler/Dodge/Plymouth Installation An example is shown in the same way that it was fitted to the original car stereo.
Sub dash Bracket Screw (3 × 5 mm) Vehicle supplied screw (not included) Dash panel Fig. 15 19 Fit the bracket provided on the vehicle to the unit in Fig. 15. Installation Standard Chrysler/Dodge/Plymouth Installation An example is shown in the same way that it was fitted to the original car stereo.

Other Manual
Page 21
Fit the bracket provided on the vehicle to the unit in Fig. 16. Sub dash Screw (3 × 5 mm) Bracket Vehicle supplied screw (not included) Dash panel Fig. 16 FRANÇAIS ITALIANO NEDERLANDS 20 ENGLISH ESPAÑOL DEUTSCH '95 Cirrus/Stratus Installation An example is shown in the same way that it was fitted to the original car stereo.
Fit the bracket provided on the vehicle to the unit in Fig. 16. Sub dash Screw (3 × 5 mm) Bracket Vehicle supplied screw (not included) Dash panel Fig. 16 FRANÇAIS ITALIANO NEDERLANDS 20 ENGLISH ESPAÑOL DEUTSCH '95 Cirrus/Stratus Installation An example is shown in the same way that it was fitted to the original car stereo.

Other Manual
Page 22
Installation Grand Cherokee/Sebring/Avenger Installation An example is shown in the same way that it was fitted to the original car stereo. Fit the bracket provided on the vehicle to the unit in Fig. 17. Sub dash Bracket Screw (3 × 5 mm) Vehicle supplied screw (not included) Dash panel Fig. 17 21
Installation Grand Cherokee/Sebring/Avenger Installation An example is shown in the same way that it was fitted to the original car stereo. Fit the bracket provided on the vehicle to the unit in Fig. 17. Sub dash Bracket Screw (3 × 5 mm) Vehicle supplied screw (not included) Dash panel Fig. 17 21


