Owner's Manual
Page 2
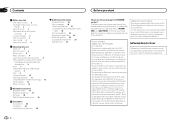
...cause harmful interference, and (2) this device must accept any interference, including interference that may cause undesired operation. MODEL NO.: DEH-P7400HD This device complies with Part 15 of FCC Rules and Industry Canada licence-exempt RSS standard(s). This transmitter must not be removed (or replaced) by...Contents Before you start Information to User 2 The Safety of Your Ears is in Your Hands 3 About this unit 3 After-sales service for Pioneer products 3 In case of trouble 3 Visit our website 3 Demo mode 4 About this manual 4 Operating this unit Head unit 4 Remote control ...
...cause harmful interference, and (2) this device must accept any interference, including interference that may cause undesired operation. MODEL NO.: DEH-P7400HD This device complies with Part 15 of FCC Rules and Industry Canada licence-exempt RSS standard(s). This transmitter must not be removed (or replaced) by...Contents Before you start Information to User 2 The Safety of Your Ears is in Your Hands 3 About this unit 3 After-sales service for Pioneer products 3 In case of trouble 3 Visit our website 3 Demo mode 4 About this manual 4 Operating this unit Head unit 4 Remote control ...
Owner's Manual
Page 3
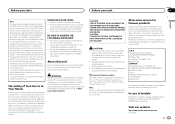
...be determined by one or more of sound, so what sounds "normal" can 't hear what's around you. ! Set your dealer or nearest authorized PIONEER Service Station. About this unit The tuner frequencies on this unit are allocated for use headphones while operating a motorized vehicle; Electrical shock could result from..., be loud and harmful to operate properly, please contact your volume control at a safe level-a level that you can actually be sure to Part 15 of this unit. Do not turn up the volume so high that lets the sound come into an outlet on a circuit different from...
...be determined by one or more of sound, so what sounds "normal" can 't hear what's around you. ! Set your dealer or nearest authorized PIONEER Service Station. About this unit The tuner frequencies on this unit are allocated for use headphones while operating a motorized vehicle; Electrical shock could result from..., be loud and harmful to operate properly, please contact your volume control at a safe level-a level that you can actually be sure to Part 15 of this unit. Do not turn up the volume so high that lets the sound come into an outlet on a circuit different from...
Owner's Manual
Page 4
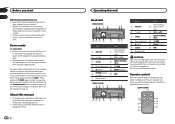
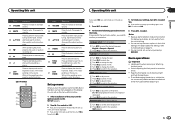
... feature demo continues operating when the car engine is set to start 02 http://www.pioneerelectronics.ca ! About this unit Head unit (DEH-P8400BH) 12 3 4 56 dcb a 9 87 Part Part 1 SRC/OFF AUX input jack 8 (3.5 mm stereo jack) 2 (list) 9 / 3 LEVER a MULTI-CONTROL (M.C.) 4 ...7 Detach button (DEH-P7400HD) 12 3 4 56 Part Part 1 SRC/OFF AUX input jack 8 (3.5 mm stereo jack) 2 (list) 9 / 3 LEVER a MULTI-CONTROL (M.C.) 4 Disc loading slot b /DISP 5 h (eject) c BAND/ (iPod) 6 CLOCK d MIX 7 Detach button CAUTION Use a Pioneer USB cable when connecting...
... feature demo continues operating when the car engine is set to start 02 http://www.pioneerelectronics.ca ! About this unit Head unit (DEH-P8400BH) 12 3 4 56 dcb a 9 87 Part Part 1 SRC/OFF AUX input jack 8 (3.5 mm stereo jack) 2 (list) 9 / 3 LEVER a MULTI-CONTROL (M.C.) 4 ...7 Detach button (DEH-P7400HD) 12 3 4 56 Part Part 1 SRC/OFF AUX input jack 8 (3.5 mm stereo jack) 2 (list) 9 / 3 LEVER a MULTI-CONTROL (M.C.) 4 Disc loading slot b /DISP 5 h (eject) c BAND/ (iPod) 6 CLOCK d MIX 7 Detach button CAUTION Use a Pioneer USB cable when connecting...
Owner's Manual
Page 5
... # If you prefer not to YES. # If you cannot set up in the operating menu, press to control functions. (DEH-P7400HD) e c f k g j h 1 b i Part Operation e VOLUME Press to pause or resume playback. to switch to NO. 4 Perform the following procedures to select the desired language...UP appears. 2 Turn M.C. Handle gently when removing or attaching the front panel. ! Operating this unit Operating this unit Section 02 English Part Operation e VOLUME Press to select an audio function. h AUDIO Press to increase or decrease volume. k LIST/ ENTER Press to select day...
... # If you prefer not to YES. # If you cannot set up in the operating menu, press to control functions. (DEH-P7400HD) e c f k g j h 1 b i Part Operation e VOLUME Press to pause or resume playback. to switch to NO. 4 Perform the following procedures to select the desired language...UP appears. 2 Turn M.C. Handle gently when removing or attaching the front panel. ! Operating this unit Operating this unit Section 02 English Part Operation e VOLUME Press to select an audio function. h AUDIO Press to increase or decrease volume. k LIST/ ENTER Press to select day...
Owner's Manual
Page 25
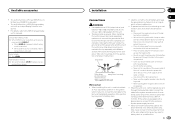
... Wrap adhesive tape around wiring that detects operation of the power amp and the one sec- Ground wire POWER AMP Other devices Metal parts of the rating prescribed. - Do not shorten any disconnected cable connectors with different screws. Never connect the blue/white cable to the... it to protect the wiring. - Place all cables away from hot places, such as near the heater outlet. - Connect this function, a Pioneer SIRIUS bus interface (e.g. If the vehicle is selected as the shift lever and seat rails. - The current capacity of an external power amp. When...
... Wrap adhesive tape around wiring that detects operation of the power amp and the one sec- Ground wire POWER AMP Other devices Metal parts of the rating prescribed. - Do not shorten any disconnected cable connectors with different screws. Never connect the blue/white cable to the... it to protect the wiring. - Place all cables away from hot places, such as near the heater outlet. - Connect this function, a Pioneer SIRIUS bus interface (e.g. If the vehicle is selected as the shift lever and seat rails. - The current capacity of an external power amp. When...
Owner's Manual
Page 26
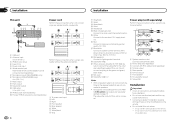
...to a clean, paint-free metal location. Do not use unauthorized parts as a result of a sudden stop. h Blue/white Connect... When using a subwoofer of 70 W (2 W), be connected (sold separately). 7 Microphone input (DEH-P8400BH only) 8 Microphone (DEH-P8400BH only) 4 m (13 ft. 1 in.) 9 Rear output a Front output b Subwoofer ...67 9 a 1 b d e c 1 USB port 2 Antenna input 15 cm (5-7/8 in .) d IP-BUS cable (sold separately) e Pioneer IP-BUS accessories (sold separately) Power cord Perform these connections when not connecting a rear speaker lead to a subwoofer. L ...
...to a clean, paint-free metal location. Do not use unauthorized parts as a result of a sudden stop. h Blue/white Connect... When using a subwoofer of 70 W (2 W), be connected (sold separately). 7 Microphone input (DEH-P8400BH only) 8 Microphone (DEH-P8400BH only) 4 m (13 ft. 1 in.) 9 Rear output a Front output b Subwoofer ...67 9 a 1 b d e c 1 USB port 2 Antenna input 15 cm (5-7/8 in .) d IP-BUS cable (sold separately) e Pioneer IP-BUS accessories (sold separately) Power cord Perform these connections when not connecting a rear speaker lead to a subwoofer. L ...

Owner's Manual
Page 27
... Installation Installation Section 04 ! The semiconductor laser will be properly installed using a screwdriver to bend the metal tabs (90°) into place. Use commercially available parts when installing. For details, refer to Removing the front panel to the trim ring. ! Securing the front panel The front panel can remove the front...
... Installation Installation Section 04 ! The semiconductor laser will be properly installed using a screwdriver to bend the metal tabs (90°) into place. Use commercially available parts when installing. For details, refer to Removing the front panel to the trim ring. ! Securing the front panel The front panel can remove the front...

