Owner's Manual
Page 3
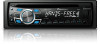
... Press again to pause or resume playback. je Press to unmute. ware updates) for repair without advance contact. Pioneer Electronics (USA) Inc. CUSTOMER SATISFACTION DEPARTMENT 300 Allstate Parkway Markham, Ontario L3R 0P2 1-877-283-5901 905-479.... ! Use an optional Pioneer USB cable (CD- Do not use unauthorized products. 7 g l a k h 1 i j Part Operation f VOLUME Press to operate properly, please contact your unit to safeguard purchase details in our files in the event of Canada, Inc. While in Canada Head unit 1234 5 Remote control 6 f 78 9...
... Press again to pause or resume playback. je Press to unmute. ware updates) for repair without advance contact. Pioneer Electronics (USA) Inc. CUSTOMER SATISFACTION DEPARTMENT 300 Allstate Parkway Markham, Ontario L3R 0P2 1-877-283-5901 905-479.... ! Use an optional Pioneer USB cable (CD- Do not use unauthorized products. 7 g l a k h 1 i j Part Operation f VOLUME Press to operate properly, please contact your unit to safeguard purchase details in our files in the event of Canada, Inc. While in Canada Head unit 1234 5 Remote control 6 f 78 9...

Owner's Manual
Page 4
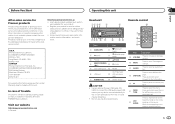
...of the folder or menu exists. 3d A lower tier of (song) the list. c (Blue- cator) vice. Use and care of the remote control 2 Press the right side of the (artist) iPod browsing function is on . If you cannot attach the front panel to adjust the volume...subjecting the front panel to a Bluetooth detooth indi- to the head unit successfully, make sure that you . played. 6 (disc) Album search refinement of the remote control. 2 Insert the battery with the plus (+) and minus (-) poles aligned properly. 4 En Connected to excessive shock. ! Turning the unit off 1 ...
...of the folder or menu exists. 3d A lower tier of (song) the list. c (Blue- cator) vice. Use and care of the remote control 2 Press the right side of the (artist) iPod browsing function is on . If you cannot attach the front panel to adjust the volume...subjecting the front panel to a Bluetooth detooth indi- to the head unit successfully, make sure that you . played. 6 (disc) Album search refinement of the remote control. 2 Insert the battery with the plus (+) and minus (-) poles aligned properly. 4 En Connected to excessive shock. ! Turning the unit off 1 ...
Owner's Manual
Page 5
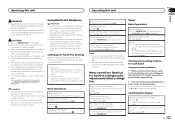
...function menu. Operating this unit Operating this may differ slightly from the list 1 Press B (BAND/ESC). CAUTION ! Remove the battery if the remote control is received, press M.C. Do not store the battery with metallic tools. ! Important ! Basic Operations Making a phone call waiting 1 Press ....is incorrectly replaced. Refer to Phone menu operation on standby to select the desired station. # You can skip stations. Notes ! The remote control may apply. Manual tuning (step by briefly pressing c or d. There is a danger of the preset tuning buttons (1 to 6)...
...function menu. Operating this unit Operating this may differ slightly from the list 1 Press B (BAND/ESC). CAUTION ! Remove the battery if the remote control is received, press M.C. Do not store the battery with metallic tools. ! Important ! Basic Operations Making a phone call waiting 1 Press ....is incorrectly replaced. Refer to Phone menu operation on standby to select the desired station. # You can skip stations. Notes ! The remote control may apply. Manual tuning (step by briefly pressing c or d. There is a danger of the preset tuning buttons (1 to 6)...
Owner's Manual
Page 11
... 1 Press M.C. If the screw for this unit and of the Bluetooth telephone ! Use this unit or power amp (sold separately), make sure to the system remote control of smoke or malfunction. Connect this cable to connect the ground wire first. S/W UPDATE (updating the software) This function is equipped with the latest...
... 1 Press M.C. If the screw for this unit and of the Bluetooth telephone ! Use this unit or power amp (sold separately), make sure to the system remote control of smoke or malfunction. Connect this cable to connect the ground wire first. S/W UPDATE (updating the software) This function is equipped with the latest...
Owner's Manual
Page 12
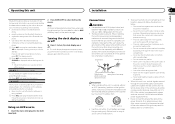
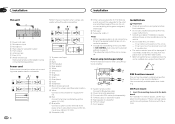
...45 67 8 1 Power cord input 2 Microphone input 3 Microphone 4 Rear output or subwoofer output 5 Front output 6 Antenna input 7 Fuse (10 A) 8 Wired remote input Hard-wired remote control adaptor can be damaged if it may cause malfunctions. ! i Subwoofer (4 Ω) 12 En j When using the optional amplifier. 1 3 2 4 &#...not connected to a clean, paint-free metal location. Use commercially available parts when installing. 1 System remote control Connect to a subwoofer. Do not use the supplied mounting sleeve. Refer to the constant 12 V supply terminal. If ...
...45 67 8 1 Power cord input 2 Microphone input 3 Microphone 4 Rear output or subwoofer output 5 Front output 6 Antenna input 7 Fuse (10 A) 8 Wired remote input Hard-wired remote control adaptor can be damaged if it may cause malfunctions. ! i Subwoofer (4 Ω) 12 En j When using the optional amplifier. 1 3 2 4 &#...not connected to a clean, paint-free metal location. Use commercially available parts when installing. 1 System remote control Connect to a subwoofer. Do not use the supplied mounting sleeve. Refer to the constant 12 V supply terminal. If ...


