Owner's Manual
Page 2
... 3 In case of trouble 3 Visit our website 3 About this manual 3 Operating this unit Head unit 4 Remote control 4 Display indication 4 Basic Operations 4 Use and care of the remote control 5 Menu operations identical for purchasing this PIONEER product. Operation is illegal in North America. Over time, your hearing "comfort level" adapts to higher volumes of...
... 3 In case of trouble 3 Visit our website 3 About this manual 3 Operating this unit Head unit 4 Remote control 4 Display indication 4 Basic Operations 4 Use and care of the remote control 5 Menu operations identical for purchasing this PIONEER product. Operation is illegal in North America. Over time, your hearing "comfort level" adapts to higher volumes of...
Owner's Manual
Page 4
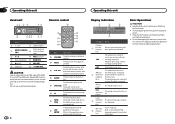
... directly to the unit will protrude out from the unit and may be dangerous. Section 02 Operating this unit Operating this unit Head unit 12 3 4 Remote control 56 d c b a9 87 Part Part 1 (list) 7 Detach button AUX input jack 2 MULTI-CONTROL 8 (3.5 mm stereo (M.C.) jack) 3 1 to 6 9 TAG/ ...(clock) 4 Disc loading slot a BAND/ESC 5 h (eject) b SRC/OFF 6 USB port c /DISP/SCRL CAUTION Use an optional Pioneer USB cable (CD-U50E) to connect the USB audio player/USB memory as any cables and devices attached to the front panel before detaching it...
... directly to the unit will protrude out from the unit and may be dangerous. Section 02 Operating this unit Operating this unit Head unit 12 3 4 Remote control 56 d c b a9 87 Part Part 1 (list) 7 Detach button AUX input jack 2 MULTI-CONTROL 8 (3.5 mm stereo (M.C.) jack) 3 1 to 6 9 TAG/ ...(clock) 4 Disc loading slot a BAND/ESC 5 h (eject) b SRC/OFF 6 USB port c /DISP/SCRL CAUTION Use an optional Pioneer USB cable (CD-U50E) to connect the USB audio player/USB memory as any cables and devices attached to the front panel before detaching it...

Owner's Manual
Page 5
...! Make sure to insert the tabs on the left . Turning the unit off 1 Press and hold /DISP/SCRL. When disposing of the remote control. 2 Insert the battery with metallic tools. ! See www.dtsc.ca.gov/hazardouswaste/ perchlorate. (Applicable to the ordinary display from the ... Canceling the initial setting menu Returning to California, U.S.A.)" Important ! If you . Use and care of the remote control Using the remote control 1 Point the remote control in your unit from the tray. Operating this unit Operating this unit Section 02 English Removing the front panel...
...! Make sure to insert the tabs on the left . Turning the unit off 1 Press and hold /DISP/SCRL. When disposing of the remote control. 2 Insert the battery with metallic tools. ! See www.dtsc.ca.gov/hazardouswaste/ perchlorate. (Applicable to the ordinary display from the ... Canceling the initial setting menu Returning to California, U.S.A.)" Important ! If you . Use and care of the remote control Using the remote control 1 Point the remote control in your unit from the tray. Operating this unit Operating this unit Section 02 English Removing the front panel...

Owner's Manual
Page 12
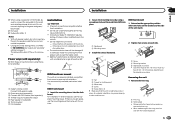
...control terminal (max. 300 mA 12 V DC). The black cable is on the ignition switch, failure to connect the red cable to the system remote control of the ignition key may result in a fire or malfunction. ! The ground wire of the power amp and the one of this unit ... may result in battery drain or a malfunction. 12 En This unit 1 23 4 56 1 Antenna input 2 Fuse (10 A) 3 Power cord input 4 Wired remote input Hard-wired remote control adaptor can be connected to protect the wiring. - The current capacity of the battery before installation. - If the vehicle is equipped with other...
...control terminal (max. 300 mA 12 V DC). The black cable is on the ignition switch, failure to connect the red cable to the system remote control of the ignition key may result in a fire or malfunction. ! The ground wire of the power amp and the one of this unit ... may result in battery drain or a malfunction. 12 En This unit 1 23 4 56 1 Antenna input 2 Fuse (10 A) 3 Power cord input 4 Wired remote input Hard-wired remote control adaptor can be connected to protect the wiring. - The current capacity of the battery before installation. - If the vehicle is equipped with other...
Owner's Manual
Page 13
... metal tabs (90°) into the dashboard. Optimum performance is obtained when the unit is monaural. Use commercially available parts when installing. 1 System remote control Connect to SW CONTROL (rear output and subwoofer setting) on the bracket and the side of this unit is installed at an angle of...
... metal tabs (90°) into the dashboard. Optimum performance is obtained when the unit is monaural. Use commercially available parts when installing. 1 System remote control Connect to SW CONTROL (rear output and subwoofer setting) on the bracket and the side of this unit is installed at an angle of...


