Service Manual
Page 1
...: [03] 580-9911 PCB CONNECTION DIAGRAM 15 7. Haven 1087 Keetberglaan 1, 9120 Melsele, Belgium PIONEER ELECTRONICS AUSTRALIA PTY. TEST MODE 10 5. PIONEER' The Art of Entertainment Service Manual • a I • 1 1 • II • i • I • I rI STEREO DOUBLE CASSETTE DECK CT-IA/504R ORDER NO. EXPLODED VIEWS, PACKING AND PARTS LIST••4 4. SCHEMATIC DIAGRAM...
...: [03] 580-9911 PCB CONNECTION DIAGRAM 15 7. Haven 1087 Keetberglaan 1, 9120 Melsele, Belgium PIONEER ELECTRONICS AUSTRALIA PTY. TEST MODE 10 5. PIONEER' The Art of Entertainment Service Manual • a I • 1 1 • II • i • I • I rI STEREO DOUBLE CASSETTE DECK CT-IA/504R ORDER NO. EXPLODED VIEWS, PACKING AND PARTS LIST••4 4. SCHEMATIC DIAGRAM...
Service Manual
Page 4
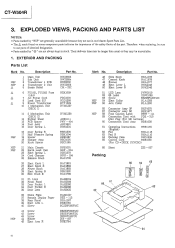
...Assy RDE1036 61 Operating Instructions RRB1155 (English) 62 Pad RHA1115 63 Pad R RHA1116 64 Packing Case RHG1635 65 Control Cord RDE1030 (For CD • DECK SYNCRO) 66 Sheet Z23 - 007 Packing 60 59 65 61 66 \' , ,63 62, 64 4 RWZ3553 RWZ3554 RNZ2602 RWZ3555 CM - 22C REK1059... of identical designation. • Parts marked by "NSF" are generally unavailable because they may be sure to use parts of the part. CT-W504R 3. EXTERIOR AND PACKING Parts List Mark No. when replacing, be unavailable. 1. Their delivery time may be longer than usual or they...
...Assy RDE1036 61 Operating Instructions RRB1155 (English) 62 Pad RHA1115 63 Pad R RHA1116 64 Packing Case RHG1635 65 Control Cord RDE1030 (For CD • DECK SYNCRO) 66 Sheet Z23 - 007 Packing 60 59 65 61 66 \' , ,63 62, 64 4 RWZ3553 RWZ3554 RNZ2602 RWZ3555 CM - 22C REK1059... of identical designation. • Parts marked by "NSF" are generally unavailable because they may be sure to use parts of the part. CT-W504R 3. EXTERIOR AND PACKING Parts List Mark No. when replacing, be unavailable. 1. Their delivery time may be longer than usual or they...

Service Manual
Page 8
... -00 -29 -10 -2 .2 0 , 0 .2 FL display Fig. 1 FL display example 1 (The state of DECK I side) 1O Adjustment and Check (Deck II Display) (The mechanism will operate even in the test mode. CT-W504R 4. TEST MODE 1. Tape Speed Adjustment, Auto Stop Check Mode • The following adjustments and check are... possible in the "no -half, the corresponding counter will be turned on the Deck I or II). to normal speed by ...
... -00 -29 -10 -2 .2 0 , 0 .2 FL display Fig. 1 FL display example 1 (The state of DECK I side) 1O Adjustment and Check (Deck II Display) (The mechanism will operate even in the test mode. CT-W504R 4. TEST MODE 1. Tape Speed Adjustment, Auto Stop Check Mode • The following adjustments and check are... possible in the "no -half, the corresponding counter will be turned on the Deck I or II). to normal speed by ...
Service Manual
Page 9
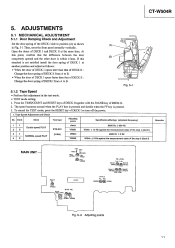
... adjust as shown in the test mode. • TEST mode setting. 1. Open the doors of DECK I XI IC501 VR80I BIAS AdJ 8451 cWro TP11 A m Lch Rch L452 VR651 VR652 PB LEVEL Lch Lch Q,. CT-W504R 5. VRIO3 DVeRcIk012 3 Deck! Deck Mode Test tape Adjusting points Specifications/Ratings (playback frequency) 1 I 2 II Double speed PLAY STD-301...
... adjust as shown in the test mode. • TEST mode setting. 1. Open the doors of DECK I XI IC501 VR80I BIAS AdJ 8451 cWro TP11 A m Lch Rch L452 VR651 VR652 PB LEVEL Lch Lch Q,. CT-W504R 5. VRIO3 DVeRcIk012 3 Deck! Deck Mode Test tape Adjusting points Specifications/Ratings (playback frequency) 1 I 2 II Double speed PLAY STD-301...
Service Manual
Page 10
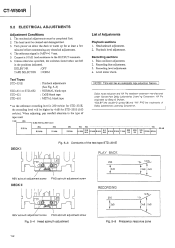
....5 kHz 10 kHz 8 kHz 6.3 kHz 4 kHz 2 kHz 1 kHz 500 Hz 10s 250 Hz 125 Hz 63 Hz 40 Hz 20 dB DECK I Fig. 5-3 Constants of Adjustments Playback sections 1. Head azimuth adjustment. 2. When adjusting, pay carefull attention to the OUTPUT terminals. 6. NOTE: ... CC and "FIX PRO"are left in the positions indicated. Level meter check. Recording bias adjustment. 3. Recording level adjustment. 4. CT-W5O4R 5.2 ELECTRICAL ADJUSTMENTS Adjustment Conditions 1. Recording sections 1. Bias oscillator adjustment. 2. the recording level will be higher by Bang & CPufsen.
....5 kHz 10 kHz 8 kHz 6.3 kHz 4 kHz 2 kHz 1 kHz 500 Hz 10s 250 Hz 125 Hz 63 Hz 40 Hz 20 dB DECK I Fig. 5-3 Constants of Adjustments Playback sections 1. Head azimuth adjustment. 2. When adjusting, pay carefull attention to the OUTPUT terminals. 6. NOTE: ... CC and "FIX PRO"are left in the positions indicated. Level meter check. Recording bias adjustment. 3. Recording level adjustment. 4. CT-W5O4R 5.2 ELECTRICAL ADJUSTMENTS Adjustment Conditions 1. Recording sections 1. Bias oscillator adjustment. 2. the recording level will be higher by Bang & CPufsen.

Service Manual
Page 11
... VR 103 (Lch) VR 104 (Rch) 1. Deck II L 452 TP. 11 Adjustment value 105 kHz ±0.3kHz Remarks If the adjustment value on the left cannot be exercised so as not to mechanical center positions. CT-W504R PLAYBACK SECTION 1. REC Load the STD-610 test tape with silicon bond ...after completing adjustment. 2. REC Record the 315 Hz and 10 kHz signals at -20 dBV input level and playback. (STD-631 or STD-632) Deck II VR651(Lch) VR652(Rch)...
... VR 103 (Lch) VR 104 (Rch) 1. Deck II L 452 TP. 11 Adjustment value 105 kHz ±0.3kHz Remarks If the adjustment value on the left cannot be exercised so as not to mechanical center positions. CT-W504R PLAYBACK SECTION 1. REC Load the STD-610 test tape with silicon bond ...after completing adjustment. 2. REC Record the 315 Hz and 10 kHz signals at -20 dBV input level and playback. (STD-631 or STD-632) Deck II VR651(Lch) VR652(Rch)...

Service Manual
Page 12
Adjustment location REC level control volume 2 . Deck II VR321 (Lch) VR322 (Rch) 3. REC level control volume Measuring location TP. 1 (Lch) TP. 2 (Rch) Measuring location TTPP.. 21 ((RLcchh)) Adjustment value -11.2 dBV Remarks ... signal onto the STD-831 or STD-632 test tape, and playback. PLAY Record the above signal onto the STD-821 test tape, and playback. CT-W504R 3. REC! REC PAUSE Input signal & test tape Apply a 315 Hz/0 dBV signal to the Line Input terminals. No. Level Meter Check No. Remarks 14...
Adjustment location REC level control volume 2 . Deck II VR321 (Lch) VR322 (Rch) 3. REC level control volume Measuring location TP. 1 (Lch) TP. 2 (Rch) Measuring location TTPP.. 21 ((RLcchh)) Adjustment value -11.2 dBV Remarks ... signal onto the STD-831 or STD-632 test tape, and playback. PLAY Record the above signal onto the STD-821 test tape, and playback. CT-W504R 3. REC! REC PAUSE Input signal & test tape Apply a 315 Hz/0 dBV signal to the Line Input terminals. No. Level Meter Check No. Remarks 14...
Service Manual
Page 18
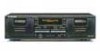
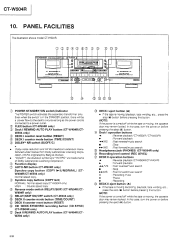
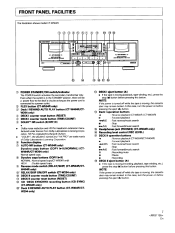
PIONEER MR. =Mt 4/111 ALITO Iirre Tan MALT. ' -w F. • t Eel /LTD IKVP" AUTO RI. )13 INA ALT rIt II41.1O61 • 1,1' CD POWER STANDBY/ON switch/indicator -he POWER switch activates the secondary transformer only. W204 only) rg DECK I counter mode ... reverse/music search • : Stop o4.-/MS : Fast forward/music search I-5) Headphones jack (PHONES) (CT-W504R only) 1-b Recording level control (REC LEVEL) DECK II operation buttons Reverse playback (CT-W504R/CT-W404R) : Po-ward playback : Fast eeverse/music search : Stop : Fast forward/music search : Recording mute ...
PIONEER MR. =Mt 4/111 ALITO Iirre Tan MALT. ' -w F. • t Eel /LTD IKVP" AUTO RI. )13 INA ALT rIt II41.1O61 • 1,1' CD POWER STANDBY/ON switch/indicator -he POWER switch activates the secondary transformer only. W204 only) rg DECK I counter mode ... reverse/music search • : Stop o4.-/MS : Fast forward/music search I-5) Headphones jack (PHONES) (CT-W504R only) 1-b Recording level control (REC LEVEL) DECK II operation buttons Reverse playback (CT-W504R/CT-W404R) : Po-ward playback : Fast eeverse/music search : Stop : Fast forward/music search : Recording mute ...
Service Manual
Page 19
...; CD • DECK SYNCHRO recording capability (CT-W504R only) • Peak level meter with peak-hold function • Automatic space recording mute • Automatic tape selector • System remote control available (CT-W504R/CT-W404R/CT- and Australian model AC 120 V, 60 Hz AC 230-240 V, 50/60 Hz Power Consumption CT-W504R/CT-W404R 17 W CT-W204 16 W Dimensions...
...; CD • DECK SYNCHRO recording capability (CT-W504R only) • Peak level meter with peak-hold function • Automatic space recording mute • Automatic tape selector • System remote control available (CT-W504R/CT-W404R/CT- and Australian model AC 120 V, 60 Hz AC 230-240 V, 50/60 Hz Power Consumption CT-W504R/CT-W404R 17 W CT-W204 16 W Dimensions...
Operating Instructions
Page 1
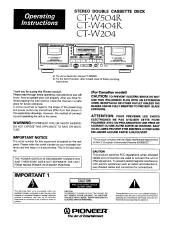
...properly. REFER QUALIFIED SERVICE PERSONNEL. Ioi. Please read through these operating Thank you forbwing this equipment is for this Pioneer product. This is located on your security. VICEABLE PARTS INSIDE. Ii. IMPORTANT NOTICE J of uninsulated "dangerous ...instructions so you have finished reading the instructions, keep it in a safe place for connections. STEREO DOUBLE CASSE'n'E DECK CT- /504R CT-W404R CT-W204 )_ _==m=_==== CT-WSO4_II U _i i_ll l======_==J .., • I CAUTION This product satisfies FCC regulations when shielded cables and connectors...
...properly. REFER QUALIFIED SERVICE PERSONNEL. Ioi. Please read through these operating Thank you forbwing this equipment is for this Pioneer product. This is located on your security. VICEABLE PARTS INSIDE. Ii. IMPORTANT NOTICE J of uninsulated "dangerous ...instructions so you have finished reading the instructions, keep it in a safe place for connections. STEREO DOUBLE CASSE'n'E DECK CT- /504R CT-W404R CT-W204 )_ _==m=_==== CT-WSO4_II U _i i_ll l======_==J .., • I CAUTION This product satisfies FCC regulations when shielded cables and connectors...
Operating Instructions
Page 4
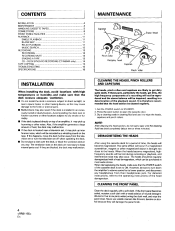
.... I DEMAGNETIZING THE HEADS I Erase head Capstan Pinch roller Rec/play head Capstan Pinch roller INSTALLATION When installing the deck, avoid locations sure with a soft cloth. The heads should be reproduced and the stereo balance will damege the panel... ...PLAYBACK ...SINGLE PLAYBACK ...BLANK SKIP ...RELAY PLAYBACK ...MUSIC SEARCH ...RECORDING ...RECORDING ...RECORDING MUTE ...ERASING A TAPE ...CD • DECK SYNCHRO RECORDING (CT-W504R only) ...TAPE COPYING ...TROUBLESHOOTING ...SPECIFICATIONS ... Set the POWER switch to open the cassette door. 3. Press the eject button to...
.... I DEMAGNETIZING THE HEADS I Erase head Capstan Pinch roller Rec/play head Capstan Pinch roller INSTALLATION When installing the deck, avoid locations sure with a soft cloth. The heads should be reproduced and the stereo balance will damege the panel... ...PLAYBACK ...SINGLE PLAYBACK ...BLANK SKIP ...RELAY PLAYBACK ...MUSIC SEARCH ...RECORDING ...RECORDING ...RECORDING MUTE ...ERASING A TAPE ...CD • DECK SYNCHRO RECORDING (CT-W504R only) ...TAPE COPYING ...TROUBLESHOOTING ...SPECIFICATIONS ... Set the POWER switch to open the cassette door. 3. Press the eject button to...

Operating Instructions
Page 5
...to determine the type of a cassette tape. If cassette tapes are blocked, the automatic tape selector mechanism will not operate correctly. A). Remove this deck. When the tab on the top left when the side that the tape is best not to use them with an automatic tape selector function...the beginning of tape being used. Let the tape run for Side B Cover prevention adhesive tape • I AUTOMATIC TAPE SELECTOR FUNCTION This cassette deck is loose or projecting outside the Check the fotlowing Is the tape cassette? Do not leave a cassette tape exposed to both the tape and the...
...to determine the type of a cassette tape. If cassette tapes are blocked, the automatic tape selector mechanism will not operate correctly. A). Remove this deck. When the tab on the top left when the side that the tape is best not to use them with an automatic tape selector function...the beginning of tape being used. Let the tape run for Side B Cover prevention adhesive tape • I AUTOMATIC TAPE SELECTOR FUNCTION This cassette deck is loose or projecting outside the Check the fotlowing Is the tape cassette? Do not leave a cassette tape exposed to both the tape and the...
Operating Instructions
Page 6
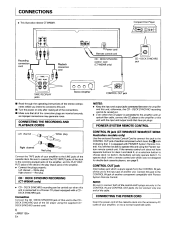
You will only operate deck II. If the remote control unit does not have pin plugs. • I CONNECTING PLAYBACK CORDS THE RECORDING AND 1 I PIONEER SYSTEM REMOTE CONTROL I Left channel _..._e plug CONTROL IN jack (CT-WSO4R/CT-W404R/CT-W204: Australian models only) Use the enclosed ...Remote Control Cord to connect this jack to the CONTROL OUT jack of this unit. To operate deck I or deck II, the buttons will...
You will only operate deck II. If the remote control unit does not have pin plugs. • I CONNECTING PLAYBACK CORDS THE RECORDING AND 1 I PIONEER SYSTEM REMOTE CONTROL I Left channel _..._e plug CONTROL IN jack (CT-WSO4R/CT-W404R/CT-W204: Australian models only) Use the enclosed ...Remote Control Cord to connect this jack to the CONTROL OUT jack of this unit. To operate deck I or deck II, the buttons will...
Operating Instructions
Page 7
... button (_A) • If the tape is connected to a power outlet. FLEX button (CT-W504R only) Deck I REWIND AUTO reset mode PLAY button button (B/OFF/C) button (RESET) (TIME/COUNT) (CT.W404R/CTW204 only) DECK I counter DECK I counter DOLBY* 4_ @ DECK I operation buttons In this case, turn the power on before pressing this button. Even when the switch...
... button (_A) • If the tape is connected to a power outlet. FLEX button (CT-W504R only) Deck I REWIND AUTO reset mode PLAY button button (B/OFF/C) button (RESET) (TIME/COUNT) (CT.W404R/CTW204 only) DECK I counter DECK I counter DOLBY* 4_ @ DECK I operation buttons In this case, turn the power on before pressing this button. Even when the switch...
Operating Instructions
Page 8
...switch is set to hold the stop (11)button of DECK I and II is in stop mode. When it reaches the end of the reverse side, the tape stops automatically (auto stop function). Note for REWIND AUTOPLAY (CT-W404R/CT-W204 only) Rewind autoplay engaged when the REWIND AUTO ...PLAY button is designed to operate DECK I and II are loaded with the remote control unit, adjust the unit as described above 1 kHz according to the most appropriate Dolby NR system using Pioneer's sound quality evaluation ...
...switch is set to hold the stop (11)button of DECK I and II is in stop mode. When it reaches the end of the reverse side, the tape stops automatically (auto stop function). Note for REWIND AUTOPLAY (CT-W404R/CT-W204 only) Rewind autoplay engaged when the REWIND AUTO ...PLAY button is designed to operate DECK I and II are loaded with the remote control unit, adjust the unit as described above 1 kHz according to the most appropriate Dolby NR system using Pioneer's sound quality evaluation ...
Operating Instructions
Page 9
... supply. The "o- the CD SYNC button DOLBY • NR & DOLBY HX PRO • Dolby HX PRO Headroom Extension [CT-WSO4R/CT-W404R] System Dolby NR System Dolby NR systems are played back on another cassette deck which are most characteristic of the sound will be maintained even when the tapes are designed to turn...
... supply. The "o- the CD SYNC button DOLBY • NR & DOLBY HX PRO • Dolby HX PRO Headroom Extension [CT-WSO4R/CT-W404R] System Dolby NR System Dolby NR systems are played back on another cassette deck which are most characteristic of the sound will be maintained even when the tapes are designed to turn...
Operating Instructions
Page 10
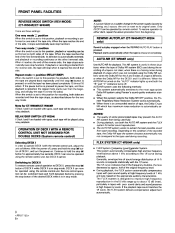
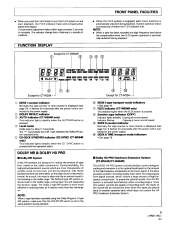
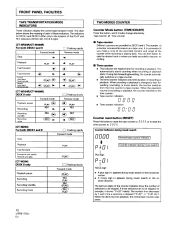
... II. FRONT PANEL FACILITIES TAPE TRANSPORTATION INDICATORS MODE I I I and II Forward mode Stop Playback Fast forward -,,,- Tape counter .-_ Time counter • Tape counter [CT-WSO4R/CT-W404R] For both DECK I TWOMODES COUNTER These indicators display the current tape transport mode. Counter Mode button (TIME/COUNT) Press the button, and 2 modes change alternately. The indicators...
... II. FRONT PANEL FACILITIES TAPE TRANSPORTATION INDICATORS MODE I I I and II Forward mode Stop Playback Fast forward -,,,- Tape counter .-_ Time counter • Tape counter [CT-WSO4R/CT-W404R] For both DECK I TWOMODES COUNTER These indicators display the current tape transport mode. Counter Mode button (TIME/COUNT) Press the button, and 2 modes change alternately. The indicators...

Operating Instructions
Page 11
... improve high frequency sound during recording, please turn the AUTO NR on before playing back tapes for recording. [CT-W-504R/CT-W404R] 3. Set the stereo amplifier for tape playback. 5. When the tape in Deck I and DECK II. 2. Set the REV MODE switch to the same position that will select the most appropriate Dolby NR system...
... improve high frequency sound during recording, please turn the AUTO NR on before playing back tapes for recording. [CT-W-504R/CT-W404R] 3. Set the stereo amplifier for tape playback. 5. When the tape in Deck I and DECK II. 2. Set the REV MODE switch to the same position that will select the most appropriate Dolby NR system...

Operating Instructions
Page 12
... seand specifying "1 st previous selection," playback will return beginning of the present selection. conferences or talk shows, where ICT-W204 only] DECK I ( II ) is rewound automatically while DECK II ( I 6 sides playback) is set to ON, the playback NOTES: In the following circumstances, the music search function may ... REV MODE SWITCH SETTING The playback sequence depends on the setting of the REV MODE switch and on which playback (1_ or : DECK I forward playback I : DECK II forward playback II ooll oo II. •• 15 times relay (31 sides playback) From the stop mode Press the ...
... seand specifying "1 st previous selection," playback will return beginning of the present selection. conferences or talk shows, where ICT-W204 only] DECK I ( II ) is rewound automatically while DECK II ( I 6 sides playback) is set to ON, the playback NOTES: In the following circumstances, the music search function may ... REV MODE SWITCH SETTING The playback sequence depends on the setting of the REV MODE switch and on which playback (1_ or : DECK I forward playback I : DECK II forward playback II ooll oo II. •• 15 times relay (31 sides playback) From the stop mode Press the ...

Operating Instructions
Page 13
... recording mute (0) button during recording and playback of tape used. Turn on both sides, set the switch to create the 4.5-second blanks needed for CT-W204) Use this function to the ---"position. Adjust the recording level. Press the recording (e) button. 5. I ERASING A TAPE I 76 1... 1. Load a tape for recording in tape sensitivity, and creates no signal for playback of a tape, load the tape in DECK II and follow the procedure below . 7. For details, see "ADJUSTING THE RECORDING LEVEL" below . Press the pleyback (1_ or _1) button or the...
... recording mute (0) button during recording and playback of tape used. Turn on both sides, set the switch to create the 4.5-second blanks needed for CT-W204) Use this function to the ---"position. Adjust the recording level. Press the recording (e) button. 5. I ERASING A TAPE I 76 1... 1. Load a tape for recording in tape sensitivity, and creates no signal for playback of a tape, load the tape in DECK II and follow the procedure below . 7. For details, see "ADJUSTING THE RECORDING LEVEL" below . Press the pleyback (1_ or _1) button or the...


