
Service Manual
Page 8
... possible : "-411" lights up • Reverse SW Check = : " I " lights up cm : " II " lights up When REV recording is carried out in double speed, the tape will be turned on the Deck I (HALF) Deck II (HALF) 2 FL display Fig. 2 FL display example 2 (The state of TIME/COUNT key ON on forcibly. MODE No...CD ON ON SYNC 1 TIME/COUNT ON ON (When there is for one of DECK II all together. (Refer to "0". CT-W504R 4. to Fig.1) Exiting the Test Mode To exit the test mode, press the RESET key of DECK I and PAUSE key of the CD SYNCHRO cord's plugs, Connect the other plug...
... possible : "-411" lights up • Reverse SW Check = : " I " lights up cm : " II " lights up When REV recording is carried out in double speed, the tape will be turned on the Deck I (HALF) Deck II (HALF) 2 FL display Fig. 2 FL display example 2 (The state of TIME/COUNT key ON on forcibly. MODE No...CD ON ON SYNC 1 TIME/COUNT ON ON (When there is for one of DECK II all together. (Refer to "0". CT-W504R 4. to Fig.1) Exiting the Test Mode To exit the test mode, press the RESET key of DECK I and PAUSE key of the CD SYNCHRO cord's plugs, Connect the other plug...
Service Manual
Page 9
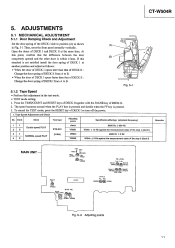
...m Lch Rch L452 VR651 VR652 PB LEVEL Lch Lch Q,. CT-W504R 5. The speed becomes normal when the PLAY key is pressed, and double when the FF key is within 15mm. Open the doors of DECK I and DECK II at another position and adjust as follows: • ... CI VR852 VR851 Fig. 5-2 Adjusting points 11 ADJUSTMENTS 5.1 MECHANICAL ADJUSTMENT 5.1.1 Door Damping Check and Adjustment Set the door spring of DECK I side to B. (A) (B) 4 Fig. 5-1 5.1.2 Tape Speed • Perform this adjustment in Fig. 5-1 Then, erect the front panel assembly vertically. At this standard is not satisfied ...
...m Lch Rch L452 VR651 VR652 PB LEVEL Lch Lch Q,. CT-W504R 5. The speed becomes normal when the PLAY key is pressed, and double when the FF key is within 15mm. Open the doors of DECK I and DECK II at another position and adjust as follows: • ... CI VR852 VR851 Fig. 5-2 Adjusting points 11 ADJUSTMENTS 5.1 MECHANICAL ADJUSTMENT 5.1.1 Door Damping Check and Adjustment Set the door spring of DECK I side to B. (A) (B) 4 Fig. 5-1 5.1.2 Tape Speed • Perform this adjustment in Fig. 5-1 Then, erect the front panel assembly vertically. At this standard is not satisfied ...
Service Manual
Page 10
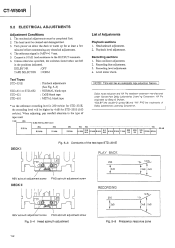
...2 kHz 1 kHz 500 Hz 10s 250 Hz 125 Hz 63 Hz 40 Hz 20 dB DECK I Fig. 5-3 Constants of the test tape STD-331E PLAY BACK 250 3dB REV azimuth adjustment screw DECK II FWD azimuth adjustment screw RECORDING 250 O 3d8 12 5k 'ok A 3dB 4cl B 125k... STD-621 STD-610 : Playback adjustments (See Fig. 5-3) : NORMAL blank tape : CrO2 blank tape : METAL blank tape * As the reference recording level is 0 dBV=1 Vrms. 5. NOTE: This unit has an automatic tape selection feature. CT-W5O4R 5.2 ELECTRICAL ADJUSTMENTS Adjustment Conditions 1. The mechanical adjustments must be completed first....
...2 kHz 1 kHz 500 Hz 10s 250 Hz 125 Hz 63 Hz 40 Hz 20 dB DECK I Fig. 5-3 Constants of the test tape STD-331E PLAY BACK 250 3dB REV azimuth adjustment screw DECK II FWD azimuth adjustment screw RECORDING 250 O 3d8 12 5k 'ok A 3dB 4cl B 125k... STD-621 STD-610 : Playback adjustments (See Fig. 5-3) : NORMAL blank tape : CrO2 blank tape : METAL blank tape * As the reference recording level is 0 dBV=1 Vrms. 5. NOTE: This unit has an automatic tape selection feature. CT-W5O4R 5.2 ELECTRICAL ADJUSTMENTS Adjustment Conditions 1. The mechanical adjustments must be completed first....

Service Manual
Page 11
... adjustment determines the DOLBY NR level, and must be obtained vkaHlzueasrewaitlhsoins1a0ti5skfaHczto±ry04. .3 2. Deck I ) or VR103, 104 (Deck II) to become under bias by checking the distortion rate. REC Load the STD-610 test tape with silicon bond after completing adjustment. 2. CT-W504R PLAYBACK SECTION 1. Head azimuth adjustment screw. (See Fig. 5-4) LINE OUT Lock...
... adjustment determines the DOLBY NR level, and must be obtained vkaHlzueasrewaitlhsoins1a0ti5skfaHczto±ry04. .3 2. Deck I ) or VR103, 104 (Deck II) to become under bias by checking the distortion rate. REC Load the STD-610 test tape with silicon bond after completing adjustment. 2. CT-W504R PLAYBACK SECTION 1. Head azimuth adjustment screw. (See Fig. 5-4) LINE OUT Lock...

Service Manual
Page 12
... Record the above signal onto the STD-810 test tape, and playback. REC/ PLAY Record the above signal onto the STD-831 or STD-632 test tape, and playback. Mode 1. REC! Check 4. Check 4. CT-W504R 3. REC PAUSE Input signal & test tape Apply a 315 Hz/0 dBV signal to the Line... Input terminals. PLAY Record the above signal onto the STD-821 test tape, and playback. No. Deck II VR321 (Lch) VR322 (...
... Record the above signal onto the STD-810 test tape, and playback. REC/ PLAY Record the above signal onto the STD-831 or STD-632 test tape, and playback. Mode 1. REC! Check 4. Check 4. CT-W504R 3. REC PAUSE Input signal & test tape Apply a 315 Hz/0 dBV signal to the Line... Input terminals. PLAY Record the above signal onto the STD-821 test tape, and playback. No. Deck II VR321 (Lch) VR322 (...
Service Manual
Page 18
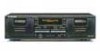
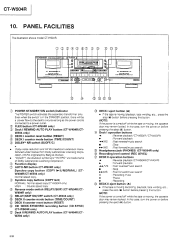
...DECK I eject button (A) • l` the tape is connected to a power outlet. (2-) FLEX button (CT-W504R only) Deck I REWIND AUTO PLAY button (CT-W404R/CTW204 only) ® DECK I counter reset button (RESET) DECK I -5) Headphones jack (PHONES) (CT-W504R only) 1-b Recording level control (REC LEVEL) DECK II operation buttons Reverse playback (CT-W504R/CT-W404R... If the power is turned off while the tape Is moving (recording, playback, tape winding, etc. . NOTE: If the cower is moving , the cassette door may remain locked. CT-W504R 10. PIONEER MR. =Mt 4/111 ALITO Iirre Tan MALT...
...DECK I eject button (A) • l` the tape is connected to a power outlet. (2-) FLEX button (CT-W504R only) Deck I REWIND AUTO PLAY button (CT-W404R/CTW204 only) ® DECK I counter reset button (RESET) DECK I -5) Headphones jack (PHONES) (CT-W504R only) 1-b Recording level control (REC LEVEL) DECK II operation buttons Reverse playback (CT-W504R/CT-W404R... If the power is turned off while the tape Is moving (recording, playback, tape winding, etc. . NOTE: If the cower is moving , the cassette door may remain locked. CT-W504R 10. PIONEER MR. =Mt 4/111 ALITO Iirre Tan MALT...
Service Manual
Page 19
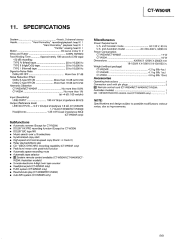
... Hz TYPE II (High/CrO2) tape 20 to 16,000 Hz TYPE I -* Deck II) • Relay playback/blank skip • CD • DECK SYNCHRO recording capability (CT-W504R only) • Peak level meter with pin plugs 2 Ell Remote control cord (CT-W504R/CT-W404R/CT-W204: Australian models) 1 CD • DECKSYNCHRO control cord (CT-W504R only) 1 NOTE: Specifications and...
... Hz TYPE II (High/CrO2) tape 20 to 16,000 Hz TYPE I -* Deck II) • Relay playback/blank skip • CD • DECK SYNCHRO recording capability (CT-W504R only) • Peak level meter with pin plugs 2 Ell Remote control cord (CT-W504R/CT-W404R/CT-W204: Australian models) 1 CD • DECKSYNCHRO control cord (CT-W504R only) 1 NOTE: Specifications and...
Operating Instructions
Page 4
...deck. • Do not place a cloth over the deck... the deck is ...deck regularly with a weak solution of the cassette deck...deck may also occur. I DEMAGNETIZING THE HEADS I Do not install the deck in a deterioration of heat, the deck...deck, avoid locations sure with a head demagnetizer, which will be recorded as this deck...deck next to oily smoke or humidity. If this happens, move the deck...tape. The heads should be regularly demagnetized with that high the temperatures deck...After using the cassette deck for a period of ...TAPES ...CONNECTIONS ...FRONT PANEL FACILITIES ...PLAYBACK ......
...deck. • Do not place a cloth over the deck... the deck is ...deck regularly with a weak solution of the cassette deck...deck may also occur. I DEMAGNETIZING THE HEADS I Do not install the deck in a deterioration of heat, the deck...deck, avoid locations sure with a head demagnetizer, which will be recorded as this deck...deck next to oily smoke or humidity. If this happens, move the deck...tape. The heads should be regularly demagnetized with that high the temperatures deck...After using the cassette deck for a period of ...TAPES ...CONNECTIONS ...FRONT PANEL FACILITIES ...PLAYBACK ......

Operating Instructions
Page 5
...tab, do not adhere to the tape, and so the tape will not be erased by mistake. Do not use so that the tape is properly wound. Let the tape run for Side B Cover prevention adhesive tape • I AUTOMATIC TAPE SELECTOR FUNCTION This cassette deck is equipped with a plastic or ...thick paper stopper to prevent the tape from becoming slack. E). When the tab on...
...tab, do not adhere to the tape, and so the tape will not be erased by mistake. Do not use so that the tape is properly wound. Let the tape run for Side B Cover prevention adhesive tape • I AUTOMATIC TAPE SELECTOR FUNCTION This cassette deck is equipped with a plastic or ...thick paper stopper to prevent the tape from becoming slack. E). When the tab on...
Operating Instructions
Page 6
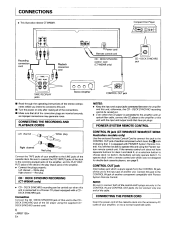
... optical fiber cable, connect the CD player to the ampfifier or this unit with a CD DECK SYNCHRO jack. Connect this jack to choose deck I Left channel _..._e plug CONTROL IN jack (CT-WSO4R/CT-W404R/CT-W204: Australian models only) Use the enclosed Remote Control Cord to connect this unit using the... CT-W504R. Right channel_ "" c_2_ Red plug Connect the TAPE jacks of your amplifier, or into a normal household outlet. 6 En Red plug CONTROL OUT jack Intermediary jack which outputs signals from the CONTROL IN jack of this unit to the LINE jacks of the CD player using the Pioneer...
... optical fiber cable, connect the CD player to the ampfifier or this unit with a CD DECK SYNCHRO jack. Connect this jack to choose deck I Left channel _..._e plug CONTROL IN jack (CT-WSO4R/CT-W404R/CT-W204: Australian models only) Use the enclosed Remote Control Cord to connect this unit using the... CT-W504R. Right channel_ "" c_2_ Red plug Connect the TAPE jacks of your amplifier, or into a normal household outlet. 6 En Red plug CONTROL OUT jack Intermediary jack which outputs signals from the CONTROL IN jack of this unit to the LINE jacks of the CD player using the Pioneer...
Operating Instructions
Page 7
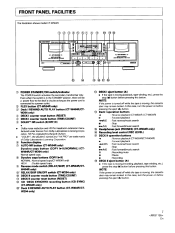
... before pressing the eject (A) button. (_ _' Q _) @ NR switch Deck I eject button (_A) • If the tape is moving, the cassette door may remain locked. FLEX button (CT-W504R only) Deck I REWIND AUTO reset mode PLAY button button (B/OFF/C) button (RESET) (TIME/COUNT) (CT.W404R/CTW204 only) DECK I counter DECK I counter DOLBY* 4_ @ DECK I operation buttons FRONT PANEL FACILITIES The illustration...
... before pressing the eject (A) button. (_ _' Q _) @ NR switch Deck I eject button (_A) • If the tape is moving, the cassette door may remain locked. FLEX button (CT-W504R only) Deck I REWIND AUTO reset mode PLAY button button (B/OFF/C) button (RESET) (TIME/COUNT) (CT.W404R/CTW204 only) DECK I counter DECK I counter DOLBY* 4_ @ DECK I operation buttons FRONT PANEL FACILITIES The illustration...
Operating Instructions
Page 8
... REVERSE MODE SWITCH (REV MODE) (CT-W504R/CT-W404R) There are three settings: One way mode ---" position When the switch is set to this position, playback or recording is set to this system selects the Dolby NR OFF position, the Pioneer Proprietary Noise Reduction System works automatically.... the tape is rewound completely. [ AUTO-NR (CT-W504R only) ] Use AUTO NR for REWIND AUTOPLAY (CT-W404R/CT-W204 only) Rewind autoplay engaged when the REWIND AUTO PLAY button is different; when the Dolby NR for playback, both sides of a tape is pressed. NOTES: CT-WSO4RICT-W404R If Deck I ...
... REVERSE MODE SWITCH (REV MODE) (CT-W504R/CT-W404R) There are three settings: One way mode ---" position When the switch is set to this position, playback or recording is set to this system selects the Dolby NR OFF position, the Pioneer Proprietary Noise Reduction System works automatically.... the tape is rewound completely. [ AUTO-NR (CT-W504R only) ] Use AUTO NR for REWIND AUTOPLAY (CT-W404R/CT-W204 only) Rewind autoplay engaged when the REWIND AUTO PLAY button is different; when the Dolby NR for playback, both sides of a tape is pressed. NOTES: CT-WSO4RICT-W404R If Deck I ...
Operating Instructions
Page 9
... is automatically adjusted during playback. 9 En NOTE: • I FUNCTION DISPLAY Except for CT-W504R I _J.o 2_T -lEO • 13 _3 I Except for CT-W204J DECK I counter indicator Q Normally the tape counter or time counter is connected to normal. It flashes for 4 seconds after the power... twice normal speed. Level meter Holds peak for CT-W204 - -J DECK I tape transport 0 _) mode indicators • See page 10. the CD SYNC button DOLBY • NR & DOLBY HX PRO • Dolby HX PRO Headroom Extension [CT-WSO4R/CT-W404R] System Dolby NR System Dolby NR systems are ...
... is automatically adjusted during playback. 9 En NOTE: • I FUNCTION DISPLAY Except for CT-W504R I _J.o 2_T -lEO • 13 _3 I Except for CT-W204J DECK I counter indicator Q Normally the tape counter or time counter is connected to normal. It flashes for 4 seconds after the power... twice normal speed. Level meter Holds peak for CT-W204 - -J DECK I tape transport 0 _) mode indicators • See page 10. the CD SYNC button DOLBY • NR & DOLBY HX PRO • Dolby HX PRO Headroom Extension [CT-WSO4R/CT-W404R] System Dolby NR System Dolby NR systems are ...
Operating Instructions
Page 10
.... It is convenient if you lastly recorded to resume recording. • Time • counter Tape counter .-_ Time counter • Tape counter [CT-WSO4R/CT-W404R] For both DECK I -left, DECK II-right). The indicators for DECK I TWOMODES COUNTER These indicators display the current tape transport mode. "ii',_"Flashing rapidly Reverse mode -11 PLAY I1_ Different counters are provided for...
.... It is convenient if you lastly recorded to resume recording. • Time • counter Tape counter .-_ Time counter • Tape counter [CT-WSO4R/CT-W404R] For both DECK I -left, DECK II-right). The indicators for DECK I TWOMODES COUNTER These indicators display the current tape transport mode. "ii',_"Flashing rapidly Reverse mode -11 PLAY I1_ Different counters are provided for...

Operating Instructions
Page 11
... playback can be performed. Load a prerecorded tape in one deck ends, the other deck will automatically begin playback. 1. PLAYBACK SINGLE PLAYBACK (Either DECK I or DECK II) I RELAY PLAYBACK ] 2 3 2 3 1 5 (5) (1) 1 5 (5) (1) When relay playback mode is not clear, or if the Dolby NR system was used for recording. [CT-W-504R/CT-W404R] 3. Load prerecorded tapes in tapes with poor recordings Press the FLEX...
... playback can be performed. Load a prerecorded tape in one deck ends, the other deck will automatically begin playback. 1. PLAYBACK SINGLE PLAYBACK (Either DECK I or DECK II) I RELAY PLAYBACK ] 2 3 2 3 1 5 (5) (1) 1 5 (5) (1) When relay playback mode is not clear, or if the Dolby NR system was used for recording. [CT-W-504R/CT-W404R] 3. Load prerecorded tapes in tapes with poor recordings Press the FLEX...

Operating Instructions
Page 12
...rewound automatically while DECK II ( I 6 sides playback) is set to ON, the playback NOTES: In the following circumstances, the music search function may be unable to properly detect blanks between selections; How Selections When lection to selections back, count one extra selection. When using a tape with blanks ... REV MODE SWITCH SETTING The playback sequence depends on the setting of the REV MODE switch and on which playback (1_ or : DECK I forward playback I : DECK II forward playback II ooll oo II. •• 15 times relay (31 sides playback) From the stop mode Press the...
...rewound automatically while DECK II ( I 6 sides playback) is set to ON, the playback NOTES: In the following circumstances, the music search function may be unable to properly detect blanks between selections; How Selections When lection to selections back, count one extra selection. When using a tape with blanks ... REV MODE SWITCH SETTING The playback sequence depends on the setting of the REV MODE switch and on which playback (1_ or : DECK I forward playback I : DECK II forward playback II ooll oo II. •• 15 times relay (31 sides playback) From the stop mode Press the...

Operating Instructions
Page 13
Press the recording (e) button. 5. Set the REV MODE switch. (Except for CT-W204) • To recordon one side is recorded. (Except for CT-W204) Use this function to create the 4.5-second blanks needed for proper operation of the music search function. • Press the recording ...11)button again, or press the playback (1_ or When the button is due to record. I RECORDING I RECORDING (Deck II only) I I 2 To erase the recorded contents of a tape, load the tape in DECK II and follow the procedure below . 7. Press the pleyback (1_ or _1) button or the pause (11) button ...
Press the recording (e) button. 5. Set the REV MODE switch. (Except for CT-W204) • To recordon one side is recorded. (Except for CT-W204) Use this function to create the 4.5-second blanks needed for proper operation of the music search function. • Press the recording ...11)button again, or press the playback (1_ or When the button is due to record. I RECORDING I RECORDING (Deck II only) I I 2 To erase the recorded contents of a tape, load the tape in DECK II and follow the procedure below . 7. Press the pleyback (1_ or _1) button or the pause (11) button ...

Operating Instructions
Page 14
...CD player enters stop mode and the cassette deck enters recording standby mode. To resume recording, load another tape and check the tape running indicator will enter stop mode.) ff the auto-reverse function operates while the CD CD • DECK SYNCHRO RECORDING (CT-W504R only) 4 396 is still playing... 4. If more than I U ! 8 7 2 When the end of the tape is reached while the CD player is still playing: The CD player returns to change direction. NOTES The CD • DECK SYNCHRO function only works with PIONEER CD players equipped with a CD. Any type of CD player which meets these...
...CD player enters stop mode and the cassette deck enters recording standby mode. To resume recording, load another tape and check the tape running indicator will enter stop mode.) ff the auto-reverse function operates while the CD CD • DECK SYNCHRO RECORDING (CT-W504R only) 4 396 is still playing... 4. If more than I U ! 8 7 2 When the end of the tape is reached while the CD player is still playing: The CD player returns to change direction. NOTES The CD • DECK SYNCHRO function only works with PIONEER CD players equipped with a CD. Any type of CD player which meets these...

Operating Instructions
Page 15
... speed). • 1. During high-speed copying, none of the operation buttons will function except for re• (CT-W504R/CT- HIGH : Tape copying at NORMAL ) 15 En I TAPE COPYING (from DECK I and a tape cording into Deck II. 2. Both decks will still audible. ( 4' is CT-W404R/CT-W204 only at twice the normal speed (COPY indicator flashes). NOTES: : T _--,-_ . _=====_m,-._--_ :t _ • ! • The...
... speed). • 1. During high-speed copying, none of the operation buttons will function except for re• (CT-W504R/CT- HIGH : Tape copying at NORMAL ) 15 En I TAPE COPYING (from DECK I and a tape cording into Deck II. 2. Both decks will still audible. ( 4' is CT-W404R/CT-W204 only at twice the normal speed (COPY indicator flashes). NOTES: : T _--,-_ . _=====_m,-._--_ :t _ • ! • The...

Operating Instructions
Page 16
... in the opposite direction. e The tape is not correctly set too low. Turn the amplifier volume control up slack (see page 4). Rewind thetape. Set the amplifier input selector correctly. Cover the hole over the tab (see page 13). CASSETTE DOOR The door dose not open The deck is moving . The amplifier input...
... in the opposite direction. e The tape is not correctly set too low. Turn the amplifier volume control up slack (see page 4). Rewind thetape. Set the amplifier input selector correctly. Cover the hole over the tab (see page 13). CASSETTE DOOR The door dose not open The deck is moving . The amplifier input...


