Installation Manual
Page 2
...™ device (for AVIC-Z150BH and AVIC-X950BH) 9 Connecting the power cord (1) 10 Connecting the power cord (2) 12 When connecting to rear video output 18 Installation Precautions before connecting the system 5 Before installing this product 5 To prevent damage 6 - Installation using a rear display...Your new navigation system and this manual 3 Important safeguards 3 Connecting the system Precautions before installation 19 To avoid electromagnetic interference 19 Before installing 19 - Using an AV input (AV2) 18 When connecting the rear display 18 - Installation notes 20 - Mounting on ...
...™ device (for AVIC-Z150BH and AVIC-X950BH) 9 Connecting the power cord (1) 10 Connecting the power cord (2) 12 When connecting to rear video output 18 Installation Precautions before connecting the system 5 Before installing this product 5 To prevent damage 6 - Installation using a rear display...Your new navigation system and this manual 3 Important safeguards 3 Connecting the system Precautions before installation 19 To avoid electromagnetic interference 19 Before installing 19 - Using an AV input (AV2) 18 When connecting the rear display 18 - Installation notes 20 - Mounting on ...
Installation Manual
Page 3
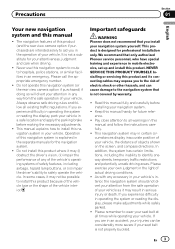
...display inaccurate position of your vehicle, the distance of your vehicle. Please call the appropriate emergency number. ! Important safeguards WARNING Pioneer does not recommend that is designed for your attentiveness, judgment and care when driving. ! This navigation system may result in... Keep this product. In addition, the system has certain limitations, including the inability to aid you install your vehicle in mobile electronics, set up and install this manual handy for the navigation system. ! If you experience difficulty in operating the system or reading the ...
...display inaccurate position of your vehicle, the distance of your vehicle. Please call the appropriate emergency number. ! Important safeguards WARNING Pioneer does not recommend that is designed for your attentiveness, judgment and care when driving. ! This navigation system may result in... Keep this product. In addition, the system has certain limitations, including the inability to aid you install your vehicle in mobile electronics, set up and install this manual handy for the navigation system. ! If you experience difficulty in operating the system or reading the ...

Installation Manual
Page 5
... carefully follow all wiring with a 12-volt battery and negative grounding only. Never feed power to become damaged, resulting in the installation manual. ! Tampering with or become caught in a short circuit or malfunction. ! Use this product, its cables, and wiring away in ...column or shift lever. Do not cut the GPS antenna cable to shorten it longer. Connecting the system Section 02 English Precautions before installation. Altering the antenna cable could result in considerable danger. ! En 5 Do not allow cables to other electronic products by cutting the...
... carefully follow all wiring with a 12-volt battery and negative grounding only. Never feed power to become damaged, resulting in the installation manual. ! Tampering with or become caught in a short circuit or malfunction. ! Use this product, its cables, and wiring away in ...column or shift lever. Do not cut the GPS antenna cable to shorten it longer. Connecting the system Section 02 English Precautions before installation. Altering the antenna cable could result in considerable danger. ! En 5 Do not allow cables to other electronic products by cutting the...

Installation Manual
Page 6
... all unused speaker leads, which if left uncovered may pull it could result in the car) *1Not supplied for the external power amps. When installing this unit. ! Be sure not to the car separately with insulating tape. Ensure that the ground wire is especially important to 8 W (impedance...of smoke or malfunction. Be sure not to metal parts of the speaker lead together. It is properly connected to use 1 W to the owner's manual for the blue/white lead ! Refer to 3 W speakers for this unit or power amp (sold separately), make connections accordingly. ! Notice for ...
... all unused speaker leads, which if left uncovered may pull it could result in the car) *1Not supplied for the external power amps. When installing this unit. ! Be sure not to the car separately with insulating tape. Ensure that the ground wire is especially important to 8 W (impedance...of smoke or malfunction. Be sure not to metal parts of the speaker lead together. It is properly connected to use 1 W to the owner's manual for the blue/white lead ! Refer to 3 W speakers for this unit or power amp (sold separately), make connections accordingly. ! Notice for ...
Installation Manual
Page 18
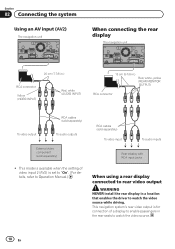
... separately) To video input To audio inputs Rear display with RCA input jacks When using a rear display connected to rear video output WARNING NEVER install the rear display in the rear seats to watch the video source while driving. This mode is available when the setting of video input 2 ...(AV2) is for connection of a display to enable passengers in a location that enables the driver to Operation Manual.) RCA cables (sold separately) ! This navigation system's rear video output is set to "On". (For details, refer to watch the video source. 18...
... separately) To video input To audio inputs Rear display with RCA input jacks When using a rear display connected to rear video output WARNING NEVER install the rear display in the rear seats to watch the video source while driving. This mode is available when the setting of video input 2 ...(AV2) is for connection of a display to enable passengers in a location that enables the driver to Operation Manual.) RCA cables (sold separately) ! This navigation system's rear video output is set to "On". (For details, refer to watch the video source. 18...

Installation Manual
Page 19
...in the vehicle's location display. If any parts are used, they may damage internal parts of the navigation system. ! Do not install this product, temporarily connect the wiring to damage fuel lines, brake lines, electronic components, communication wires or power cables. ! Please... the driver's vision, (ii) impair the performance of the driver's seat, or close to your vehicle's owner's manual for errors in the manner specified after installation of this navigation system, other cables or leads: ! To avoid electromagnetic interference In order to prevent interference, set the...
...in the vehicle's location display. If any parts are used, they may damage internal parts of the navigation system. ! Do not install this product, temporarily connect the wiring to damage fuel lines, brake lines, electronic components, communication wires or power cables. ! Please... the driver's vision, (ii) impair the performance of the driver's seat, or close to your vehicle's owner's manual for errors in the manner specified after installation of this navigation system, other cables or leads: ! To avoid electromagnetic interference In order to prevent interference, set the...
Operation Manual
Page 1
...installation may be required. Important Information for the User first! Be sure to read Important Information for the User includes the important information that the navigation system is properly connected to your vehicle's parking brake and depending on your Authorized Pioneer Electronics retailer or call us at (800) 421-1404. English Operation Manual... MULTIMEDIA NAVIGATION RECEIVER AVIC-Z150BH AVIC-X950BH AVIC-X850BT AVIC-X8510BT Notice to all users: This...
...installation may be required. Important Information for the User first! Be sure to read Important Information for the User includes the important information that the navigation system is properly connected to your vehicle's parking brake and depending on your Authorized Pioneer Electronics retailer or call us at (800) 421-1404. English Operation Manual... MULTIMEDIA NAVIGATION RECEIVER AVIC-Z150BH AVIC-X950BH AVIC-X850BT AVIC-X8510BT Notice to all users: This...

Operation Manual
Page 108
... Bluetooth devices on page 56. 3 Unlock your smartphone. 4 Connect your smartphone to this product via the separately sold App Connectivity Kit (CD-AH200) (for AVIC-Z150BH and AVIC-X950BH). = For details of the operations, refer to Displaying the AV operation screen on page 71. 108 En When you touch [Pandora] or [aha], the... page 109. = For details, refer to Using Aha Radio on page 111. 6 Touch [Pandora] or [aha] on the left side of the screen to the Installation Manual.
... Bluetooth devices on page 56. 3 Unlock your smartphone. 4 Connect your smartphone to this product via the separately sold App Connectivity Kit (CD-AH200) (for AVIC-Z150BH and AVIC-X950BH). = For details of the operations, refer to Displaying the AV operation screen on page 71. 108 En When you touch [Pandora] or [aha], the... page 109. = For details, refer to Using Aha Radio on page 111. 6 Touch [Pandora] or [aha] on the left side of the screen to the Installation Manual.

Operation Manual
Page 125
... curves = For details, refer to Using the equalizer on page 151. 2 Hides the touch panel keys and information of the connection method, refer to the Installation Manual. For details of the current video Touching shows only the current video. CAUTION For safety reasons, video images cannot be viewed while your vehicle is...
... curves = For details, refer to Using the equalizer on page 151. 2 Hides the touch panel keys and information of the connection method, refer to the Installation Manual. For details of the current video Touching shows only the current video. CAUTION For safety reasons, video images cannot be viewed while your vehicle is...

Operation Manual
Page 129
... smartphone. = For details, refer to this product via the Bluetooth wireless technology. For smartphone users p This description is for AVIC-Z150BH and AVIC-X950BH. 1 Prepare the navigation system to connect to your smartphone to Selecting the device connection method on this product via the separately... is connected. p The [Apps] key icon and Bluetooth icon vary according to the condition of the operations, refer to the Installation Manual. 5 Press the HOME button to the application menu screen. p The registered device must be selected as follows: Icon Meaning Appears...
... smartphone. = For details, refer to this product via the Bluetooth wireless technology. For smartphone users p This description is for AVIC-Z150BH and AVIC-X950BH. 1 Prepare the navigation system to connect to your smartphone to Selecting the device connection method on this product via the separately... is connected. p The [Apps] key icon and Bluetooth icon vary according to the condition of the operations, refer to the Installation Manual. 5 Press the HOME button to the application menu screen. p The registered device must be selected as follows: Icon Meaning Appears...

Operation Manual
Page 131
...The image in your smartphone appears on the screen. 4 Launch an application on your device. = For details of the operations, refer to the Installation Manual. 2 Press the HOME button to display the "Top Menu" screen. 3 Touch [Apps]. p You can only control the application on the ... you want to launch your application, appears on your iPhone. 4 Use your application (smartphone) p This function is available on AVIC-Z150BH and AVIC-X950BH. Using AppRadio Mode Chapter 26 Using AppRadio Mode Other functions Displaying the image of your application (iPhone) You can set an image...
...The image in your smartphone appears on the screen. 4 Launch an application on your device. = For details of the operations, refer to the Installation Manual. 2 Press the HOME button to display the "Top Menu" screen. 3 Touch [Apps]. p You can only control the application on the ... you want to launch your application, appears on your iPhone. 4 Use your application (smartphone) p This function is available on AVIC-Z150BH and AVIC-X950BH. Using AppRadio Mode Chapter 26 Using AppRadio Mode Other functions Displaying the image of your application (iPhone) You can set an image...
Operation Manual
Page 168
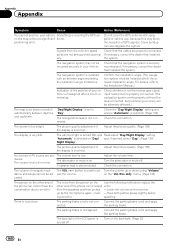
... signal input lead (violet) is properly connected. (The navigation system works properly without a significant tenna. "Day/Night Display" is set to the Installation Manual.) Indication of the position of the display is too bright. The picture quality adjustment of your vehicle is misaligned after a U-turn or reversing. A...person on the receiver up prop- The backlight of the phone call cannot hear the conversation due to ad- The navigation system is installed with spray paint or vehicle wax, because this may not be ad- The voice from the person on the Use the following ...
... signal input lead (violet) is properly connected. (The navigation system works properly without a significant tenna. "Day/Night Display" is set to the Installation Manual.) Indication of the position of the display is too bright. The picture quality adjustment of your vehicle is misaligned after a U-turn or reversing. A...person on the receiver up prop- The backlight of the phone call cannot hear the conversation due to ad- The navigation system is installed with spray paint or vehicle wax, because this may not be ad- The voice from the person on the Use the following ...

