Owner's Manual
Page 2
... use the Navigation menu screen Operating the Navigation menu screen 29 How to use the map How to erasure 12 - Selecting a rear source 25 Turning off the display 20 - When the Application screen is not available 20 How to operate your product against theft 16 - Conventions used in this manual 11 - Introduction Manual overview 11 - Using the remote control 15 Protecting your model properly. Operating list screens 27 - Switching screens using the hardware buttons 23 Supported AV source 24 Displaying...
... use the Navigation menu screen Operating the Navigation menu screen 29 How to use the map How to erasure 12 - Selecting a rear source 25 Turning off the display 20 - When the Application screen is not available 20 How to operate your product against theft 16 - Conventions used in this manual 11 - Introduction Manual overview 11 - Using the remote control 15 Protecting your model properly. Operating list screens 27 - Switching screens using the hardware buttons 23 Supported AV source 24 Displaying...
Owner's Manual
Page 3
... cannot receive a GPS signal 35 Searching for a destination Searching for a location by address 37 Searching for a location by scrolling the map 44 Using the "Map Location" screen 45 Checking and modifying the current route Modifying the route 46 - Smart History 42 Searching for a location using "Combined Search" 43 Searching for a location by categories or directly from stored routes 41 Selecting a location you want to see 33 - Checking route alternatives 47 - Deleting stored routes 53 Saving a location as...
... cannot receive a GPS signal 35 Searching for a destination Searching for a location by address 37 Searching for a location by scrolling the map 44 Using the "Map Location" screen 45 Checking and modifying the current route Modifying the route 46 - Smart History 42 Searching for a location using "Combined Search" 43 Searching for a location by categories or directly from stored routes 41 Selecting a location you want to see 33 - Checking route alternatives 47 - Deleting stored routes 53 Saving a location as...
Owner's Manual
Page 4
... - "Route Preferences" settings 63 - "Trip Monitor" settings 69 - Searching for hands-free phoning 86 Switching the ring tone 85 - "Sound" settings 65 - "Online Services" settings 69 - Touch panel keys 80 - Using the preset dial lists 83 Receiving a phone call automatically 85 - "Warnings" settings 66 - Preparations before you use of the navigation functions 71 - Inverting names in the phone book 81 - Editing a trip log 59 Using the Trip Computer mode 59 Calculating the fuel consumption 60 - Entering the fuel consumption information...
... - "Route Preferences" settings 63 - "Trip Monitor" settings 69 - Searching for hands-free phoning 86 Switching the ring tone 85 - "Sound" settings 65 - "Online Services" settings 69 - Touch panel keys 80 - Using the preset dial lists 83 Receiving a phone call automatically 85 - "Warnings" settings 66 - Preparations before you use of the navigation functions 71 - Inverting names in the phone book 81 - Editing a trip log 59 Using the Trip Computer mode 59 Calculating the fuel consumption 60 - Entering the fuel consumption information...
Owner's Manual
Page 8
... active 188 Adjusting the picture 189 Displaying the firmware version 190 Updating firmware 190 Setting the reversed image setting for the second camera input image 185 Turning off the demo screen 185 Selecting the system language 186 Setting the keyboard language with the hardware buttons 171 Using an HDMI source Using the touch panel keys 172 Reading the screen 172 Starting procedure 172 Using an AUX source Using the touch panel keys 173 Reading the screen 173 Starting...
... active 188 Adjusting the picture 189 Displaying the firmware version 190 Updating firmware 190 Setting the reversed image setting for the second camera input image 185 Turning off the demo screen 185 Selecting the system language 186 Setting the keyboard language with the hardware buttons 171 Using an HDMI source Using the touch panel keys 172 Reading the screen 172 Starting procedure 172 Using an AUX source Using the touch panel keys 173 Reading the screen 173 Starting...

Owner's Manual
Page 9
... automatically (Auto EQ) 203 - Setting the password 224 - Exporting "Theme" settings 211 - Setting the code number and level 215 Displaying your DivX VOD registration code 216 Displaying your DivX VOD deregistration code 217 Automatic playback of leads 192 Audio adjustments Using fader/balance adjustment 194 Using balance adjustment 194 Switching sound muting/attenuation 195 Adjusting source levels 195 Adjusting the filter 198 - Changing to the splash screen stored on the external storage device (USB, SD) 207 Setting the illumination...
... automatically (Auto EQ) 203 - Setting the password 224 - Exporting "Theme" settings 211 - Setting the code number and level 215 Displaying your DivX VOD registration code 216 Displaying your DivX VOD deregistration code 217 Automatic playback of leads 192 Audio adjustments Using fader/balance adjustment 194 Using balance adjustment 194 Switching sound muting/attenuation 195 Adjusting source levels 195 Adjusting the filter 198 - Changing to the splash screen stored on the external storage device (USB, SD) 207 Setting the illumination...
Owner's Manual
Page 57
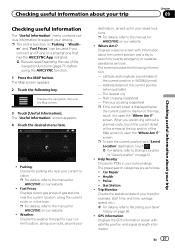
... screen with satellite position and signal strength information. screen. Help Nearby: Checks for AVICSYNC on our website. ! Health: ! GPS Information: Displays the GPS information screen with information about your trip Checking useful information The "Useful Information" menu contains various information to support your driving. p For details, refer to the manual for POIs in your surroundings. Latitude and longitude (coordinates of the navigation functions (page 71) before using the AVICSYNC function. 1 Press the MAP button. The nearest city - When you connect an...
... screen with satellite position and signal strength information. screen. Help Nearby: Checks for AVICSYNC on our website. ! Health: ! GPS Information: Displays the GPS information screen with information about your trip Checking useful information The "Useful Information" menu contains various information to support your driving. p For details, refer to the manual for POIs in your surroundings. Latitude and longitude (coordinates of the navigation functions (page 71) before using the AVICSYNC function. 1 Press the MAP button. The nearest city - When you connect an...
Owner's Manual
Page 58
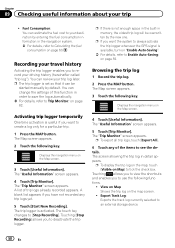
... to Enable Auto-Saving: on "Enable Auto-Saving". = For details, refer to see the details. Displays the navigation menu on page 60. Activating trip logger temporarily One-time activation is available, turn on page 59. p The trip logger is activated. Browsing the trip log 1 Record the trip log. 2 Press the MAP button. Touching [Stop Recording] allows you to [Stop Recording]. Touching allows you to view the shortcuts and enables you to an external storage device. 58 En The screen showing the trip log...
... to Enable Auto-Saving: on "Enable Auto-Saving". = For details, refer to see the details. Displays the navigation menu on page 60. Activating trip logger temporarily One-time activation is available, turn on page 59. p The trip logger is activated. Browsing the trip log 1 Record the trip log. 2 Press the MAP button. Touching [Stop Recording] allows you to [Stop Recording]. Touching allows you to view the shortcuts and enables you to an external storage device. 58 En The screen showing the trip log...
Owner's Manual
Page 68
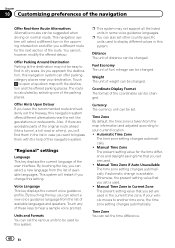
... can be changed . Time Zone By default, the time zone is available. Automatic Time Zone The time zone setting changes automatically. ! Currency The currency unit can select a new language from the map information and adjusted according to your vehicle moves to bypass them in the list in Current Zone The present setting value that you set other country specific units used . ! Time Zone You can be set the time difference. 68 En Touch any of distance can set . Manual Time Zone...
... can be changed . Time Zone By default, the time zone is available. Automatic Time Zone The time zone setting changes automatically. ! Currency The currency unit can select a new language from the map information and adjusted according to your vehicle moves to bypass them in the list in Current Zone The present setting value that you set other country specific units used . ! Time Zone You can be set the time difference. 68 En Touch any of distance can set . Manual Time Zone...

Owner's Manual
Page 70
... the points in this navigation system for improving the user interface and the program workflow. Online Fuel Prices You can enable or disable the online search service. "Usage Reports" settings Application Usage Information You can enable or disable the online traffic service. Displays the navigation menu on using this category. ! The following key. Visual: You will receive audible and visible warnings while you of anonymous statistical information on the Map screen. 3 Touch to change the setting. Online Parking...
... the points in this navigation system for improving the user interface and the program workflow. Online Fuel Prices You can enable or disable the online search service. "Usage Reports" settings Application Usage Information You can enable or disable the online traffic service. Displays the navigation menu on using this category. ! The following key. Visual: You will receive audible and visible warnings while you of anonymous statistical information on the Map screen. 3 Touch to change the setting. Online Parking...
Owner's Manual
Page 77
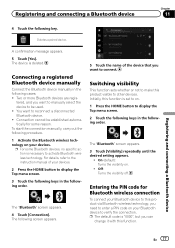
... to manually select the device to display the Top menu screen. 2 Touch the following keys in the following screen appears. 5 Touch the name of your devices. For details, refer to the instruction manual of the device that you can change it with this product visible to activate Bluetooth wireless technology. A confirmation message appears. 5 Touch [Yes]. p For some reason. p The default code is deleted. To start the connection manually, carry out the following cases: ! Switching...
... to manually select the device to display the Top menu screen. 2 Touch the following keys in the following screen appears. 5 Touch the name of your devices. For details, refer to the instruction manual of the device that you can change it with this product visible to activate Bluetooth wireless technology. A confirmation message appears. 5 Touch [Yes]. p For some reason. p The default code is deleted. To start the connection manually, carry out the following cases: ! Switching...
Owner's Manual
Page 87
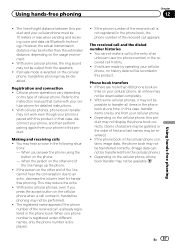
... phone. - If the phone book in the phone book at one by operating your cellular phone. ! Using hands-free phoning Chapter 12 Using hands-free phoning ! Refer to this case, transfer items one time. You may be 10 meters or less when sending and receiving voice and data via Bluetooth technology. This may not be disabled. The received call to an echo, decrease the volume level for detailed instructions. ! Phone book transfers ! In this product. Cellular phone operations...
... phone. - If the phone book in the phone book at one by operating your cellular phone. ! Using hands-free phoning Chapter 12 Using hands-free phoning ! Refer to this case, transfer items one time. You may be 10 meters or less when sending and receiving voice and data via Bluetooth technology. This may not be disabled. The received call to an echo, decrease the volume level for detailed instructions. ! Phone book transfers ! In this product. Cellular phone operations...

Owner's Manual
Page 138
... the Installation Manual. 2 Press the HOME button to the Top menu screen. p Android Auto may not be shown on your Bluetooth device before using this function, do not connect other devices via the separately sold App Connectivity Kit (CD-AH200). Be sure to this product via Bluetooth wireless technology. Using Android Auto 8100NEX 7100NEX You can set "Mode" in "Smartphone Setup" to "Android Auto" beforehand. = For details, refer to the Google support...
... the Installation Manual. 2 Press the HOME button to the Top menu screen. p Android Auto may not be shown on your Bluetooth device before using this function, do not connect other devices via the separately sold App Connectivity Kit (CD-AH200). Be sure to this product via Bluetooth wireless technology. Using Android Auto 8100NEX 7100NEX You can set "Mode" in "Smartphone Setup" to "Android Auto" beforehand. = For details, refer to the Google support...
Owner's Manual
Page 139
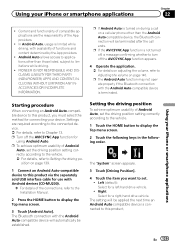
... availability of Android Auto, set the driving position setting correctly according to the vehicle. 1 Touch the HOME button to Adjusting the volume on a cellular phone other than the Android Auto-compatible device, the Bluetooth connection will be applied the next time an Android Auto-compatible device is not turned off, a message confirming whether to this product. Starting procedure When connecting an Android Auto-compatible device to this product via the separately sold USB interface cable...
... availability of Android Auto, set the driving position setting correctly according to the vehicle. 1 Touch the HOME button to Adjusting the volume on a cellular phone other than the Android Auto-compatible device, the Bluetooth connection will be applied the next time an Android Auto-compatible device is not turned off, a message confirming whether to this product. Starting procedure When connecting an Android Auto-compatible device to this product via the separately sold USB interface cable...
Owner's Manual
Page 140
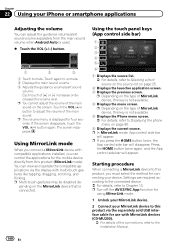
... (+/-) button to mute. Using MirrorLink mode When you connect a MirrorLink device with multi-touch gestures like tapping, dragging, scrolling, and flicking. p Turn off the AVICSYNC App function for the mobile device directly from the main sound volume when Android Auto is used. % Touch the VOL (+/-) button. 1 2 3 1 Touch to adjust the volume of [+] or [-] increases or decreases the volume level. p Depending on the type of the main sound on page 80. 6 Displays the current source...
... (+/-) button to mute. Using MirrorLink mode When you connect a MirrorLink device with multi-touch gestures like tapping, dragging, scrolling, and flicking. p Turn off the AVICSYNC App function for the mobile device directly from the main sound volume when Android Auto is used. % Touch the VOL (+/-) button. 1 2 3 1 Touch to adjust the volume of [+] or [-] increases or decreases the volume level. p Depending on the type of the main sound on page 80. 6 Displays the current source...
Owner's Manual
Page 153
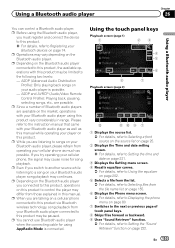
... cannot use Bluetooth audio player when the connecting cable for song playback. p Even if you are talking on a cellular phone connected to this product via Bluetooth wireless technology, song playback from the file name list on page 155. 6 Displays the Phone menu screen. = For details, refer to Displaying the phone menu on page 80. 7 Switches to Setting the "Sound Retriever" function on your audio player is connected. En 153 p Before using the Bluetooth audio player...
... cannot use Bluetooth audio player when the connecting cable for song playback. p Even if you are talking on a cellular phone connected to this product via Bluetooth wireless technology, song playback from the file name list on page 155. 6 Displays the Phone menu screen. = For details, refer to Displaying the phone menu on page 80. 7 Switches to Setting the "Sound Retriever" function on your audio player is connected. En 153 p Before using the Bluetooth audio player...
Owner's Manual
Page 202
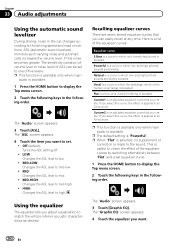
... you create. The "Audio" screen appears. 3 Touch [Graphic EQ]. ASL (automatic sound levelizer) monitors such varying noise and automatically increases the volume level, if this noise becomes greater. LOW: Changes the ASL level to match the vehicle interior acoustic characteristics as desired. Using the equalizer The equalizer lets you create. and high-pitched sounds are boosted. Custom2 is "Powerful". p The default setting is an adjusted...
... you create. The "Audio" screen appears. 3 Touch [Graphic EQ]. ASL (automatic sound levelizer) monitors such varying noise and automatically increases the volume level, if this noise becomes greater. LOW: Changes the ASL level to match the vehicle interior acoustic characteristics as desired. Using the equalizer The equalizer lets you create. and high-pitched sounds are boosted. Custom2 is "Powerful". p The default setting is an adjusted...

Owner's Manual
Page 222
... successfully complete. Setting the "Sound Retriever" function The "Sound Retriever" function automatically enhances compressed audio and restores rich sound. % Touch the following key. When the song information is received, is displayed while the desired song is being acquired, is already connected, the song information will be stored. 7 Connect your iPod. p If the iPod is displayed. p If you touch the touch panel key on the AV operation screen. HD...
... successfully complete. Setting the "Sound Retriever" function The "Sound Retriever" function automatically enhances compressed audio and restores rich sound. % Touch the following key. When the song information is received, is displayed while the desired song is being acquired, is already connected, the song information will be stored. 7 Connect your iPod. p If the iPod is displayed. p If you touch the touch panel key on the AV operation screen. HD...
Owner's Manual
Page 226
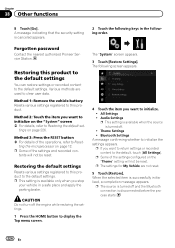
... Do not turn off and the Bluetooth connection is disconnected before the process starts. 226 En All Settings ! Audio Settings p This setting is available when the source is canceled appears. 2 Touch the following order. p The settings for My Vehicle are used to initialize. ! When the selected item is available only when you want to return settings or recorded content to Restoring the default set- Restoring this product to Reset- p This setting is...
... Do not turn off and the Bluetooth connection is disconnected before the process starts. 226 En All Settings ! Audio Settings p This setting is available when the source is canceled appears. 2 Touch the following order. p The settings for My Vehicle are used to initialize. ! When the selected item is available only when you want to return settings or recorded content to Restoring the default set- Restoring this product to Reset- p This setting is...

Owner's Manual
Page 227
... is not firmly secured. Insert a normal, round disc. lar file format. not be played Replace the disc. Park your dealer or the nearest authorized Pioneer service facility. Correct the settings. (Page 180) nected equipment. No sounds are not connected correctly. Connect the cables correctly. disc playback. Input the correct code number. (Page 215) En 227 Check the file format. The loaded disc is no sound on fast reverse...
... is not firmly secured. Insert a normal, round disc. lar file format. not be played Replace the disc. Park your dealer or the nearest authorized Pioneer service facility. Correct the settings. (Page 180) nected equipment. No sounds are not connected correctly. Connect the cables correctly. disc playback. Input the correct code number. (Page 215) En 227 Check the file format. The loaded disc is no sound on fast reverse...

Other Manual
Page 1
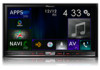
... use the AppRadio Mode, install the AppRadio app on the mobile device beforehand to enable launching of the application on the upper right corner of the Home screen to display the phone menu. 2.Tap the icon to display the "Bluetooth Connection Menu". 5.Tap the name of the mobile device, and make the Bluetooth connection with Lightning connector is connected, [iPod] is disabled. Registering your device in the device list. 6.When PIN code input is required, enter the PIN code (the default PIN code...
... use the AppRadio Mode, install the AppRadio app on the mobile device beforehand to enable launching of the application on the upper right corner of the Home screen to display the phone menu. 2.Tap the icon to display the "Bluetooth Connection Menu". 5.Tap the name of the mobile device, and make the Bluetooth connection with Lightning connector is connected, [iPod] is disabled. Registering your device in the device list. 6.When PIN code input is required, enter the PIN code (the default PIN code...


