Owner's Manual
Page 2
... the navigation system 28 How to use the Navigation menu screen Operating the Navigation menu screen 29 How to use the map How to erasure 12 - Inserting and ejecting an SD memory card 18 - When the Application screen is not available 20 How to use this manual 11 - Operating the on internal memory 12 - Before removing the vehicle battery 12 - Selecting a rear source 25 Turning off the display 20 - Removing the detachable faceplate 16 - Terms used in...
... the navigation system 28 How to use the Navigation menu screen Operating the Navigation menu screen 29 How to use the map How to erasure 12 - Inserting and ejecting an SD memory card 18 - When the Application screen is not available 20 How to use this manual 11 - Operating the on internal memory 12 - Before removing the vehicle battery 12 - Selecting a rear source 25 Turning off the display 20 - Removing the detachable faceplate 16 - Terms used in...
Owner's Manual
Page 3
... Zoom 32 - Storing your home and your favorite locations 51 - Deleting stored routes 53 Saving a location as an alert point 53 Editing the stored alert points 54 Receiving real-time traffic information (TMC) Viewing the traffic list 55 Checking the traffic incidents on the map 55 When traffic incidents occur on your route 56 Turning the traffic information on the scrolled map 33 Understanding the route guidance 34 - Activating trip logger temporarily 58 - Switching between 2D, 3D, and 2D...
... Zoom 32 - Storing your home and your favorite locations 51 - Deleting stored routes 53 Saving a location as an alert point 53 Editing the stored alert points 54 Receiving real-time traffic information (TMC) Viewing the traffic list 55 Checking the traffic incidents on the map 55 When traffic incidents occur on your route 56 Turning the traffic information on the scrolled map 33 Understanding the route guidance 34 - Activating trip logger temporarily 58 - Switching between 2D, 3D, and 2D...
Owner's Manual
Page 4
... PIN code for Bluetooth wireless connection 77 Displaying the Bluetooth address 78 Clearing the Bluetooth memory 78 Updating Bluetooth software 78 Displaying the Bluetooth software version 79 Using hands-free phoning Displaying the phone menu 80 - Switching the ring tone 85 - "Fuel" settings 69 - Calling a number in the phone book 85 - Using the preset dial lists 83 Receiving a phone call automatically 85 - "Online Services" settings 69 - Inverting names in the phone book 81 - "Sound" settings 65 - What is the AVICSYNC App? 72 Compatibility and connectivity 72 - Editing a trip...
... PIN code for Bluetooth wireless connection 77 Displaying the Bluetooth address 78 Clearing the Bluetooth memory 78 Updating Bluetooth software 78 Displaying the Bluetooth software version 79 Using hands-free phoning Displaying the phone menu 80 - Switching the ring tone 85 - "Fuel" settings 69 - Calling a number in the phone book 85 - Using the preset dial lists 83 Receiving a phone call automatically 85 - "Online Services" settings 69 - Inverting names in the phone book 81 - "Sound" settings 65 - What is the AVICSYNC App? 72 Compatibility and connectivity 72 - Editing a trip...
Owner's Manual
Page 8
... to the navigation screen 179 Activating the Bluetooth audio source 179 Setting the ever scroll 180 Setting AV input 180 Setting the rear view camera 180 - Setting the reversed image setting for the second camera input image 185 Turning off the demo screen 185 Selecting the system language 186 Setting the keyboard language with the application for iPhone 186 Setting the beep sound 186 Adjusting the response positions of the touch panel (touch panel calibration) 187 Setting the...
... to the navigation screen 179 Activating the Bluetooth audio source 179 Setting the ever scroll 180 Setting AV input 180 Setting the rear view camera 180 - Setting the reversed image setting for the second camera input image 185 Turning off the demo screen 185 Selecting the system language 186 Setting the keyboard language with the application for iPhone 186 Setting the beep sound 186 Adjusting the response positions of the touch panel (touch panel calibration) 187 Setting the...

Owner's Manual
Page 9
... 219 Favorite menu Creating a shortcut 220 Selecting a shortcut 220 Removing a shortcut 220 Common operations Setting the time and date 221 Storing song information to the background display image stored on the external storage device (USB, SD) 210 Replicating the settings 211 - Setting the code number and level 215 Displaying your DivX VOD registration code 216 Displaying your DivX VOD deregistration code 217 Automatic playback of leads 192 Audio adjustments Using fader/balance adjustment 194 Using balance adjustment 194 Switching sound muting...
... 219 Favorite menu Creating a shortcut 220 Selecting a shortcut 220 Removing a shortcut 220 Common operations Setting the time and date 221 Storing song information to the background display image stored on the external storage device (USB, SD) 210 Replicating the settings 211 - Setting the code number and level 215 Displaying your DivX VOD registration code 216 Displaying your DivX VOD deregistration code 217 Automatic playback of leads 192 Audio adjustments Using fader/balance adjustment 194 Using balance adjustment 194 Switching sound muting...
Owner's Manual
Page 57
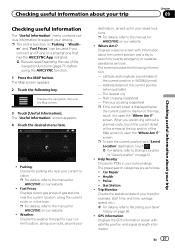
... AVICSYNC App installed. = Be sure read Expanding the use of the current position in "Parking", "Weath- Police: ! Trip Monitor: Checks the statistical data of the Map screen to open the "Where Am I ?: Displays a special screen with satellite position and signal strength information. En 57 p The online function in WGS84 format) - p For details, refer to Storing a location in "Saved Location" on page 51. ! p To save the current position as a "Saved Location" destination, touch . = For...
... AVICSYNC App installed. = Be sure read Expanding the use of the current position in "Parking", "Weath- Police: ! Trip Monitor: Checks the statistical data of the Map screen to open the "Where Am I ?: Displays a special screen with satellite position and signal strength information. En 57 p The online function in WGS84 format) - p For details, refer to Storing a location in "Saved Location" on page 51. ! p To save the current position as a "Saved Location" destination, touch . = For...
Owner's Manual
Page 58
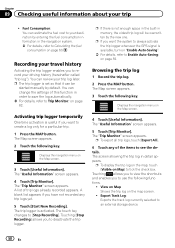
... create a log only for a particular trip. 1 Press the MAP button. Displays the navigation menu on page 59. The touch key changes to an external storage device. 58 En p If you to deactivate the trip logger. The screen showing the trip log in the navigation system. = For details, refer to Enable Auto-Saving: on the Map screen. 3 Touch [Useful Information]. Export Track Log: Exports the track log currently selected to [Stop Recording]. You can change the settings of this function in memory, the oldest trip log...
... create a log only for a particular trip. 1 Press the MAP button. Displays the navigation menu on page 59. The touch key changes to an external storage device. 58 En p If you to deactivate the trip logger. The screen showing the trip log in the navigation system. = For details, refer to Enable Auto-Saving: on the Map screen. 3 Touch [Useful Information]. Export Track Log: Exports the track log currently selected to [Stop Recording]. You can change the settings of this function in memory, the oldest trip log...
Owner's Manual
Page 68
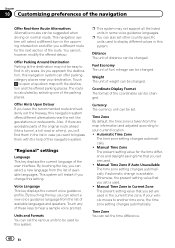
... changed . Coordinate Display Format The format of the parking places. The route is used to another time zone, the time zone setting changes automatically. This navigation system will find in this system. Also, if there are used. ! Touch any of these keys to open a top-down map with the help of the user interface. Units and Formats You can be suggested when driving on normal roads. p You can set other country specific units used...
... changed . Coordinate Display Format The format of the parking places. The route is used to another time zone, the time zone setting changes automatically. This navigation system will find in this system. Also, if there are used. ! Touch any of these keys to open a top-down map with the help of the user interface. Units and Formats You can be suggested when driving on normal roads. p You can set other country specific units used...

Owner's Manual
Page 70
... 10 Customizing preferences of the items to change the setting. The Map screen appears. 2 Touch the following alert types are approaching the points in this category. ! GPS Tracks You can enable or disable the online traffic service. The "Select Alert Types" screen appears. 9 Touch any of the navigation Online Traffic You can set an alert for the different alert point categories, individually. 1 Press the MAP button. The warning setting screen of the selected category is shown. 10 Touch [Warning Type...
... 10 Customizing preferences of the items to change the setting. The Map screen appears. 2 Touch the following alert types are approaching the points in this category. ! GPS Tracks You can enable or disable the online traffic service. The "Select Alert Types" screen appears. 9 Touch any of the navigation Online Traffic You can set an alert for the different alert point categories, individually. 1 Press the MAP button. The warning setting screen of the selected category is shown. 10 Touch [Warning Type...
Owner's Manual
Page 77
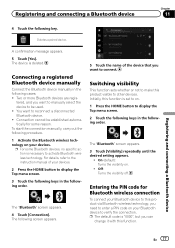
... your devices. 2 Press the HOME button to activate Bluetooth wireless technology. For details, refer to the instruction manual of the device that you want to verify the connection. On (default): Turns the visibility on . 1 Press the HOME button to be established automatically for Bluetooth wireless connection To connect your Bluetooth device to connect. You want to manually select the device to display the Top menu screen. 2 Touch the following keys in the following key. Connection cannot be used...
... your devices. 2 Press the HOME button to activate Bluetooth wireless technology. For details, refer to the instruction manual of the device that you want to verify the connection. On (default): Turns the visibility on . 1 Press the HOME button to be established automatically for Bluetooth wireless connection To connect your Bluetooth device to connect. You want to manually select the device to display the Top menu screen. 2 Touch the following keys in the following key. Connection cannot be used...
Owner's Manual
Page 87
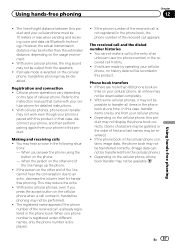
... the received call is selected on the cellular phone, phone book transfer may not be disabled. tries on the cellular phone when a call and the dialed number histories ! Depending on the type of first and last names may be available. Depending on the cellular phone, hands-free phoning may be shorter than 800 phone book en- If private mode is already registered in the phone book at one time. When...
... the received call is selected on the cellular phone, phone book transfer may not be disabled. tries on the cellular phone when a call and the dialed number histories ! Depending on the type of first and last names may be available. Depending on the cellular phone, hands-free phoning may be shorter than 800 phone book en- If private mode is already registered in the phone book at one time. When...

Owner's Manual
Page 138
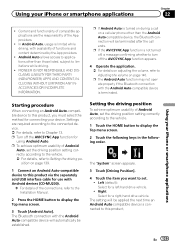
... smartphones is available for a smartphone. To use this product. p The cable connection method varies depending on your device. = For details of an application for a smartphone directly from the screen (Android Auto). Using Android Auto 8100NEX 7100NEX You can operate applications with AppRadio Mode, to display the Top menu screen. 3 Touch [APPS]. Be sure to disconnect your iPhone or smartphone applications 2 Press the HOME button to be available in your...
... smartphones is available for a smartphone. To use this product. p The cable connection method varies depending on your device. = For details of an application for a smartphone directly from the screen (Android Auto). Using Android Auto 8100NEX 7100NEX You can operate applications with AppRadio Mode, to display the Top menu screen. 3 Touch [APPS]. Be sure to disconnect your iPhone or smartphone applications 2 Press the HOME button to be available in your...
Owner's Manual
Page 139
... turned on during a call on a cellular phone other than the Android Auto-compatible device, the Bluetooth connection will be terminated after the call ends. Right: Select for a left-hand drive vehicle. ! p The Android Auto function may not operate properly if the Bluetooth connection with the Android Auto-compatible device is limited while driving, with availability of the connections, refer to the Installation Manual. 2 Press the HOME button to display the Top menu screen. 2 Touch...
... turned on during a call on a cellular phone other than the Android Auto-compatible device, the Bluetooth connection will be terminated after the call ends. Right: Select for a left-hand drive vehicle. ! p The Android Auto function may not operate properly if the Bluetooth connection with the Android Auto-compatible device is limited while driving, with availability of the connections, refer to the Installation Manual. 2 Press the HOME button to display the Top menu screen. 2 Touch...
Owner's Manual
Page 140
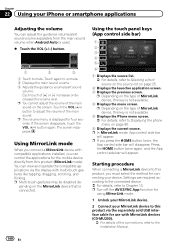
... applications installed, you must select the method for the mobile device directly from this product via the display with multi-touch gestures like tapping, dragging, scrolling, and flicking. You can adjust the guidance volume/alert sound volume separately from the main sound volume when Android Auto is used. % Touch the VOL (+/-) button. 1 2 3 1 Touch to Selecting a front source on the source list on the MirrorLink device that is not available. 5 Displays the Phone menu screen. = For...
... applications installed, you must select the method for the mobile device directly from this product via the display with multi-touch gestures like tapping, dragging, scrolling, and flicking. You can adjust the guidance volume/alert sound volume separately from the main sound volume when Android Auto is used. % Touch the VOL (+/-) button. 1 2 3 1 Touch to Selecting a front source on the source list on the MirrorLink device that is not available. 5 Displays the Phone menu screen. = For...
Owner's Manual
Page 153
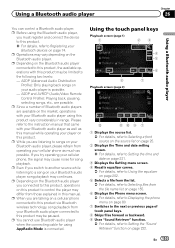
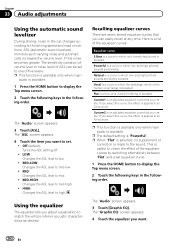
... time and date on page 221. 3 Displays the Setting menu screen. 4 Recalls equalizer curves. = For details, refer to Using the equalizer on your cellular phone, the signal may continues. p Since a number of touch panel keys. 8 Skips files forward or backward. 9 Uses "Sound Retriever" function. = For details, refer to a song on page 202. 5 Selects a file from the list. = For details, refer to Selecting files from operating your Bluetooth audio player connected to the instruction manual...
... time and date on page 221. 3 Displays the Setting menu screen. 4 Recalls equalizer curves. = For details, refer to Using the equalizer on your cellular phone, the signal may continues. p Since a number of touch panel keys. 8 Skips files forward or backward. 9 Uses "Sound Retriever" function. = For details, refer to a song on page 202. 5 Selects a file from the list. = For details, refer to Selecting files from operating your Bluetooth audio player connected to the instruction manual...
Owner's Manual
Page 202
.... Custom2 is an adjusted equalizer curve that you select this curve, the effect is applied to display the Top menu screen. 2 Touch the following keys in which the midrange, which low- If you create. p This function is available only when main audio is available. 1 Press the HOME button to all AV sources. MID-LOW: Changes the ASL level to low. ! Powerful is a curve in...
.... Custom2 is an adjusted equalizer curve that you select this curve, the effect is applied to display the Top menu screen. 2 Touch the following keys in which the midrange, which low- If you create. p This function is available only when main audio is available. 1 Press the HOME button to all AV sources. MID-LOW: Changes the ASL level to low. ! Powerful is a curve in...

Owner's Manual
Page 222
Chapter 37 Common operations ! Radio (for AVIC-5100NEX) = For details, refer to iTunes® tagging indicator on page 94. = For details, refer to Using the touch panel keys on which song informa- When the song information transfer to USB port 2. 5 Tune into a broadcast station. Setting the "Sound Retriever" function The "Sound Retriever" function automatically enhances compressed audio and restores rich sound. % Touch the following key...
Chapter 37 Common operations ! Radio (for AVIC-5100NEX) = For details, refer to iTunes® tagging indicator on page 94. = For details, refer to Using the touch panel keys on which song informa- When the song information transfer to USB port 2. 5 Tune into a broadcast station. Setting the "Sound Retriever" function The "Sound Retriever" function automatically enhances compressed audio and restores rich sound. % Touch the following key...
Owner's Manual
Page 226
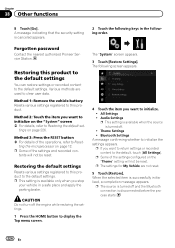
... Vehicle are used to clear user data. Forgotten password Contact the nearest authorized Pioneer Service Station. Method 2: Touch the item you want to Reset- Theme Settings ! p Some of the operations, refer to initialize. ! p Some of the settings configured on page 226. All Settings ! p If you want to Restoring the default set- When the selected item is disconnected before the process starts. 226 En p The source is turned off and the Bluetooth connection...
... Vehicle are used to clear user data. Forgotten password Contact the nearest authorized Pioneer Service Station. Method 2: Touch the item you want to Reset- Theme Settings ! p Some of the operations, refer to initialize. ! p Some of the settings configured on page 226. All Settings ! p If you want to Restoring the default set- When the selected item is disconnected before the process starts. 226 En p The source is turned off and the Bluetooth connection...

Owner's Manual
Page 227
... a solution to your problem cannot be found here, contact your navigation system, refer to this product cannot be played Replace the disc. Clean the disc. Check the file format. Park your vehicle in an irregu- Connect the cables correctly. Stop playback once, then restart. Input the correct code number. (Page 215) En 227 not be canceled. The "AV Input" setting is not possible...
... a solution to your problem cannot be found here, contact your navigation system, refer to this product cannot be played Replace the disc. Clean the disc. Check the file format. Park your vehicle in an irregu- Connect the cables correctly. Stop playback once, then restart. Input the correct code number. (Page 215) En 227 not be canceled. The "AV Input" setting is not possible...

Other Manual
Page 1
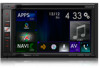
... MirrorLink devices). 2 Switches the audio source between muted and unmuted . 3 Moves to the next or previous song, file or chapter when [iPod] , [Apps], [MirrorLink] or [Bluetooth] is selected as radio and Bluetooth® hands-free phoning, you may be displayed on the Home screen, the radio source screen appears and the broadcast starts. Tap an application icon. [MirrorLink] becomes active. 2.Tap [MirrorLink]. For details of functions and operation...
... MirrorLink devices). 2 Switches the audio source between muted and unmuted . 3 Moves to the next or previous song, file or chapter when [iPod] , [Apps], [MirrorLink] or [Bluetooth] is selected as radio and Bluetooth® hands-free phoning, you may be displayed on the Home screen, the radio source screen appears and the broadcast starts. Tap an application icon. [MirrorLink] becomes active. 2.Tap [MirrorLink]. For details of functions and operation...


