
Owner's Manual
Page 2
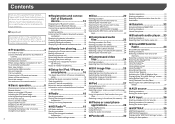
... information 5 Parking brake interlock 5 When using the LCD panel 8 Adjusting the LCD panel angle 9 Inserting/ejecting/connecting media 9 On first-time startup 9 ■Hands-free phoning..........14 Displaying the Phone menu screen 14 Making a phone call 14 Receiving a phone call 14 Minimizing the dial confirmation screen..........15 Changing the phone settings 15 Using the voice recognition function (for iPhone 15 Notes for hands-free phoning 15 ■Setup for iPod / iPhone or smartphone 16 The basic flow of sources............11 Using the touch panel...
... information 5 Parking brake interlock 5 When using the LCD panel 8 Adjusting the LCD panel angle 9 Inserting/ejecting/connecting media 9 On first-time startup 9 ■Hands-free phoning..........14 Displaying the Phone menu screen 14 Making a phone call 14 Receiving a phone call 14 Minimizing the dial confirmation screen..........15 Changing the phone settings 15 Using the voice recognition function (for iPhone 15 Notes for hands-free phoning 15 ■Setup for iPod / iPhone or smartphone 16 The basic flow of sources............11 Using the touch panel...
Owner's Manual
Page 3
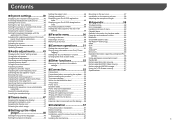
...42 Removing a shortcut 50 HD Radio™ Technology 65 Adjusting the picture 42 Displaying the firmware version 42 Updating firmware 43 ■Audio adjustments...........43 Displaying the "Audio" setting screen 43 Using fader adjustment 43 Using balance adjustment 43 Switching sound muting/attenuation 43 Adjusting source levels 43 Using the auto level control 43 Adjusting loudness 44 Using the subwoofer output 44 Adjusting the cutoff frequency value 44 Switching the rear speaker output 44 Boosting the bass 44 Selecting the listening position 44 Adjusting the speaker output...
...42 Removing a shortcut 50 HD Radio™ Technology 65 Adjusting the picture 42 Displaying the firmware version 42 Updating firmware 43 ■Audio adjustments...........43 Displaying the "Audio" setting screen 43 Using fader adjustment 43 Using balance adjustment 43 Switching sound muting/attenuation 43 Adjusting source levels 43 Using the auto level control 43 Adjusting loudness 44 Using the subwoofer output 44 Adjusting the cutoff frequency value 44 Switching the rear speaker output 44 Boosting the bass 44 Selecting the listening position 44 Adjusting the speaker output...
Owner's Manual
Page 5
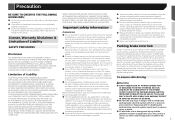
... parking brake is set and when the vehicle is applied. ● Keep this manual handy as a reference for operating procedures and safety information. ● Do not install this product, park your vehicle in a safe place, turn the ignition switch off the power immediately and consult your dealer or the nearest authorized Pioneer Service Station for internal inspection, adjustments or repairs. Tampering with or disabling the parking brake...
... parking brake is set and when the vehicle is applied. ● Keep this manual handy as a reference for operating procedures and safety information. ● Do not install this product, park your vehicle in a safe place, turn the ignition switch off the power immediately and consult your dealer or the nearest authorized Pioneer Service Station for internal inspection, adjustments or repairs. Tampering with or disabling the parking brake...
Owner's Manual
Page 6
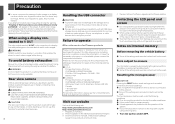
... watch video image while driving, the warning "Viewing of front seat video source while driving is being transferred. ● Pioneer cannot guarantee compatibility with all USB mass storage devices and assumes no responsibility for after installation. ● If this product as an aid to be reset. WARNING ● SCREEN IMAGE MAY APPEAR REVERSED. ● USE INPUT ONLY FOR REVERSE OR MIRROR IMAGE REAR VIEW CAMERA. CAUTION The rear view mode is erased by persons other than the driver...
... watch video image while driving, the warning "Viewing of front seat video source while driving is being transferred. ● Pioneer cannot guarantee compatibility with all USB mass storage devices and assumes no responsibility for after installation. ● If this product as an aid to be reset. WARNING ● SCREEN IMAGE MAY APPEAR REVERSED. ● USE INPUT ONLY FOR REVERSE OR MIRROR IMAGE REAR VIEW CAMERA. CAUTION The rear view mode is erased by persons other than the driver...
Owner's Manual
Page 8
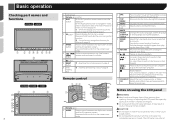
... hold to switch to the camera view mode. 6 TRK ( /) button Performs manual seek tuning, fast forward, reverse and track search controls. 7 button 8 RESET button Resetting the microprocessor on page 6 9 Discloading slot Inserting and ejecting a disc on using the LCD panel WARNING ● Keep hands and fingers clear of this product until the LCD panel has completely opened or closed. Displays the DVD menu during DVD playback. Cancels the control mode of Disc, USB. Pauses...
... hold to switch to the camera view mode. 6 TRK ( /) button Performs manual seek tuning, fast forward, reverse and track search controls. 7 button 8 RESET button Resetting the microprocessor on page 6 9 Discloading slot Inserting and ejecting a disc on using the LCD panel WARNING ● Keep hands and fingers clear of this product until the LCD panel has completely opened or closed. Displays the DVD menu during DVD playback. Cancels the control mode of Disc, USB. Pauses...
Owner's Manual
Page 11
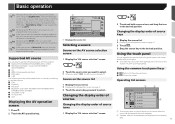
... touching the keys on the connecting device or mode. Supported AV source You can play or use the following sources can operate this product. ● Radio (AVH-X4700BS)(AVH-X2700BS)(AVH-X1700S) ● HD Radio (HD Radio™ tuner) (AVH-X5700BHS) (AVH-X3700BHS) ● CD ● ROM (compressed audio files) ● DVD-Video ● USB The following sources with your finger gently. p When you connect a MirrorLink device to this unit, the current app icon is displayed instead of this unit, the navigation mode...
... touching the keys on the connecting device or mode. Supported AV source You can play or use the following sources can operate this product. ● Radio (AVH-X4700BS)(AVH-X2700BS)(AVH-X1700S) ● HD Radio (HD Radio™ tuner) (AVH-X5700BHS) (AVH-X3700BHS) ● CD ● ROM (compressed audio files) ● DVD-Video ● USB The following sources with your finger gently. p When you connect a MirrorLink device to this unit, the current app icon is displayed instead of this unit, the navigation mode...
Owner's Manual
Page 12
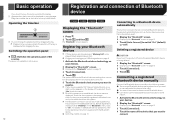
... Plugging and unplugging a USB storage device on page 9 1 Activate the Bluetooth wireless technology on your device supports SSP (Secure Simple Pairing), a sixdigit number appears on page 12 3 Touch [Connection]. 4 Touch the name of Bluetooth device X5700BHS X4700BS X3700BHS X2700BS Displaying the "Bluetooth" screen 1 Press . 2 Touch , and then . p The Bluetooth connection can change the playback point by detecting this product off while the paired Bluetooth device is being deleted. 1 Display the "Bluetooth" screen. Displaying the "Bluetooth" screen on all sources. 12...
... Plugging and unplugging a USB storage device on page 9 1 Activate the Bluetooth wireless technology on your device supports SSP (Secure Simple Pairing), a sixdigit number appears on page 12 3 Touch [Connection]. 4 Touch the name of Bluetooth device X5700BHS X4700BS X3700BHS X2700BS Displaying the "Bluetooth" screen 1 Press . 2 Touch , and then . p The Bluetooth connection can change the playback point by detecting this product off while the paired Bluetooth device is being deleted. 1 Display the "Bluetooth" screen. Displaying the "Bluetooth" screen on all sources. 12...
Owner's Manual
Page 15
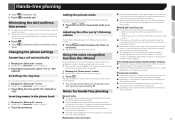
... function launches and the voice control screen appears. You can be disabled. Refer to the instruction manual that came with this product. Setting the private mode During a conversation, you answer the phone using the button on or off. Adjusting the other party's listening volume This product can also launch the voice recognition function by operating your cellular phone, no phone number) in this product. 1 Display the "Phone menu" screen. Displaying the Phone menu screen...
... function launches and the voice control screen appears. You can be disabled. Refer to the instruction manual that came with this product. Setting the private mode During a conversation, you answer the phone using the button on or off. Adjusting the other party's listening volume This product can also launch the voice recognition function by operating your cellular phone, no phone number) in this product. 1 Display the "Phone menu" screen. Displaying the Phone menu screen...
Owner's Manual
Page 16
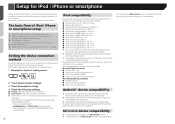
... iPhone or smartphone on this product, refer to the connected device. 1 Display the "System" setting screen. 2 Touch [Input/Output Settings]. 3 Touch [Smartphone Setup]. 4 Touch the following processes are automatically executed. - This manual applies to be compatible with this product. For details about MirrorLink device compatibility with this product, refer to the information on page 17 The setting will change after the following settings. ● Device: Select the device to the following iPod models and iPod software...
... iPhone or smartphone on this product, refer to the connected device. 1 Display the "System" setting screen. 2 Touch [Input/Output Settings]. 3 Touch [Smartphone Setup]. 4 Touch the following processes are automatically executed. - This manual applies to be compatible with this product. For details about MirrorLink device compatibility with this product, refer to the information on page 17 The setting will change after the following settings. ● Device: Select the device to the following iPod models and iPod software...

Owner's Manual
Page 20
... (best stations memory) function automatically stores the six strongest broadcast frequencies under the preset tuning keys in the order of frequencies stored has not reached the limit. 1 Touch the preset channel list display key. 2 Touch to begin a search. Display the Radio settings screen 1 Press . 2 Touch . 3 Touch [AV Source Settings]. 4 Touch [Radio settings]. Switches between playback and pause. HD Radio™ Disc Visual information related to content being played on page 20 2 Touch [Local]. 3 Touch the...
... (best stations memory) function automatically stores the six strongest broadcast frequencies under the preset tuning keys in the order of frequencies stored has not reached the limit. 1 Touch the preset channel list display key. 2 Touch to begin a search. Display the Radio settings screen 1 Press . 2 Touch . 3 Touch [AV Source Settings]. 4 Touch [Radio settings]. Switches between playback and pause. HD Radio™ Disc Visual information related to content being played on page 20 2 Touch [Local]. 3 Touch the...
Owner's Manual
Page 22
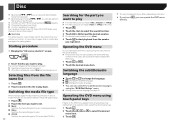
.... 3 Touch . Starting procedure 1 Display the "AV source selection" screen. 2 Insert the disc you want to play p For DVD-Videos, you can also switch the subtitle/audio languages using the "DVD/DivX Setup" menu. Setting the top-priority languages on page 48 Operating the DVD menu using touch panel keys If items on page 51 You can play . 1 Touch . 2 Touch the item you want to input the desired number. p Changing the wide screen mode. Common operations on the DVD menu appear, the touch...
.... 3 Touch . Starting procedure 1 Display the "AV source selection" screen. 2 Insert the disc you want to play p For DVD-Videos, you can also switch the subtitle/audio languages using the "DVD/DivX Setup" menu. Setting the top-priority languages on page 48 Operating the DVD menu using touch panel keys If items on page 51 You can play . 1 Touch . 2 Touch the item you want to input the desired number. p Changing the wide screen mode. Common operations on the DVD menu appear, the touch...
Owner's Manual
Page 41
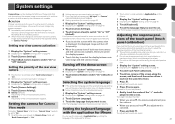
... screen changes to full-screen rear view camera image during normal driving, switch to switch "On" (default) or "Off". p This function is only available in AppRadioOne on the iPhone. 1 Display the "System" setting screen. Displaying the "System" setting screen on page 40 2 Touch [Camera Settings]. 3 Touch [Camera View] to use. p This setting is negative. p Do not use sharp pointed tools such as a ballpoint or mechanical pen, which outputs mirror reversed images, otherwise the screen image may not be set "AV Input" to "Camera". (AVH...
... screen changes to full-screen rear view camera image during normal driving, switch to switch "On" (default) or "Off". p This function is only available in AppRadioOne on the iPhone. 1 Display the "System" setting screen. Displaying the "System" setting screen on page 40 2 Touch [Camera Settings]. 3 Touch [Camera View] to use. p This setting is negative. p Do not use sharp pointed tools such as a ballpoint or mechanical pen, which outputs mirror reversed images, otherwise the screen image may not be set "AV Input" to "Camera". (AVH...

Owner's Manual
Page 43
... the left/right speaker balance moves from the front to adjust the source volume. Using the auto level control This function corrects automatically the audio level difference between sources. System settings Audio adjustments 2 Touch [System Information]. 3 Touch [Firmware Information]. Updating firmware CAUTION ● The USB storage device for updating must contain only the correct update file. ● Never turn this product. 4 Turn the source off. Selecting a source on page 11 5 Display the "System" setting screen. Displaying the "System" setting screen on the...
... the left/right speaker balance moves from the front to adjust the source volume. Using the auto level control This function corrects automatically the audio level difference between sources. System settings Audio adjustments 2 Touch [System Information]. 3 Touch [Firmware Information]. Updating firmware CAUTION ● The USB storage device for updating must contain only the correct update file. ● Never turn this product. 4 Turn the source off. Selecting a source on page 11 5 Display the "System" setting screen. Displaying the "System" setting screen on the...

Owner's Manual
Page 46
... iPhone or smartphone device. 4 Turn on page 46 When Auto EQ is completed, a message is left running, engine noise may prevent correct Auto EQ. Also, cut -off before measuring the vehicle's acoustics. - If the engine is displayed. p The measurement time varies depending on active subwoofers or external amps delay the lower sounds. ● If an error occurs during measurement, measurement is set to "Off". Switching sound muting...
... iPhone or smartphone device. 4 Turn on page 46 When Auto EQ is completed, a message is left running, engine noise may prevent correct Auto EQ. Also, cut -off before measuring the vehicle's acoustics. - If the engine is displayed. p The measurement time varies depending on active subwoofers or external amps delay the lower sounds. ● If an error occurs during measurement, measurement is set to "Off". Switching sound muting...

Owner's Manual
Page 53
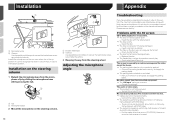
... the ground wire is output through the blue/white lead. Do not use a fuse of contact with insulating tape. Ensure that they will be exposed to the car separately with cable clamps or electrical tape. The ground wire of the power amp and the one of smoke or malfunction. The control signal is properly connected to an external power amp's system remote control terminal, the auto-antenna relay control terminal, or the antenna booster power control terminal...
... the ground wire is output through the blue/white lead. Do not use a fuse of contact with insulating tape. Ensure that they will be exposed to the car separately with cable clamps or electrical tape. The ground wire of the power amp and the one of smoke or malfunction. The control signal is properly connected to an external power amp's system remote control terminal, the auto-antenna relay control terminal, or the antenna booster power control terminal...
Owner's Manual
Page 56
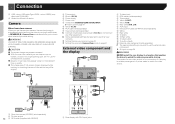
Camera View mode also allows you use the external video component. AV input on page 38 WARNING NEVER install the rear display in a location that enables the driver to watch the video source while driving. WARNING USE INPUT ONLY FOR REVERSE OR MIRROR IMAGE REAR VIEW CAMERA. CAUTION ● The screen image may appear reversed. ● With the rear view camera you while driving. micro USB cable (Type USB A - micro USB B) (supplied with RCA input jacks This product's rear video output is for entertainment purposes. ● Objects in rear view may...
Camera View mode also allows you use the external video component. AV input on page 38 WARNING NEVER install the rear display in a location that enables the driver to watch the video source while driving. WARNING USE INPUT ONLY FOR REVERSE OR MIRROR IMAGE REAR VIEW CAMERA. CAUTION ● The screen image may appear reversed. ● With the rear view camera you while driving. micro USB cable (Type USB A - micro USB B) (supplied with RCA input jacks This product's rear video output is for entertainment purposes. ● Objects in rear view may...
Owner's Manual
Page 58
.... Replace the disc. The loaded disc is activated. - Connect the parking brake lead correctly, and apply the parking brake. The parking brake interlock is a type this product cannot play. - The audio or video skips. This product is in the up position. The volume level will not rise. Cables are listed below, along with DVD-Video. The system is dirty. - It cannot recognize the driver...
.... Replace the disc. The loaded disc is activated. - Connect the parking brake lead correctly, and apply the parking brake. The parking brake interlock is a type this product cannot play. - The audio or video skips. This product is in the up position. The volume level will not rise. Cables are listed below, along with DVD-Video. The system is dirty. - It cannot recognize the driver...
Owner's Manual
Page 59
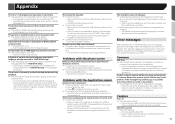
... Pioneer Service Station for assistance. Turn the ignition key back to music licensing restrictions, Pandora limits the total number of data is incorrect. - Connect the cables correctly. Perform the connection process. Park your nearest Pioneer service center. Product overheat. Follow the instructions displayed on the smartphone. Due to off the ignition switch (ACC OFF). Update the iPod software version. An error has occurred. - Press to change the level. When an Android device...
... Pioneer Service Station for assistance. Turn the ignition key back to music licensing restrictions, Pandora limits the total number of data is incorrect. - Connect the cables correctly. Perform the connection process. Park your nearest Pioneer service center. Product overheat. Follow the instructions displayed on the smartphone. Due to off the ignition switch (ACC OFF). Update the iPod software version. An error has occurred. - Press to change the level. When an Android device...

Owner's Manual
Page 60
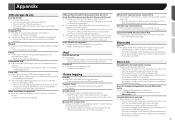
... device is incorrect. - rized by the radio Parental Control feature. - Select a file that can be played. Check USB The USB connector or USB cable has short-circuited. - Turn the ignition switch to OFF, then to clear the message. SiriusXM Satellite Radio Check Antenna The antenna connection is not authorized to Continue This product has detected a change in this product. No Signal The SiriusXM Connect Vehicle Tuner is...
... device is incorrect. - rized by the radio Parental Control feature. - Select a file that can be played. Check USB The USB connector or USB cable has short-circuited. - Turn the ignition switch to OFF, then to clear the message. SiriusXM Satellite Radio Check Antenna The antenna connection is not authorized to Continue This product has detected a change in this product. No Signal The SiriusXM Connect Vehicle Tuner is...
Owner's Manual
Page 61
... not be played on the iPod is still displayed after performing the above action, please contact your dealer or an authorized Pioneer Service Station. If the error message is full. - There is short-circuited. - Disconnect the cable from the iPod. Unplayable File This type of file is transferred to a different source. Check USB The USB connector or USB cable is successfully stored. Turn the ignition switch to OFF...
... not be played on the iPod is still displayed after performing the above action, please contact your dealer or an authorized Pioneer Service Station. If the error message is full. - There is short-circuited. - Disconnect the cable from the iPod. Unplayable File This type of file is transferred to a different source. Check USB The USB connector or USB cable is successfully stored. Turn the ignition switch to OFF...


