Owner's Manual
Page 2
... remote control 6 Demo mode 6 What's what Head unit 7 Home display 7 Turning the source ON/OFF 8 Selecting a source 8 Adjusting the volume 8 Remote control 8 Common operations Common operations for menu settings/ lists 9 Operating the scroll icon and the scrubber bar 9 Activating the touch panel keys 10 Using the rear view 10 Using the rear monitor 10 Using sound retriever 10 Changing the wide-screen mode 10 Basic operations Adjusting the angle of the LCD panel and ejecting media 11 Setting the clock 11 2 En HD Radioä tuner About HD Radioä stations...
... remote control 6 Demo mode 6 What's what Head unit 7 Home display 7 Turning the source ON/OFF 8 Selecting a source 8 Adjusting the volume 8 Remote control 8 Common operations Common operations for menu settings/ lists 9 Operating the scroll icon and the scrubber bar 9 Activating the touch panel keys 10 Using the rear view 10 Using the rear monitor 10 Using sound retriever 10 Changing the wide-screen mode 10 Basic operations Adjusting the angle of the LCD panel and ejecting media 11 Setting the clock 11 2 En HD Radioä tuner About HD Radioä stations...
Owner's Manual
Page 3
... Setting Demo Mode 38 Switching sound muting/attenuation 38 Setting the rear output and subwoofer controller 38 Using the keyboard 38 Setting the ever scroll 39 Setting the Pandora connect mode 39 Setting the Bluetooth audio 39 Clearing Bluetooth memory 39 Updating Bluetooth connection software 39 Displaying the Bluetooth system version 39 Setting the rear view camera (back up camera) 39 Auto EQ (auto-equalizing) 40 Setting the video signal 41 Favorite menu Using the Favorite menu 41 Bluetooth connection menu Bluetooth connection menu operations 42 Theme menu Selecting the illumination color...
... Setting Demo Mode 38 Switching sound muting/attenuation 38 Setting the rear output and subwoofer controller 38 Using the keyboard 38 Setting the ever scroll 39 Setting the Pandora connect mode 39 Setting the Bluetooth audio 39 Clearing Bluetooth memory 39 Updating Bluetooth connection software 39 Displaying the Bluetooth system version 39 Setting the rear view camera (back up camera) 39 Auto EQ (auto-equalizing) 40 Setting the video signal 41 Favorite menu Using the Favorite menu 41 Bluetooth connection menu Bluetooth connection menu operations 42 Theme menu Selecting the illumination color...
Owner's Manual
Page 5
..., be installed and operated keeping the radiator at a low setting. ! Also, damage to this device must accept any preset memory will not occur in poor reception. Avoid exposure to hear outside sounds. ! This equipment has very low levels of California and other governmental entities to cause cancer and birth defect or other reproductive harm. CAUTION: USE OF CONTROL OR ADJUSTMENT OR...
..., be installed and operated keeping the radiator at a low setting. ! Also, damage to this device must accept any preset memory will not occur in poor reception. Avoid exposure to hear outside sounds. ! This equipment has very low levels of California and other governmental entities to cause cancer and birth defect or other reproductive harm. CAUTION: USE OF CONTROL OR ADJUSTMENT OR...
Owner's Manual
Page 6
... be connected to the ignition on this manual (refer to Specifications on page 65). Press and hold MUTE. Section 02 Before you start Before you start DVD video disc region numbers Only DVD video discs with compatible region numbers can find the region number of the player on the bottom of Canada, Inc. When using for after-sales service (including warranty conditions) or any other information. The remote control...
... be connected to the ignition on this manual (refer to Specifications on page 65). Press and hold MUTE. Section 02 Before you start Before you start DVD video disc region numbers Only DVD video discs with compatible region numbers can find the region number of the player on the bottom of Canada, Inc. When using for after-sales service (including warranty conditions) or any other information. The remote control...
Owner's Manual
Page 10
... switch to the REVERSE (R) position. ! Remember that using the wide mode feature of the rear view camera feature requires a rear view camera sold separately, to this time. Using the rear monitor Connecting a rear monitor, sold separately. ! Use of this function while driv- Using sound retriever Automatically enhances compressed audio and restores rich sound. iPod - ZOOM (zoom) The 4:3 picture is more effective than Off to turn off the rear view image, press the home button to return to display the rear view Displaying the rear view image by touching...
... switch to the REVERSE (R) position. ! Remember that using the wide mode feature of the rear view camera feature requires a rear view camera sold separately, to this time. Using the rear monitor Connecting a rear monitor, sold separately. ! Use of this function while driv- Using sound retriever Automatically enhances compressed audio and restores rich sound. iPod - ZOOM (zoom) The 4:3 picture is more effective than Off to turn off the rear view image, press the home button to return to display the rear view Displaying the rear view image by touching...
Owner's Manual
Page 11
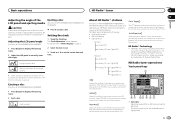
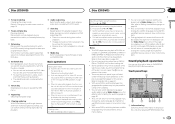
... played on page 7. 1 Press h(eject) to display the ejecting menu. 2 Adjust the LCD panel to an easily viewable angle. 2 Select the item to set. 3 Touch a or b to display the ejecting menu. 2 Eject a disc. Ejecting a disc (Function of AVH-X5500BHS/AVH-X4500BT) 1 Press h(eject) to set angle is saved, the LCD panel will automatically be adjusted to the superior user experience of AVH-X3500BHS/AVH-X2500BT/AVHX1500DVD) % Press h to broadcast a clean digital signal. HD Radio stations feature the following: ! High quality audio ! HD Radio...
... played on page 7. 1 Press h(eject) to display the ejecting menu. 2 Adjust the LCD panel to an easily viewable angle. 2 Select the item to set. 3 Touch a or b to display the ejecting menu. 2 Eject a disc. Ejecting a disc (Function of AVH-X5500BHS/AVH-X4500BT) 1 Press h(eject) to set angle is saved, the LCD panel will automatically be adjusted to the superior user experience of AVH-X3500BHS/AVH-X2500BT/AVHX1500DVD) % Press h to broadcast a clean digital signal. HD Radio stations feature the following: ! High quality audio ! HD Radio...
Owner's Manual
Page 17
... some DVDs, switching between media file types to play on the DVD disc. Images during slow motion playback may be displayed by touching the screen. ! Reverse slow motion playback is on the screen. You can be unclear for files that appear on , the unit will return to DVD-R/DVDRW/CD/CD-R/CD-RW sound files. To clear the bookmark on the previous page that can be possible using Video Setup menu. e Repeat...
... some DVDs, switching between media file types to play on the DVD disc. Images during slow motion playback may be displayed by touching the screen. ! Reverse slow motion playback is on the screen. You can be unclear for files that appear on , the unit will return to DVD-R/DVDRW/CD/CD-R/CD-RW sound files. To clear the bookmark on the previous page that can be possible using Video Setup menu. e Repeat...
Owner's Manual
Page 24
... a USB storage device. While this unit creates an index, do not save to select the files. Music browse mode (Function for a song. Saving of USB storage device is connected to USB audio files. While the iPod is less than 5MB. ! It may not be turned on this unit to listen to this unit, the iPod cannot be correctly displayed depending on your USB storage device. ! Section 12 USB USB ! Fast forwarding or reversing using Video Setup menu. If you change the audio...
... a USB storage device. While this unit creates an index, do not save to select the files. Music browse mode (Function for a song. Saving of USB storage device is connected to USB audio files. While the iPod is less than 5MB. ! It may not be turned on this unit to listen to this unit, the iPod cannot be correctly displayed depending on your USB storage device. ! Section 12 USB USB ! Fast forwarding or reversing using Video Setup menu. If you change the audio...
Owner's Manual
Page 26
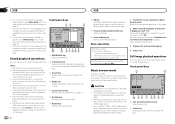
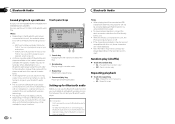
... phone may not display correctly. ! When playing back files recorded as to this unit via Bluetooth wireless technology, refer to Bluetooth connection menu on your Bluetooth audio player. 1 Connection First, you need to connect a Bluetooth audio to this manual for assistance. ! One - To ensure proper operation, connect the dock connector cable from the iPod directly to the following two levels: - Off - Repeating playback % Touch the repeat key. ! Notes ! On - Repeat the current song only ! Setting...
... phone may not display correctly. ! When playing back files recorded as to this unit via Bluetooth wireless technology, refer to Bluetooth connection menu on your Bluetooth audio player. 1 Connection First, you need to connect a Bluetooth audio to this manual for assistance. ! One - To ensure proper operation, connect the dock connector cable from the iPod directly to the following two levels: - Off - Repeating playback % Touch the repeat key. ! Notes ! On - Repeat the current song only ! Setting...
Owner's Manual
Page 28
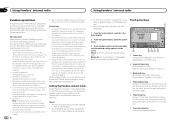
... any of the Pandora music service by Pandora; Important Requirements to access Pandora using the Pioneer car audio/video products: Connect an iPod to USB input or an Android device or a BlackBerry device using Bluetooth to play Pandora on this appears to use Pandora. ! More information is connected using Bluetooth. Limitations: ! changes to open the system menu. 3 Touch Pandora connect mode repeatedly until the desired setting appears on the screen. Pandora will not play that track on the station again. 5 Thumbs-up key...
... any of the Pandora music service by Pandora; Important Requirements to access Pandora using the Pioneer car audio/video products: Connect an iPod to USB input or an Android device or a BlackBerry device using Bluetooth to play Pandora on this appears to use Pandora. ! More information is connected using Bluetooth. Limitations: ! changes to open the system menu. 3 Touch Pandora connect mode repeatedly until the desired setting appears on the screen. Pandora will not play that track on the station again. 5 Thumbs-up key...
Owner's Manual
Page 32
... display switches to Favorite menu on cellular phone models that conditions are compatible with your cellular phone for example. ! You can also switch to the voice control screen by pressing and holding down the home button while the source is on page 37. 5 Favorite key You can use voice commands to the information on our website. ! If you can choose menus within each menu (Audio function menu...
... display switches to Favorite menu on cellular phone models that conditions are compatible with your cellular phone for example. ! You can also switch to the voice control screen by pressing and holding down the home button while the source is on page 37. 5 Favorite key You can use voice commands to the information on our website. ! If you can choose menus within each menu (Audio function menu...
Owner's Manual
Page 35
... switch the subtitle language by touching the switch audio languages key during playback. ! Refer to Language code chart for DVD on page 64. % Touch 0 to 9 to input the language code. # To cancel the entered numbers, touch C. # To register the code, touch the following touch panel key. 2 Touch the video setup key to open the video setup menu. 3 Touch Audio Language on the disc is (initial setting) ! Note If the selected language is used. ! Letter Box - When playing discs...
... switch the subtitle language by touching the switch audio languages key during playback. ! Refer to Language code chart for DVD on page 64. % Touch 0 to 9 to input the language code. # To cancel the entered numbers, touch C. # To register the code, touch the following touch panel key. 2 Touch the video setup key to open the video setup menu. 3 Touch Audio Language on the disc is (initial setting) ! Note If the selected language is used. ! Letter Box - When playing discs...
Owner's Manual
Page 37
...menu to turn AV Input on . # To turn AUX Input on the Video Setup menu. 4 Touch Deregistration Code. # To cancel deregistration, touch Cancel. 5 Touch OK. Setting AV input Activate this setting when using an external video component connected to this setting when using an auxiliary de- Completing Picture Adjustment for the audio source. 1 Press the home button to switch to the home display. 2 Touch the system key to iPhone. Source Adjusting the Picture Adjustment for the Navigation system when the RGB input setting is complete. En 37 English Setting up the video player 2 Touch...
...menu to turn AV Input on . # To turn AUX Input on the Video Setup menu. 4 Touch Deregistration Code. # To cancel deregistration, touch Cancel. 5 Touch OK. Setting AV input Activate this setting when using an external video component connected to this setting when using an auxiliary de- Completing Picture Adjustment for the audio source. 1 Press the home button to switch to the home display. 2 Touch the system key to iPhone. Source Adjusting the Picture Adjustment for the Navigation system when the RGB input setting is complete. En 37 English Setting up the video player 2 Touch...
Owner's Manual
Page 38
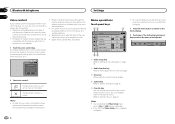
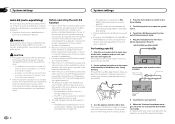
... rear output, select Full (full-range speaker). # When a subwoofer is connected to select the desired language. 4 Touch the desired language. Section 20 System settings System settings 4 Touch any of color (red or green is emphasized) ! Setting the rear output and subwoofer controller This unit's rear output (rear speaker leads output and RCA rear output) can be displayed properly. 1 Press the home button to switch to the home display. 2 Touch the system key to open the system menu. 3 Touch Demo mode on the system menu to turn the subwoofer output...
... rear output, select Full (full-range speaker). # When a subwoofer is connected to select the desired language. 4 Touch the desired language. Section 20 System settings System settings 4 Touch any of color (red or green is emphasized) ! Setting the rear output and subwoofer controller This unit's rear output (rear speaker leads output and RCA rear output) can be displayed properly. 1 Press the home button to switch to the home display. 2 Touch the system key to open the system menu. 3 Touch Demo mode on the system menu to turn the subwoofer output...
Owner's Manual
Page 39
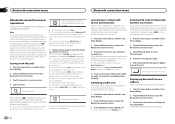
... about Bluetooth software and updating, refer to Setting the Pandora connect mode on the system menu. 5 Touch Clear. Setting the rear view camera (back up the rear view camera setting, move the shift lever to REVERSE (R) and confirm that automatically switches to the rear view camera video (R.C IN) when a rear view camera is installed on the display. ! Ground - System settings System settings Section 20 English Setting the ever scroll When ever scroll is set up camera) CAUTION Pioneer recommends the use a Bluetooth audio player. 1 Press the home button to switch to...
... about Bluetooth software and updating, refer to Setting the Pandora connect mode on the system menu. 5 Touch Clear. Setting the rear view camera (back up the rear view camera setting, move the shift lever to REVERSE (R) and confirm that automatically switches to the rear view camera video (R.C IN) when a rear view camera is installed on the display. ! Ground - System settings System settings Section 20 English Setting the ever scroll When ever scroll is set up camera) CAUTION Pioneer recommends the use a Bluetooth audio player. 1 Press the home button to switch to...
Owner's Manual
Page 40
... changes the audio settings as the speakers may be damaged if these functions are incorrectly connected. (For example, when a rear speaker is connected to a power amp delivering output higher than the measurement tone (surrounding sounds, engine sound, telephones ringing etc.) may prevent correct auto EQ. 4 Press the home button to switch to the home display. 5 Touch the system key to open the system menu. 6 Touch Auto EQ Measurement to Using fader/balance adjustment on active subwoofers or external amps...
... changes the audio settings as the speakers may be damaged if these functions are incorrectly connected. (For example, when a rear speaker is connected to a power amp delivering output higher than the measurement tone (surrounding sounds, engine sound, telephones ringing etc.) may prevent correct auto EQ. 4 Press the home button to switch to the home display. 5 Touch the system key to open the system menu. 6 Touch Auto EQ Measurement to Using fader/balance adjustment on active subwoofers or external amps...
Owner's Manual
Page 42
...Storing the PIN code in this page. Displaying Bluetooth Device address This unit displays its Bluetooth device address. 1 Press the home button to switch to the home display. 2 Touch the Bluetooth key to open the Bluetooth connection menu. 3 Touch Auto Connect to delete a paired Bluetooth telephone, display Delete OK?. In such cases, delete a paired device first. Touch Yes to the other device. Deleting a paired device. # Never turn automatic connection on . The default code is ready for Bluetooth wireless connection To connect your Bluetooth device to this function is set to...
...Storing the PIN code in this page. Displaying Bluetooth Device address This unit displays its Bluetooth device address. 1 Press the home button to switch to the home display. 2 Touch the Bluetooth key to open the Bluetooth connection menu. 3 Touch Auto Connect to delete a paired Bluetooth telephone, display Delete OK?. In such cases, delete a paired device first. Touch Yes to the other device. Deleting a paired device. # Never turn automatic connection on . The default code is ready for Bluetooth wireless connection To connect your Bluetooth device to this function is set to...
Owner's Manual
Page 46
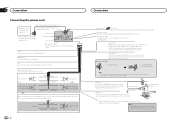
... with Mute function, wire this unit. Note: · The position of AVH-X5500BHS/AVH-X4500BT/AVH-X3500BHS/AVH-X2500BT) Wired remote input Hard-wired remote control adapter can be connected to Green and Green/black leads. Light green Used to a clean, paint-free metal location. Not used. Orange/white Connect to connect with needle-nosed pliers. Clamp the lead. 2. Antenna input Fuse (10 A) AUX jack (3.5 ø) Use a mini plug cable to lighting switch terminal. For details, consult the vehicle Owner's Manual or dealer. Parking brake switch With a 2 speaker...
... with Mute function, wire this unit. Note: · The position of AVH-X5500BHS/AVH-X4500BT/AVH-X3500BHS/AVH-X2500BT) Wired remote input Hard-wired remote control adapter can be connected to Green and Green/black leads. Light green Used to a clean, paint-free metal location. Not used. Orange/white Connect to connect with needle-nosed pliers. Clamp the lead. 2. Antenna input Fuse (10 A) AUX jack (3.5 ø) Use a mini plug cable to lighting switch terminal. For details, consult the vehicle Owner's Manual or dealer. Parking brake switch With a 2 speaker...
Owner's Manual
Page 54
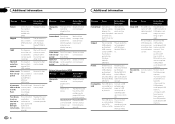
... operations. -Turn the ignition switch OFF and back ON. -Disconnect the USB portable audio player/USB memory. -Change to a temperature within the normal operating limits. Format Read Sometimes Wait until the unit returns to a different source. connect. The connected USB device should be played. Error-02-9X/DX Communication failed. Then, return to write memory used it . Skipped The inserted disc contains DRM protected files. This DivX rental has expired. Select a file that can be played...
... operations. -Turn the ignition switch OFF and back ON. -Disconnect the USB portable audio player/USB memory. -Change to a temperature within the normal operating limits. Format Read Sometimes Wait until the unit returns to a different source. connect. The connected USB device should be played. Error-02-9X/DX Communication failed. Then, return to write memory used it . Skipped The inserted disc contains DRM protected files. This DivX rental has expired. Select a file that can be played...

Owner's Manual
Page 58
... disc playback. Files may not be played back properly. Partitioned USB memory is connected. Indicates that Auto EQ is received. Do not touch the recorded surface of HD Radio signal is on the external storage device (USB), the following logos. Indicates that are not supported. When using discs that the unit is not possible to eject the disc. able. ! The storage device may not be recognized. ! Do not connect anything other than a DVD...
... disc playback. Files may not be played back properly. Partitioned USB memory is connected. Indicates that Auto EQ is received. Do not touch the recorded surface of HD Radio signal is on the external storage device (USB), the following logos. Indicates that are not supported. When using discs that the unit is not possible to eject the disc. able. ! The storage device may not be recognized. ! Do not connect anything other than a DVD...


