Owner's Manual
Page 5
... these instructions regarding your display by yourself. Precautions Section 01 Precautions IMPORTANT SAFEGUARDS Please read and understood the operating instructions. 5 Do not install the display where it may be used . fore operating your display. 2 Keep this manual handy as a reference for future reference. ...equipment and automotive accessories may be - To ensure safe driving WARNING ! Also, rear displays should not be in this unit's DVD features should never be illegal. Where such regulations apply, they are disabled unless the parking brake is strictly prohibited. Do not ...
... these instructions regarding your display by yourself. Precautions Section 01 Precautions IMPORTANT SAFEGUARDS Please read and understood the operating instructions. 5 Do not install the display where it may be used . fore operating your display. 2 Keep this manual handy as a reference for future reference. ...equipment and automotive accessories may be - To ensure safe driving WARNING ! Also, rear displays should not be in this unit's DVD features should never be illegal. Where such regulations apply, they are disabled unless the parking brake is strictly prohibited. Do not ...
Owner's Manual
Page 6
...for some similar reason, the microcomputer of a display to V OUT This unit's V OUT is supplied to whether full screen images are able to watch the DVD or TV while driving. We recommend that senses when the parking brake is in a location that enables the driver to use for connection of this... being used while driving. The rear view camera function is to be dangerous and/or unlawful if used while the vehicle is set. WARNING NEVER install the rear display in motion, there is returned to run the vehicle engine while using a rear view camera With an optional rear view camera, you...
...for some similar reason, the microcomputer of a display to V OUT This unit's V OUT is supplied to whether full screen images are able to watch the DVD or TV while driving. We recommend that senses when the parking brake is in a location that enables the driver to use for connection of this... being used while driving. The rear view camera function is to be dangerous and/or unlawful if used while the vehicle is set. WARNING NEVER install the rear display in motion, there is returned to run the vehicle engine while using a rear view camera With an optional rear view camera, you...
Owner's Manual
Page 10
Section 02 Before You Start When an operation is prohibited When you are watching a DVD and attempt to perform an operation, it may drain battery power. To restart the feature demo, press and hold MUTE. When this happens, the icon ... without changing the bookmark information. If the unit fails to using this unit should be performed because of this unit for the first time after installation ! Remember that if the feature demo continues operating when the car engine is set the ignition switch to a terminal coupled with certain discs. The microprocessor...
Section 02 Before You Start When an operation is prohibited When you are watching a DVD and attempt to perform an operation, it may drain battery power. To restart the feature demo, press and hold MUTE. When this happens, the icon ... without changing the bookmark information. If the unit fails to using this unit should be performed because of this unit for the first time after installation ! Remember that if the feature demo continues operating when the car engine is set the ignition switch to a terminal coupled with certain discs. The microprocessor...
Owner's Manual
Page 54
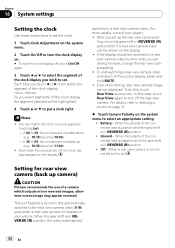
...the display. ! Ground - This unit features a function that automatically switches to the rear view camera video (V IN jack) when a rear view camera is installed on your dealer.) ! You can be switched to a rear view camera video by touching Just. - If 30 to 59, the minutes are driving forward..., change the rear view camera setting. ! After you set up camera) CAUTION Pioneer recommends the use of a camera which outputs mirror reversed images, otherwise screen image may appear reversed. Even while driving, rear view camera image can...
...the display. ! Ground - This unit features a function that automatically switches to the rear view camera video (V IN jack) when a rear view camera is installed on your dealer.) ! You can be switched to a rear view camera video by touching Just. - If 30 to 59, the minutes are driving forward..., change the rear view camera setting. ! After you set up camera) CAUTION Pioneer recommends the use of a camera which outputs mirror reversed images, otherwise screen image may appear reversed. Even while driving, rear view camera image can...
Owner's Manual
Page 58
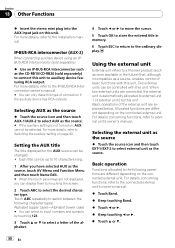
Selecting AUX as the source % Touch the source icon and then touch AUX-1/AUX-2 to a Pioneer product (such as ones available in memory. 6 Touch ESC to return to external unit 1 or external unit 2 by this unit. Using the external unit External ... connected external unit. For more details, refer to select external unit as the source % Touch the source icon and then touch EXT-1/EXT-2 to the installation manual. Each title can only make this unit.
Selecting AUX as the source % Touch the source icon and then touch AUX-1/AUX-2 to a Pioneer product (such as ones available in memory. 6 Touch ESC to return to external unit 1 or external unit 2 by this unit. Using the external unit External ... connected external unit. For more details, refer to select external unit as the source % Touch the source icon and then touch EXT-1/EXT-2 to the installation manual. Each title can only make this unit.

Owner's Manual
Page 85
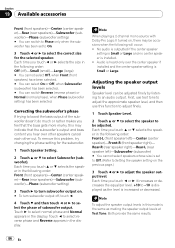
...touch c or d to gradually adjust the sound field either towards the front or the surrounds. +3 to -3 is imperative that non-installed speakers be positioned between the center speaker and the left and right speakers over a range 0 to select Panorama (panorama). Setting the ... with the following order: Panorama (panorama)-Dimension (dimension)-Center Width (center width) 4 Touch d to turn the panorama control on the installed speakers. Available accessories Section 19 Available accessories 1 Touch Dolby Pro Logic II. 2 Touch any of reproducing bass content, or if no ...
...touch c or d to gradually adjust the sound field either towards the front or the surrounds. +3 to -3 is imperative that non-installed speakers be positioned between the center speaker and the left and right speakers over a range 0 to select Panorama (panorama). Setting the ... with the following order: Panorama (panorama)-Dimension (dimension)-Center Width (center width) 4 Touch d to turn the panorama control on the installed speakers. Available accessories Section 19 Available accessories 1 Touch Dolby Pro Logic II. 2 Touch any of reproducing bass content, or if no ...
Owner's Manual
Page 86
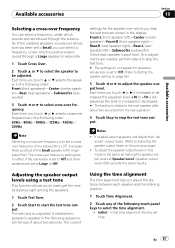
.... 1 Touch Speaker Setting. 2 Touch a or b to boost the bass output of subwoofer output. Each time you hear over the center speaker if installed and the center speaker setting is installed. ! Correcting the subwoofer's phase If trying to select Subwoofer (subwoofer). Touch c to select normal phase and Normal appears in the display. Touch...
.... 1 Touch Speaker Setting. 2 Touch a or b to boost the bass output of subwoofer output. Each time you hear over the center speaker if installed and the center speaker setting is installed. ! Correcting the subwoofer's phase If trying to select Subwoofer (subwoofer). Touch c to select normal phase and Normal appears in the display. Touch...
Owner's Manual
Page 87
... alignment The time alignment lets you hear the test tone are shown in the following touch panel keys to select cross-over frequency. If the installed speakers include one whose size is increased or decreased. # The test tone rotates to the next speaker after about two seconds. Rear-R (rear speaker right...
... alignment The time alignment lets you hear the test tone are shown in the following touch panel keys to select cross-over frequency. If the installed speakers include one whose size is increased or decreased. # The test tone rotates to the next speaker after about two seconds. Rear-R (rear speaker right...
Owner's Manual
Page 93
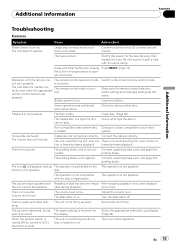
... with certain discs. is a normal operation. remote control buttons are incorrectly connected. Load new battery. Non compatible video system disc Change to a disc compatible to install a fuse with the disc's organization. There is loaded. Volume level is incorrect for Select the appropriate setting for the fuse blowing, then replace the fuse...
... with certain discs. is a normal operation. remote control buttons are incorrectly connected. Load new battery. Non compatible video system disc Change to a disc compatible to install a fuse with the disc's organization. There is loaded. Volume level is incorrect for Select the appropriate setting for the fuse blowing, then replace the fuse...
Installation Manual
Page 2
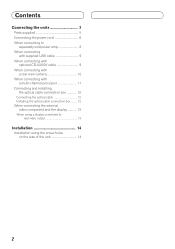
... optional CD-IU200V cable 9 When connecting with a rear view camera 10 When connecting with a multi-channel processor 11 Connecting and installing the optical cable connection box 12 Connecting the optical cable 12 Installing the optical cable connection box ........ 12 When connecting the external video component and the display .......... 13 When using a display...
... optional CD-IU200V cable 9 When connecting with a rear view camera 10 When connecting with a multi-channel processor 11 Connecting and installing the optical cable connection box 12 Connecting the optical cable 12 Installing the optical cable connection box ........ 12 When connecting the external video component and the display .......... 13 When using a display...
Installation Manual
Page 3
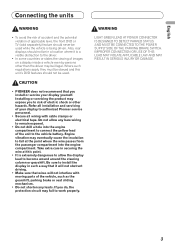
...clamps or electrical tape. Engine vibration may eventually cause the insulation to fail at this unit's DVD features should not be used . Also, rear displays should not be illegal. Refer all installation and servicing of your display yourself. Do not allow the display lead to work properly. ... BE CONNECTED TO THE POWER SUPPLY SIDE OF THE PARKING BRAKE SWITCH. Take extra care in such a way that you install or service your display to authorized Pioneer service personnel. • Secure all wiring with moving parts of the vehicle, such as the gearshift, parking brake or ...
...clamps or electrical tape. Engine vibration may eventually cause the insulation to fail at this unit's DVD features should not be used . Also, rear displays should not be illegal. Refer all installation and servicing of your display yourself. Do not allow the display lead to work properly. ... BE CONNECTED TO THE POWER SUPPLY SIDE OF THE PARKING BRAKE SWITCH. Take extra care in such a way that you install or service your display to authorized Pioneer service personnel. • Secure all wiring with moving parts of the vehicle, such as the gearshift, parking brake or ...
Installation Manual
Page 4
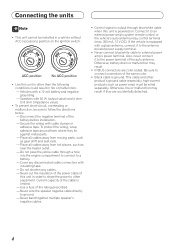
... Never wire the speaker negative cable directly to follow the directions below. - Place all cables away from moving parts, such as power amp) must be installed in fire or malfunction. - This cable and other product's ground cable (especially, high-current products such as gear shift and seat rails. - Otherwise,...Secure the wiring with a 12-volt battery and negative grounding. - Never cut the insulation of the power cable of the battery before installation. - Current capacity of the auto antenna. Also, never connect it to the power terminal of the cable is ground.
... Never wire the speaker negative cable directly to follow the directions below. - Place all cables away from moving parts, such as power amp) must be installed in fire or malfunction. - This cable and other product's ground cable (especially, high-current products such as gear shift and seat rails. - Otherwise,...Secure the wiring with a 12-volt battery and negative grounding. - Never cut the insulation of the power cable of the battery before installation. - Current capacity of the auto antenna. Also, never connect it to the power terminal of the cable is ground.
Installation Manual
Page 8
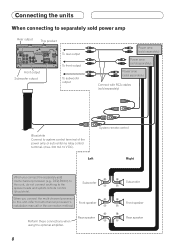
... amp (sold separately) Power amp (sold separately) Connect with RCA cables (sold multi-channel processor (e.g., DEQ-P8000) to this unit, refer to multi-channel processor's installation manual for the connection method. Subwoofer When you connect the separately sold separately) Blue/white Connect to the speaker leads and system remote control (blue...
... amp (sold separately) Power amp (sold separately) Connect with RCA cables (sold multi-channel processor (e.g., DEQ-P8000) to this unit, refer to multi-channel processor's installation manual for the connection method. Subwoofer When you connect the separately sold separately) Blue/white Connect to the speaker leads and system remote control (blue...
Installation Manual
Page 12
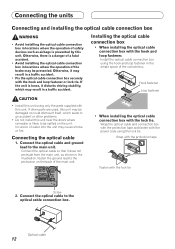
...may result in a traffic accident. • Fix the optical cable connection box securely with this unit. Connect the optical cable to the main unit. Install the optical cable connection box using only the parts supplied with the hook and loop fastener or lock tie. Hook fastener Loop fastener CAUTION •...back of the console box. If other parts are used, this unit may result in the ample space of the main unit. • When installing the optical cable connection box with the power code using the lock tie. Fasten the ground lead to an accident or other problems. • ...
...may result in a traffic accident. • Fix the optical cable connection box securely with this unit. Connect the optical cable to the main unit. Install the optical cable connection box using only the parts supplied with the hook and loop fastener or lock tie. Hook fastener Loop fastener CAUTION •...back of the console box. If other parts are used, this unit may result in the ample space of the main unit. • When installing the optical cable connection box with the power code using the lock tie. Fasten the ground lead to an accident or other problems. • ...
Installation Manual
Page 13
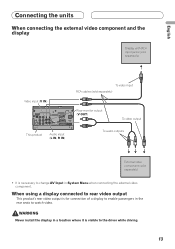
... display Display with RCA input jacks (sold separately) Video input (V IN) This product Audio input (L IN, R IN) To video input RCA cables (sold separately) Rear monitor output (V OUT) To video output To audio outputs External video component (sold separately) • It is necessary to change AV Input in the rear seats...
... display Display with RCA input jacks (sold separately) Video input (V IN) This product Audio input (L IN, R IN) To video input RCA cables (sold separately) Rear monitor output (V OUT) To video output To audio outputs External video component (sold separately) • It is necessary to change AV Input in the rear seats...
Installation Manual
Page 14
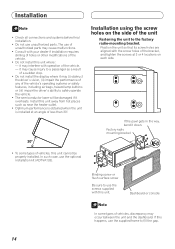
... screw holes of the unit Fastening the unit to a passenger as near the heater outlet. • Optimum performance is obtained when the unit is installed at 3 or 4 locations on each side. In such case, use unauthorized parts. Dashboard or console Note In some types of less than 30°...vehicle's operating systems or safety features, including air bags, hazard lamp buttons or (iii) impair the driver's ability to fill the gap. 14 Installation using the screw holes on the side of the bracket, and tighten the screws at an angle of vehicles, this happens, use of unauthorized parts...
... screw holes of the unit Fastening the unit to a passenger as near the heater outlet. • Optimum performance is obtained when the unit is installed at 3 or 4 locations on each side. In such case, use unauthorized parts. Dashboard or console Note In some types of less than 30°...vehicle's operating systems or safety features, including air bags, hazard lamp buttons or (iii) impair the driver's ability to fill the gap. 14 Installation using the screw holes on the side of the bracket, and tighten the screws at an angle of vehicles, this happens, use of unauthorized parts...


