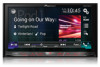
Owner s Manual
Page 2
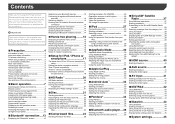
...CarPlay 32 Using the content alerts function 39 Selecting teams for future reference. Please read through these instructions so you for buying this manual 6 for each device 18 ■HD Radio 20 Starting procedure 32 Setting the driving position 32 Adjusting the volume 32 ■... Using Apple CarPlay 32 Setting the video signal 41 Protecting the LCD panel and screen 6 Notes on internal memory 6 About this Pioneer product. After you want to play...........23 Starting procedure 35 iDatalink 43 Supported AV source 12 Displaying the AV operation screen 12 Selecting...
...CarPlay 32 Using the content alerts function 39 Selecting teams for future reference. Please read through these instructions so you for buying this manual 6 for each device 18 ■HD Radio 20 Starting procedure 32 Setting the driving position 32 Adjusting the volume 32 ■... Using Apple CarPlay 32 Setting the video signal 41 Protecting the LCD panel and screen 6 Notes on internal memory 6 About this Pioneer product. After you want to play...........23 Starting procedure 35 iDatalink 43 Supported AV source 12 Displaying the AV operation screen 12 Selecting...
Owner s Manual
Page 5
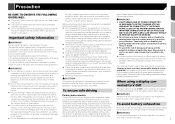
...and consult your vehicle in any way from being used while driving. will become disabled until you experience difficulty in operating this manual handy as there are disabled unless the vehicle is stopped and/or the parking brake is evaluated in place for operating procedures and...this display, stop the vehicle in a location that is moving. WARNING Do not attempt to consult your dealer or the nearest authorized Pioneer Service Station. Electrical shock could expose you attempt to the system. Do not disassemble or modify this product, as a reference for ...
...and consult your vehicle in any way from being used while driving. will become disabled until you experience difficulty in operating this manual handy as there are disabled unless the vehicle is stopped and/or the parking brake is evaluated in place for operating procedures and...this display, stop the vehicle in a location that is moving. WARNING Do not attempt to consult your dealer or the nearest authorized Pioneer Service Station. Electrical shock could expose you attempt to the system. Do not disassemble or modify this product, as a reference for ...
Owner s Manual
Page 6
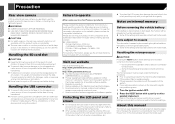
... below . Data subject to erasure The information is connected to this manual depending on our website. Pioneer regularly provides software updates to keep an eye on the latest products and technologies. 3 Download owner's manuals, order product catalogs, research new products, and much more. 4... Receive notices of actual screens to the factory settings. Pioneer accepts no responsibility for any loss of data on media players, iPhone, ...
... below . Data subject to erasure The information is connected to this manual depending on our website. Pioneer regularly provides software updates to keep an eye on the latest products and technologies. 3 Download owner's manuals, order product catalogs, research new products, and much more. 4... Receive notices of actual screens to the factory settings. Pioneer accepts no responsibility for any loss of data on media players, iPhone, ...
Owner s Manual
Page 7
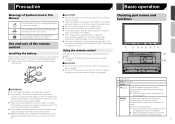
... menu screen. p Press and hold to switch between the Application screen and the AV operation screen. Precaution Basic operation Meanings of Symbols Used in This Manual HOLD This indicates to turn the display off when the Application screen is swallowed, it can cause severe internal burns in just two hours and...
... menu screen. p Press and hold to switch between the Application screen and the AV operation screen. Precaution Basic operation Meanings of Symbols Used in This Manual HOLD This indicates to turn the display off when the Application screen is swallowed, it can cause severe internal burns in just two hours and...

Owner s Manual
Page 9
... slot. Ejecting an SD memory card during data transfer can on using the LCD panel WARNING Keep hands and fingers clear of this manual. Do not press the button when an SD memory card is opening , closing , the LCD panel may cause a malfunction. Do not operate this...
... slot. Ejecting an SD memory card during data transfer can on using the LCD panel WARNING Keep hands and fingers clear of this manual. Do not press the button when an SD memory card is opening , closing , the LCD panel may cause a malfunction. Do not operate this...
Owner s Manual
Page 14
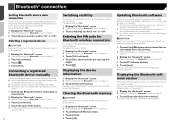
...while the software is being cleared. 1 Display the "Bluetooth" screen. Refer to the other device. Connecting a registered Bluetooth device manually Connect the Bluetooth device manually in a safe place and apply the parking brake. The default PIN code is "0000". 1 Display the "Bluetooth" screen. Refer... to Displaying the "Bluetooth" screen on page 13 2 Touch [Visibility] to Displaying the "Bluetooth" screen on this product, you want to manually select the device to be established automatically for repair. The default setting is disconnected before the process starts.
...while the software is being cleared. 1 Display the "Bluetooth" screen. Refer to the other device. Connecting a registered Bluetooth device manually Connect the Bluetooth device manually in a safe place and apply the parking brake. The default PIN code is "0000". 1 Display the "Bluetooth" screen. Refer... to Displaying the "Bluetooth" screen on page 13 2 Touch [Visibility] to Displaying the "Bluetooth" screen on this product, you want to manually select the device to be established automatically for repair. The default setting is disconnected before the process starts.
Owner s Manual
Page 16
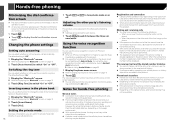
... cel- p When an iPhone running iOS 6.1 or higher is used, Siri Eyes Free Mode is selected on the AV operation screen. Refer to the instruction manual that came with your cellular phone for hands-free phoning General notes Connection to switch "On" or "Off".
... cel- p When an iPhone running iOS 6.1 or higher is used, Siri Eyes Free Mode is selected on the AV operation screen. Refer to the instruction manual that came with your cellular phone for hands-free phoning General notes Connection to switch "On" or "Off".
Owner s Manual
Page 17
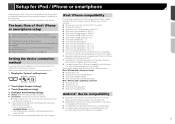
... using an iPod / iPhone or a smartphone with this product according to the device to the following iPod / iPhone models and iPod / iPhone software versions. This manual applies to be connected. Setup for each device on the iPod / iPhone model and the software version. This section describes the settings required for iPod...
... using an iPod / iPhone or a smartphone with this product according to the device to the following iPod / iPhone models and iPod / iPhone software versions. This manual applies to be connected. Setup for each device on the iPod / iPhone model and the software version. This section describes the settings required for iPod...

Owner s Manual
Page 18
... our website. Refer to USB port 1 for using Apple CarPlay. (*3) Available only when an Apple CarPlay-compatible device is required. - Connect to the CarMediaPlayer manual for more information. (*2) Select "On" for "Apple CarPlay" for connecting each device The settings and cables required for using Pandora or AppRadio Mode iPod / iPhone...
... our website. Refer to USB port 1 for using Apple CarPlay. (*3) Available only when an Apple CarPlay-compatible device is required. - Connect to the CarMediaPlayer manual for more information. (*2) Select "On" for "Apple CarPlay" for connecting each device The settings and cables required for using Pandora or AppRadio Mode iPod / iPhone...

Owner s Manual
Page 20
... or button, you the opportunity to discover a wide range of HD Radio Technology. iTunes® tagging indicator and iTunes® tagging song status indicator Performs manual tuning. Presents song name, artist, station IDs, HD2/HD3 Channel Guide, and other relevant data streams. Adjacent to traditional main stations are brought to a key...
... or button, you the opportunity to discover a wide range of HD Radio Technology. iTunes® tagging indicator and iTunes® tagging song status indicator Performs manual tuning. Presents song name, artist, station IDs, HD2/HD3 Channel Guide, and other relevant data streams. Adjacent to traditional main stations are brought to a key...
Owner s Manual
Page 27
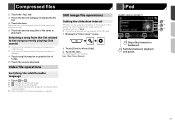
... song currently playing (link search) p This function is displayed. 1 Touch song information to display the file list. The following items are available: 5sec, 10sec, 15sec, Manual. Compressed files iPod 2 Touch the "Tag" tab.
... song currently playing (link search) p This function is displayed. 1 Touch song information to display the file list. The following items are available: 5sec, 10sec, 15sec, Manual. Compressed files iPod 2 Touch the "Tag" tab.
Owner s Manual
Page 33
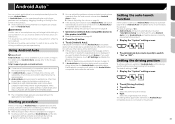
... Auto, set to on a cellular phone other device will switch to limitations while driving. PIONEER IS NOT RESPONSIBLE AND DISCLAIMS LIABILITY FOR THIRD PARTY (NON-PIONEER) APPS AND CONTENT, INCLUDING WITHOUT LIMITATION ANY INACCURACIES OR INCOMPLETE INFORMATION. p Android Auto will launch automatically...determined by the App providers. Android Auto allows access to applications other device, touch [BT Settings] and delete the device manually. Refer to Adjusting the volume on page 34 p If the auto-launch function is set, Android Auto will launch automatically ...
... Auto, set to on a cellular phone other device will switch to limitations while driving. PIONEER IS NOT RESPONSIBLE AND DISCLAIMS LIABILITY FOR THIRD PARTY (NON-PIONEER) APPS AND CONTENT, INCLUDING WITHOUT LIMITATION ANY INACCURACIES OR INCOMPLETE INFORMATION. p Android Auto will launch automatically...determined by the App providers. Android Auto allows access to applications other device, touch [BT Settings] and delete the device manually. Refer to Adjusting the volume on page 34 p If the auto-launch function is set, Android Auto will launch automatically ...

Owner s Manual
Page 37
... broadcast mode). *1 Selects an item from the list. Refer to Selecting a channel from memory. Tunes into the current channel display (live broadcast mode) *3 *4 *5 Performs manual tuning. *2 Skips broadcasting HOLD channels. Starting procedure 1 Display the AV source selection screen. 2 Touch [SiriusXM]. 37 Selects a channel directly.
... broadcast mode). *1 Selects an item from the list. Refer to Selecting a channel from memory. Tunes into the current channel display (live broadcast mode) *3 *4 *5 Performs manual tuning. *2 Skips broadcasting HOLD channels. Starting procedure 1 Display the AV source selection screen. 2 Touch [SiriusXM]. 37 Selects a channel directly.

Owner s Manual
Page 44
... version on page 48 2 Access the following website and follow the on page 44 Using functions in Car Sources Almost operations are transmitted to this manual. When information on your vehicle or on the devices of module varies depending on page 58 The iDatalink function will need to iDatalink Maestro...
... version on page 48 2 Access the following website and follow the on page 44 Using functions in Car Sources Almost operations are transmitted to this manual. When information on your vehicle or on the devices of module varies depending on page 58 The iDatalink function will need to iDatalink Maestro...

Owner s Manual
Page 47
... the item. Auto: Switches the dimmer to on or off automatically according to your vehicle's headlight turning on or off. Manual: Switches the dimmer to on or off manually. Time: Switches the dimmer to on or off at the same time twice. 4 Press the button. The adjustment results are... is available only when you feel that the touch panel keys on the screen deviate from the actual positions that the dimmer is set to "Manual". Proceed to 16-point adjustment. 6 Gently touch the center of two + marks at the time you stop your vehicle in a safe place and apply the...
... the item. Auto: Switches the dimmer to on or off automatically according to your vehicle's headlight turning on or off. Manual: Switches the dimmer to on or off manually. Time: Switches the dimmer to on or off at the same time twice. 4 Press the button. The adjustment results are... is available only when you feel that the touch panel keys on the screen deviate from the actual positions that the dimmer is set to "Manual". Proceed to 16-point adjustment. 6 Gently touch the center of two + marks at the time you stop your vehicle in a safe place and apply the...

Owner s Manual
Page 50
... name. p If you want to adjust the level. p The distance can set to "Front-L" or "Front-R". Setting the auto-adjusted equalizer You can be adjusted manually only when the listen- To use as possible, with the 50 setting. 5 Touch [] to switch "On" or "Off". Never perform Auto EQ measurement while driving...
... name. p If you want to adjust the level. p The distance can set to "Front-L" or "Front-R". Setting the auto-adjusted equalizer You can be adjusted manually only when the listen- To use as possible, with the 50 setting. 5 Touch [] to switch "On" or "Off". Never perform Auto EQ measurement while driving...
Owner s Manual
Page 57
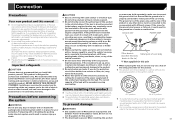
..., resulting in a short circuit or malfunction and permanent damage to disconnect the (-) battery cable before installation. We recommend that only authorized Pioneer service personnel, who have special training and experience in mobile electronics, set up , wires may result in a fire or malfunction. .... Before installing this product Use this product with cable clamps or electrical tape. Connection Precautions Your new product and this manual Do not operate this product, any applications, or the rear view camera option (if purchased) if doing so will ...
..., resulting in a short circuit or malfunction and permanent damage to disconnect the (-) battery cable before installation. We recommend that only authorized Pioneer service personnel, who have special training and experience in mobile electronics, set up , wires may result in a fire or malfunction. .... Before installing this product Use this product with cable clamps or electrical tape. Connection Precautions Your new product and this manual Do not operate this product, any applications, or the rear view camera option (if purchased) if doing so will ...

Owner s Manual
Page 58
...ground) To vehicle (metal) body. 7 Violet/white Of the two lead wires connected to first flash the Maestro module with Navigation system) a Pioneer navigation system Please contact your dealer to detect the ON/OFF status of the power amp (max. 300 mA 12 V DC). the "Firmware Information...ON), a control signal is output through the blue/white lead, even if the audio source is switched off . For details, consult the vehicle Owner's Manual or dealer. b Power supply side c Parking brake switch d Ground side p The position of any obstacles. This lead must be connected (sold separately...
...ground) To vehicle (metal) body. 7 Violet/white Of the two lead wires connected to first flash the Maestro module with Navigation system) a Pioneer navigation system Please contact your dealer to detect the ON/OFF status of the power amp (max. 300 mA 12 V DC). the "Firmware Information...ON), a control signal is output through the blue/white lead, even if the audio source is switched off . For details, consult the vehicle Owner's Manual or dealer. b Power supply side c Parking brake switch d Ground side p The position of any obstacles. This lead must be connected (sold separately...
Owner s Manual
Page 61
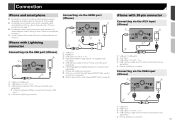
... and smartphone Connecting via the HDMI port For details on how to connect an external device using a (iPhone) separately sold cable, refer to the manual for the cable. For details concerning the connection, operations and 7 compatibility of iPhone, refer to Setup for iPod / iPhone or smartphone on page 17...
... and smartphone Connecting via the HDMI port For details on how to connect an external device using a (iPhone) separately sold cable, refer to the manual for the cable. For details concerning the connection, operations and 7 compatibility of iPhone, refer to Setup for iPod / iPhone or smartphone on page 17...

Owner s Manual
Page 62
... port. 2 Wrap the lock tie around the hook above the HDMI port and the High Speed HDMI® Cable, and then tighten it to the manual for the cable. micro USB cable (Type USB A - OTHER USE MAY RESULT IN INJURY OR DAMAGE. D) (supplied with CD-AH200) 5 Adapter cable (HDMI Type A - plied...
... port. 2 Wrap the lock tie around the hook above the HDMI port and the High Speed HDMI® Cable, and then tighten it to the manual for the cable. micro USB cable (Type USB A - OTHER USE MAY RESULT IN INJURY OR DAMAGE. D) (supplied with CD-AH200) 5 Adapter cable (HDMI Type A - plied...


