
Operating Instructions
Page 3
...mistake in installation or mounting, misuse, modification or a natural disaster. Before using your dealer install and set up the product. Always have an installation specialist or your Plasma Display, please read the "Safety Precautions" and these "Operating Instructions" carefully so you very much for.... Notes on Installation Work: This product is marketed assuming that it useful in a safe place. PIONEER cannot assume liabilities for purchasing this manual to the customer and explain to the customer how to deliver this PIONEER product. Keep this manual in the future.
...mistake in installation or mounting, misuse, modification or a natural disaster. Before using your dealer install and set up the product. Always have an installation specialist or your Plasma Display, please read the "Safety Precautions" and these "Operating Instructions" carefully so you very much for.... Notes on Installation Work: This product is marketed assuming that it useful in a safe place. PIONEER cannot assume liabilities for purchasing this manual to the customer and explain to the customer how to deliver this PIONEER product. Keep this manual in the future.
Operating Instructions
Page 7
... to use this manual 3 Checking supplied accessories 5 Part Names and Functions 6 Main unit 6 Remote control unit 7 Connection panel (PDP-507CMX 9 Connection panel (PDP-607CMX 10 Installation and Connections 11 Installation of the unit 11 Connection to a personal computer 13 Audio connections 14 Power cord connection... 15 How to route cables 16 System Settings 17 Setting the onscreen display language 17 Settings after ...
... to use this manual 3 Checking supplied accessories 5 Part Names and Functions 6 Main unit 6 Remote control unit 7 Connection panel (PDP-507CMX 9 Connection panel (PDP-607CMX 10 Installation and Connections 11 Installation of the unit 11 Connection to a personal computer 13 Audio connections 14 Power cord connection... 15 How to route cables 16 System Settings 17 Setting the onscreen display language 17 Settings after ...
Operating Instructions
Page 8
... heat-radiating design greatly improves environmental operating conditions. Further, aspect ratio and screen size settings supported include [DOT BY DOT], [4:3] and [FULL] (*1). * Supported signals are ... commercial use. ¶ Improved usability User convenience has been improved by Pioneer. PDP-507CMX: While producing a large 50" screen image, the display is only 99 mm thick, and weighs... ¶ Introduces newly developed Wide Plasma Panel The new wide high-precision plasma panel (1365x768 / 16:9) pushes the envelope of previous high-luminance panels, producing brighter, clearer images with...
... heat-radiating design greatly improves environmental operating conditions. Further, aspect ratio and screen size settings supported include [DOT BY DOT], [4:3] and [FULL] (*1). * Supported signals are ... commercial use. ¶ Improved usability User convenience has been improved by Pioneer. PDP-507CMX: While producing a large 50" screen image, the display is only 99 mm thick, and weighs... ¶ Introduces newly developed Wide Plasma Panel The new wide high-precision plasma panel (1365x768 / 16:9) pushes the envelope of previous high-luminance panels, producing brighter, clearer images with...

Operating Instructions
Page 9
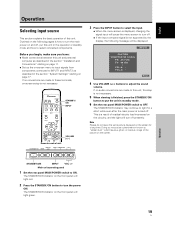
...operations associated with selecting a source component up to the more complex operations associated with adjusting the Plasma Display picture to match the requirements of components. The section "System Settings" starting on page 17 covers the on page 6 to a wide variety of specific components ...actions and operations in this manual is set up this unit. E N H A N C E PICTURE RESET SETUP : : : : INPUT1 OPTION 0 0 0 0 SET ENTER MENU EXIT Images shown here may not be referred to follow the course of the Plasma Display with the plasma monitor and remote control unit, as ...
...operations associated with selecting a source component up to the more complex operations associated with adjusting the Plasma Display picture to match the requirements of components. The section "System Settings" starting on page 17 covers the on page 6 to a wide variety of specific components ...actions and operations in this manual is set up this unit. E N H A N C E PICTURE RESET SETUP : : : : INPUT1 OPTION 0 0 0 0 SET ENTER MENU EXIT Images shown here may not be referred to follow the course of the Plasma Display with the plasma monitor and remote control unit, as ...

Operating Instructions
Page 10
... in these Operating Instructions should be performed on the remote control unit, the commands can be considered typical images; When the Plasma Display controls include equivalent buttons to those buttons found on the main unit as well. some difference will refer to confirm whether... the operation is described in its contents, the input source and various other control settings. Before Proceeding 4 En The following illustrations are provided to allow you to the operating controls found on the remote control unit,...
... in these Operating Instructions should be performed on the remote control unit, the commands can be considered typical images; When the Plasma Display controls include equivalent buttons to those buttons found on the main unit as well. some difference will refer to confirm whether... the operation is described in its contents, the input source and various other control settings. Before Proceeding 4 En The following illustrations are provided to allow you to the operating controls found on the remote control unit,...
Operating Instructions
Page 12
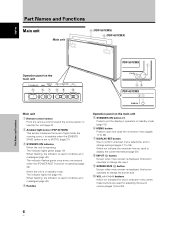
... to indicate error messages (page 40). Part Names and Functions 6 En English Part Names and Functions Main unit Main unit 4 (PDP-507CMX) 4 (PDP-607CMX) Operation panel on -screen menu (pages 17 to 36). 7 DISPLAY/SET button Use to confirm onscreen menu selections, and to change the screen size. 0 VOL +/- (}/]) buttons When not indicated for use...
... to indicate error messages (page 40). Part Names and Functions 6 En English Part Names and Functions Main unit Main unit 4 (PDP-507CMX) 4 (PDP-607CMX) Operation panel on -screen menu (pages 17 to 36). 7 DISPLAY/SET button Use to confirm onscreen menu selections, and to change the screen size. 0 VOL +/- (}/]) buttons When not indicated for use...
Operating Instructions
Page 13
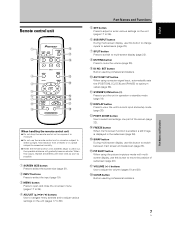
...the volume (pages 19 and 20). % CLEAR button Button used by professional installers. 7 En Part Names and Functions English SET button Button used by professional installers. 0 AUTO SET UP button When using the picture-in a place subject to excessive humidity. ¶ When the remote control unit's batteries begin...open and close the on-screen menu (pages 17 to 36). 4 ADJUST (5/∞/3/2) buttons Use to navigate menu screens and to adjust various settings on the unit (pages 17 to 36). 6 SUB INPUT button During multi-screen display, use this button to switch between main screen and ...
...the volume (pages 19 and 20). % CLEAR button Button used by professional installers. 7 En Part Names and Functions English SET button Button used by professional installers. 0 AUTO SET UP button When using the picture-in a place subject to excessive humidity. ¶ When the remote control unit's batteries begin...open and close the on-screen menu (pages 17 to 36). 4 ADJUST (5/∞/3/2) buttons Use to navigate menu screens and to adjust various settings on the unit (pages 17 to 36). 6 SUB INPUT button During multi-screen display, use this button to switch between main screen and ...
Operating Instructions
Page 15
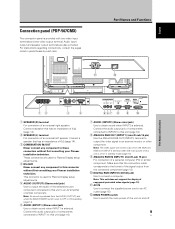
...of copyguard-protected video signals (page 13). - This connector is used for Plasma Display setup adjustments. 5 AUDIO (OUTPUT) (Stereo mini jack) Use to ... RGB (INPUT2) (DVI-D jack) Use to these connectors without first consulting your Pioneer installation technician. Connect a speaker that has an impedance of components connected to INPUT2...from the AUDIO (OUTPUT) jack when the MAIN POWER switch is set to OFF or ON (standby) (page 14). 6 AUDIO (...the display of an external right speaker. English Connection panel (PDP-507CMX) The connection panel is off . 9 En Make sure that the ...
...of copyguard-protected video signals (page 13). - This connector is used for Plasma Display setup adjustments. 5 AUDIO (OUTPUT) (Stereo mini jack) Use to ... RGB (INPUT2) (DVI-D jack) Use to these connectors without first consulting your Pioneer installation technician. Connect a speaker that has an impedance of components connected to INPUT2...from the AUDIO (OUTPUT) jack when the MAIN POWER switch is set to OFF or ON (standby) (page 14). 6 AUDIO (...the display of an external right speaker. English Connection panel (PDP-507CMX) The connection panel is off . 9 En Make sure that the ...
Operating Instructions
Page 16
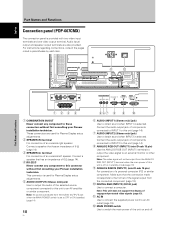
... INPUT1 ANALOG RGB IN (D-Sub) INPUT2 DIGITAL RGB (DVI-D) 1 23 4 1 COMBINATION IN/OUT Never connect any component to obtain sound when INPUT2 is set to OFF or ON (standby) (page 14). 10 En 567 8 9 0 6 AUDIO (INPUT1) (Stereo mini jack) Use to an AV amplifier or...an AC outlet (page 15). = MAIN POWER switch Use to these connectors without first consulting your Pioneer installation technician. English Part Names and Functions Connection panel (PDP-607CMX) The connection panel is used for Plasma Display setup adjustments. 5 AUDIO (OUTPUT) (Stereo mini jack) Use to output the audio of a...
... INPUT1 ANALOG RGB IN (D-Sub) INPUT2 DIGITAL RGB (DVI-D) 1 23 4 1 COMBINATION IN/OUT Never connect any component to obtain sound when INPUT2 is set to OFF or ON (standby) (page 14). 10 En 567 8 9 0 6 AUDIO (INPUT1) (Stereo mini jack) Use to an AV amplifier or...an AC outlet (page 15). = MAIN POWER switch Use to these connectors without first consulting your Pioneer installation technician. English Part Names and Functions Connection panel (PDP-607CMX) The connection panel is used for Plasma Display setup adjustments. 5 AUDIO (OUTPUT) (Stereo mini jack) Use to output the audio of a...

Operating Instructions
Page 23
... SET button. System Settings MENU 2/3 SET 5/∞ Remote control unit STANDBY/ON DISPLAY MENU / SET INPUT SCREEN SIZE - VOL + STANDBY/ON SET 5/∞ 2/3 MENU Main unit operating panel 1 Set the rear panel MAIN POWER switch to change to another language, the screen setting must be set to that shown in step 4. 8 When settings ... PICTURE SCREEN CONTRAST BRIGHTNESS H.ENHANCE V. Follow the procedures below to ON. The STANDBY/ON indicator on the front panel will be set for either INPUT1 or INPUT2, the display language for the other input will light red. 2 Press the STANDBY/...
... SET button. System Settings MENU 2/3 SET 5/∞ Remote control unit STANDBY/ON DISPLAY MENU / SET INPUT SCREEN SIZE - VOL + STANDBY/ON SET 5/∞ 2/3 MENU Main unit operating panel 1 Set the rear panel MAIN POWER switch to change to another language, the screen setting must be set to that shown in step 4. 8 When settings ... PICTURE SCREEN CONTRAST BRIGHTNESS H.ENHANCE V. Follow the procedures below to ON. The STANDBY/ON indicator on the front panel will be set for either INPUT1 or INPUT2, the display language for the other input will light red. 2 Press the STANDBY/...
Operating Instructions
Page 24
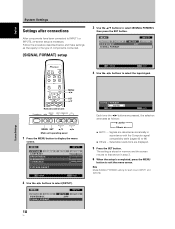
... that shown in accordance with the Computer signal compatibility table (pages 42 to display the menu screen. MENU PICTURE SCREEN CONTRAST BRIGHTNESS H.ENHANCE V. VOL + MENU SET 5/∞ 2/3 Main unit operating panel 1 Press the MENU button to 44) ÷ Others ... MENU PICTURE SCREEN P O W E R M G T. Note Make [SIGNAL FORMAT...
... that shown in accordance with the Computer signal compatibility table (pages 42 to display the menu screen. MENU PICTURE SCREEN CONTRAST BRIGHTNESS H.ENHANCE V. VOL + MENU SET 5/∞ 2/3 Main unit operating panel 1 Press the MENU button to 44) ÷ Others ... MENU PICTURE SCREEN P O W E R M G T. Note Make [SIGNAL FORMAT...
Operating Instructions
Page 25
...: ÷ Made connections between this step is not necessary. 5 When viewing is how to turn off , put the unit in standby mode. 6 Set the rear panel MAIN POWER switch to OFF. If no connections are made to these terminals, on page 17. Operation 19 En The STANDBY/ON indicator may...as "screen burn" which leaves a ghost, or residual, image of the picture on and off presently. STANDBY/ON INPUT VOL +/- Main unit operating panel 1 Set the rear panel MAIN POWER switch to turn the power ON. VOL + 3 Press the INPUT button to select the input. ÷ When the menu screen is ...
...: ÷ Made connections between this step is not necessary. 5 When viewing is how to turn off , put the unit in standby mode. 6 Set the rear panel MAIN POWER switch to OFF. If no connections are made to these terminals, on page 17. Operation 19 En The STANDBY/ON indicator may...as "screen burn" which leaves a ghost, or residual, image of the picture on and off presently. STANDBY/ON INPUT VOL +/- Main unit operating panel 1 Set the rear panel MAIN POWER switch to turn the power ON. VOL + 3 Press the INPUT button to select the input. ÷ When the menu screen is ...

Operating Instructions
Page 26
...restore the sound. Confirming current status Main unit operating panel STANDBY/ON DISPLAY MENU / SET INPUT SCREEN SIZE - The currently selected input, screen size and refresh rates will be slightly different from the speakers. VOL + DISPLAY/SET VOLUME [+/-] DISPLAY Remote control unit Press the VOLUME ... sound from actual values. Press the MUTING button on the remote control unit. English Operation Adjusting sound volume Main unit operating panel STANDBY/ON DISPLAY MENU / SET INPUT SCREEN SIZE - INPUT1 FH : 31.5kHz FV : 60.0Hz 640X480 POL.H : NEGA POL.V : POSI DOT...
...restore the sound. Confirming current status Main unit operating panel STANDBY/ON DISPLAY MENU / SET INPUT SCREEN SIZE - The currently selected input, screen size and refresh rates will be slightly different from the speakers. VOL + DISPLAY/SET VOLUME [+/-] DISPLAY Remote control unit Press the VOLUME ... sound from actual values. Press the MUTING button on the remote control unit. English Operation Adjusting sound volume Main unit operating panel STANDBY/ON DISPLAY MENU / SET INPUT SCREEN SIZE - INPUT1 FH : 31.5kHz FV : 60.0Hz 640X480 POL.H : NEGA POL.V : POSI DOT...
Operating Instructions
Page 27
...various height and width ratios. A Operation SCREEN SIZE Main unit operating panel The screen size changes each time the power is used for full display of 16:9 and fills the entire screen. Notes ÷ When the [FULL] setting is used to prevent image burning. 21 En For optimal viewing,...may be cut off or appear deformed. ÷ Be aware that you are designed for commercial or public viewing purposes, selecting the [FULL] mode setting may violate the rights of authors protected under copyright law. ÷ When [DOT BY DOT] or [4:3] screen size is selected, the display ...
...various height and width ratios. A Operation SCREEN SIZE Main unit operating panel The screen size changes each time the power is used for full display of 16:9 and fills the entire screen. Notes ÷ When the [FULL] setting is used to prevent image burning. 21 En For optimal viewing,...may be cut off or appear deformed. ÷ Be aware that you are designed for commercial or public viewing purposes, selecting the [FULL] mode setting may violate the rights of authors protected under copyright law. ÷ When [DOT BY DOT] or [4:3] screen size is selected, the display ...
Operating Instructions
Page 28
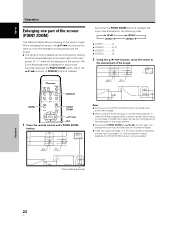
...move the screen to the desired part of the image. 24 R12 DISPLAY MENU POINT ZOOM 5/∞/2/3 SET 1 Press the remote control unit's POINT ZOOM button. 66.0 24 R12 Notes ¶ During use ... for about three seconds whenever the POINT ZOOM button, one part of the screen (POINT ZOOM) This Plasma Display allows enlarging of the screen image. When enlarging the screen, the 5/∞/2/3 buttons can be confirmed... LEVEL2 LEVEL3 2 ÷ LEVEL1 .......... English Operation 10 22.1 84.3 10 22.1 10 50 Operation Enlarging one of the 5/∞/2/3 buttons, or DISPLAY button is pressed.
...move the screen to the desired part of the image. 24 R12 DISPLAY MENU POINT ZOOM 5/∞/2/3 SET 1 Press the remote control unit's POINT ZOOM button. 66.0 24 R12 Notes ¶ During use ... for about three seconds whenever the POINT ZOOM button, one part of the screen (POINT ZOOM) This Plasma Display allows enlarging of the screen image. When enlarging the screen, the 5/∞/2/3 buttons can be confirmed... LEVEL2 LEVEL3 2 ÷ LEVEL1 .......... English Operation 10 22.1 84.3 10 22.1 10 50 Operation Enlarging one of the 5/∞/2/3 buttons, or DISPLAY button is pressed.
Operating Instructions
Page 30
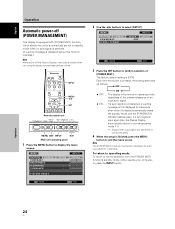
...control unit STANDBY/ON DISPLAY MENU / SET INPUT SCREEN SIZE - VOL + MENU SET INPUT 2/3 Main unit operating panel 1 Press the MENU button to select [SETUP]. If a sync signal is [OFF]. Operation 24 En E N H A N C E SETUP : : : : INPUT1 OPTION 0 0 0 0 PICTURE RESET SET ENTER MENU EXIT 2 Use the 2/3...flashes green. SIGNAL FORMAT INPUT1 SETUP OPTION :OFF SET CHANGE MENU EXIT 3 Press the SET button to normal operating mode (*1). *1. The factory default setting is input again later, the Plasma Display automatically returns to confirm selection of an ...
...control unit STANDBY/ON DISPLAY MENU / SET INPUT SCREEN SIZE - VOL + MENU SET INPUT 2/3 Main unit operating panel 1 Press the MENU button to select [SETUP]. If a sync signal is [OFF]. Operation 24 En E N H A N C E SETUP : : : : INPUT1 OPTION 0 0 0 0 PICTURE RESET SET ENTER MENU EXIT 2 Use the 2/3...flashes green. SIGNAL FORMAT INPUT1 SETUP OPTION :OFF SET CHANGE MENU EXIT 3 Press the SET button to normal operating mode (*1). *1. The factory default setting is input again later, the Plasma Display automatically returns to confirm selection of an ...

Operating Instructions
Page 31
... picture can be set default. 25 En VOL + MENU SET 5/∞ 2/3 Main unit operating panel 1 Press the MENU button to select the adjustment item, then press the SET button. E N H A N C E PICTURE RESET SETUP : : : : INPUT1 OPTION 0 0 0 0 SET ENTER MENU EXIT BRIGHTNESS SET SET : 0 MENU EXIT 4 Press the SET button. To reset [PICTURE] mode settings to the default If settings have been adjusted...
... picture can be set default. 25 En VOL + MENU SET 5/∞ 2/3 Main unit operating panel 1 Press the MENU button to select the adjustment item, then press the SET button. E N H A N C E PICTURE RESET SETUP : : : : INPUT1 OPTION 0 0 0 0 SET ENTER MENU EXIT BRIGHTNESS SET SET : 0 MENU EXIT 4 Press the SET button. To reset [PICTURE] mode settings to the default If settings have been adjusted...
Operating Instructions
Page 32
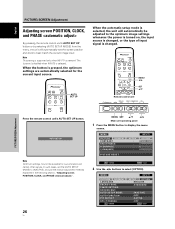
... in the following section, "Adjusting screen POSITION, CLOCK, and PHASE ". 26 En MENU SET 5/∞ 2/3 Main unit operating panel 1 Press the MENU button to best match the current image input. MENU 2/3 SET 5/∞ Remote control unit STANDBY/ON DISPLAY MENU / SET INPUT SCREEN SIZE - MENU PICTURE SCREEN CONTRAST BRIGHTNESS H.ENHANCE V. E N H A N C E SETUP : : : : INPUT1 OPTION 0 0 0 0 PICTURE...
... in the following section, "Adjusting screen POSITION, CLOCK, and PHASE ". 26 En MENU SET 5/∞ 2/3 Main unit operating panel 1 Press the MENU button to best match the current image input. MENU 2/3 SET 5/∞ Remote control unit STANDBY/ON DISPLAY MENU / SET INPUT SCREEN SIZE - MENU PICTURE SCREEN CONTRAST BRIGHTNESS H.ENHANCE V. E N H A N C E SETUP : : : : INPUT1 OPTION 0 0 0 0 PICTURE...
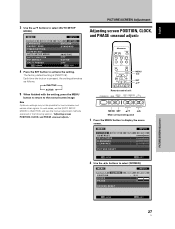
Operating Instructions
Page 33
... the menu screen. MENU PICTURE POSITION CLOCK PHASE SCREEN INPUT1 SETUP OPTION : 0/ 0 : 0 : 0 SCREEN RESET SET ENTER MENU EXIT PICTURE/SCREEN Adjustment 27 En VOL + MENU SET 5/∞ 2/3 Main unit operating panel 1 Press the MENU button to activate the setting. The factory default setting is pressed, the setting alternates as follows: 3 INACTIVE ACTIVE 2 5 When finished with the...
... the menu screen. MENU PICTURE POSITION CLOCK PHASE SCREEN INPUT1 SETUP OPTION : 0/ 0 : 0 : 0 SCREEN RESET SET ENTER MENU EXIT PICTURE/SCREEN Adjustment 27 En VOL + MENU SET 5/∞ 2/3 Main unit operating panel 1 Press the MENU button to activate the setting. The factory default setting is pressed, the setting alternates as follows: 3 INACTIVE ACTIVE 2 5 When finished with the...

Operating Instructions
Page 34
...the picture's position upward or downward. English PICTURE/SCREEN Adjustment 3 Use the 5/∞ buttons to select [SCREEN RESET], then press the SET button. Pressing the SET button writes the value into the memory and returns the display to the step 3 screen. 6 When adjustment is changed , the [POSITION.... However, if the input source is finished, press the MENU button to 27) before beginning your adjustments. All [SCREEN] mode settings are adjusted excessively, the picture may require readjustment. ÷ If the adjustment items in the previous procedure, use the 5/∞ ...
...the picture's position upward or downward. English PICTURE/SCREEN Adjustment 3 Use the 5/∞ buttons to select [SCREEN RESET], then press the SET button. Pressing the SET button writes the value into the memory and returns the display to the step 3 screen. 6 When adjustment is changed , the [POSITION.... However, if the input source is finished, press the MENU button to 27) before beginning your adjustments. All [SCREEN] mode settings are adjusted excessively, the picture may require readjustment. ÷ If the adjustment items in the previous procedure, use the 5/∞ ...


