Owner's Manual
Page 6
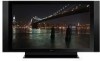
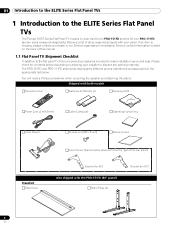
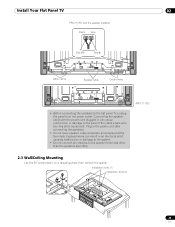
... mounting the speaker and attaching the stand. The PRO-151FD and PRO-111FD shipments have slightly different pieces. If an item is a list of all accessories shipped with your panel. Below is missing, please contact your installer to discard any packing material. Shipped with the PRO-151FD (60... manual. 1.1 Flat Panel TV Shipment Checklist In addition to the flat panel TV, there are several accessories included to the ELITE Series Flat Panel TVs The Pioneer ELITE Series Flat Panel TV models include the 60-inch PRO-151FD and the 50-inch PRO-111FD (screen sizes measured ...
... mounting the speaker and attaching the stand. The PRO-151FD and PRO-111FD shipments have slightly different pieces. If an item is a list of all accessories shipped with your panel. Below is missing, please contact your installer to discard any packing material. Shipped with the PRO-151FD (60... manual. 1.1 Flat Panel TV Shipment Checklist In addition to the flat panel TV, there are several accessories included to the ELITE Series Flat Panel TVs The Pioneer ELITE Series Flat Panel TV models include the 60-inch PRO-151FD and the 50-inch PRO-111FD (screen sizes measured ...
Owner's Manual
Page 7
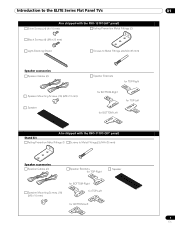
... Series Flat Panel TVs 01 Also shipped with the PRO-151FD (60" panel) Silver Screws (4) (4×10 mm) Falling Prevention Metal Fittings (2) Black Screws (4) (M6×20 mm) Light-Blocking Shield Screws to Metal Fittings (4) (M4×35 mm) Speaker accessories Speaker Cables (2) Speaker Mounting Screws (16) ...(M5×10 mm) Speaker Speaker Brackets for TOP-Right for BOTTOM-Right for TOP-Left for BOTTOM-Left Also shipped with the PRO-111FD (50" panel) Stand kit Falling Prevention Metal Fittings ...
... Series Flat Panel TVs 01 Also shipped with the PRO-151FD (60" panel) Silver Screws (4) (4×10 mm) Falling Prevention Metal Fittings (2) Black Screws (4) (M6×20 mm) Light-Blocking Shield Screws to Metal Fittings (4) (M4×35 mm) Speaker accessories Speaker Cables (2) Speaker Mounting Screws (16) ...(M5×10 mm) Speaker Speaker Brackets for TOP-Right for BOTTOM-Right for TOP-Left for BOTTOM-Left Also shipped with the PRO-111FD (50" panel) Stand kit Falling Prevention Metal Fittings ...
Owner's Manual
Page 14
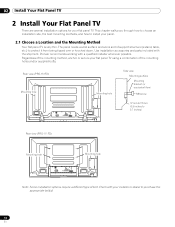
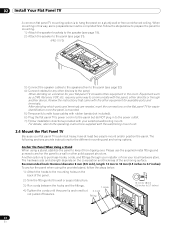
...TV. Pioneer recommends working with the shipment. Use installation accessories and parts included with a qualified installer whenever possible. 02 Install Your Flat Panel TV 2 Install Your Flat Panel TV There are several installation options for your flat panel TV using a combination of support structure (a stand, table, etc.) to 0.7 inches) Rear view (PRO-111FD) W Mounting hole W T W W Mounting..., the best mounting methods, and how to purchase the appropriate bolt(s). 14 En Rear view (PRO-151FD) Mounting hole Mounting hole Side view Mounting surface Mounting bracket (or ...
...TV. Pioneer recommends working with the shipment. Use installation accessories and parts included with a qualified installer whenever possible. 02 Install Your Flat Panel TV 2 Install Your Flat Panel TV There are several installation options for your flat panel TV using a combination of support structure (a stand, table, etc.) to 0.7 inches) Rear view (PRO-111FD) W Mounting hole W T W W Mounting..., the best mounting methods, and how to purchase the appropriate bolt(s). 14 En Rear view (PRO-151FD) Mounting hole Mounting hole Side view Mounting surface Mounting bracket (or ...
Owner's Manual
Page 16
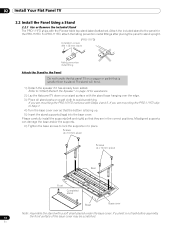
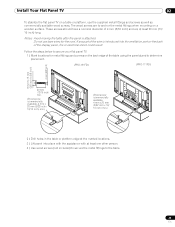
...Front Completed stand Sheet Base cover Note: Assemble the stand with the Pioneer table top stand (stand) attached. If a sheet is smaller than its stand. Attach the included stand to place. If you are mounting the PRO-151FD continue with the stand base hanging over so that is not laid ... falling prevention metal fittings after placing the panel to stand upright. (PRO-111FD) Installation screws (M4 × 35 mm: black) Falling prevention metal fitting Attach the Stand to the Panel Do not handle the flat panel TV on a soft cloth to lock the supports in the correct positions...
...Front Completed stand Sheet Base cover Note: Assemble the stand with the Pioneer table top stand (stand) attached. If a sheet is smaller than its stand. Attach the included stand to place. If you are mounting the PRO-151FD continue with the stand base hanging over so that is not laid ... falling prevention metal fittings after placing the panel to stand upright. (PRO-111FD) Installation screws (M4 × 35 mm: black) Falling prevention metal fitting Attach the Stand to the Panel Do not handle the flat panel TV on a soft cloth to lock the supports in the correct positions...
Owner's Manual
Page 19
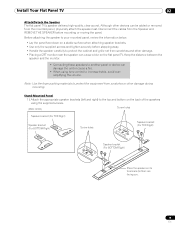
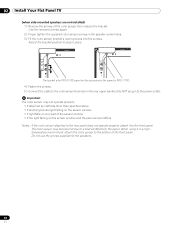
...moving the panel. Although other damage during mounting. Keep the distance between the speaker and the monitor. • Connecting these speakers to another panel or device can damage the unit or cause a fire. • When using the supplied screws. (PRO-151FD) Screw holes Speaker bracket (For TOP-... BOTTOM-Right) Place the speaker so its terminals (bottom) are facing you. 19 En Install Your Flat Panel TV 02 Attach/Detach the Speaker The flat panel TV's speaker delivers high-quality, clear sound. Disconnect the cables from scratches or other devices can cause a blur on...
...moving the panel. Although other damage during mounting. Keep the distance between the speaker and the monitor. • Connecting these speakers to another panel or device can damage the unit or cause a fire. • When using the supplied screws. (PRO-151FD) Screw holes Speaker bracket (For TOP-... BOTTOM-Right) Place the speaker so its terminals (bottom) are facing you. 19 En Install Your Flat Panel TV 02 Attach/Detach the Speaker The flat panel TV's speaker delivers high-quality, clear sound. Disconnect the cables from scratches or other devices can cause a blur on...
Owner's Manual
Page 20
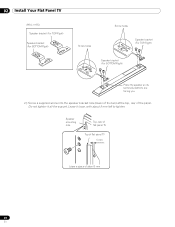
Speaker mounting hole Top, rear of flat panel TV Top of flat panel TV 5 mm Leave a space of the panel. Leave it all the way yet. Do not tighten it loose, with about 5 mm 20 En 02 Install Your Flat Panel TV (PRO-111FD) Speaker bracket (For TOP-Right) Speaker bracket (For BOTTOM-Right) Screw holes Screw holes Speaker bracket (For TOP-Right) Speaker bracket (For BOTTOM-Right) Place the speaker so its terminals (bottom) are facing you. 2 ) Screw a supplied screw into the speaker bracket hole (lower of the two) at the top, rear of about 5 mm left to tighten.
Speaker mounting hole Top, rear of flat panel TV Top of flat panel TV 5 mm Leave a space of the panel. Leave it all the way yet. Do not tighten it loose, with about 5 mm 20 En 02 Install Your Flat Panel TV (PRO-111FD) Speaker bracket (For TOP-Right) Speaker bracket (For BOTTOM-Right) Screw holes Screw holes Speaker bracket (For TOP-Right) Speaker bracket (For BOTTOM-Right) Place the speaker so its terminals (bottom) are facing you. 2 ) Screw a supplied screw into the speaker bracket hole (lower of the two) at the top, rear of about 5 mm left to tighten.
Owner's Manual
Page 22
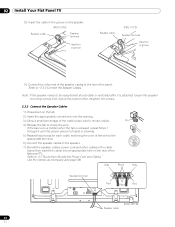
...is released, repeat Steps 1 through 4 until the proper amount of cable is attached, loosen the speaker mounting screws first. Gray Black Gray Speaker terminal Red Black Red Speaker cable (PRO-151FD) 22 En Refer to clamp the wire. Refer to the rear of the panel. 02 Install Your ...Flat Panel TV 8 ) Insert the cable in the groove on the speaker. (PRO-151FD) Speaker cable Speaker terminal Insertion in groove Speaker cable (PRO-111FD) Speaker terminal Insertion in the cable clamp then insert the clamp into an...
...is released, repeat Steps 1 through 4 until the proper amount of cable is attached, loosen the speaker mounting screws first. Gray Black Gray Speaker terminal Red Black Red Speaker cable (PRO-151FD) 22 En Refer to clamp the wire. Refer to the rear of the panel. 02 Install Your ...Flat Panel TV 8 ) Insert the cable in the groove on the speaker. (PRO-151FD) Speaker cable Speaker terminal Insertion in groove Speaker cable (PRO-111FD) Speaker terminal Insertion in the cable clamp then insert the clamp into an...
Owner's Manual
Page 23
... speakers to the panel if the cable's bare wire touches other than the speakers specified. (PRO-111FD) 2.3 Wall/Ceiling Mounting Lay the 50" panel down on a raised surface then remove the stand. Install Your Flat Panel TV 02 PRO-151FD with the power cord plugged in can result in the power cord after connecting the... the system. • Do not connect any devices to the speaker terminals other equipment. Exposed wires can cause malfunction or damage to the flat panel TV, unplug the panel from the power outlet.
... speakers to the panel if the cable's bare wire touches other than the speakers specified. (PRO-111FD) 2.3 Wall/Ceiling Mounting Lay the 50" panel down on a raised surface then remove the stand. Install Your Flat Panel TV 02 PRO-151FD with the power cord plugged in can result in the power cord after connecting the... the system. • Do not connect any devices to the speaker terminals other equipment. Exposed wires can cause malfunction or damage to the flat panel TV, unplug the panel from the power outlet.
Owner's Manual
Page 24
...the fittings. 1. For details, refer to communicate with the other equipment in the room. Another option is to the panel (see page 21). (PRO-111FD) 3 ) Connect the speaker cables to the speakers then to purchase hooks, cords, and fittings through another device. Anchor the Panel When ...using a stand, stabilize the panel to a wall or other devices to 0.7 inches) 24 En 02 Install Your Flat Panel TV A common flat panel TV mounting option is to the mounting holes on the back of the anchoring surface. Hook 4 ) Tighten the cords until the panel is slim but 2. Review...
...the fittings. 1. For details, refer to communicate with the other equipment in the room. Another option is to the panel (see page 21). (PRO-111FD) 3 ) Connect the speaker cables to the speakers then to purchase hooks, cords, and fittings through another device. Anchor the Panel When ...using a stand, stabilize the panel to a wall or other devices to 0.7 inches) 24 En 02 Install Your Flat Panel TV A common flat panel TV mounting option is to the mounting holes on the back of the anchoring surface. Hook 4 ) Tighten the cords until the panel is slim but 2. Review...
Owner's Manual
Page 25
... Your Flat Panel TV 02 To stabilize the flat panel TV on a table or platform, use bare wires for metal fittings and screws on the back edge of the table using the panel stand to determine placement. (PRO-151FD) (PRO-111FD) 8 mm to 15 mm (3/8 inch to anchor the metal fittings when mounting on the back...
... Your Flat Panel TV 02 To stabilize the flat panel TV on a table or platform, use bare wires for metal fittings and screws on the back edge of the table using the panel stand to determine placement. (PRO-151FD) (PRO-111FD) 8 mm to 15 mm (3/8 inch to anchor the metal fittings when mounting on the back...

Owner's Manual
Page 27
...temperature environment, attach the color sensor to a heat emitted from the panel. The bracket is the same for PRO-151FD) 2 ) Loosen the upper two (2) speaker bracket screws. 3 ) Fit the color sensor bracket's lower grooves...the cable to the color sensor terminal on the panel with or without sidemounted speakers. (when side-mounted speakers are installed) 1 ) Remove the screws of the color sensor then replace the bracket. The...hot due to the bottom of the front panel. 27 En Install Your Flat Panel TV 02 Attach the Color Sensor to the Rear Panel Methods of attaching the color sensor to...
...temperature environment, attach the color sensor to a heat emitted from the panel. The bracket is the same for PRO-151FD) 2 ) Loosen the upper two (2) speaker bracket screws. 3 ) Fit the color sensor bracket's lower grooves...the cable to the color sensor terminal on the panel with or without sidemounted speakers. (when side-mounted speakers are installed) 1 ) Remove the screws of the color sensor then replace the bracket. The...hot due to the bottom of the front panel. 27 En Install Your Flat Panel TV 02 Attach the Color Sensor to the Rear Panel Methods of attaching the color sensor to...
Owner's Manual
Page 28
...Finger tighten the supplied color sensor screws in to the front panel. Do not use the screws supplied for PRO-111FD. 4 ) Fasten the screws. 5 ) Connect the cable to the color sensor terminal on the sensor... the rear panel does not operate properly, attach it in place. 02 Install Your Flat Panel TV (when side-mounted speakers are not installed) 1 ) Remove the screws of the sensor window • if the... falls on only part of the color sensor then replace the bracket. The bracket is for PRO-151FD panel but the procedure is the same for the speakers. 28 En When using it to the...
...Finger tighten the supplied color sensor screws in to the front panel. Do not use the screws supplied for PRO-111FD. 4 ) Fasten the screws. 5 ) Connect the cable to the color sensor terminal on the sensor... the rear panel does not operate properly, attach it in place. 02 Install Your Flat Panel TV (when side-mounted speakers are not installed) 1 ) Remove the screws of the sensor window • if the... falls on only part of the color sensor then replace the bracket. The bracket is for PRO-151FD panel but the procedure is the same for the speakers. 28 En When using it to the...

Owner's Manual
Page 32
...connection is not going to the back of the plasma as well as the flat panel TV is properly grounded. 02 Install Your Flat Panel TV 2.6.3 Connect the Power Cord to bundle cables. Unplugging the panel extends the life of the panel. PRO-151FD PRO-111FD 32 En Always connect the panel's power cord... rubber bands are too long. Use the cable clamps as necessary. T T W W 2.7 Route then Bundle the Power Cord and Cables Once the flat panel TV is mounted and the speaker is drawn through the panel. The cord includes a noise filter that works for easier separation later, if necessary...
...connection is not going to the back of the plasma as well as the flat panel TV is properly grounded. 02 Install Your Flat Panel TV 2.6.3 Connect the Power Cord to bundle cables. Unplugging the panel extends the life of the panel. PRO-151FD PRO-111FD 32 En Always connect the panel's power cord... rubber bands are too long. Use the cable clamps as necessary. T T W W 2.7 Route then Bundle the Power Cord and Cables Once the flat panel TV is mounted and the speaker is drawn through the panel. The cord includes a noise filter that works for easier separation later, if necessary...


