
Leaflet
Page 1
...®/MPEG movies, MP3-CD/CD music and JPEG photos on the go • DVD, DVD+/-R, DVD+/-RW, (S)VCD, CD compatible • DivX Certified for standard DivX video playback • MP3-CD, CD and CD-RW playback • View JPEG images from ... the go . You can indulge in up to 5-hour playback with USB for video, photo and music Enjoy your great viewing experience. Philips Portable DVD Player 23cm/ 9" LCD 5-hr playtime USB PD9030 Longer movies enjoyment on the go with a built-in stereo speakers Extra touches for your movies, music and photos on Power Loss...
...®/MPEG movies, MP3-CD/CD music and JPEG photos on the go • DVD, DVD+/-R, DVD+/-RW, (S)VCD, CD compatible • DivX Certified for standard DivX video playback • MP3-CD, CD and CD-RW playback • View JPEG images from ... the go . You can indulge in up to 5-hour playback with USB for video, photo and music Enjoy your great viewing experience. Philips Portable DVD Player 23cm/ 9" LCD 5-hr playtime USB PD9030 Longer movies enjoyment on the go with a built-in stereo speakers Extra touches for your movies, music and photos on Power Loss...

Leaflet
Page 2
...videos and movies from home on a single charge. The Philips Portable DVD player is a shorthand term for a DVD drive that can bring your portable DVD player from the Internet, including purchased Hollywood films. The DivX ...Philips device. DVD+/-R is compatible with a quick-release arm that simple. Portable DVD Player 23cm/ 9" LCD 5-hr playtime USB Highlights 5-hour built-in your portable USB device to the USB connector on your Philips portable DVD player and playback your digital videos, music or photos directly. USB connection Simply plug in battery* PD9030/37 recordable DVD...
...videos and movies from home on a single charge. The Philips Portable DVD player is a shorthand term for a DVD drive that can bring your portable DVD player from the Internet, including purchased Hollywood films. The DivX ...Philips device. DVD+/-R is compatible with a quick-release arm that simple. Portable DVD Player 23cm/ 9" LCD 5-hr playtime USB Highlights 5-hour built-in your portable USB device to the USB connector on your Philips portable DVD player and playback your digital videos, music or photos directly. USB connection Simply plug in battery* PD9030/37 recordable DVD...

Leaflet
Page 3
...owners. Battery life and number of charge cycles and may vary depending on application condition. Specifications are trademarks of Koninklijke Philips Electronics N.V. www.philips.com * DivX, DivX Certified, and associated logos are subject to noise ratio: >80dB(earphone), >62dB(built- Trademarks...; Battery lifetime: Up to be replaced. All Rights reserved. and are the property of DivXNetworks, Inc. Portable DVD Player 23cm/ 9" LCD 5-hr playtime USB Specifications PD9030/37 Picture/Display • Diagonal screen size: 9 inch / 23 cm • Resolution: 640(w)x220(H)x3...
...owners. Battery life and number of charge cycles and may vary depending on application condition. Specifications are trademarks of Koninklijke Philips Electronics N.V. www.philips.com * DivX, DivX Certified, and associated logos are subject to noise ratio: >80dB(earphone), >62dB(built- Trademarks...; Battery lifetime: Up to be replaced. All Rights reserved. and are the property of DivXNetworks, Inc. Portable DVD Player 23cm/ 9" LCD 5-hr playtime USB Specifications PD9030/37 Picture/Display • Diagonal screen size: 9 inch / 23 cm • Resolution: 640(w)x220(H)x3...

User manual
Page 3
Contents 1 Important 6 Important Safety Instructions 6 Hearing safety 8 Notice 9 2 Your portable DVD player 12 Introduction 12 What's in the box 12 Overview of the main unit 13 Overview of the remote control 15 3 Get started 17 Preparation (for ...in-car use) 17 Charge the battery 19 Install remote control battery 21 Connect additional equipment 21 4 Use your player 22 Turn on 22 Select OSD language 23 Play discs 23 Play from USB 23 Play options 24 Adjust brightness of screen backlight 24 5 Adjust...
Contents 1 Important 6 Important Safety Instructions 6 Hearing safety 8 Notice 9 2 Your portable DVD player 12 Introduction 12 What's in the box 12 Overview of the main unit 13 Overview of the remote control 15 3 Get started 17 Preparation (for ...in-car use) 17 Charge the battery 19 Install remote control battery 21 Connect additional equipment 21 4 Use your player 22 Turn on 22 Select OSD language 23 Play discs 23 Play from USB 23 Play options 24 Adjust brightness of screen backlight 24 5 Adjust...

User manual
Page 12
... sound (depending on disc and playback set-up). Introduction Your portable DVD player plays digital video discs that conform to Philips! 2 Your portable DVD player Congratulations on your purchase, and welcome to the universal DVD Video standard.With it, you can restrict the play of discs that...files What's in the box Check and identify the contents of your product at www.philips. To fully benefit from the support that Philips offers, register your package: • Portable DVD player • Remote control • AC power adaptor, AY5808/37 • Car adaptor •...
... sound (depending on disc and playback set-up). Introduction Your portable DVD player plays digital video discs that conform to Philips! 2 Your portable DVD player Congratulations on your purchase, and welcome to the universal DVD Video standard.With it, you can restrict the play of discs that...files What's in the box Check and identify the contents of your product at www.philips. To fully benefit from the support that Philips offers, register your package: • Portable DVD player • Remote control • AC power adaptor, AY5808/37 • Car adaptor •...
User manual
Page 14
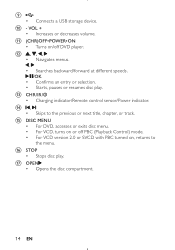
...;POWER•ON • Turns on/off PBC (Playback Control) mode. • For VCD version 2.0 or SVCD with PBC turned on or off DVD player. o DISC MENU • For DVD, accesses or exits disc menu. • For VCD, turns on , returns to the previous or next title, chapter, or track. l , ,, • Navigates menus...
...;POWER•ON • Turns on/off PBC (Playback Control) mode. • For VCD version 2.0 or SVCD with PBC turned on or off DVD player. o DISC MENU • For DVD, accesses or exits disc menu. • For VCD, turns on , returns to the previous or next title, chapter, or track. l , ,, • Navigates menus...

User manual
Page 17
... Preparation (for in-car use . DVD player fastening screw node B.Viewing angle adjustment node C. To use the player in use ) Warning • Remove the mounting kit and the DVD player from the seat when the DVD player is not in a car, attach the player to the front seat headrest. If you contact Philips, you will be asked for the...
... Preparation (for in-car use . DVD player fastening screw node B.Viewing angle adjustment node C. To use the player in use ) Warning • Remove the mounting kit and the DVD player from the seat when the DVD player is not in a car, attach the player to the front seat headrest. If you contact Philips, you will be asked for the...
User manual
Page 18
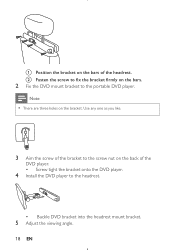
b Fasten the screw to fix the bracket firmly on the back of the DVD player. • Screw tight the bracket onto the DVD player. 4 Install the DVD player to the portable DVD player. a Position the bracket on the bracket. Note • There are three holes on the bars of the bracket to the screw nut on the bars. 2 Fix the DVD mount bracket to the headrest. • Buckle DVD bracket into the headrest mount bracket. 5 Adjust the viewing angle. 18 EN Use any one as you like. 3 Aim the screw of the headrest.
b Fasten the screw to fix the bracket firmly on the back of the DVD player. • Screw tight the bracket onto the DVD player. 4 Install the DVD player to the portable DVD player. a Position the bracket on the bracket. Note • There are three holes on the bars of the bracket to the screw nut on the bars. 2 Fix the DVD mount bracket to the headrest. • Buckle DVD bracket into the headrest mount bracket. 5 Adjust the viewing angle. 18 EN Use any one as you like. 3 Aim the screw of the headrest.

User manual
Page 19
b Adjust the viewing angle as desired. English a Release the node. Ensure that the power supply voltage corresponds to the voltage printed on the bottom of the player. EN 19 Charge the battery Caution • Risk of the player. • Use only the supplied AC adaptor to release the DVD player from headrest. c Fasten the node. 6 Press the release button to charge the battery. Note • The type plate is located on the bottom of product damage.
b Adjust the viewing angle as desired. English a Release the node. Ensure that the power supply voltage corresponds to the voltage printed on the bottom of the player. EN 19 Charge the battery Caution • Risk of the player. • Use only the supplied AC adaptor to release the DVD player from headrest. c Fasten the node. 6 Press the release button to charge the battery. Note • The type plate is located on the bottom of product damage.
User manual
Page 22
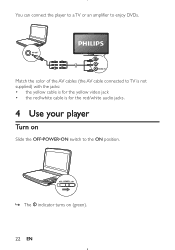
You can connect the player to a TV or an amplifier to the ON position. » The indicator turns on (green). 22 EN R L VIDEO IN Match the color of the AV cables (the AV cable connected to TV is not supplied) with the jacks: • the yellow cable is for the yellow video jack • the red/white cable is for the red/white audio jacks. 4 Use your player Turn on Slide the OFF•POWER•ON switch to enjoy DVDs.
You can connect the player to a TV or an amplifier to the ON position. » The indicator turns on (green). 22 EN R L VIDEO IN Match the color of the AV cables (the AV cable connected to TV is not supplied) with the jacks: • the yellow cable is for the yellow video jack • the red/white cable is for the red/white audio jacks. 4 Use your player Turn on Slide the OFF•POWER•ON switch to enjoy DVDs.


