Leaflet
Page 2
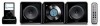
...your music enjoyment by emphasizing the bass content of the music throughout the range of a button! Use the remote control to navigate, select and playback the music stored on your Philips player. The Docking entertainment system automatically charges your iPod while it is set Jazz, Rock, Pop and ... connect your iPod directly to worry about your iPod battery running out. Micro Hi-Fi System MP3/WMA-CD playback Compact design Highlights MCM108DB/37 Play MP3/WMA-CD, CD and CD-RW Audio compression technology allows large digital music files to be switched on the Internet...
...your music enjoyment by emphasizing the bass content of the music throughout the range of a button! Use the remote control to navigate, select and playback the music stored on your Philips player. The Docking entertainment system automatically charges your iPod while it is set Jazz, Rock, Pop and ... connect your iPod directly to worry about your iPod battery running out. Micro Hi-Fi System MP3/WMA-CD playback Compact design Highlights MCM108DB/37 Play MP3/WMA-CD, CD and CD-RW Audio compression technology allows large digital music files to be switched on the Internet...
Leaflet
Page 3
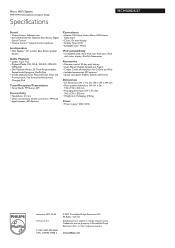
...12 NC: 8670 000 28641 UPC: 6 09585 12938 2 © 2011 Koninklijke Philips Electronics N.V. Trademarks are subject to change without notice. Micro Hi-Fi System MP3/WMA-CD playback Compact design Specifications MCM108DB/37 Sound • Output Power: 2x2watts rms • Sound Enhancement: Dynamic ...color: White iPod compatibility • Compatible with: iPod, iPod mini, iPod nano, iPod with color display, iPod 5th Generation Accessories • Remote control: 20-key with battery • User Manual: English, Spanish and French • Cradle: Cradle and adaptors for GoGear and iPod ...
...12 NC: 8670 000 28641 UPC: 6 09585 12938 2 © 2011 Koninklijke Philips Electronics N.V. Trademarks are subject to change without notice. Micro Hi-Fi System MP3/WMA-CD playback Compact design Specifications MCM108DB/37 Sound • Output Power: 2x2watts rms • Sound Enhancement: Dynamic ...color: White iPod compatibility • Compatible with: iPod, iPod mini, iPod nano, iPod with color display, iPod 5th Generation Accessories • Remote control: 20-key with battery • User Manual: English, Spanish and French • Cradle: Cradle and adaptors for GoGear and iPod ...
User manual
Page 8
... General Information Environmental information 9 Supplied accessories 9 Safety information 9-10 Preparation Rear connections 11-12 Before using the remote control 12 Replacing battery (lithium CR2032) into the remote control 12 Controls Controls on the system and remote control 13 Basic Functions Switching the system on 14 Power-saving automatic standby 14 Adjusting volume and...
... General Information Environmental information 9 Supplied accessories 9 Safety information 9-10 Preparation Rear connections 11-12 Before using the remote control 12 Replacing battery (lithium CR2032) into the remote control 12 Controls Controls on the system and remote control 13 Basic Functions Switching the system on 14 Power-saving automatic standby 14 Adjusting volume and...
User manual
Page 9
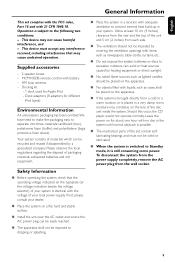
... system is switched to Standby mode, it is subject to separate into three materials: cardboard (box), polystyrene foam (buffer) and polyethylene (bags, protective foam sheet). MCM108DB remote control with 21 CFR 1040.10. Safety Information ● Before operating the system, check that may not cause harmful interference, and - English General Information This...
... system is switched to Standby mode, it is subject to separate into three materials: cardboard (box), polystyrene foam (buffer) and polyethylene (bags, protective foam sheet). MCM108DB remote control with 21 CFR 1040.10. Safety Information ● Before operating the system, check that may not cause harmful interference, and - English General Information This...

User manual
Page 12
... (for a long time. - A B CAUTION! - Perchlorate Material-special handling may apply. Please refer to the SPECIFICATIONS section of the speaker wire into the remote control 1 Pull out the knob A slightly to the left speaker to "LEFT", the wire (marked red) to "+" and the wire (marked black) to ..."-". Remove battery if it is exhausted or will not be disposed of +/- Before using the remote control 1 Pull out the plastic protective sheet. 2 Select the source you wish to control by pressing one pair of properly. - Battery contains chemical...
... (for a long time. - A B CAUTION! - Perchlorate Material-special handling may apply. Please refer to the SPECIFICATIONS section of the speaker wire into the remote control 1 Pull out the knob A slightly to the left speaker to "LEFT", the wire (marked red) to "+" and the wire (marked black) to ..."-". Remove battery if it is exhausted or will not be disposed of +/- Before using the remote control 1 Pull out the plastic protective sheet. 2 Select the source you wish to control by pressing one pair of properly. - Battery contains chemical...
User manual
Page 13
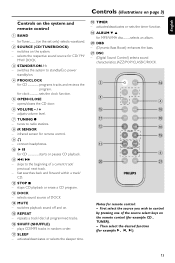
...the CD door. 6 VOLUME - / + - fast searches back and forward within a track/ CD. @ STOP 9 - switches playback sound off and on the system and remote control 1 BAND - for CD/ FM/ MW/ DOCK. 3 STANDBY-ON / y - adjusts volume level. 7 TUNING 0 - stops CD playback or erase a CD program...plays CD/MP3 tracks in random order. & SLEEP - activates/deactivates or selects the sleeper time. * TIMER - connect headphones. 0 ÉÅ for remote control: - selects sound source of the source select keys on the set only) selects waveband. 2 SOURCE (CD/ TUNER/DOCK) - activates/deactivates or...
...the CD door. 6 VOLUME - / + - fast searches back and forward within a track/ CD. @ STOP 9 - switches playback sound off and on the system and remote control 1 BAND - for CD/ FM/ MW/ DOCK. 3 STANDBY-ON / y - adjusts volume level. 7 TUNING 0 - stops CD playback or erase a CD program...plays CD/MP3 tracks in random order. & SLEEP - activates/deactivates or selects the sleeper time. * TIMER - connect headphones. 0 ÉÅ for remote control: - selects sound source of the source select keys on the set only) selects waveband. 2 SOURCE (CD/ TUNER/DOCK) - activates/deactivates or...

User manual
Page 14
...STANDBY-ON SOURCE BAND PROG / CLOCK - press MUTE again; - To switch the system to standby mode ● Press STANDBY-ON (y on the remote control) for more than 2 seconds. ➜ The clock is displayed. Note: - To switch the system to Eco power standby 15 minutes after... - Power-saving automatic standby The power-saving feature automatically switches to Eco-power standby mode ● Press and hold STANDBY-ON (y on the remote control). ➜ The clock is displayed. VOLUME + TUNING IMPORTANT: Before you can be activated. 14 Switching the system on ● In ...
...STANDBY-ON SOURCE BAND PROG / CLOCK - press MUTE again; - To switch the system to standby mode ● Press STANDBY-ON (y on the remote control) for more than 2 seconds. ➜ The clock is displayed. Note: - To switch the system to Eco power standby 15 minutes after... - Power-saving automatic standby The power-saving feature automatically switches to Eco-power standby mode ● Press and hold STANDBY-ON (y on the remote control). ➜ The clock is displayed. VOLUME + TUNING IMPORTANT: Before you can be activated. 14 Switching the system on ● In ...
User manual
Page 16
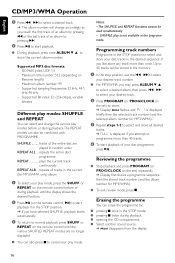
...stored track number (and the album number for MP3/WMA only) album 1 To select your play mode, press the SHUFF or REPEAT on the remote control before or during playback.The REPEAT modes can erase the programme by pressing 2™ . 4 Press 2; SHUFFLE play mode. Reviewing the ...; The album number will change the various play modes before or during playback until the display shows the desired function. 2 Press 2; (on the remote control 2;) to start playback if in the STOP position. ➜ If you have selected SHUFFLE, playback starts automatically. 3 To return to normal playback...
...stored track number (and the album number for MP3/WMA only) album 1 To select your play mode, press the SHUFF or REPEAT on the remote control before or during playback.The REPEAT modes can erase the programme by pressing 2™ . 4 Press 2; SHUFFLE play mode. Reviewing the ...; The album number will change the various play modes before or during playback until the display shows the desired function. 2 Press 2; (on the remote control 2;) to start playback if in the STOP position. ➜ If you have selected SHUFFLE, playback starts automatically. 3 To return to normal playback...
User manual
Page 17
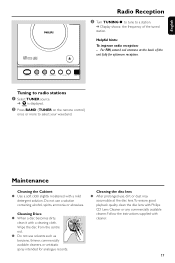
.... Follow the instructions supplied with a mild detergent solution. Cleaning Discs ● When a disc becomes dirty, clean it with Philips CD Lens Cleaner or any commercially available cleaner. TUNER 2 Press BAND (TUNER on the remote control) once or more to radio stations 1 Select TUNER source. ➜ is displayed. Wipe the disc from the...
.... Follow the instructions supplied with a mild detergent solution. Cleaning Discs ● When a disc becomes dirty, clean it with Philips CD Lens Cleaner or any commercially available cleaner. TUNER 2 Press BAND (TUNER on the remote control) once or more to radio stations 1 Select TUNER source. ➜ is displayed. Wipe the disc from the...
User manual
Page 18
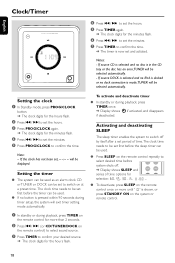
... once or more than 2 seconds. 2 Press ¡1 / 2™ (or CD/TUNER/DOCK on the system or remote control. 18 English Clock/Timer MICR O SY STEM MCM108DB iR 4 Press ¡1 / 2™ to set the hours. 5 Press TIMER again. ➜ The clock digits for the minutes flash. 6 Press ¡1 / 2™ to set the ...; The timer is now set the minutes. 5 Press PROG/CLOCK to confirm the time. The clock time needs to be set to switch on the remote control repeatly to select desired time before the timer can be displayed. If source DOCK is selected and no iPod is docked or no disc...
... once or more than 2 seconds. 2 Press ¡1 / 2™ (or CD/TUNER/DOCK on the system or remote control. 18 English Clock/Timer MICR O SY STEM MCM108DB iR 4 Press ¡1 / 2™ to set the hours. 5 Press TIMER again. ➜ The clock digits for the minutes flash. 6 Press ¡1 / 2™ to set the ...; The timer is now set the minutes. 5 Press PROG/CLOCK to confirm the time. The clock time needs to be set to switch on the remote control repeatly to select desired time before the timer can be displayed. If source DOCK is selected and no iPod is docked or no disc...
User manual
Page 20
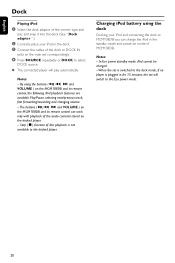
...to the Eco power mode. 20 The buttons ( 2;, ¡1, 2™ and VOLUME ) on the MCM108DB and its remote control can charge the iPod in the standby mode and power-on mode of MCM108DB. In Eco power standby mode, iPod cannot be charged. - Charging iPod battery using the buttons ( 2;, ...dock (See " Dock adaptor " ). 2 Correctly place your iPod and connecting the dock to MCM108DB you can work only with playback of the audio contents stored on the MCM108DB and its remote control, the following iPod playback features are available: Play/Pause, selecting next/previous track, fast forwarding...
...to the Eco power mode. 20 The buttons ( 2;, ¡1, 2™ and VOLUME ) on the MCM108DB and its remote control can charge the iPod in the standby mode and power-on mode of MCM108DB. In Eco power standby mode, iPod cannot be charged. - Charging iPod battery using the buttons ( 2;, ...dock (See " Dock adaptor " ). 2 Correctly place your iPod and connecting the dock to MCM108DB you can work only with playback of the audio contents stored on the MCM108DB and its remote control, the following iPod playback features are available: Play/Pause, selecting next/previous track, fast forwarding...
User manual
Page 21
... the function button (É,í,ë). ✔ Reduce the distance between the Micro HiFi System and your dealer or service centre. The remote control does not function properly. ✔ Select the source (CD or TUNER, for example) before taking the system for better reception. ...✔ Increase the distance between the remote control and the system. ✔ Insert the batteries with sampling frequencies at the lens has cleared. ✔ Replace or clean the disc, see...
... the function button (É,í,ë). ✔ Reduce the distance between the Micro HiFi System and your dealer or service centre. The remote control does not function properly. ✔ Select the source (CD or TUNER, for example) before taking the system for better reception. ...✔ Increase the distance between the remote control and the system. ✔ Insert the batteries with sampling frequencies at the lens has cleared. ✔ Replace or clean the disc, see...

User manual
Page 22
... using the STOP 9 button on the docked player. The STOP 9 and some buttons on MCM108DB and its remote control have no function. ✔ The playback of audio contents.To navigate the menu, use the controls on MCM108DB and its remote control. ✔ The buttons ( 2;, ¡1, 2™ and VOLUME) can only control playback of the...
... using the STOP 9 button on the docked player. The STOP 9 and some buttons on MCM108DB and its remote control have no function. ✔ The playback of audio contents.To navigate the menu, use the controls on MCM108DB and its remote control. ✔ The buttons ( 2;, ¡1, 2™ and VOLUME) can only control playback of the...
Quick start guide (English)
Page 1
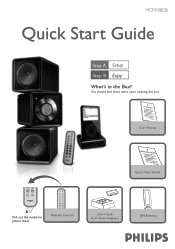
You should find these items upon opening the box. 2 User Manual User Manual VOLUME DBB DSC Pull out the insulation plastic sheet. MUTE CD TUNER AUX PROG REPEAT SHUFF SLEEP TIMER ALBUM VOLUME DBB DSC Remote Control 1 Quick Start Guide Quick Start Guide 2-in the Box? MCM108DB Quick Start Guide Step A Setup Step B Enjoy What's in -1 dock & 11 Dock Adapters AM Antenna
You should find these items upon opening the box. 2 User Manual User Manual VOLUME DBB DSC Pull out the insulation plastic sheet. MUTE CD TUNER AUX PROG REPEAT SHUFF SLEEP TIMER ALBUM VOLUME DBB DSC Remote Control 1 Quick Start Guide Quick Start Guide 2-in the Box? MCM108DB Quick Start Guide Step A Setup Step B Enjoy What's in -1 dock & 11 Dock Adapters AM Antenna
Quick start guide (English)
Page 3
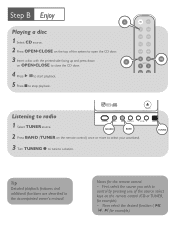
... control by pressing one of the system to open the CD door. 3 Insert a disc with the printed side facing up and press down on the remote control (CD or TUNER, for example). - TUNING TUNING 3 Turn TUNING 0 to tune to radio 1 Select TUNER source. Tip Detailed playback features and additional ...functions are described in the accompanied owner's manual. Then select the desired function ( 2;, í, ë for the remote control: - VOLUME + SOURCE BAND 2 Press BAND (TUNER on the remote control) once or more to stop playback.
... control by pressing one of the system to open the CD door. 3 Insert a disc with the printed side facing up and press down on the remote control (CD or TUNER, for example). - TUNING TUNING 3 Turn TUNING 0 to tune to radio 1 Select TUNER source. Tip Detailed playback features and additional ...functions are described in the accompanied owner's manual. Then select the desired function ( 2;, í, ë for the remote control: - VOLUME + SOURCE BAND 2 Press BAND (TUNER on the remote control) once or more to stop playback.
Quick start guide (English)
Page 4
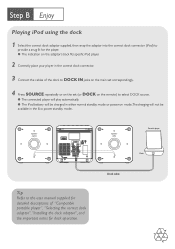
... the cables of the dock to DOCK IN jacks on the main set correspondingly. 4 Press SOURCE repeatedly or on the set (or DOCK on the remote) to provide a snug fit for dock operation. Speaker (right) Speaker (left) Portable player Dock sd Tip Refer to the user manual supplied for detailed descriptions...
... the cables of the dock to DOCK IN jacks on the main set correspondingly. 4 Press SOURCE repeatedly or on the set (or DOCK on the remote) to provide a snug fit for dock operation. Speaker (right) Speaker (left) Portable player Dock sd Tip Refer to the user manual supplied for detailed descriptions...


